标签:bind oca .post private als control throw val 应用程序
一、深入浅出Struts2
struts2是一种基于MVC的轻量级的WEB应用框架。有了这个框架我们就可以在这个框架的基础上做起,这样就大大的提高了我们的开发效率和质量,为公司节省了不少的人力成本。
struts2实现了视图与业务应用逻辑的解耦(软件工程的高内聚,低耦合原则)。
在Model 1时代,开发web项目我们都是在JSP里写入处理业务逻辑的JAVA代码,尤其像涉及到数据库和页面form表单数据之间交互的时候,每次都要写连接、查询、增加、修改、删除等数据库代码。有各种如HTML与Java,JavaScript在一个页面的,可读性差,重复,多余,耦合,性能差,不易维护等各种问题。让我们观察model1与model2的不同:
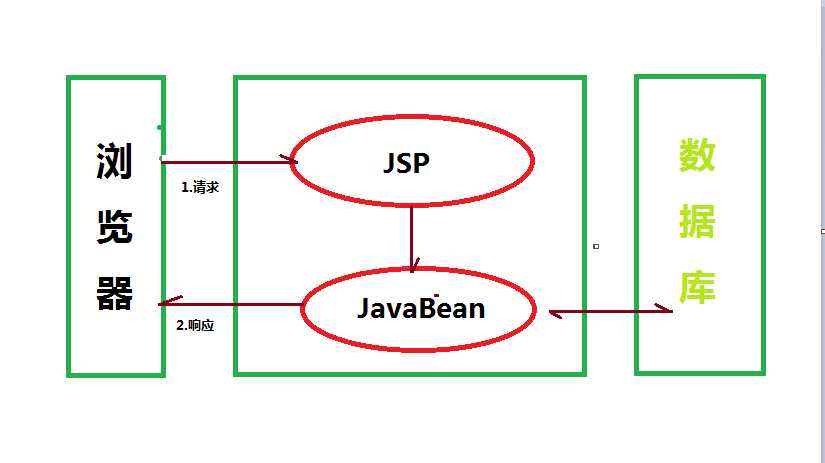
model 1的程序流程
到Model2时代,JSP不再承担控制器的责任。它仅仅是表现层角色,仅仅用于将结果呈现给客户,JSP页面的请求与Servlet(控制器)交互,而Servlet负责与后台 的Javabean通信。在Model2模式下,模型(Model)由JavaBean充当,视图(View)由JSP页面充当,而控制器(Controller)则由Servlet充当,Model2模式也叫“MVC模式”。
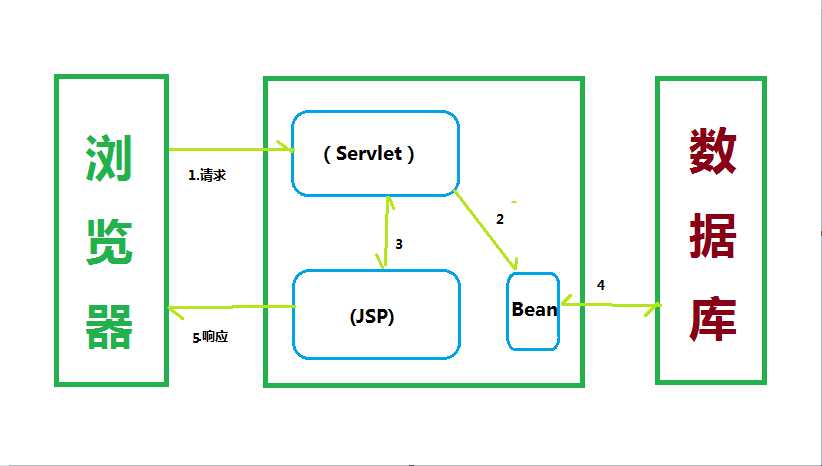
model 2 程序流程
在后来开发者根据Model2模式开发出了一个框架,那就是我们现在用的Struts2。控制器(Contoller)由FilterDispather充当,模型(Model)由Action充当,视图(View)由Result来充当,这样实现了与Servlet API的解耦,使得ACtion的单元测试更加简单,而且强大的类型转换也使得我们少做了很多重复的工作。下图是Struts2 MVC结构:

Struts2的请求周期:
1、客户端初始化一个指向Servlet容器(例如Tomcat)的请求
2、这个请求经过一系列的过滤器(Filter)(这些过滤器中有一个叫做ActionContextCleanUp的可选过滤器,这个过滤器对于Struts2和其他框架的集成很有帮助,例如:SiteMesh Plugin)
3、接着FilterDispatcher被调用,FilterDispatcher询问ActionMapper来决定这个请是否需要调用某个Action
FilterDispatcher是控制器的核心,就是mvc中c控制层的核心。下面粗略的分析下我理解的FilterDispatcher工作流程和原理:FilterDispatcher进行初始化并启用核心doFilter
4、如果ActionMapper决定需要调用某个Action,FilterDispatcher把请求的处理交给ActionProxy
5、ActionProxy通过ConfigurationManager询问框架的配置文件,找到需要调用的Action类 ,这里,我们一般是从struts.xml配置中读取。
6、ActionProxy创建一个ActionInvocation的实例。
7、ActionInvocation实例使用命名模式来调用,在调用Action的过程前后,涉及到相关拦截器(Intercepter)的调用。
配置就像程序的影子,与程序总是与影随行。大部分框架技术,配置总是作为其中重要的组成部分,在框架的运行中发挥作用。声明应用程序有两种不同的方式,XML和注解的方式。
XML配置方式:
struts.xml的配置
<?xml version="1.0" encoding="UTF-8" ?>

<!DOCTYPE struts PUBLIC
    "-//Apache Software Foundation//DTD Struts Configuration 2.3//EN"
    "http://struts.apache.org/dtds/struts-2.3.dtd">
<!-- 上面的头注意版本,从样例里复制过来 -->
<struts>
    <constant name="struts.objectFactory" value="spring"></constant>

    <package name="mypackage" extends="struts-default">
        <action name="myNews6Action_*" class="myNews6Action" method="{1}">
            <result name="success">/WEB-INF/jsp/index.jsp</result>
            <result name="deleteok">/WEB-INF/jsp/ok.jsp</result>
            <result name="deleteon">/WEB-INF/jsp/error.jsp</result>
        </action>
    </package>
</struts>
Action类只要继承ActionSupport类:
package myNews6.action;

import java.util.List;

import org.springframework.beans.factory.annotation.Autowired;
import org.springframework.context.annotation.Scope;
import org.springframework.stereotype.Controller;

import com.opensymphony.xwork2.ActionSupport;

import myNews6.entity.News;
import myNews6.service.MyNews6Service;

@Controller
@Scope("prototype")
public class MyNews6Action extends ActionSupport {
    @Autowired
    private MyNews6Service mns;
    private List<News> list;
    private Integer id;

    public List<News> getList() {
        return list;
    }

    public void setId(Integer id) {
        this.id = id;
    }

    public String getAllNews(){
        list=mns.getAllNews();
        return "success";
    }

    public String deleteNewsById(){
        String value=mns.deleteNewsById(id);
        return value;
    }
}
注解配置方式:
要使用注解方式必须添加一个额外包:struts2-convention-plugin-2.x.x.jar。
<?xml version="1.0" encoding="UTF-8" ?>
<!DOCTYPE struts PUBLIC
    "-//Apache Software Foundation//DTD Struts Configuration 2.1.7//EN"
    "http://struts.apache.org/dtds/struts-2.1.7.dtd">

<struts>
    <!-- 请求参数的编码方式-->
    <constant name="struts.i18n.encoding" value="UTF-8"/>
    <!-- 指定被struts2处理的请求后缀类型。多个用逗号隔开-->
    <constant name="struts.action.extension" value="action,do,htm"/>
    <!-- 当struts.xml改动后,是否重新加载。默认值为false(生产环境下使用),开发阶段最好打开  -->
    <constant name="struts.configuration.xml.reload" value="true"/>
    <!-- 是否使用struts的开发模式。开发模式会有更多的调试信息。默认值为false(生产环境下使用),开发阶段最好打开  -->
    <constant name="struts.devMode" value="false"/>
    <!-- 设置浏览器是否缓存静态内容。默认值为true(生产环境下使用),开发阶段最好关闭  -->
    <constant name="struts.serve.static.browserCache" value="false" />
    <!-- 指定由spring负责action对象的创建
    <constant name="struts.objectFactory" value="spring" />
    -->
    <!-- 是否开启动态方法调用-->
    <constant name="struts.enable.DynamicMethodInvocation" value="false"/>
</struts>
action类的注解:
/**
 * Struts2基于注解的Action配置
 *
 */
@ParentPackage("struts-default")
@Namespace("/annotation_test")
@Results( { @Result(name = "success", location = "/main.jsp"),
        @Result(name = "error", location = "/error.jsp") })
@ExceptionMappings( { @ExceptionMapping(exception = "java.lange.RuntimeException", result = "error") })
public class LoginAction extends ActionSupport {
    private static final long serialVersionUID = 2730268055700929183L;
    private String loginName;
    private String password;

    @Action("login") //或者写成  @Action(value = "login")
    public String login() throws Exception {

        if ("yjd".equals(loginName) && "yjd".equals(password)) {
            return SUCCESS;
        } else {
            return ERROR;
        }
    }
    @Action(value = "add", results = { @Result(name = "success", location = "/index.jsp") })
    public String add() throws Exception {
        return SUCCESS;
    }
    public String getLoginName() {
        return loginName;
    }
    public void setLoginName(String loginName) {
        this.loginName = loginName;
    }
    public String getPassword() {
        return password;
    }
    public void setPassword(String password) {
        this.password= password;
    }
}
这样就完成了一个基于注解的action配置。
Struts2的两种配置都可以达到同样的效果,只不过xml是把配置外部,annotation是把配置内部化,他们各自的优缺点、适用场合应该是很明显的。 如果一个配置只是用来描述某个组件本身的属性,那么annotation优先,比如hibernate、validate;优点是配置和组件往往需要同时修改,放在一起便于维护、保证一致性;反之,如果配置是描述一堆组件如何协作、关联,或者很难说清是针对哪个组件的,那么应该用xml,比如spring配置。优点是配置集中、架构清晰、维护配置不需修改组件代码,反之亦然。

springMVC的请求周期:
1、客户端发出一个http请求给web服务器,web服务器对http请求进行解析,如果匹配DispatcherServlet的请求映射路径(在web.xml中指定),web容器将请求转交给DispatcherServlet.
2、DipatcherServlet接收到这个请求之后将根据请求的信息(包括URL、Http方法、请求报文头和请求参数Cookie等)以及HandlerMapping的配置找到处理请求的处理器(Handler)。
3-4、DispatcherServlet根据HandlerMapping找到对应的Handler,将处理权交给Handler(Handler将具体的处理进行封装),再由具体的HandlerAdapter对Handler进行具体的调用。
5、Handler对数据处理完成以后将返回一个ModelAndView()对象给DispatcherServlet。
6、Handler返回的ModelAndView()只是一个逻辑视图并不是一个正式的视图,DispatcherSevlet通过ViewResolver将逻辑视图转化为真正的视图View。
7、Dispatcher通过model解析出ModelAndView()中的参数进行解析最终展现出完整的view并返回给客户端
springMVC搭建的例子:
1. jar包引入
Spring 2.5.6:spring.jar、spring-webmvc.jar、commons-logging.jar、cglib-nodep-2.1_3.jar等;
1、配置web.xml
指除了Control层外的其它Bean的Spring配置文件,定义DispatcherServlet。这里是把spring与spring mvc的功能随着服务器启动而启动;
<?xml version="1.0" encoding="UTF-8"?>
<web-app version="2.5" xmlns="http://java.sun.com/xml/ns/javaee"
    xmlns:xsi="http://www.w3.org/2001/XMLSchema-instance"
    xsi:schemaLocation="http://java.sun.com/xml/ns/javaee
    http://java.sun.com/xml/ns/javaee/web-app_2_5.xsd">
    <!-- 除了Control层外的其它Bean的Spring容器设置,这个与SSH整合的时候一样 -->
    <context-param>
        <param-name>contextConfigLocation</param-name>
        <param-value>classpath:applicationContext.xml</param-value>
    </context-param>
    <listener>
        <listener-class>org.springframework.web.context.ContextLoaderListener</listener-class>
    </listener>

    <!-- 配置DispatcherServlet -->
    <!-- 名字为mvc,那么我们在WEB-INF中需要一个名为mvc-servlet.xml的spring mvc配置文件来对Control层的Bean、相关页面以及Spring mvc提供的一些工具Bean进行管理 -->
    <servlet>
        <servlet-name>mvc</servlet-name>
        <servlet-class>org.springframework.web.servlet.DispatcherServlet</servlet-class>
        <load-on-startup>1</load-on-startup>
    </servlet>
    <!-- 接收页面以.abc结尾的请求 -->
    <servlet-mapping>
        <servlet-name>mvc</servlet-name>
        <url-pattern>*.abc</url-pattern>
    </servlet-mapping>

    <welcome-file-list>
        <welcome-file>index.jsp</welcome-file>
    </welcome-file-list>
</web-app>
2、编写处理请求的Controller(处理器)
package cn.framelife.mvc.control;

import org.springframework.stereotype.Controller;
import org.springframework.web.bind.annotation.RequestMapping;
import org.springframework.web.bind.annotation.RequestMethod;
import org.springframework.web.servlet.ModelAndView;

import cn.framelife.mvc.entity.User;

/**
 * @Controller 通过Spring的自动扫描功能,把一个POJO转化为处理请求的控制器
*通过@RequestMapping标注,可以将特定的url和具体的controller类或controller类中的方法绑定。
 * @RequestMapping("/user") 处理来自/user的请求,一般来说是用于区分不同模块的
 */
@Controller
@RequestMapping("/user")
public class UserControl {

    /**
     * 处理/user的请求,请求的方法为POST
     * 参数的User对象是把页面的表单值放进一个User对象中
     * ModelAndView 是返回一个View。在这里我们是一个JSP页面。
     */
    @RequestMapping(method=RequestMethod.POST)
    public ModelAndView createUser(User user){
        System.out.println(user.getUsername()+"-"+user.getPassword());

        //ModelAndView.setViewName("/success") 根据mvc的配置文件,可知返回的是/user/success.jsp
        ModelAndView view = new ModelAndView();
        view.setViewName("/success");

        //把一个user对象放到ModelAndView中
        user.setUsername("li");
        view.addObject(user);
        return view;
    }
}
3、编写视图文件
我们在WebRoot/uesr目录下有一个add.jsp及一个success.jsp页面。add.jsp是用以表单输入。而success.jsp是Controller处理完后返回的页面。
add.jsp:
<body>
    <form action="user.abc" method="post">
        用户名:<input type="text" name="username"><br/>
        密 码:<input type="text" name="password"><br/>
        <input type="submit">
    </form>
  </body>
success.jsp:
<body>
    success!!${user.username}.
  </body>
4、配置Spring MVC的配置文件,使控制器、视图解析器等生效
mvc-servlet.xml:
<?xml version="1.0" encoding="UTF-8"?>
<beans xmlns="http://www.springframework.org/schema/beans"
    xmlns:xsi="http://www.w3.org/2001/XMLSchema-instance" xmlns:p="http://www.springframework.org/schema/p"
    xmlns:context="http://www.springframework.org/schema/context"
    xmlns:aop="http://www.springframework.org/schema/aop"
    xmlns:tx="http://www.springframework.org/schema/tx"
    xsi:schemaLocation="http://www.springframework.org/schema/beans
        http://www.springframework.org/schema/beans/spring-beans-3.0.xsd
        http://www.springframework.org/schema/context
        http://www.springframework.org/schema/context/spring-context-3.0.xsd
        http://www.springframework.org/schema/aop
        http://www.springframework.org/schema/aop/spring-aop-3.0.xsd
        http://www.springframework.org/schema/tx
        http://www.springframework.org/schema/tx/spring-tx-3.0.xsd">
    <!-- 扫描控制器 -->
    <context:component-scan base-package="cn.framelife.mvc.control"></context:component-scan>

    <!-- 视图名称解析器 -->
    <!--
        Controller中:ModelAndView.setViewName("/success")
        配置的是/user/success.jsp
     -->
    <bean class="org.springframework.web.servlet.view.InternalResourceViewResolver"
        p:prefix="/user"
        p:suffix=".jsp"></bean>
</beans>
5、配置其它的Bean
诸如service层、dao层等Bean在applicationContext.xml中配置,如我们之前做的工作一样。
1、Struts2是类级别的拦截, 一个类对应一个request上下文,SpringMVC是方法级别的拦截,一个方法对应一个request上下文,而方法同时又跟一个url对应,所以说从架构本身上SpringMVC就容易实现restful url,而struts2的架构实现起来要费劲,因为Struts2中Action的一个方法可以对应一个url,而其类属性却被所有方法共享,这也就无法用注解或其他方式标识其所属方法了。
2、由上边原因,SpringMVC的方法之间基本上独立的,独享request response数据,请求数据通过参数获取,处理结果通过ModelMap交回给框架,方法之间不共享变量,而Struts2搞的就比较乱,虽然方法之间也是独立的,但其所有Action变量是共享的,这不会影响程序运行,却给我们编码 读程序时带来麻烦,每次来了请求就创建一个Action,一个Action对象对应一个request上下文。
3、由于Struts2需要针对每个request进行封装,把request,session等servlet生命周期的变量封装成一个一个Map,供给每个Action使用,并保证线程安全,所以在原则上,是比较耗费内存的。
4、 拦截器实现机制上,Struts2有以自己的interceptor机制,SpringMVC用的是独立的AOP方式,这样导致Struts2的配置文件量还是比SpringMVC大。
5、SpringMVC的入口是servlet,而Struts2是filter(这里要指出,filter和servlet是不同的。以前认为filter是servlet的一种特殊),这就导致了二者的机制不同,这里就牵涉到servlet和filter的区别了。
6、SpringMVC集成了Ajax,使用非常方便,只需一个注解@ResponseBody就可以实现,然后直接返回响应文本即可,而Struts2拦截器集成了Ajax,在Action中处理时一般必须安装插件或者自己写代码集成进去,使用起来也相对不方便。
7、SpringMVC验证支持JSR303,处理起来相对更加灵活方便,而Struts2验证比较繁琐,感觉太烦乱。
8、spring MVC和Spring是无缝的。从这个项目的管理和安全上也比Struts2高(当然Struts2也可以通过不同的目录结构和相关配置做到SpringMVC一样的效果,但是需要xml配置的地方不少)。
9、 设计思想上,Struts2更加符合OOP的编程思想, SpringMVC就比较谨慎,在servlet上扩展。
10、SpringMVC开发效率和性能高于Struts2。
11、SpringMVC可以认为已经100%零配置。
二、深入浅出Spring
在Spring IOC容器中,有两个主要的容器系列:BeanFactory和ApplicationContext;BeanFactory它提供了最基本的IOC容器的功能,实例化对象、配置对象之间的依赖关系,在spring中,所有的对象都是由BeanFactory工厂来生厂管理的。ApplicationContext则提供了更多的面向企业级应用的功能,它是BeanFactory的子接口,拥有BeanFactory的所有功能;并提供了文本信息解析工具,提供了载入文件资源的通用方法,可以向注测为监听器的Bean发送事件。
什么的依赖反转,打个比方:我每次吃饭的时候都要买一双一次性筷子(每一次使用都要new一次),在这样的关系下,是”我“(即调用者)每次都要”主动“去买一次性筷子(另一个类),我对筷子说你老老实实的过来我的手上,是我控制了筷子,那好,在这种控制正转的关系下,放在现实生活当中,肯定是不现实的,而且人是懒惰的,他总会去创造出更加方便自己生活的想法,更确切的做法是,买一双普通的筷子(非一次性),把他放在一个容器当中(在Spring中叫做IOC容器),你需要使用的时候就对容器说:IOC我想要用筷子(向容器发出请求),接着筷子就会”注入“到的手上,而在这个过程当中,你不再是控制方,反而演变成一名请求者(虽然本身还是调用者),依赖于容器给予你资源,控制权坐落到了容器身上,于是这就是人们俗称的控制反转。——再理解为调用者应该依赖被调用者,而不是依赖于它的具体实现。
如何来实现依赖反转模式,我可以用依赖注入,依赖注入有3种方式,分别为构造注入,设置注入,接口注入。
接口注入:
在接口中定义要注入的信息,并通过接口来完成注入。(Spring不支持这种注入方式--不支持的原因是--Spring声称其是非入侵式的《离开这个框架也能活》,如果使用接口注入的话,就违背了这一原则),这里不做代码实现讲解。
public interface  Computeable{
void inject(Printer p);
}

public class Computer  implements  Computeable{
Printer p;
public void inject(Printer p){

this.p=p;

}

}
2.构造器注入:
构造器注入方式,表示的是调用者在实例化的时候必须注入被调用者的实例,把上例改成构造器注入;
public class Computer {
  Printer p;
  public Computer(Printer p){
  this.p=p;
}

}

Computer c=new Computer(new ColorPrinter());
3.setter注入:
setter注入方式,表示的是调用者通过设置一个全局属性并给设置set方法来注入;
public interface UserDao{
  addUser(String username);
}

public class UserDaoImpl implements UserDao{
    @Override
    public void addUser(String username)
{
    System.out.println("添加用户:"+username);
}
}

public class UserMessage{

    private UserDaoImpl userDao;

    //使用设值方式赋值
    public void setUserDao(UserDao userDao) {
        this.userDao = userDao;
    }
    public void addUser(String userName, String password) {

        userDao.addUser(userName, password);
    }
}

public class test{
  UserDao usedao =new UserDaoImpl();
  UserMessage userMessage=new UserMessage();
  userMessage.setUserDao(userdao);
}
spring配置文件是用于指导Spring工厂进行Bean生产、依赖关系注入(装配)及Bean实例分发的"图纸"。Java EE程序员必须学会并灵活应用这份"图纸"准确地表达自己的"生产意图"。Spring配置文件是一个或多个标准的XML文档,applicationContext.xml是Spring的默认配置文件,当容器启动时找不到指定的配置文档时,将会尝试加载这个默认的配置文件。
1.纯XML配置的Spring
<?xml version="1.0" encoding="UTF-8"?>
<beans xmlns="http://www.springframework.org/schema/beans"
        xmlns:xsi="http://www.w3.org/2001/XMLSchema-instance"
        xmlns:p="http://www.springframework.org/schema/p"
        xmlns:aop="http://www.springframework.org/schema/aop"
        xmlns:context="http://www.springframework.org/schema/context"
        xmlns:jee="http://www.springframework.org/schema/jee"
        xmlns:tx="http://www.springframework.org/schema/tx"
        xsi:schemaLocation="
            http://www.springframework.org/schema/aop http://www.springframework.org/schema/aop/spring-aop-4.2.xsd
            http://www.springframework.org/schema/beans http://www.springframework.org/schema/beans/spring-beans-4.2.xsd
            http://www.springframework.org/schema/context http://www.springframework.org/schema/context/spring-context-4.2.xsd
            http://www.springframework.org/schema/jee http://www.springframework.org/schema/jee/spring-jee-4.2.xsd
            http://www.springframework.org/schema/tx http://www.springframework.org/schema/tx/spring-tx-4.2.xsd">
    <!-- 类似于财务部门一样,类就是钱,所有需要类的实例都由srping去管理 -->
    <bean id="myIndexAction" class="ssh.action.IndexAction" scope="prototype">
        <!-- setIs(myIndexService) -->
        <property name="is" ref="myIndexService"/>
    </bean>

    <!-- myIndexService = new ssh.service.IndexServiceImpl() -->
    <bean id="myIndexService" class="ssh.service.IndexServiceImpl" scope="prototype">
        <property name="id" ref="myIndexDao"/>
    </bean>

    <bean id="myIndexDao" class="ssh.dao.IndexDaoImpl" scope="prototype">
        <!-- 晚点再注入能用的seesionFactory -->
        <property name="sessionFactory"><null/></property>
    </bean>

</beans>
纯的XML配置方式进一步降低了耦合,使得应用更加容易扩展,即使对配置文件进一步修改也不需要工程进行修改和重新编译。
在处理大的业务量的时候,用XML配置应该更加好一些。因为XML更加清晰的表明了各个对象之间的关系,各个业务类之间的调用。同时spring的相关配置也能一目了然。
但它也有缺点:配置文件读取和解析需要花费一定的时间,配置文件过多的时候难以管理,无法对配置的正确性进行校验,增加了测试难度。
2.使用注解的spring配置文件
在配置文件中加上注解解析器
<?xml version="1.0" encoding="UTF-8"?>
<beans xmlns="http://www.springframework.org/schema/beans"
    xmlns:xsi="http://www.w3.org/2001/XMLSchema-instance" xmlns:p="http://www.springframework.org/schema/p"
    xmlns:aop="http://www.springframework.org/schema/aop" xmlns:context="http://www.springframework.org/schema/context"
    xmlns:jee="http://www.springframework.org/schema/jee" xmlns:tx="http://www.springframework.org/schema/tx"
    xsi:schemaLocation="
            http://www.springframework.org/schema/aop http://www.springframework.org/schema/aop/spring-aop-4.2.xsd
            http://www.springframework.org/schema/beans http://www.springframework.org/schema/beans/spring-beans-4.2.xsd
            http://www.springframework.org/schema/context http://www.springframework.org/schema/context/spring-context-4.2.xsd
            http://www.springframework.org/schema/jee http://www.springframework.org/schema/jee/spring-jee-4.2.xsd
            http://www.springframework.org/schema/tx http://www.springframework.org/schema/tx/spring-tx-4.2.xsd">
    <!-- 注解解析器 -->
    <context:component-scan base-package="包名"/>

</beans>
在各个JavaBean中加注解:
@Controller
@Scope("prototype")
public class MyNews6Action extends ActionSupport {
    @Autowired
    private MyNews6Service mns;
@Service
@Scope("prototype")
public class MyNews6ServiceImpl implements MyNews6Service {
    @Autowired
    private MyNews6Dao mnd;
@Repository
@Scope("prototype")
public class MyNews6DaoImpl implements MyNews6Dao {
    @Autowired
  private SessionFactory sf;
注解也有自己的优缺点;
优点有:
1. 在class文件中,可以降低维护成本,annotation的配置机制很明显简单
2. 不需要第三方的解析工具,利用java反射技术就可以完成任务
3. 编辑期可以验证正确性,差错变得容易
4. 提高开发效率
缺点有:
1. 如果需要对于annotation进行修改,那么要重新编译整个工程
2. 业务类之间的关系不如XML配置那样容易把握。
3. 如果在程序中annotation比较多,直接影响代码质量,对于代码的简洁度有一定的影响。
深入浅出Struts2+Spring+Hibernate框架
标签:bind oca .post private als control throw val 应用程序
原文地址:http://www.cnblogs.com/huangjinwen/p/5985147.html