

前言
本文主要大致介绍CentOS 7下编译安装Nginx、MariaDB、PHP。面向有Linux基础且爱好钻研的朋友。技艺不精,疏漏再所难免,还望指正。
环境简介:
| 系统: | CentOS 7,最小化安装 |
| IP: | 192.168.100.100 |
| Nginx: | 1.6.1 |
| MariaDB: | 5.5.39 |
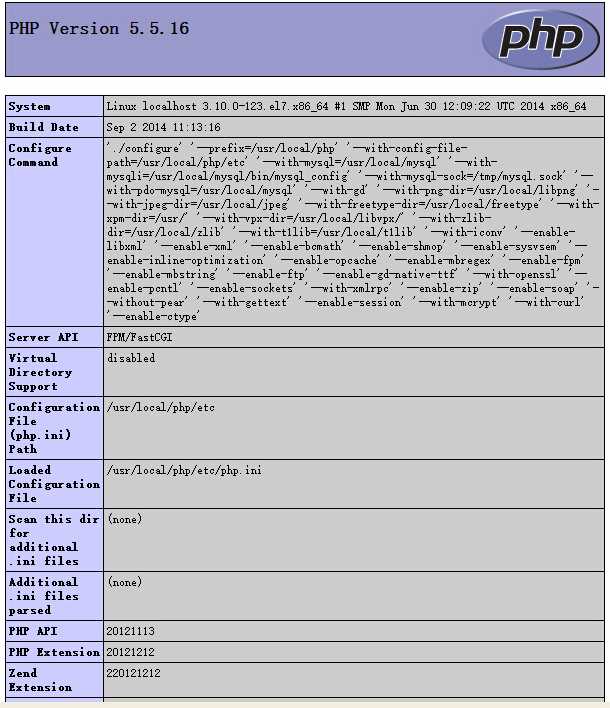
| PHP: | 5.5.16 |
1、准备工作
1.1、系统硬件准备
尽管Linux能最大化发挥硬件资源,但RHEL/CentOS随着版本增加对最低硬件的配置也越来越高[1]。RHEL7/CentOS最低要求内存最小 1GB,建议每个逻辑 CPU 1 GB。但如果系统为CentOS7,硬件内存小于1G,比如512M,而且没有配置交换分区,建议先配置SWAP,以防内存不足导致数据库启动失败或进程异常退出。配置添加SWAP方法参考《Linux下添加swap分区》。
1.2、系统软件准备
如果是最小化安装,比如VPS、云主机一般就是最小化安装。需要配置系统至方便易用。
更新系统至最新:
|
1
|
yum makecache && yum -y update
|
安装必要实用基础软件:
|
1
|
yum -y install bash-completion vim net-tools bind-utils wget screen
|
建议重启以应用最新补丁:
|
1
|
reboot
|
1.3、所需软件及各软件简介
安装需要用到的软件有nginx、mysql、php、pcre、openssl、zlib、cmake、mcrypt、yasm、t1lib、libgd、libvpx、tiff、libpng、libjpeg、freetype。这些软件的简介如下:
(1)Nginx
Nginx(发音同 engine x)是一款轻量级的Web 服务器/反向代理服务器及电子邮件(IMAP/POP3)代理服务器,并在一个BSD-like 协议下发行。其特点是占有内存少,并发能力强,事实上nginx的并发能力确实在同类型的网页服务器中表现较好,中国大陆使用nginx网站用户有:新浪、网易、腾讯等。
官方下载地址:http://nginx.org/en/download.html
(2)PHP
PHP,这里略去十万字…
官方下载网址:http://cn2.php.net/downloads.php
最新版下载地址:http://cn2.php.net/distributions/php-5.5.16.tar.bz2
(3)MariaDB
MariaDB数据库管理系统是MySQL的一个分支,主要由开源社区在维护,采用GPL授权许可。开发这个分支的原因之一是:甲骨文公司收购了MySQL后,有将MySQL闭源的潜在风险,因此社区采用分支的方式来避开这个风险。 MariaDB的目的是完全兼容MySQL,包括API和命令行,使之能轻松成为MySQL的代替品。在存储引擎方面,使用XtraDB(英语:XtraDB)来代替MySQL的InnoDB。现在MariaDB官方主推最新版MariaDB 10,其对应MySQL 5.6,但它在文件结构、一些功能上已经和MySQL 5.6大为不同,查看官方博文《MariaDB vs. MySQL》、《MariaDB 10.0 and MySQL 5.6》。如果用于生产环境,建议使用稳定版5.5。
官方下载地址:https://downloads.mariadb.org/;MariaDB 5.5;下载页面:https://mariadb.com/kb/en/mariadb/what-is-mariadb-55/
(4)PCRE
PCRE(Perl Compatible Regular Expressions)是一个Perl库,包括 perl 兼容的正则表达式库。PCRE被广泛使用在许多开源软件之中,最著名的莫过于Apache HTTP服务器和PHP脚本语言。
官方网址:http://www.pcre.org/
(5)OpenSSL
OpenSSL 是一个强大的安全套接字层密码库,囊括主要的密码算法、常用的密钥和证书封装管理功能及SSL协议,并提供丰富的应用程序供测试或其它目的使用。该程序出现安全漏洞时比较危险,建议从官方网站下载最新版。
官方下载网址:http://www.openssl.org/source/
(6)zlib
zlib是提供数据压缩用的函式库,使用DEFLATE算法.zlib是一种事实上的业界标准,以至于在标准文档中,zlib和DEFLATE常常互换使用。数以千计的应用程序直接或间接依靠zlib压缩函式库,包括: Linux核心:使用zlib以实作网络协定的压缩、档案系统的压缩以及开机时解压缩自身的核心;libpng,用于PNG图形格式的一个实现,对bitmap数据规定了DEFLATE作为流压缩方法。Apache:使用zlib实作http 1.1;OpenSSH、OpenSSL:以zlib达到最佳化加密网络传输。
官方下载网址:http://zlib.net/
(7)CMake
CMake是一个跨平台的安装(编译)工具,可以用简单的语句来描述所有平台的安装(编译过程)。他能够输出各种各样的makefile或者project文件,能测试编译器所支持的C++特性,类似UNIX下的automake。CMake 可以编译源代码、制作程式库、产生适配器(wrapper)、还可以用任意的顺序建构执行档。CMake 支持 in-place 建构(二进档和源代码在同一个目录树中)和 out-of-place 建构(二进档在别的目录里),因此可以很容易从同一个源代码目录树中建构出多个二进档。CMake 也支持静态与动态程式库的建构。这里用来编译MySQL或MariaDB
官方网址:http://www.cmake.org/
(8)mcrypt
mcrypt 是 php 里面重要的加密支持扩展库,Mcrypt库支持20多种加密算法和8种加密模式,具体可以通过函数mcrypt_list_algorithms()和mcrypt_list_modes()来显示。
下载地址:http://mcrypt.sourceforge.net/
(9)yasm
In computing, Yasm is an assembler and disassembler for the Intel x86 architecture. It can be used to write 16-bit, 32-bit (IA-32) and 64-bit (x86-64) programs. Yasm is a full rewrite of Netwide Assembler (NASM). Yasm can generally be used interchangeably with NASM and supports the x86 and x86-64 architectures. It is licensed under a revision of the BSD licenses. As of 2011 it was developed by Peter Johnson and Michael Urman.
下载地址:http://yasm.tortall.net/Download.html
(10)libgd
GD 是一个开源的图像处理库,支持 PNG/JPEG/GIF以及其他格式的图像。GD一般被用来创建图表、图形、缩略图以及其他图像相关的处理操作。
下载地址:http://libgd.bitbucket.org/
(11)libpng
libpng 软件包包含 libpng 库.这些库被其他程式用于读写png文件. PNG 库是用来创立和操作PNG 格式的图像文件.PNG 格式是设计来替代GIF,他对于更小范围的TIFF(标记图象文件格式)来说, 有了非常多的进步和拓展并且减少了关于专利权的麻烦.
下载地址:http://www.libpng.org/pub/png/libpng.html
(12)libvpx
libvpx 是一个开源的VP8编码解码器。VP8:高质量的视频编码。
(13)FreeType
FreeType库是一个完全免费(开源)的、高质量的且可移植的字体引擎,它提供统一的接口来访问多种字体格式文件,包括TrueType, OpenType, Type1, CID, CFF, Windows FON/FNT, X11 PCF等。FreeType 2被设计为一种占用空间小的、高效的、高度可定制的、并且可以产生可移植的高品质输出(符号图像)。可以被用在诸如图像库、展出服务器、字体转换工具、图像文字产生工具等多种其它产品上。
官方网址:http://www.freetype.org/
下载页面网址:http://www.freetype.org/download.html
(14)LibJPEG
LibJPEG 是一个广泛使用的 JPEG 图像压缩库,采用 C 语言开发。
官方网址:http://www.ijg.org/
1.4、下载所需软件
各软件一键下载:
|
1
2
3
4
5
6
7
8
9
10
11
12
13
14
15
16
17
18
|
cd /usr/local/src/ &&
wget -ct 5 http://nginx.org/download/nginx-1.6.1.tar.gz &&
wget -ct 5 http://sfo1.mirrors.digitalocean.com/mariadb/mariadb-5.5.39/source/mariadb-5.5.39.tar.gz &&
wget -ct 5 http://cn2.php.net/distributions/php-5.5.16.tar.bz2 &&
wget -ct 5 ftp://ftp.csx.cam.ac.uk/pub/software/programming/pcre/pcre-8.35.tar.gz &&
wget -ct 5 http://www.openssl.org/source/openssl-1.0.1i.tar.gz &&
wget -ct 5 http://zlib.net/zlib-1.2.8.tar.gz &&
wget -ct 5 http://www.cmake.org/files/v2.8/cmake-2.8.11.2.tar.gz &&
wget -ct 5 http://nchc.dl.sourceforge.net/project/mcrypt/Libmcrypt/2.5.8/libmcrypt-2.5.8.tar.gz &&
wget -ct 5 http://www.tortall.net/projects/yasm/releases/yasm-1.2.0.tar.gz &&
wget -ct 5 ftp://sunsite.unc.edu/pub/Linux/libs/graphics/t1lib-5.1.2.tar.gz &&
wget -ct 5 https://bitbucket.org/libgd/gd-libgd/downloads/libgd-2.1.0.tar.gz &&
wget -ct 5 https://webm.googlecode.com/files/libvpx-v1.3.0.tar.bz2 &&
wget -ct 5 http://download.osgeo.org/libtiff/tiff-4.0.3.tar.gz &&
wget -ct 5 ftp://ftp.simplesystems.org/pub/png/src/libpng16/libpng-1.6.13.tar.gz &&
wget -ct 5 http://download.savannah.gnu.org/releases/freetype/freetype-2.5.3.tar.bz2 &&
wget -ct 5 http://www.ijg.org/files/jpegsrc.v9a.tar.gz &&
echo "下载完毕!"
|
注意:使用-c断点续传,-t参数表示重试次数。
2、安装MariaDB
安装依赖库、编译工具
|
1
|
yum install -y apr* autoconf automake bison bzip2 bzip2* cloog-ppl compat* cpp curl curl-devel fontconfig fontconfig-devel freetype freetype* freetype-devel gcc gcc-c++ gtk+-devel gd gettext gettext-devel glibc kernel kernel-headers keyutils keyutils-libs-devel krb5-devel libcom_err-devel libpng libpng-devel libjpeg* libsepol-devel libselinux-devel libstdc++-devel libtool* libgomp libxml2 libxml2-devel libXpm* libtiff libtiff* make mpfr ncurses* ntp openssl openssl-devel patch pcre-devel perl php-common php-gd policycoreutils telnet t1lib t1lib* nasm nasm* zlib-devel gd-devel
|
安装CMake:
|
1
2
3
4
|
tar -zxvf cmake-2.8.11.2.tar.gz &&
cd cmake-2.8.11.2 &&
./configure &&
make && make install
|
添加mysql运行组及用户、创建数据库数据文件文件夹并授予合适权限:
Trip:/bin/false是最严格的禁止login选项,一切服务都不能用,而/sbin/nologin只是不允许系统login,可以使用其他ftp等服务。如果想要用false在禁止login的同时允许ftp,则必须在/etc/shells里增加一行/bin/false。为了系统安全,这里建议使用/bin/false。
|
1
2
3
|
groupadd mysql && useradd -g mysql mysql -s /bin/false &&
mkdir -p /data/mysql &&
chown -R mysql:mysql /data/mysql
|
编译、安装MariaDB:
|
1
2
3
4
5
6
|
mkdir -p /usr/local/mysql &&
cd /usr/local/src &&
tar -zxvf mariadb-5.5.39.tar.gz &&
cd mariadb-5.5.39 &&
cmake . -DCMAKE_INSTALL_PREFIX=/usr/local/mysql -DMYSQL_DATADIR=/data/mysql -DSYSCONFDIR=/etc &&
make && make install
|
由于系统自带了MariaDB配置文件,备份或删除它都可以:
|
1
|
mv /etc/my.cnf /etc/my.cnf.bak
|
初始化数据库,配置启动脚本:
|
1
2
3
4
5
6
|
cd /usr/local/mysql &&
./scripts/mysql_install_db --user=mysql --basedir=/usr/local/mysql --datadir=/data/mysql &&
ln -s /usr/local/mysql/my.cnf /etc/my.cnf &&
cp ./support-files/mysql.server /etc/rc.d/init.d/mysqld &&
chmod 755 /etc/init.d/mysqld &&
chkconfig mysqld on
|
配置MariaDB启动脚本:
|
1
2
3
4
5
6
|
#vim /etc/rc.d/init.d/mysqld
改动如下:
basedir=/usr/local/mysql #MySQL程序安装路径
datadir=/data/mysql #MySQl数据库存放目录
##重启MySQL
#service mysqld start
|
把MariaDB加入系统环境变量:
|
1
|
echo ‘export PATH=$PATH:/usr/local/mysql/bin‘>>/etc/profile && source /etc/profile
|
把MariaDB的库文件链接到系统默认的位置,在编译PHP等软件时可以不用指定其库文件地址:
|
1
2
3
4
|
ln -s /usr/local/mysql/lib/mysql /usr/lib/mysql &&
ln -s /usr/local/mysql/include/mysql /usr/include/mysql &&
mkdir /var/lib/mysql &&
ln -s /tmp/mysql.sock /var/lib/mysql/mysql.sock
|
交互式设置数据库:
|
1
2
3
4
5
6
7
8
9
10
11
12
13
14
15
16
17
18
19
20
21
22
23
24
25
26
27
28
29
30
31
32
33
34
35
36
37
38
39
40
41
42
43
44
45
46
47
48
49
50
51
52
53
54
55
56
57
58
59
60
|
[root@localhost mysql]# mysql_secure_installation
NOTE: RUNNING ALL PARTS OF THIS SCRIPT IS RECOMMENDED FOR ALL MariaDB
      SERVERS IN PRODUCTION USE!  PLEASE READ EACH STEP CAREFULLY!

In order to log into MariaDB to secure it, we‘ll need the current
password for the root user.  If you‘ve just installed MariaDB, and
you haven‘t set the root password yet, the password will be blank,
so you should just press enter here.

Enter current password for root (enter for none):
OK, successfully used password, moving on...

Setting the root password ensures that nobody can log into the MariaDB
root user without the proper authorisation.

Set root password? [Y/n] Y
New password:
Re-enter new password:
Password updated successfully!
Reloading privilege tables..
 ... Success!


By default, a MariaDB installation has an anonymous user, allowing anyone
to log into MariaDB without having to have a user account created for
them.  This is intended only for testing, and to make the installation
go a bit smoother.  You should remove them before moving into a
production environment.

Remove anonymous users? [Y/n] Y
 ... Success!

Normally, root should only be allowed to connect from ‘localhost‘.  This
ensures that someone cannot guess at the root password from the network.

Disallow root login remotely? [Y/n] Y
 ... Success!

By default, MariaDB comes with a database named ‘test‘ that anyone can
access.  This is also intended only for testing, and should be removed
before moving into a production environment.

Remove test database and access to it? [Y/n] Y
 - Dropping test database...
 ... Success!
 - Removing privileges on test database...
 ... Success!

Reloading the privilege tables will ensure that all changes made so far
will take effect immediately.

Reload privilege tables now? [Y/n] Y
 ... Success!

Cleaning up...

All done!  If you‘ve completed all of the above steps, your MariaDB
installation should now be secure.

Thanks for using MariaDB!
|
3、安装Nginx
创建nginx的用户和用户组:
|
1
|
groupadd www && useradd -g www www -s /bin/false
|
安装PCRE:
|
1
2
3
4
5
6
|
cd /usr/local/src &&
mkdir /usr/local/pcre &&
tar -zxvf pcre-8.35.tar.gz &&
cd pcre-8.35 &&
./configure --prefix=/usr/local/pcre &&
make && make install
|
安装OpenSSL:
|
1
2
3
4
5
6
7
8
|
cd /usr/local/src &&
mkdir /usr/local/openssl &&
tar -zxvf openssl-1.0.1i.tar.gz &&
cd openssl-1.0.1i &&
./config --prefix=/usr/local/openssl &&
make && make install &&
echo ‘export PATH=$PATH:/usr/local/openssl/bin‘>>/etc/profile &&
source /etc/profile
|
安装zlib:
|
1
2
3
4
5
6
|
cd /usr/local/src &&
mkdir /usr/local/zlib &&
tar zxvf zlib-1.2.8.tar.gz &&
cd zlib-1.2.8 &&
./configure --prefix=/usr/local/zlib &&
make && make install
|
安装第三方模块ngx_http_accesskey_module以实现Nginx防盗链
|
1
2
3
4
|
cd /usr/local/src &&
wget http://wiki.nginx.org/images/5/51/Nginx-accesskey-2.0.3.tar.gz &&
tar vxzf Nginx-accesskey-2.0.3.tar.gz &&
cd nginx-accesskey-2.0.3/
|
修改config文件,替换其中 的”$HTTP_ACCESSKEY_MODULE”为”ngx_http_accesskey_module”.
我们可以在官方文档查看更多信息(http://nginx.org/en/docs/)。下面安装Nginx:
|
1
2
3
4
5
6
7
8
9
10
11
12
13
14
15
16
17
18
|
cd /usr/local/src &&
tar -zxvf nginx-1.6.1.tar.gz &&
cd nginx-1.6.1 &&
./configure --prefix=/usr/local/nginx \
--without-http_memcached_module \
--user=www \
--group=www \
--with-http_stub_status_module \
--with-http_ssl_module \
--with-http_gzip_static_module \
--with-openssl=/usr/local/src/openssl-1.0.1i \
--with-zlib=/usr/local/src/zlib-1.2.8 \
--with-pcre=/usr/local/src/pcre-8.35 \
--with-http_stub_status_module \
--with-http_sub_module \
--add-module=/usr/local/src/nginx-accesskey-2.0.3/ &&
make && make install &&
echo "安装NGINX完毕!"
|
补充:–with-http_sub_module用于替换,非常有用(见Wiki)。–with-http_stub_status_module开启Nginx状态信息,非核心模块,可不加入。
到此,Nginx软件编译并安装完毕。
更多官方文档:nginx documentation
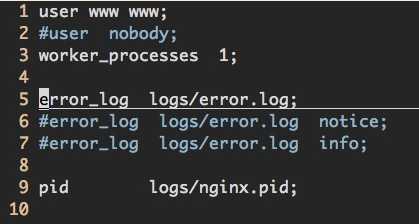
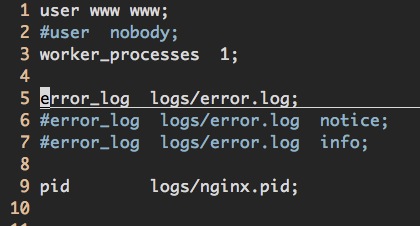
修改Nginx配置文件,改为如下:
配置Nginx控制脚本或者从这里下载:
|
1
2
3
4
|
从本网站下载:
cd /etc/rc.d/init.d/ && wget http://idoseek.com/dl/nx/nginx
或手动写入:
vim /etc/rc.d/init.d/nginx
|
写入如下内容:
|
1
2
3
4
5
6
7
8
9
10
11
12
13
14
15
16
17
18
19
20
21
22
23
24
25
26
27
28
29
30
31
32
33
34
35
36
37
38
39
40
41
42
43
44
45
46
47
48
49
50
51
52
53
54
55
56
57
58
59
60
61
62
63
64
65
66
67
68
69
70
71
72
73
74
75
76
77
78
79
80
81
82
83
84
85
86
87
88
89
90
91
92
93
94
95
96
97
98
99
100
101
102
103
104
105
106
107
108
109
110
111
112
113
114
115
116
117
118
119
120
121
122
123
124
125
126
|
#!/bin/sh
#
# nginx - this script starts and stops the nginx daemon
#
# chkconfig: - 85 15
# description: Nginx is an HTTP(S) server, HTTP(S) reverse \
# proxy and IMAP/POP3 proxy server
# processname: nginx
# config: /etc/nginx/nginx.conf
# config: /usr/local/nginx/conf/nginx.conf
# pidfile: /usr/local/nginx/logs/nginx.pid
# Source function library.
. /etc/rc.d/init.d/functions
# Source networking configuration.
. /etc/sysconfig/network
# Check that networking is up.
[ "$NETWORKING" = "no" ] && exit 0
nginx="/usr/local/nginx/sbin/nginx"
prog=$(basename $nginx)
NGINX_CONF_FILE="/usr/local/nginx/conf/nginx.conf"
[ -f /etc/sysconfig/nginx ] && . /etc/sysconfig/nginx
lockfile=/var/lock/subsys/nginx
make_dirs() {
# make required directories
user=`$nginx -V 2>&1 | grep "configure arguments:" | sed ‘s/[^*]*--user=\([^ ]*\).*/\1/g‘ -`
if [ -z "`grep $user /etc/passwd`" ]; then
useradd -M -s /bin/nologin $user
fi
options=`$nginx -V 2>&1 | grep ‘configure arguments:‘`
for opt in $options; do
if [ `echo $opt | grep ‘.*-temp-path‘` ]; then
value=`echo $opt | cut -d "=" -f 2`
if [ ! -d "$value" ]; then
# echo "creating" $value
mkdir -p $value && chown -R $user $value
fi
fi
done
}
start() {
[ -x $nginx ] || exit 5
[ -f $NGINX_CONF_FILE ] || exit 6
make_dirs
echo -n $"Starting $prog: "
daemon $nginx -c $NGINX_CONF_FILE
retval=$?
echo
[ $retval -eq 0 ] && touch $lockfile
return $retval
}
stop() {
echo -n $"Stopping $prog: "
killproc $prog -QUIT
retval=$?
echo
[ $retval -eq 0 ] && rm -f $lockfile
return $retval
}
restart() {
#configtest || return $?
stop
sleep 1
start
}
reload() {
#configtest || return $?
echo -n $"Reloading $prog: "
killproc $nginx -HUP
RETVAL=$?
echo
}
force_reload() {
restart
}
configtest() {
$nginx -t -c $NGINX_CONF_FILE
}
rh_status() {
status $prog
}
rh_status_q() {
rh_status >/dev/null 2>&1
}
case "$1" in
start)
rh_status_q && exit 0
$1
;;
stop)
rh_status_q || exit 0
$1
;;
restart|configtest)
$1
;;
reload)
rh_status_q || exit 7
$1
;;
force-reload)
force_reload
;;
status)
rh_status
;;
condrestart|try-restart)
rh_status_q || exit 0
;;
*)
echo $"Usage: $0 {start|stop|status|restart|condrestart|try-restart|reload|force-reload|configtest}"
exit 2
esac
|
设置启动脚本、启动Nginx:
|
1
2
3
|
chmod 775 /etc/rc.d/init.d/nginx &&
chkconfig nginx on &&
/etc/rc.d/init.d/nginx start
|
把Nginx加入系统变量:
|
1
|
echo ‘export PATH=$PATH:/usr/local/nginx/sbin‘>>/etc/profile && source /etc/profile
|
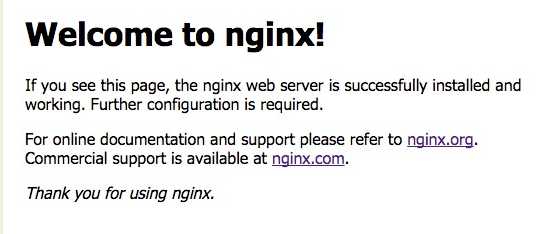
打开地址,输出如下内容说明安装Nginx已经成功:
4、安装PHP
4.1、编译相关软件安装PHP
安装yasm:
|
1
2
3
4
5
6
|
cd /usr/local/src &&
tar -zxvf yasm-1.2.0.tar.gz &&
cd yasm-1.2.0 &&
./configure &&
make &&
make install
|
安装mcrypt:
|
1
2
3
4
5
6
|
cd /usr/local/src &&
tar -zxvf libmcrypt-2.5.8.tar.gz &&
cd libmcrypt-2.5.8 &&
./configure &&
make &&
make install
|
安装libvpx:
|
1
2
3
4
5
6
|
cd /usr/local/src &&
tar -jxvf libvpx-v1.3.0.tar.bz2 &&
cd libvpx-v1.3.0 &&
./configure --prefix=/usr/local/libvpx --enable-shared --enable-vp9 &&
make &&
make install
|
安装tiff:
|
1
2
3
4
5
6
|
cd /usr/local/src &&
tar -zxvf tiff-4.0.3.tar.gz &&
cd tiff-4.0.3 &&
./configure --prefix=/usr/local/tiff --enable-shared &&
make &&
make install
|
安装libpng:
|
1
2
3
4
5
6
|
cd /usr/local/src &&
tar -zxvf libpng-1.6.13.tar.gz &&
cd libpng-1.6.13 &&
./configure --prefix=/usr/local/libpng --enable-shared --with-x=no &&
make &&
make install
|
安装freetype:
|
1
2
3
4
5
6
|
cd /usr/local/src &&
tar -jxvf freetype-2.5.3.tar.bz2 &&
cd freetype-2.5.3 &&
./configure --prefix=/usr/local/freetype --enable-shared --with-x=no &&
make &&
make install
|
安装jpeg:
|
1
2
3
4
5
6
|
cd /usr/local/src &&
tar -zxvf jpegsrc.v9a.tar.gz &&
cd jpeg-9a &&
./configure --prefix=/usr/local/jpeg --enable-shared &&
make &&
make install
|
安装libgd:
|
1
2
3
4
5
|
cd /usr/local/src &&
tar -zxvf libgd-2.1.0.tar.gz &&
cd libgd-2.1.0 &&
./configure --prefix=/usr/local/libgd --enable-shared --with-jpeg=/usr/local/jpeg --with-png=/usr/local/libpng --with-freetype=/usr/local/freetype --with-fontconfig=/usr/local/freetype --with-xpm=/usr/ --with-tiff=/usr/local/tiff --with-vpx=/usr/local/libvpx &&
make && make install
|
安装t1lib:
|
1
2
3
4
5
6
|
cd /usr/local/src &&
tar -zxvf t1lib-5.1.2.tar.gz &&
cd t1lib-5.1.2 &&
./configure --prefix=/usr/local/t1lib --enable-shared &&
make without_doc &&
make install
|
安装php:
注意:如果系统是64位,安装前请执行以下两条命令:
|
1
2
|
ln -s /usr/lib64/libltdl.so /usr/lib/libltdl.so &&
\cp -frp /usr/lib64/libXpm.so* /usr/lib/
|
编译并安装PHP:
|
1
2
3
4
5
6
7
8
9
10
11
12
13
14
15
16
17
18
19
20
21
22
23
24
25
26
27
28
29
30
31
32
33
34
35
36
37
38
39
40
41
42
43
44
45
|
cd /usr/local/src &&
tar -jvxf php-5.5.16.tar.bz2 &&
cd php-5.5.16 &&
export LD_LIBRARY_PATH=/usr/local/libgd/lib &&
./configure --prefix=/usr/local/php \
--with-config-file-path=/usr/local/php/etc \
--with-mysql=/usr/local/mysql \
--with-mysqli=/usr/local/mysql/bin/mysql_config \
--with-mysql-sock=/tmp/mysql.sock \
--with-pdo-mysql=/usr/local/mysql \
--with-gd \
--with-png-dir=/usr/local/libpng \
--with-jpeg-dir=/usr/local/jpeg \
--with-freetype-dir=/usr/local/freetype \
--with-xpm-dir=/usr/ \
--with-vpx-dir=/usr/local/libvpx/ \
--with-zlib-dir=/usr/local/zlib \
--with-t1lib=/usr/local/t1lib \
--with-iconv \
--enable-libxml \
--enable-xml \
--enable-bcmath \
--enable-shmop \
--enable-sysvsem \
--enable-inline-optimization \
--enable-opcache \
--enable-mbregex \
--enable-fpm \
--enable-mbstring \
--enable-ftp \
--enable-gd-native-ttf \
--with-openssl \
--enable-pcntl \
--enable-sockets \
--with-xmlrpc \
--enable-zip \
--enable-soap \
--without-pear \
--with-gettext \
--enable-session \
--with-mcrypt \
--with-curl \
--enable-exif \
--enable-ctype &&
make && make install
|
编译配置说明:
–enable-opcache:PHP5.5内置了Zend Opcache,即Optimizer+,是 Zend 开发的闭源但可以免费使用的 PHP 优化加速组件。现在,Zend 科技公司将 Optimizer+ 在 PHP License 下开源成为 Zend Opcache。Zend OPcache 通过 opcode 缓存和优化提供更快的 PHP 执行过程。它将预编译的脚本文件存储在共享内存中供以后使用,从而避免了从磁盘读取代码并进行编译的时间消耗。同时,它还应用了一些代码优化模式,使得代码执行更快。
更多编译信息请查看
|
1
|
./configure --help
|
编译、安装完成后结尾输出如下一段比较重要的信息:
|
1
2
3
4
5
6
7
8
9
10
11
12
13
14
15
16
17
18
19
20
21
|
...
Installing shared extensions:     /usr/local/php/lib/php/extensions/no-debug-non-zts-20121212/
Installing PHP CLI binary:        /usr/local/php/bin/
Installing PHP CLI man page:      /usr/local/php/php/man/man1/
Installing PHP FPM binary:        /usr/local/php/sbin/
Installing PHP FPM config:        /usr/local/php/etc/
Installing PHP FPM man page:      /usr/local/php/php/man/man8/
Installing PHP FPM status page:      /usr/local/php/php/fpm/
Installing PHP CGI binary:        /usr/local/php/bin/
Installing PHP CGI man page:      /usr/local/php/php/man/man1/
Installing build environment:     /usr/local/php/lib/php/build/
Installing header files:          /usr/local/php/include/php/
Installing helper programs:       /usr/local/php/bin/
  program: phpize
  program: php-config
Installing man pages:             /usr/local/php/php/man/man1/
  page: phpize.1
  page: php-config.1
/usr/local/src/php-5.5.16/build/shtool install -c ext/phar/phar.phar /usr/local/php/bin
ln -s -f /usr/local/php/bin/phar.phar /usr/local/php/bin/phar
Installing PDO headers:          /usr/local/php/include/php/ext/pdo/
|
安装结束。
4.2、配置PHP运行环境
复制php配置文件到安装目录