标签:span 增删查改 cat alt one 平台 生成 http 环境
hibernate 基础理论知识网上很多,可以百度和google.这里不做多的介绍,以一个User表来开展例子
建一个web-project
我这里用了junit单元测试环境来进行增删查改的测试,别的不多说,导包就行
本次用到的所有jar包下载地址:
链接:http://pan.baidu.com/s/1skHrg0t 密码:dbe2
1、hibernate配置文件(hibernate.cfg.xml):主要是数据库连接核心的配置项
<?xml version=‘1.0‘ encoding=‘utf-8‘?>
<!DOCTYPE hibernate-configuration PUBLIC
        "-//Hibernate/Hibernate Configuration DTD 3.0//EN"
        "http://hibernate.sourceforge.net/hibernate-configuration-3.0.dtd">

<hibernate-configuration>
    <session-factory>
        <!--数据库URL -->
        <property name="connection.url">
            jdbc:oracle:thin:@127.0.0.1:1521:orcl
        </property>
        <!--数据库用户 -->
        <property name="connection.username">rent</property>
        <!--数据库用户密码 -->
        <property name="connection.password">rent</property>
        <!--数据库JDBC驱动 -->
        <property name="connection.driver_class">
            oracle.jdbc.driver.OracleDriver
        </property>
        <!--每个数据库都有其对应的Dialect以匹配其平台特性 -->
        <property name="dialect">
            org.hibernate.dialect.Oracle9Dialect
        </property>
        <!--是否将运行期生成的SQL输出到日志以供调试 -->
        <property name="show_sql">true</property>
        <!--是否格式化SQL -->
        <property name="format_sql">true</property>

        <mapping resource="com/cn/entity/User.hbm.xml" />


    </session-factory>


</hibernate-configuration>
2、映射文件(User.hbm.xml),主要是对象一表的映射
<?xml version="1.0"?>
<!DOCTYPE hibernate-mapping PUBLIC
        "-//Hibernate/Hibernate Mapping DTD 3.0//EN"
        "http://hibernate.sourceforge.net/hibernate-mapping-3.0.dtd">

<hibernate-mapping>
    <class name="com.cn.entity.User" table="users" >
        <id name="id" column="id" type="java.lang.Integer">
            <!-- 主键的生成策略 -->
            <generator class="assigned"/>
        </id>
        <property name="name" type="java.lang.String" column="name"/>
        <property name="password" type="java.lang.String" column="password"/>
         <property name="telephone" type="java.lang.String" column="telephone"/>
          <property name="username" type="java.lang.String" column="username"/>
           <property name="isadmin" type="java.lang.String" column="isadmin"/>


    </class>
</hibernate-mapping>
<!--
    class ==== 表
    对象    =====一行数据
    属性     ===== 列
    属性的类型    ==== 列的类型

 -->
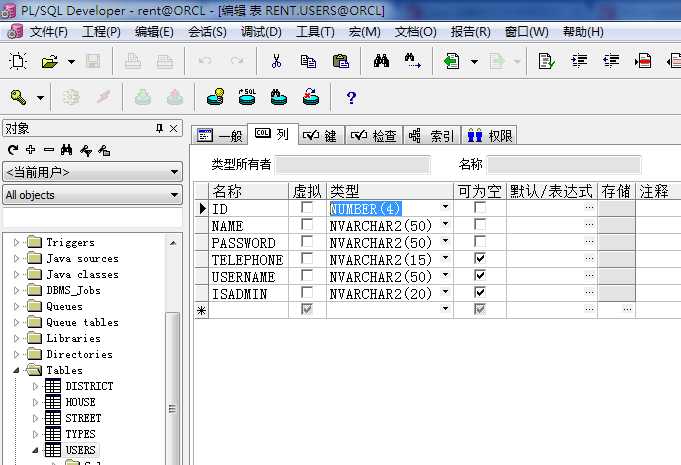
3、我的数据库表结构。这里表结构与实体类中属性的名称和类型要保持一致

4、实体类(User.java)
package com.cn.entity;

import java.io.Serializable;

public class User implements Serializable {
    private Integer id;
    private String name;
    private String password;
    private String telephone;
    private String username;
    private String isadmin;
    public User(Integer id, String name, String password, String telephone,
            String username, String isadmin) {
        super();
        this.id = id;
        this.name = name;
        this.password = password;
        this.telephone = telephone;
        this.username = username;
        this.isadmin = isadmin;
    }
    public User() {
        super();
        // TODO Auto-generated constructor stub
    }
    public Integer getId() {
        return id;
    }
    public void setId(Integer id) {
        this.id = id;
    }
    public String getName() {
        return name;
    }
    public void setName(String name) {
        this.name = name;
    }
    public String getPassword() {
        return password;
    }
    public void setPassword(String password) {
        this.password = password;
    }
    public String getTelephone() {
        return telephone;
    }
    public void setTelephone(String telephone) {
        this.telephone = telephone;
    }
    public String getUsername() {
        return username;
    }
    public void setUsername(String username) {
        this.username = username;
    }
    public String getIsadmin() {
        return isadmin;
    }
    public void setIsadmin(String isadmin) {
        this.isadmin = isadmin;
    }

}
重要的事再说一遍:为避免以后可能遇到的问题和麻烦,强烈要求实体类属性和类型与数据库表中字段名称和类型保持一致。实体类中的类型用包装类的类型
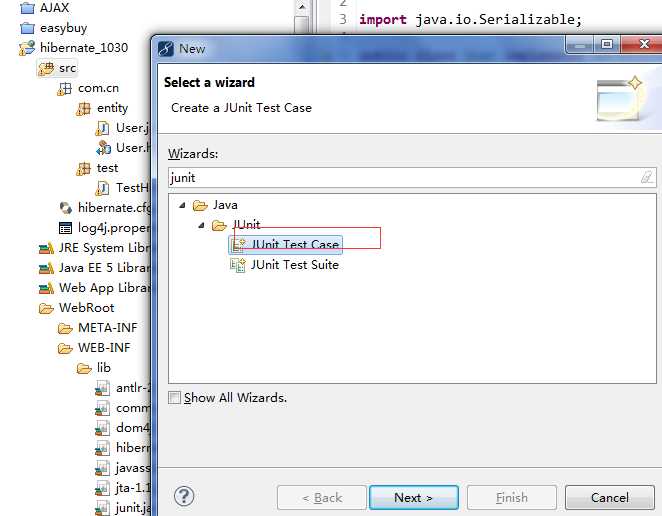
5、建junit测试环境:新建junit文件

帖代码:
package com.cn.test;

import static org.junit.Assert.*;

import java.io.Serializable;

import org.hibernate.Session;
import org.hibernate.SessionFactory;
import org.hibernate.Transaction;
import org.hibernate.cfg.Configuration;
import org.junit.Test;

import com.cn.entity.User;

public class TestHibernate {

    @Test
    public void add() {
        // 读取配置文件
        Configuration config = new Configuration().configure();
        SessionFactory factory = config.buildSessionFactory();
        // 得到当前连接数据库的session
        Session session = factory.openSession();
        // 开启事务
        Transaction tx = session.beginTransaction();
        try {
            User user = new User(15, "liujuan1", "123456", "13610249898",
                    "admin", "yes");
            Serializable id = session.save(user);

            if (id != null) {
                System.out.println("新增成功!");
                tx.commit();// 提交事务
            } else {
                tx.rollback();// 失败回滚
            }

        } catch (Exception e) {
            e.printStackTrace();
        } finally {
            session.close();
        }
    }

    @Test
    public void select() {
        // 读取配置文件
        Configuration config = new Configuration().configure();
        SessionFactory factory = config.buildSessionFactory();
        // 得到当前连接数据库的session
        Session session = factory.openSession();
        // 开启事务
        Transaction tx = session.beginTransaction();
        try {
            // 查询get
            User user = (User) session.get(User.class, 15);
            System.out.println("查询结果:" + user.getName());
            tx.commit();
        } catch (Exception e) {
            e.printStackTrace();
        } finally {
            session.close();
        }
    }

    @Test
    public void update() {
        // 读取配置文件
        Configuration config = new Configuration().configure();
        SessionFactory factory = config.buildSessionFactory();
        // 得到当前连接数据库的session
        Session session = factory.openSession();
        // 开启事务
        Transaction tx = session.beginTransaction();
        try {
            // 第1种:update持久化修改:先查询,与数据库有关联
        /*    User user = (User) session.get(User.class, 15);
            user.setName("duheyu");
            user.setPassword("duheyu");
            session.update(user);
            tx.commit();*/

            //第2种:瞬时状态下修改,会set全部字段,不修改的字段全部清空了
            /*User user =new User();
            user.setId(15);
            user.setName("duxinke");
            user.setPassword("duxinke");
            session.update(user);
            tx.commit();*/

            //第3种,新增或修改,拿瞬时状态来测试
            User user =new User();
            user.setId(15);
            user.setName("duxinke");
            user.setPassword("duxinke");
            session.saveOrUpdate(user);
            tx.commit();

        } catch (Exception e) {
            e.printStackTrace();
        } finally {
            session.close();
        }
    }

    @Test
    public void delete(){
        //读取并解析配置文件hibernate.cfg.xml
        Configuration config=new Configuration().configure();
        //读取并解析映射信息,User.hbm.xml,创建SessionFactory
        SessionFactory factory = config.buildSessionFactory();
        //打开一个连接数据库的Session
        Session session = factory.openSession();
        //开始一个事务,增删除查改操作必须有,查询操作可选
        Transaction tx =session.beginTransaction();
        //执行操作,都是用当前Session执行
        try {
            User user =new User();
            user.setId(15);
            session.delete(user);
            tx.commit();
        } catch (Exception e) {
            // TODO: handle exception
        }
    }

}
本次是以帖代码为主,不讲原理,如果你懂一点,看的话,会非常容易上手做项目。我做东西就是的,原理似懂非懂,上网搜代码,下来改改,就能用了。还好我的环境对代码质量和性能要求不是太严格。一切以工具能运行即可。
标签:span 增删查改 cat alt one 平台 生成 http 环境
原文地址:http://www.cnblogs.com/sincoolvip/p/6012764.html