标签:isp 密码 meta input 成功 local bean 名称 技术分享
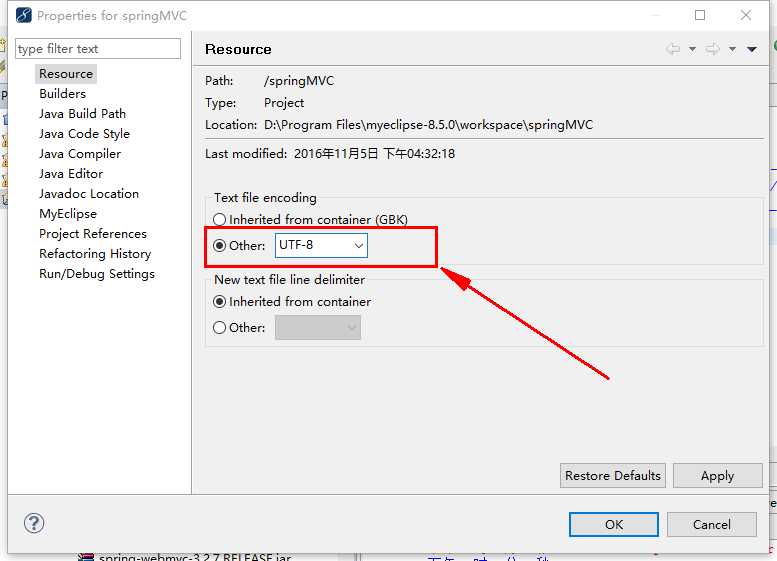
一、创建一个web项目springMVC,修改编码方式:utf-8.

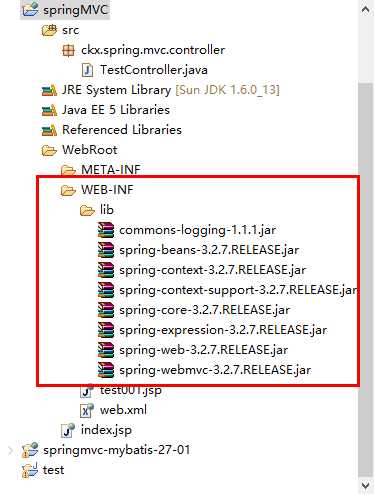
二、在web-INF下lib导入所需.jar包。(本次加入包有限只为基本环境使用)

三、环境搭建于测试
3.1在src下建包ckx.spring.mvc.controller
在包下new一个Controller测试类TestController.java代码如下:
package ckx.spring.mvc.controller;

import org.springframework.stereotype.Controller;
import org.springframework.web.bind.annotation.RequestMapping;
import org.springframework.web.servlet.ModelAndView;

@Controller
public class TestController {

    @RequestMapping("/test001")
    public ModelAndView test001(ModelAndView ModelAndView){
        ModelAndView.setViewName("test001");
        return ModelAndView;
    }
}
3.2根据返回的视图名在web-root下new一个test001.jsp,直观期间修改body里面内容:This is test001 page.
<%@ page language="java" import="java.util.*" pageEncoding="ISO-8859-1"%>
<%
String path = request.getContextPath();
String basePath = request.getScheme()+"://"+request.getServerName()+":"+request.getServerPort()+path+"/";
%>

<!DOCTYPE HTML PUBLIC "-//W3C//DTD HTML 4.01 Transitional//EN">
<html>
  <head>
    <base href="<%=basePath%>">

    <title>My JSP ‘test001.jsp‘ starting page</title>

    <meta http-equiv="pragma" content="no-cache">
    <meta http-equiv="cache-control" content="no-cache">
    <meta http-equiv="expires" content="0">
    <meta http-equiv="keywords" content="keyword1,keyword2,keyword3">
    <meta http-equiv="description" content="This is my page">
    <!--
    <link rel="stylesheet" type="text/css" href="styles.css">
    -->

  </head>

  <body>
    This is test001 page. <br>
  </body>
</html>
3.3在web.xml配置核心控制器dispatchservlet:
<?xml version="1.0" encoding="UTF-8"?>
<web-app version="2.5"
    xmlns="http://java.sun.com/xml/ns/javaee"
    xmlns:xsi="http://www.w3.org/2001/XMLSchema-instance"
    xsi:schemaLocation="http://java.sun.com/xml/ns/javaee
    http://java.sun.com/xml/ns/javaee/web-app_2_5.xsd">

    <!-- 初始化DispatcherServlet -->
    <servlet>
        <!--servlet名称-->
        <servlet-name>springmvc</servlet-name>
        <!--springmvc核心控制器DispatcherServlet-->
        <servlet-class>org.springframework.web.servlet.DispatcherServlet</servlet-class>
        <!--初始化配置文件-->
        <init-param>
            <param-name>contextConfigLocation</param-name>
            <param-value>/WEB-INF/springmvc-servlet.xml</param-value>
        </init-param>
        <!--设置启动顺序,启动的时候就加载这个servlet-->
        <load-on-startup>1</load-on-startup>
    </servlet>
    <servlet-mapping>
        <servlet-name>springmvc</servlet-name>
        <!--配置拦截形式 "/"拦截所有-->
        <url-pattern>/</url-pattern>
    </servlet-mapping>


  <welcome-file-list>
    <welcome-file>index.jsp</welcome-file>
  </welcome-file-list>
</web-app>
3.3在web-inf下创建springmvc-servlet.xml配置文件。
3.3.1配置解析:
1、因为在MVC中常用到注释因此要有开启注释的驱动:<mvc:annotation-driven></mvc:annotation-driven>
2、配置对controller的扫描:<context:component-scan base-package="ckx\spring\mvc\controller"></context:component-scan>注意路径
3、配置解析类:
<?xml version="1.0" encoding="UTF-8"?>
<beans xmlns="http://www.springframework.org/schema/beans"
    xmlns:xsi="http://www.w3.org/2001/XMLSchema-instance" xmlns:mvc="http://www.springframework.org/schema/mvc"
    xmlns:p="http://www.springframework.org/schema/p" xmlns:context="http://www.springframework.org/schema/context"
    xmlns:aop="http://www.springframework.org/schema/aop" xmlns:tx="http://www.springframework.org/schema/tx"
    xsi:schemaLocation="http://www.springframework.org/schema/beans
            http://www.springframework.org/schema/beans/spring-beans-3.2.xsd
            http://www.springframework.org/schema/context
            http://www.springframework.org/schema/context/spring-context-3.2.xsd
            http://www.springframework.org/schema/aop
            http://www.springframework.org/schema/aop/spring-aop-3.2.xsd
            http://www.springframework.org/schema/tx
            http://www.springframework.org/schema/tx/spring-tx-3.2.xsd
            http://www.springframework.org/schema/mvc
            http://www.springframework.org/schema/mvc/spring-mvc-3.2.xsd
            http://www.springframework.org/schema/context
            http://www.springframework.org/schema/context/spring-context-3.2.xsd">

    <!--开启注解驱动-->
    <mvc:annotation-driven></mvc:annotation-driven>

    <!--扫描controller-->
    <context:component-scan base-package="ckx\spring\mvc\controller"></context:component-scan>

    <!-- 定义viewResolver实例,视图解释类 -->
    <bean id="viewResolver"
        class="org.springframework.web.servlet.view.InternalResourceViewResolver">
        <!-- 注入viewClass实例 -->
        <property name="viewClass"
            value="org.springframework.web.servlet.view.JstlView" />
        <!-- <!-- URL前缀 ,在jsp直接位于web-INF下是直接用“/”即可,若在web-INF下文件夹,还需拼接--> -->
        <property name="prefix" value="/" />
        <!-- URL后缀 找出我们需要的视图,以.jsp文件 -->
        <property name="suffix" value=".jsp" />
    </bean>
</beans>
3.3.2修改index.jsp欢迎页,使其有跳转功能。
<%@ page language="java" import="java.util.*" pageEncoding="utf-8"%>
<%
String path = request.getContextPath();
String basePath = request.getScheme()+"://"+request.getServerName()+":"+request.getServerPort()+path+"/";
%>

<!DOCTYPE HTML PUBLIC "-//W3C//DTD HTML 4.01 Transitional//EN">
<html>
  <head>
    <base href="<%=basePath%>">

    <title>My JSP ‘index.jsp‘ starting page</title>
    <meta http-equiv="pragma" content="no-cache">
    <meta http-equiv="cache-control" content="no-cache">
    <meta http-equiv="expires" content="0">
    <meta http-equiv="keywords" content="keyword1,keyword2,keyword3">
    <meta http-equiv="description" content="This is my page">
    <!--
    <link rel="stylesheet" type="text/css" href="styles.css">
    -->
  </head>

  <body>
   <a href="<%=path %>/test001">跳转test001</a> <br/><br/>
  </body>
</html>
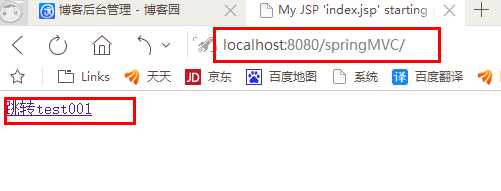
3.3.3在tomcat中添加项目springMVC后在浏览器地址栏运行localhost:8080/springMVC:

3.3.4点击超链接跳转到test001.jsp:

3.3.5完成基本配置实现页面跳转。
3.4.1页面带值传递,在test001方法中加入数据模型参数model(model默认作用于request)
注意导入正确的包:import org.springframework.ui.Model;
@RequestMapping("/test001")
    public ModelAndView test001(ModelAndView ModelAndView,Model model){
        ModelAndView.setViewName("test001");
        model.addAttribute("name","凯特.温斯莱特");
        return ModelAndView;
    }
3.4.2刷新test001.jsp,实现带值跳转:

3.5已返回字符串的形式跳转页面(代码更为简洁,这里使用test001页面,只是改变跳转请求。):
@RequestMapping("/test002")
    public String test002(Model model){
        model.addAttribute("name", "杨千嬅");
        return "test001";
    }
在欢迎页加test002跳转请求
<a href="<%=path %>/test002">跳转test002</a> <br/><br/>
重启服务器,点击test002超链接,实现用返回字符串的方法实现带数据跳转:

3.6重定向redirect(注意重定向是要加.jsp后缀名,或者return "redirect:/test002";)
@RequestMapping("/test003")
    public String test003(Model model){
        model.addAttribute("name", "RedirectTest003");
        return "redirect:test002.jsp";
    }
new一个 test002.jsp:
  <body>
    This is test002 page. <br></br>
    ${name}

  </body>
index.jsp添加超链接:
<a href="<%=path %>/test002">跳转test002</a> <br/><br/>
重启服务,跳转test003实现重定向(重定向是get请求注意地址栏):

四、参数解析,从页面提取数据到后台:
4.1在controller添加一个登陆的方法login:
@RequestMapping("/login")
    public String login(String username , String password){
        System.out.println("username:"+username);
        System.out.println("password:"+password);
        return "index";
    }
new一个login.jsp:
<body>
      <p align="center">
        <form action="<%=path %>/login" method="post">
            用户名:<input type="text" name="username"><br/>
            密码:<input type="password" name="password"><br/>
                <input type="submit" value="提交">
        </form>
     </p>
  </body>
重启服务器,运行localhost:8080/login.jsp:

输入用户名、密码提交,查看控制台获取数据成功:

但是这种方法在面对多字段时会使方法参数过于冗余,这时就要引进用类做参数了:
创建一个注册页面:
<body>
      <p align="center">
        <form action="<%=path %>/register" method="post">
            用户名:<input type="text" name="username"><br/>
            性别:<input type="text" name="sex"><br/>
            年龄:<input type="text" name="age"><br/>
            政治面貌:<input type="text" name="zzmm"><br/>
            密码:<input type="password" name="password"><br/>
                <input type="submit" value="注册">
        </form>
     </p>
  </body>
创建一个实体类用来保存这些字段参数:
package ckx.spring.mvc.entity;

public class User {
    private String username;
    private String sex;
    private int age;
    private String zzmm;
    private String password;


    public String getUsername() {
        return username;
    }
    public void setUsername(String username) {
        this.username = username;
    }
    public String getSex() {
        return sex;
    }
    public void setSex(String sex) {
        this.sex = sex;
    }
    public int getAge() {
        return age;
    }
    public void setAge(int age) {
        this.age = age;
    }
    public String getZzmm() {
        return zzmm;
    }
    public void setZzmm(String zzmm) {
        this.zzmm = zzmm;
    }
    public String getPassword() {
        return password;
    }
    public void setPassword(String password) {
        this.password = password;
    }


}
新增一个请求方法register,以user类作为参数:
@RequestMapping("/register")
    public String register(User user){
        System.out.println("username:"+user.getUsername());
        System.out.println("username:"+user.getAge());
        System.out.println("username:"+user.getSex());
        System.out.println("username:"+user.getZzmm());
        System.out.println("username:"+user.getPassword());
        return "index";
    }
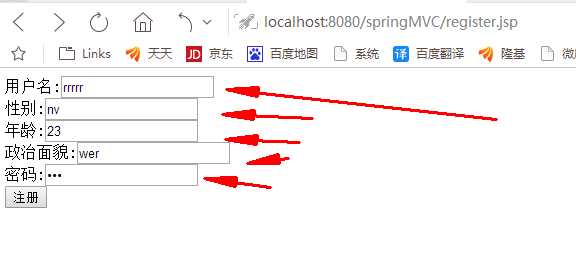
重启服务器,运行register.jsp页面,并填入数据:

点击提交查看控制台获取数据成功:

标签:isp 密码 meta input 成功 local bean 名称 技术分享
原文地址:http://www.cnblogs.com/ckxlovejava/p/6034489.html