标签:des android style blog http color 使用 os
这几天忙着驾校考试,连电脑都碰不到了,今天总算告一段落了~~service的注册跟activity的注册类似,同样是要在AndroidManifest.xml的文件里注册。
        <service android:name=".MinaService"><!-- 你自定义的service文件   (在<application></application>里面加)-->
        <intent-filter>
                <action android:name="com.MinaService" /><!-- 用intent启动时的快捷名(也可以用常规的方式启动) -->
                <category android:name="android.intent.category.default" />
        </intent-filter>
        </service>
service有两种模式,本地服务和远程服务。我们一般开发应用都是用的本地服务,而远程服务经常在做系统开发时被用到。所以今天我会主要讲本地的服务,远程服务放着以后再讲吧(其实UP主也没用过远程服务就是了==)
| 类别 | 区别 | 优点 | 缺点 | 应用 |
| 本地服务(Local) | 该服务依附在主进程上, | 服务依附在主进程上而不是独立的进程,这样在一定程度上节约了资源,另外Local服务因为是在同一进程因此不需要IPC,也不需要AIDL。相应bindService会方便很多。 | 主进程被Kill后,服务便会终止。 | 非常常见的应用如:HTC的音乐播放服务,天天动听音乐播放服务。 |
| 远程服务(Remote) | 该服务是独立的进程, | 服务为独立的进程,对应进程名格式为所在包名加上你指定的android:process字符串。由于是独立的进程,因此在Activity所在进程被Kill的时候,该服务依然在运行,不受其他进程影响,有利于为多个进程提供服务具有较高的灵活性。 | 该服务是独立的进程,会占用一定资源,并且使用AIDL进行IPC稍微麻烦一点。 | 一些提供系统服务的Service,这种Service是常驻的。 |
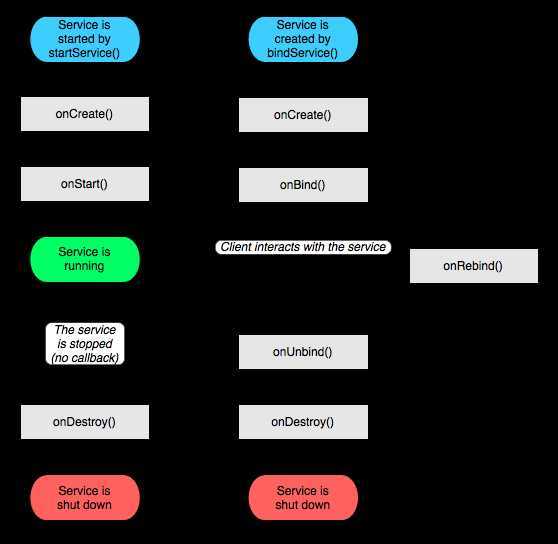
service的生命周期比activity简单多了,原因是service是在后台运行的,它是一直运行的,所以不需要那么多的状态判断。它只继承了onCreate()、onStart()或者说是onStartCommand()、
// 2.0 API level之后,实现onStart等同于重写onStartCommand并返回 关于onStartCommon()的详解:http://blog.csdn.net/lizzy115/article/details/7001731
onDestroy()三个方法。
服务不能自己运行,需要通过调用Context.startService()或Context.bindService()方法启动服务。这两个方法都可以启动Service,但是它们的使用场合有所不同。
四、Service实例
接下来我会写一个关于service的实例demo,希望看了之后会对大家有所帮助。
 1 public class MinaService extends Service{
 2     private String msg = "service bind success";
 3
 4     private final IBinder mBinder = new LocalBinder();
 5
 6     @Override
 7     public IBinder onBind(Intent intent) {
 8         Log.d("TEST", "onbind");
 9         //onBind service时会调用此方法,用于绑定Activity
10         return mBinder;
11     }
12
13     @Override
14     public void onCreate() {
15         //开启服务时会首先调用该方法
16         Log.d("TEST", "onCreate");
17         super.onCreate();
18     }
19
20     @Override
21     public int onStartCommand(Intent intent, int flags, int startId) {
22         //start service时会在onCreate后调用该方法
23         Log.d("TEST", "start");
24         return START_STICKY;
25     }
26
27     @Override
28     public void onDestroy() {
29         // 停止service后会调用此方法
30         Log.d("TEST", "destroy");
31         super.onDestroy();
32     }
33
34     @Override
35     public boolean onUnbind(Intent intent) {
36         //取消Activity与service绑定时要调用此方法
37         Log.d("TEST", "onunbind");
38         return super.onUnbind(intent);
39     }
40
41     @Override
42     public void onRebind(Intent intent) {
43         // 重新绑定时调用此方法
44         Log.d("TEST", "onrebind");
45         super.onRebind(intent);
46     }
47
48
49     /**
50      * @author cpacm
51      * 通过Binder返回service的引用到Activity中
52      */
53     public class LocalBinder extends Binder {
54         MinaService getService() {
55             return MinaService.this;
56         }
57     }
58
59     //普通方法,证明service在后台运行
60     public String getMsg(){
61         return msg;
62     }
63     public void setMsg(String m){
64         this.msg = m;
65     }
66
67 }
  1 public class MainActivity extends Activity implements OnClickListener{
  2
  3     private MinaService ms = null;
  4     private Button b1,b2,b3,b4,b5,b6;
  5     private TextView textView;
  6     private EditText editText;
  7     @Override
  8     protected void onCreate(Bundle savedInstanceState) {
  9         super.onCreate(savedInstanceState);
 10         setContentView(R.layout.activity_main);
 11         //获得界面的控件
 12         textView = (TextView) findViewById(R.id.textView1);
 13         editText = (EditText) findViewById(R.id.editText1);
 14         b1 = (Button) findViewById(R.id.button1);
 15         b1.setOnClickListener(this);
 16         b2 = (Button) findViewById(R.id.button2);
 17         b2.setOnClickListener(this);
 18         b3 = (Button) findViewById(R.id.button3);
 19         b3.setOnClickListener(this);
 20         b4 = (Button) findViewById(R.id.button4);
 21         b4.setOnClickListener(this);
 22         b5 = (Button) findViewById(R.id.button5);
 23         b5.setOnClickListener(this);
 24         b6 = (Button) findViewById(R.id.button6);
 25         b6.setOnClickListener(this);
 26         Log.d("TEST","===初始化完成===");
 27     }
 28
 29     @Override
 30     public void onClick(View v) {
 31         // TODO Auto-generated method stub
 32         switch(v.getId()){
 33             case R.id.button1:{//按钮一:用startService开启服务
 34                 Intent i  = new Intent();
 35                 i.setClass(MainActivity.this, MinaService.class);
 36                 startService(i);
 37                 break;
 38             }
 39             case R.id.button2:{//按钮二:停止服务
 40                 Intent i  = new Intent();
 41                 i.setClass(MainActivity.this, MinaService.class);
 42                 stopService(i);
 43                 break;
 44             }
 45             case R.id.button3:{//按钮三:用bindService来绑定Service和Activity
 46                 bindService(new Intent(MainActivity.this,
 47                         MinaService.class), mConnection, Context.BIND_AUTO_CREATE);
 48                 break;
 49             }
 50             case R.id.button4:{//取消绑定
 51                 unbindService(mConnection);
 52                 break;
 53             }
 54             case R.id.button5:{//跳转到下一个Activity
 55                 Intent i  = new Intent();
 56                 i.setClass(MainActivity.this, SecondActivity.class);
 57                 startActivity(i);
 58
 59                 break;
 60             }
 61             case R.id.button6:{//显示Service里面的信息
 62                 textView.setText(ms.getMsg());
 63                 ms.setMsg(editText.getText().toString());
 64                 break;
 65             }
 66         }
 67     }
 68
 69
 70     public void show(String str){
 71         Toast.makeText(this, str, Toast.LENGTH_LONG).show();
 72     }
 73
 74     private ServiceConnection mConnection = new ServiceConnection(){
 75
 76
 77         /**
 78          * 绑定Service和Activity时会用到这个函数,所以可以在这里获取到Service的引用对象
 79          * @see android.content.ServiceConnection#onServiceConnected(android.content.ComponentName, android.os.IBinder)
 80          **/
 81         @Override
 82         public void onServiceConnected(ComponentName name, IBinder service) {
 83             //获取Service的引用对象
 84              ms = ((MinaService.LocalBinder)service).getService();
 85              Toast.makeText(MainActivity.this, "connect",
 86                      Toast.LENGTH_SHORT).show();
 87         }
 88
 89         /**
 90          * 这个函数是在绑定异常时调用,平时不会使用到这个函数
 91          * @see android.content.ServiceConnection#onServiceDisconnected(android.content.ComponentName)
 92          **/
 93         @Override
 94         public void onServiceDisconnected(ComponentName name) {
 95             // TODO Auto-generated method stub
 96             ms = null;
 97             Toast.makeText(MainActivity.this, "cutdown",
 98                     Toast.LENGTH_SHORT).show();
 99         }
100
101     };
102
103 }

<?xml version="1.0" encoding="utf-8"?>
<LinearLayout xmlns:android="http://schemas.android.com/apk/res/android"
    android:layout_width="fill_parent"
    android:layout_height="fill_parent"
    android:orientation="vertical" >

    <LinearLayout
        android:layout_width="match_parent"
        android:layout_height="wrap_content"
        android:orientation="vertical" >

        <TextView
            android:id="@+id/textView1"
            android:layout_width="match_parent"
            android:layout_height="57dp"
            android:text="TextView" />

        <EditText
            android:id="@+id/editText1"
            android:layout_width="match_parent"
            android:layout_height="50dp"
            android:ems="10" >

            <requestFocus />
        </EditText>

    </LinearLayout>

    <LinearLayout
        android:layout_width="match_parent"
        android:layout_height="wrap_content"
        android:orientation="vertical" >
        <Button
            android:id="@+id/button1"
            android:layout_width="wrap_content"
            android:layout_height="wrap_content"
            android:text="start service" />
        <Button
            android:id="@+id/button2"
            android:layout_width="wrap_content"
            android:layout_height="wrap_content"
            android:text="stop service" />

        <Button
            android:id="@+id/button3"
            android:layout_width="wrap_content"
            android:layout_height="wrap_content"
            android:text="bind service" />

        <Button
            android:id="@+id/button4"
            android:layout_width="wrap_content"
            android:layout_height="wrap_content"
            android:text="unbind service" />

        <Button
            android:id="@+id/button5"
            android:layout_width="wrap_content"
            android:layout_height="wrap_content"
            android:text="next activity" />

        <Button
            android:id="@+id/button6"
            android:layout_width="wrap_content"
            android:layout_height="wrap_content"
            android:text="set message" />

    </LinearLayout>

</LinearLayout>
case R.id.button5:{
    Intent i  = new Intent();
     i.setClass(SecondActivity.this, MainActivity.class);
    startActivity(i);
    break;
}
以上就是Demo里面的组成部分了。接下来我们来看一下运行结果。


public boolean bindService(Intent service, ServiceConnection conn, int flags)
该方法的第1个参数表示与服务类相关联的Intent对象,第2个参数是一个ServiceConnection类型的变量,负责连接Intent对象指定的服务。通过ServiceConnection对象可以获得连接成功或失败的状态,并可以获得连接后的服务对象。第3个参数是一个标志位,一般设为 Context.BIND_AUTO_CREATE。如果我们想保持和 Service 的通信,又不想让 Service 随着 Activity 退出而退出呢?你可以先 startService() 然后再 bindService() 。当你不需要绑定的时候就执行 unbindService() 方法,执行这个方法只会触发 Service 的 onUnbind() 而不会把这个 Service 销毁。这样就可以既保持和 Service 的通信,也不会随着 Activity 销毁而销毁了。(销毁Service还是要调用StopService)
在应用中,我们先按下第一个按钮,再按下第三个按钮,这样activity就获得了service的对象。现在我们改变service里的值,在输入框输入“Activity与Service通信”,按下第六个按钮。
然后按下第五个按钮跳转到下一个Activity。在跳转到的Activity中,我们按下第三个按钮(onBind),在按下第六个按钮,你会发现文本框会出现“Activity与Service通信”的字符串。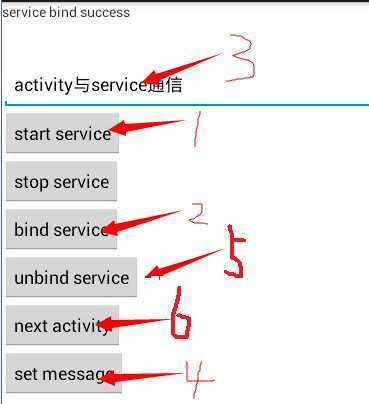
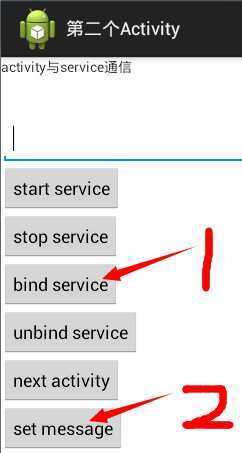
从截图上看,第二个activity成功获得了service里面的值。(注意,跳转到下一个Activity前一定要unbind,不然会报错)
五、结语
Service不仅可以与前端界面组件建立双向连接、提供数据和功能支持,也可以单向接受Intent对象的请求,进行数据的分析处理和功能调度。在不同的使用方式下,Service服务组件扮演的角色和开发模式完全不同。这种设计,也为理解Service带来了一定的难度。所以理解和习惯Service的使用显得非常重要。 参考文章:(1)Android Service学习之本地服务 http://android.blog.51cto.com/268543/527314/DEMO下载(百度网盘)(过期的请CALL我) 作者:cpacm联系方式:QQ 348515494(请注明博客园)【Android的从零单排开发日记】之入门篇(五)——Android四大组件之Service,布布扣,bubuko.com
【Android的从零单排开发日记】之入门篇(五)——Android四大组件之Service
标签:des android style blog http color 使用 os
原文地址:http://www.cnblogs.com/cpacm/p/3912578.html
