标签:items str config pointer 数据 配置 参数 mem images
1,安装依懒包
yum install -y epel-release
yum install -y libevent-devel
2,安装memcached
yum install -y memcached
3,安装libmemcached(memcached工具)
yum install -y libmemcached
4,memcached启动参数配置文件 /etc/sysconfig/memcached
vi /etc/sysconfig/memcached
参数内容如下,用户默认是memcached,由于我这边使用的是nobody,所以需要修改一下用户。
PORT="11211"
USER="nobody"
MAXCONN="1024"
CACHESIZE="64"
OPTIONS=""
5,启动memcached。
/etc/init.d/memcached start
ps aux|grep mem //查看是否启动memcached

memcached 使用参数讲解:
-d 放到后台运行
-p 指定端口
-u 指定用户
-m 指定内存
-c 最大连接数
-P 指定进程的PID
6,查看memcached运行状态。
memcached-tool 127.0.0.1
或者memstat --servers 127.0.0.1:11211
如果没有更改过端口,可以不用添加端口。
Server: 127.0.0.1 (11211)
         pid: 1082
         uptime: 1506
         time: 1479205237
         version: 1.4.4
         pointer_size: 64
         rusage_user: 0.26995
         rusage_system: 0.114982
         curr_items: 0
         total_items: 0
         bytes: 0
         curr_connections: 10
         total_connections: 18
         connection_structures: 11
         cmd_get: 0
         cmd_set: 0
         get_hits: 0
         get_misses: 0
         evictions: 0
         bytes_read: 0
         bytes_written: 0
         limit_maxbytes: 67108864
         threads: 4
7,连接memcached
telnet 127.0.0.1 11211
存数据
set key 10 200 2
取数据
get key
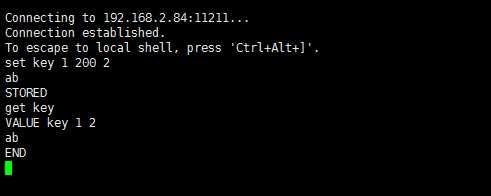
当然你也可以stats查看当前状态
8,php连接memcached
在此之前php 需要扩展安装memcache扩展模块.
1,php安装memcache扩展模块
2 wget http://pecl.php.net/get/memcache-2.2.4.tgz
3 tar -zxvf memcache-2.2.4.tgz
4 cd memcache-2.2.4
5 /usr/local/php/bin/phpize //生成可执行的configure文件
这里可能报错如下信息:
Cannot find autoconf. Please check your autoconf installation and the
$PHP_AUTOCONF environment variable. Then, rerun this script.
很明显是让我们安装antoconf
yum install -y autoconf
/usr/local/php/bin/phpize
./configure --with-php-config=/usr/local/php/bin/php-config
make && make install
可以看到提示
Libraries have been installed in:
/usr/local/src/memcache-2.2.4/modules 说明我们已经安装完毕 但是还是这个还是不能用的.

6 vim /usr/local/php/
添加如下信息:
extension = memcache.so
重启httpd服务.
7 验证php扩展模块安装是否成功/usr/local/php/bin/php -m 查看
8,验证php连接memcached
vi test.php 添加如下内容
<?php
//连接Memcache Memcache
$mem = new Memcache;
$mem->connect("localhost", 11211);
//保存数据
$mem->set(‘key1‘, ‘This is first value‘, 0, 60);
$val = $mem->get(‘key1‘);
echo "Get key1 value: " . $val ."<br>";
//替换数据
$mem->replace(‘key1‘, ‘This is replace value‘, 0, 60);
$val = $mem->get(‘key1‘);
echo "Get key1 value: " . $val . "<br>";
//保存数组数据
$arr = array(‘aaa‘, ‘bbb‘, ‘ccc‘, ‘ddd‘);
$mem->set(‘key2‘, $arr, 0, 60);
$val2 = $mem->get(‘key2‘);
echo "Get key2 value: ";
print_r($val2);
echo "<br>";
//删除数据
$mem->delete(‘key1‘);
$val = $mem->get(‘key1‘);
echo "Get key1 value: " . $val . "<br>";
//清除所有数据
$mem->flush();
$val2 = $mem->get(‘key2‘);
echo "Get key2 value: ";
print_r($val2);
echo "<br>";
//关闭连接
$mem->close();
?>
查看测试结果是否下面一直,如果一致说明连接ok.

9.memcached共享session
在lamp/lnmp环境下实现的通用配置
编辑php.ini添加下面两行
session.save_handler = "memcache"
session.save_path = "tcp://127.0.0.1:11211"
或者编辑httpd.conf中对应的虚拟主机添加:
php_value session.save_handler "memcache"
php_value session.save_path "tcp://127.0.0.1:11211"
或者php-fpm.conf对应的pool中添加
php_value[session.save_handler] = memcache
php_value[session.save_path] = "tcp://127.0.0.1:11211"
IP地址是Memcached server的ip地址
修改后重启httpd服务
测试:
在网站根目录下,写个session.php,内容如下
<?php

session_start();

if (!isset($_SESSION[‘TEST‘])) {

$_SESSION[‘TEST‘] = time();

}

$_SESSION[‘TEST3‘] = time();

print $_SESSION[‘TEST‘];

print "<br><br>";

print $_SESSION[‘TEST3‘];

print "<br><br>";

print session_id();

?>
然后访问 curl localhost/session.php 或者打开浏览器访问
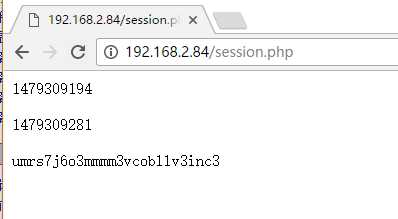
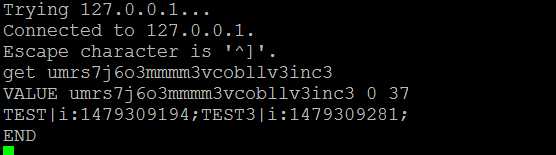
用telnet连上,获取一下vlaue.
telnet 127.0.0.1 11211
get umrs7j6o3mmmm3vcobllv3inc3
这里的key就上浏览器下面显示的结果,则说明数据存放到session中去了.
也可以通过phpinfo.php在页面中的session项中看到memcache的配置信息
标签:items str config pointer 数据 配置 参数 mem images
原文地址:http://www.cnblogs.com/lin1/p/6071489.html