标签:方法 configure base path jsp setting source 后缀 config
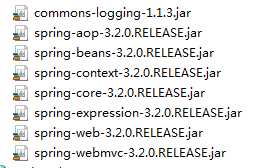
1.导入springMVC相关jar包:

2.添加Web.xml配置文件中关于SpringMVC的配置
<servlet>
<servlet-name>springmvc</servlet-name>
<servlet-class>org.springframework.web.servlet.DispatcherServlet</servlet-class>
<init-param>
<param-name>contextConfigLocation</param-name>
<param-value>classpath:springmvc-servlet.xml</param-value>
</init-param>
</servlet>
<servlet-mapping>
<servlet-name>springmvc</servlet-name>
<url-pattern>/</url-pattern>
</servlet-mapping>
3.在src下添加springmvc-servlet.xml配置文件
<!-- scan the package and the sub package -->
<context:component-scan base-package="test.SpringMVC"/>
<!-- don‘t handle the static resource -->
<mvc:default-servlet-handler />
<!-- if you use annotation you must configure following setting -->
<mvc:annotation-driven />
<!-- configure the InternalResourceViewResolver -->
<bean class="org.springframework.web.servlet.view.InternalResourceViewResolver"
id="internalResourceViewResolver">
<!-- 前缀 配置后台返回跳转到jsp页面 -->
<property name="prefix" value="/WEB-INF/jsp/" />
<!-- 后缀 -->
<property name="suffix" value=".jsp" />
</bean>
4.在WEB-INF文件夹下创建名为jsp的文件夹,用来存放jsp视图。创建一个hello.jsp
5.建立包及Controller,如下所示:

6.编写Controller代码:
@Controller
@RequestMapping("/mvc")
public class mvcController {
@RequestMapping("/hello")
public String hello(){
return "hello";
}
@ResponseBody
@RequestMapping("/hello2")
public String hello2(){
System.out.println("hello2");
return "hello2";
}
}
代码说明:如果执行方法后需要返回到jsp页面,方法上面就不要加@ResponseBody;
如果执行方法体返回方法的结果则需要加:@ResponseBody注解
7.启动服务器,键入 http://localhost:8080/项目名/mvc/hello
更多参考:http://www.admin10000.com/document/6436.html
标签:方法 configure base path jsp setting source 后缀 config
原文地址:http://www.cnblogs.com/chafe/p/6084876.html