标签:strong ble schema com style alt als table font
1:在我们Android开发中,常见的布局的方式有6大类
线性布局LinearLayout
相对布局RelativeLayout
表格布局TableLayout
单帧布局FrameLayout
绝对布局AbsoluteLayout
瀑布流布局 recylerview(流行的)-----请查看------->友情链接 http://blog.csdn.net/zchlww/article/details/51524951
2:使用特点
使用最多的是: 线性布局LinearLayout , 相对布局RelativeLayout, 瀑布流布局 recylerview(流行的)
须知:开发中通常是布局与布局之间是相互嵌套使用的。
3:分析布局
线性布局LinearLayout
按照垂直或者水平的顺序依次排列子元素(如果不指定,默认为水平),每一个子元素都位于前一个元素之后。这样形成单行N列,
或者单列N行的布局;如果想要N行N列,可以嵌套使用LinearLayout。 看效果:
layout/main_out.xml
<LinearLayout xmlns:android="http://schemas.android.com/apk/res/android"
    xmlns:tools="http://schemas.android.com/tools"
    android:layout_width="match_parent"
    android:layout_height="match_parent" >

    <TextView
        android:id="@+id/firstText"
        android:layout_width="wrap_content"
        android:layout_height="wrap_content"
        android:background="#FFFFFF"
        android:text="@string/first" />

    <TextView
        android:id="@+id/secondText"
        android:layout_width="wrap_content"
        android:layout_height="wrap_content"
        android:background="#FFFF00"
        android:text="@string/second" />

    <TextView
        android:id="@+id/thirdText"
        android:layout_width="wrap_content"
        android:layout_height="wrap_content"
        android:background="#FF00FF"
        android:text="@string/third" />

    <TextView
        android:id="@+id/fourthText"
        android:layout_width="wrap_content"
        android:layout_height="wrap_content"
        android:background="#00FFFF"
        android:text="@string/fourth" />

</LinearLayout>
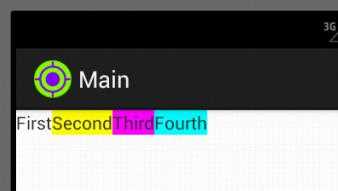
效果如下
这里没有指定任何属性默认水平排布的,显示如下,可以看到4个标签水平依次排列:

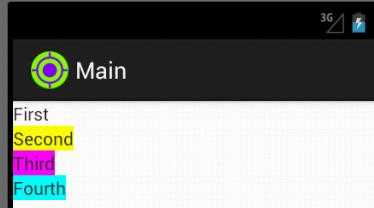
现在略微修改一下代码,在LinearLayout节点内添加属性android:orientation="vertical",显示如下:

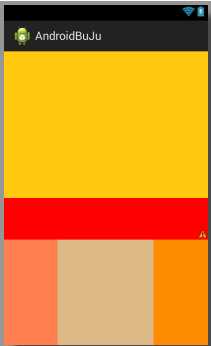
再来演示下N行N列的布局方法,使用嵌套结构,
layout/testlinear.xml 文件
<?xml version="1.0" encoding="utf-8"?>
<LinearLayout xmlns:android="http://schemas.android.com/apk/res/android"
    android:layout_width="match_parent"
    android:layout_height="match_parent"
    android:orientation="vertical" >

      <!-- 上半部分的区域的 -->
     <LinearLayout
        android:layout_weight="1"
        android:layout_width="fill_parent"
        android:layout_height="wrap_content"
        android:background="#FFC90E"
         >


      </LinearLayout>

      <!--下半部分的区域-->
     <LinearLayout
        android:layout_weight="1"
        android:layout_width="match_parent"
        android:layout_height="wrap_content"
        android:background="@color/green"
        android:orientation="vertical"
        >

                 <LinearLayout
                     android:layout_width="match_parent"
                     android:layout_height="wrap_content"
                     android:layout_weight="1"
                     android:background="@color/red"
                     android:orientation="vertical" >

                </LinearLayout>

                 <!--最下面有划分的那个线性的布局,相当于最后的那个div  -->
                 <LinearLayout
                     android:baselineAligned="false"
                      android:layout_width="match_parent"
                      android:layout_height="wrap_content"
                      android:layout_weight="2.5"
                     android:background="@color/aqua"
                     android:orientation="horizontal"
                    >

                     <!-- 这里开始的划分的了左边-->
                     <LinearLayout
                          android:layout_width="wrap_content"
                          android:layout_height="match_parent"
                           android:layout_weight="1"
                          android:background="@color/coral"
                       >


                    </LinearLayout>

                     <LinearLayout
                         android:layout_width="wrap_content"
                         android:layout_height="match_parent"
                         android:layout_weight="1.78"
                         android:background="@color/burlywood" >

                    </LinearLayout>


                     <LinearLayout
                          android:layout_width="wrap_content"
                           android:layout_weight="1"
                           android:layout_height="match_parent"
                           android:background="@color/darkorange"
                       >


                    </LinearLayout>


                </LinearLayout>


    </LinearLayout>
</LinearLayout>
效果图如下

--------------------------------------------------------------------------------------------
以上就是线性布局的特点。
标签:strong ble schema com style alt als table font
原文地址:http://www.cnblogs.com/HB135WBH/p/6091738.html