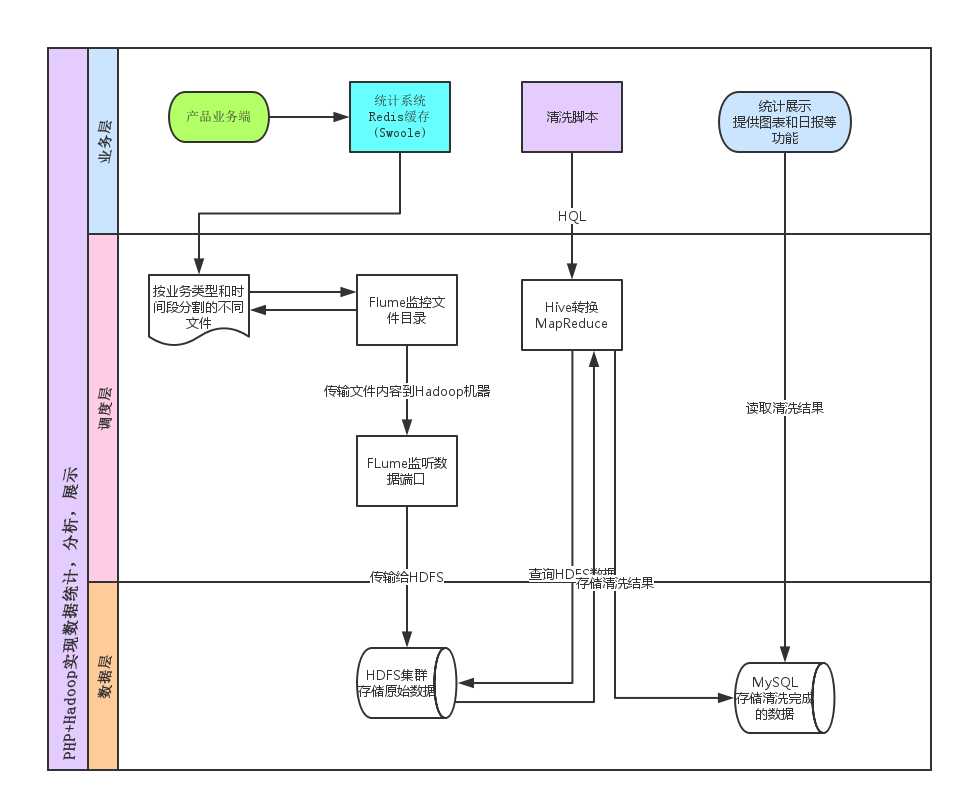
记一次完全独立完成的统计分析系统的搭建过程,主要用到了PHP+Hadoop+Hive+Thrift+Mysql实现

安装
Hadoop安装: http://www.powerxing.com/install-hadoop/
Hadoop集群配置: http://www.powerxing.com/install-hadoop-cluster/
Hive安装: https://chu888chu888.gitbooks.io/hadoopstudy/content/Content/8/chapter0807.html
安装具体教程请看上面链接,本地测试只用了单机配置,集群配置(后面的flume用到)看上面的详细链接, 因为之前没有接触过java的相关,这里说下遇到的几个问题.
- Hadoop和Hive的1.x和2.x版本要对应
- JAVA/Hadoop相关的环境变量配置,习惯了PHP的童鞋在这块可能容易忽略
- 启动Hadoop提示
Starting namenodes on [],namenodes为空,是因为没有指定ip或端口,修改hadoop/core-site.xml如下
<configuration>
<property>
<name>dfs.namenode.rpc-address</name>
<value>127.0.0.0:9001</value>
</property>
</configuration>
- 安装完成后输入
jps可以查看到NameNode,DataNode等
上报和接收
- swoole和workerman都有简单版本实现的数据监控,包括上报,接收,存储,展示, 主要使用udp上传(swoole版本已升级为tcp长连接),redis缓存,文件持久化,highcharts展示,可以作为思路参考
swoole-statistics : https://github.com/smalleyes/statistics
workerman-statistics : https://github.com/walkor/workerman-statistics - 本例使用swoole提供的接口实现UDP传输,因为上报数据是一定程度可以容错,所以选择UDP效率优先
- 接收数据临时存储在Redis中,每隔几分钟刷到文件中存储,文件名按模块和时间分割存储,字段|分割(后面与hive对应)
数据转存
创建Hive数据表
- 根据文件数据格式编写Hive数据表,
TERMINATED BY字段与前面文件字段分隔符想对应 - 对表按日期分区
PARTITIONED BY
CREATE TABLE login (
    time int comment ‘登陆时间‘,
    type string comment ‘类型,email,username,qq等‘,
    device string comment ‘登陆设备,pc,android,ios‘,
    ip string comment ‘登陆ip‘,
    uid int comment ‘用户id‘,
    is_old int comment ‘是否老用户‘
)
PARTITIONED BY (
    `date` string COMMENT ‘date‘
)
ROW FORMAT DELIMITED FIELDS TERMINATED BY ‘|‘;
- 定时(Crontab)创建hadoop分区
hive -e "use web_stat; alter table login add if not exists partition (date=‘${web_stat_day}‘)"
转存
- Flume监听文件目录,将数据传输到能访问Hdfs集群的服务器上,这里传输到了224机器的7000端口
#agent3表示代理名称 login
agent3.sources=source1
agent3.sinks=sink1
agent3.channels=channel1

#配置source1
agent3.sources.source1.type=spooldir
agent3.sources.source1.spoolDir=/data/releases/stat/Data/10001/
agent3.sources.source1.channels=channel1
agent3.sources.source1.fileHeader = false

#配置sink1
agent3.sinks.sink1.type=avro
agent3.sinks.sink1.hostname=192.168.23.224
agent3.sinks.sink1.port=7000
agent3.sinks.sink1.channel=channel1


#配置channel1
agent3.channels.channel1.type=file
agent3.channels.channel1.checkpointDir=/data/flume_data/checkpoint_login
agent3.channels.channel1.dataDirs=/data/flume_data/channelData_login
- 启动flume
# 加到supervisor守护进程
/home/flume/bin/flume-ng agent -n agent3 -c /home/flume/conf/ -f /home/flume/conf/statistics/login_flume.conf  -Dflume.root.logger=info,console
- 224机器监听7000端口,将数据写到hdfs集群
#agent1表示代理名称
agent4.sources=source1
agent4.sinks=sink1
agent4.channels=channel1


#配置source1
agent4.sources.source1.type=avro
agent4.sources.source1.bind=192.168.23.224
agent4.sources.source1.port=7000
agent4.sources.source1.channels=channel1

#配置sink1
agent4.sinks.sink1.type=hdfs
agent4.sinks.sink1.hdfs.path=hdfs://hdfs/umr-ubvzlf/uhiveubnhq5/warehouse/web_stat.db/login/date\=%Y-%m-%d
agent4.sinks.sink1.hdfs.fileType=DataStream
agent4.sinks.sink1.hdfs.filePrefix=buffer_census_
agent4.sinks.sink1.hdfs.writeFormat=TEXT
agent4.sinks.sink1.hdfs.rollInterval=30
agent4.sinks.sink1.hdfs.inUsePrefix = .
agent4.sinks.sink1.hdfs.rollSize=536870912
agent4.sinks.sink1.hdfs.useLocalTimeStamp = true
agent4.sinks.sink1.hdfs.rollCount=0
agent4.sinks.sink1.channel=channel1


#配置channel1
agent4.channels.channel1.type=file
agent4.channels.channel1.checkpointDir=/data/flume_data/login_checkpoint
agent4.channels.channel1.dataDirs=/data/flume_data/login_channelData
- 启动
# 加到supervisor守护进程
/usr/local/flume/bin/flume-ng agent -n agent4 -c /usr/local/flume/conf/ -f /usr/local/flume/conf/statistics/login_flume.conf -Dflume.root.logger=info,console
清洗数据
通过Thrift的PHP扩展包调用Hive,编写类SQL的HQL转换为MapReduce任务读取计算HDFS里的数据, 将结果存储在MySQL中php-thrift-client下载地址: https://github.com/garamon/php-thrift-hive-client
define(‘THRIFT_HIVE‘ , ROOT .‘/libs/thrift‘);
$GLOBALS[‘THRIFT_ROOT‘] = THRIFT_HIVE . ‘/lib‘;
require_once $GLOBALS[‘THRIFT_ROOT‘] . ‘/packages/hive_service/ThriftHive.php‘;
require_once $GLOBALS[‘THRIFT_ROOT‘] . ‘/transport/TSocket.php‘;
require_once $GLOBALS[‘THRIFT_ROOT‘] . ‘/protocol/TBinaryProtocol.php‘;
require_once THRIFT_HIVE . ‘/ThriftHiveClientEx.php‘;

$transport = new \TSocket(‘127.0.0.1‘, 10000);
$transport->setSendTimeout(600 * 1000);
$transport->setRecvTimeout(600 * 1000);
$this->client = new \ThriftHiveClientEx(new \TBinaryProtocol($transport));
$this->client->open();
$this->client->execute("show databases");
$result = $this->client->fetchAll();
var_dump($result);
$this->client->close();
- HQL语法说明: https://chu888chu888.gitbooks.io/hadoopstudy/content/Content/8/chapter0803.html
- 注意的是,尽量要将HQL语句能转换为MapReduce任务,不然没利用上Hadoop的大数据计算分析,就没意义
- 例如下面的逻辑,取出来在内存里分析,这样的逻辑尽量避免,因为sql在hive里执行就是普普通通的数据,没有转换为mapreduce
select * from login limit 5;
// php处理
$count = 0;
foreach ($queryResult as $row) {
  $count ++;
}
- 一次性转换为MapReduce,利用Hadoop的计算能力
select type,count(*) from login group by type; // 这样就用到了
- 建表使用了
PARTITIONED BY分区断言后,查询就可以利用分区剪枝(input pruning)的特性,但是断言字段必须离where关键字最近才能被利用上
// 如前面的login表使用到了date分区断言,这里就得把date条件放在第一位
select count(*) from login where date=‘2016-08-23‘ and is_old=1;
- Hive中不支持等值连表,如下
select * from dual a,dual b where a.key = b.key;
应写为:
select * from dual a join dual b on a.key = b.key;
- Hive中不支持insert,而且逻辑上也不允许,应为hadoop是我们用来做大数据分析,而不应该作为业务细分数据
数据报表展示
这一步就简单了,读取MySQL数据,使用highcharts等工具做各种展示,也可以用crontab定时执行php脚本发送日报,周报等等
后续更新
最近看一些资料和别人沟通发现,清洗数据这一步完全不用php,可以专注于HQL实现清洗逻辑,将结果保存在hadoop中,再用
Sqoop将hadoop数据和MySQL数据同步。即简化了流程,免去mysql手工插入,又做到了数据更实时,为二次清洗逻辑的连表HQL做了铺垫
