标签:gulp jad 管理 config 路径 version mod bpa pen
安装nodejs环境,具体内容可以百度;
新建一个文件夹:
mkdir VUE-ES6-WebPack
全局安装gulp:
npm install gulp -g
全局安装webpack:
npm install webpack -g
在VUE-ES6-WebPack目录先新建一个webpack.config.js文件,粘贴以下代码:
 1 module.exports = {
 2   // 这是一个入口文件
 3   entry: ‘./resource/js/main.js‘,
 4   // 编译后的文件路径
 5   output: {
 6     //`dist`文件夹
 7     path: ‘./resource/dist‘,
 8     // 文件 `build.js` 即 dist/build.js
 9     filename: ‘build.js‘
10   },
11   module: {
12     loaders: [
13       {
14         //处理ES6语法
15         test: /\.js$/,
16         //loader babel
17         loader: ‘babel‘,
18         exclude: /node_modules/
19       },
20       {
21        //处理.vue文件
22         test: /\.vue$/,
23         loader: ‘vue‘
24       }
25     ]
26   },
27   vue: {
28     loaders: {
29       js: ‘babel‘
30     }
31   }
32 }
再新建一个package.json文件用于管理依赖:
 1 {
 2   "name": "test",
 3   "version": "1.0.0",
 4   "description": "",
 5   "main": "main.js",
 6   "scripts": {
 7     "test": "echo \"Error: no test specified\" && exit 1"
 8   },
 9   "author": "MonkeyWang",
10   "license": "ISC",
11   "dependencies": {
12     "babel-core": "^6.1.2",
13     "babel-loader": "^6.1.0",
14     "babel-plugin-transform-runtime": "^6.1.2",
15     "babel-preset-es2015": "^6.1.2",
16     "babel-preset-stage-0": "^6.1.2",
17     "babel-runtime": "^5.8.0",
18     "css-loader": "^0.23.0",
19     "gulp": "^3.9.1",
20     "jade-loader": "^0.8.0",
21     "style-loader": "^0.13.0",
22     "stylus": "^0.54.5",
23     "stylus-loader": "^2.3.1",
24     "template-html-loader": "0.0.3",
25     "then-jade": "^2.4.3",
26     "vue": "^2.1.0",
27     "vue-hot-reload-api": "^1.2.0",
28     "vue-html-loader": "^1.2.3",
29     "vue-loader": "^7.3.0",
30     "webpack": "^1.13.3"
31   }
32 }
新建gulpfile.js:
 1 var webpackConfig = require(‘./webpack.config.js‘);
 2 var gulp = require(‘gulp‘);
 3 var webpack = require("webpack");
 4 gulp.task("webpack", function(callback) {
 5   var myConfig = Object.create(webpackConfig);
 6   webpack(myConfig, function(err, stats) {
 7       callback();
 8     });
 9 });
10 gulp.task(‘watchVue‘,function(){
11   gulp.watch([‘resource/js/**/*.vue‘,‘resource/js/**/*.js‘], [‘webpack‘]);
12 });
安装依赖:
npm install
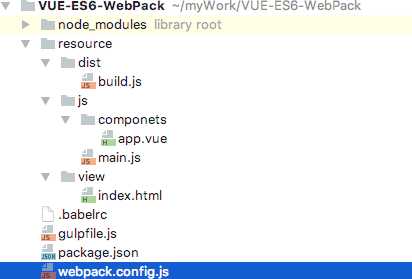
通过webpack.config.js入口配置可以知道 我们需要新建入口文件,项目目录可以参考:

新建main.js:
import是ES6的模块语法。这里为了更多的体现Vue的功能,采用了vue的单文件组件,这里定义了一个App组件:
 1 /**
 2  * Created by monkeywang.
 3  */
 4 import Vue from ‘../../node_modules/vue/dist/vue‘
 5 import App from ‘./componets/app.vue‘
 6
 7 new Vue({
 8   el: ‘#app‘,
 9   data: {
10     message: "Hello Vue"
11   },
12   components: { App }
13 });
新建app.vue组件:
 1 <template>
 2   <div class="message">{{msg}}</div>
 3 </template>
 4
 5 <script>
 6 export default {
 7   data () {
 8     return {
 9       msg: ‘Hello Monkey Wang‘
10     }
11   }
12 }
13 </script>
14
15 <style lang="stylus" rel="stylesheet/stylus">
16 .message
17   color blue
18 </style>
当然<template></template>也可以使用jade模板引擎
 1 <template>
 2 .message{{msg}}
 3 </template>
 4
 5 <script>
 6 export default {
 7   data () {
 8     return {
 9       msg: ‘Hello Monkey Wang‘
10     }
11   }
12 }
13 </script>
14
15 <style lang="stylus" rel="stylesheet/stylus">
16 .message
17   color blue
18 </style>
编译Vue:
gulp webpack
监听文件变动:
gulp watchVue
一切就绪,准备开始你的Vue.js和Es6的开发体验吧!
使用ES6+Vue+webpack+gulp构建新一代Web应用
标签:gulp jad 管理 config 路径 version mod bpa pen
原文地址:http://www.cnblogs.com/tiedaweishao/p/6094583.html