标签:ict 一键 demo final ext2 out span graph blog
前面学习了动态生成表格,不单单是要动态生成控件,也同时生成一个事件。
接下来用个小小栗子去了解这个知识点。
<LinearLayout xmlns:android="http://schemas.android.com/apk/res/android"
    xmlns:tools="http://schemas.android.com/tools"
    android:layout_width="match_parent"
    android:layout_height="match_parent"
    android:orientation="vertical" >


    <LinearLayout
        android:layout_width="match_parent"
        android:layout_height="wrap_content"
        android:orientation="vertical" >

        <LinearLayout
            android:layout_weight="1"
            android:layout_width="match_parent"
            android:layout_height="wrap_content"
            android:orientation="horizontal" >

            <TextView
                android:layout_width="wrap_content"
                android:gravity="center_vertical"
                android:layout_height="match_parent"
                android:layout_marginLeft="10dp"
                android:textSize="20sp"
                android:text="请输入行:"
                />

            <EditText
                android:id="@+id/editText1"
                android:layout_width="wrap_content"
                android:layout_height="wrap_content"
                android:ems="10"
                android:hint="请输入数字!"
                android:numeric="decimal" />

        </LinearLayout>

        <LinearLayout
            android:layout_weight="1"
            android:layout_width="match_parent"
            android:layout_height="wrap_content"
            android:orientation="horizontal" >

            <TextView
                android:layout_width="wrap_content"
                android:gravity="center_vertical"
                android:layout_height="match_parent"
                android:layout_marginLeft="10dp"
                android:textSize="20sp"
                android:text="请输入列:"
                />

            <EditText
                android:id="@+id/editText2"
                android:layout_width="wrap_content"
                android:layout_height="wrap_content"
                android:ems="10"
                android:hint="请输入数字!"
                android:numeric="decimal">

                <requestFocus />
            </EditText>

        </LinearLayout>

        <LinearLayout
            android:layout_width="match_parent"
            android:layout_height="wrap_content"
            android:orientation="horizontal"
            >

            <Button
                android:layout_width="match_parent"
                android:layout_height="wrap_content"
                android:id="@+id/button1"
                android:text="一键自动生成表格"
                />

        </LinearLayout>

    </LinearLayout>


    <TableLayout
        android:layout_width="match_parent"
        android:layout_height="match_parent"
        android:id="@+id/table1">


    </TableLayout>

</LinearLayout>
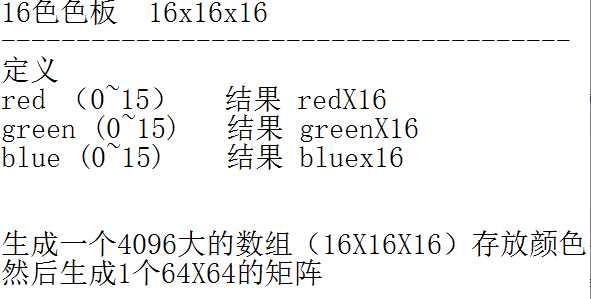
package com.example.dynamictable;

import android.app.Activity;
import android.graphics.Color;
import android.os.Bundle;
import android.util.Log;
import android.view.Gravity;
import android.view.Menu;
import android.view.MenuItem;
import android.view.View;
import android.view.View.OnClickListener;
import android.view.ViewGroup;
import android.widget.Button;
import android.widget.EditText;
import android.widget.TableLayout;
import android.widget.TableRow;
import android.widget.TextView;
import android.widget.Toast;


public class MainActivity extends Activity {
    private final int WC = ViewGroup.LayoutParams.WRAP_CONTENT;
    private final int MP = ViewGroup.LayoutParams.MATCH_PARENT;
    private EditText row;
    private EditText column;
    private Button bt1;
    private TableLayout tableLayout;

    @Override
    protected void onCreate(Bundle savedInstanceState) {
        super.onCreate(savedInstanceState);
        setContentView(R.layout.activity_main);
        //获取控件Button
        bt1=(Button) findViewById(R.id.button1);
        //获取文本输入框控件
        row=(EditText) findViewById(R.id.editText1);
        column=(EditText) findViewById(R.id.editText2);

        //给button按钮绑定单击事件
        bt1.setOnClickListener(new OnClickListener() {

            @Override
            public void onClick(View v) {
                //Color[] colorBlocks= new Color[4096];
                //int row_int=Integer.parseInt(row.getText().toString());
                //int col_int=Integer.parseInt(column.getText().toString());


                 //获取控件tableLayout
                tableLayout = (TableLayout)findViewById(R.id.table1);
                //清除表格所有行
                tableLayout.removeAllViews();
                //全部列自动填充空白处
                tableLayout.setStretchAllColumns(true);
                //生成X行,Y列的表格

                int theLength = 64;


                for(int i=0;i<theLength;i++)
                {
                    TableRow tableRow=new TableRow(MainActivity.this);
                    //生成颜色
                    for(int j=0;j<theLength;j++)
                    {
                        int result = i*theLength +(j+1)-1;//0~4095
                        int red = result / 256 ;
                        int green = (result-red*256) / 16;
                        int blue = result-red*256 - green*16;

                        //tv用于显示
                        TextView tv=new TextView(MainActivity.this);
                        //Button bt=new Button(MainActivity.this);


                        tv.setText("-");
                        tv.setBackgroundColor( Color.rgb(red*16, green*16,  blue*16) );

                        //Color.rgb(red*16-1, green*16-1,  blue*16-1)
                        //tv.setBackgroundResource(35434);
                        tableRow.addView(tv);
                    }
                    //新建的TableRow添加到TableLayout

                    tableLayout.addView(tableRow, new TableLayout.LayoutParams(MP, WC,1));
                }


            }
        });


    }

}
运行结果:
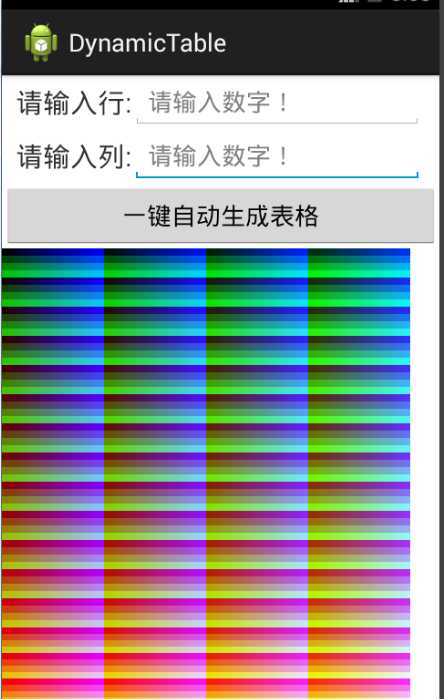
注意运行的时候会比较慢,当你一直看见那个页面不动,不要激动,请耐心等待,好事多磨。你懂的。
由于考虑到电脑的因素我们就不循环全部颜色出来,只取其中的一部分。看见上面的颜色表,只是一部分而已,
如果你想检测你的机器好不好,不妨试试255做出整个颜色表
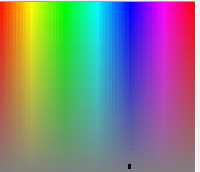
相信那会你会想崩溃,因为你的电脑或是手机都好难hold 住。
标签:ict 一键 demo final ext2 out span graph blog
原文地址:http://www.cnblogs.com/heyhhz/p/6095368.html