标签:rgs 消息 ann 添加 开发 struct 文件中 blog lis

----------------------------------------------------------------------------
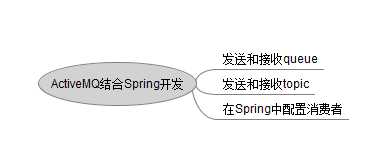
Spring结合ActiveMQ开发 : 发送和接收queue
1.首先在pom.xml文件中添加activemq的依赖包
 1      <!-- Spring对JMS的支持 -->
 2       <dependency>
 3           <groupId>org.springframework</groupId>
 4           <artifactId>spring-jms</artifactId>
 5           <version>4.0.0.RELEASE</version>
 6       </dependency>
 7       <!-- 添加ActiveMQ的pool包 -->
 8       <dependency>
 9           <groupId>org.apache.activemq</groupId>
10           <artifactId>activemq-pool</artifactId>
11           <version>5.9.0</version>
12       </dependency>
2.在Spring的配置文件applicationContext.xml中配置jmsTemplate
 1 <bean id="jmsFactory" class="org.apache.activemq.pool.PooledConnectionFactory"
 2         destroy-method="stop">
 3         <property name="connectionFactory">
 4             <bean class="org.apache.activemq.ActiveMQConnectionFactory">
 5                 <property name="brokerURL">
 6                     <value>tcp://192.168.1.81:61616</value>
 7                 </property>
 8             </bean>
 9         </property>
10         <property name="maxConnections" value="100"></property>
11     </bean>
12
13     <bean id="jmsTemplate" class="org.springframework.jms.core.JmsTemplate">
14         <property name="connectionFactory" ref="jmsFactory"></property>
15         <property name="defaultDestination" ref="destination"></property>
16         <property name="messageConverter">
17             <bean class="org.springframework.jms.support.converter.SimpleMessageConverter"/>
18         </property>
19     </bean>
20
21     <bean id="destination" class="org.apache.activemq.command.ActiveMQQueue">
22         <constructor-arg index="0" value="spring-queue"/>
23     </bean>
3.创建一个queue的消息发送者程序
 1 import javax.jms.JMSException;
 2 import javax.jms.Message;
 3 import javax.jms.Session;
 4 import javax.jms.TextMessage;
 5
 6 import org.springframework.beans.factory.annotation.Autowired;
 7 import org.springframework.context.ApplicationContext;
 8 import org.springframework.context.support.ClassPathXmlApplicationContext;
 9 import org.springframework.jms.core.JmsTemplate;
10 import org.springframework.jms.core.MessageCreator;
11 import org.springframework.stereotype.Service;
12
13 @Service
14 public class SpringQueueSender {
15     @Autowired
16     private JmsTemplate jt = null;
17
18     public static void main(String[] args) {
19         ApplicationContext ctx = new ClassPathXmlApplicationContext("applicationContext.xml");
20         SpringQueueSender sqs = (SpringQueueSender)ctx.getBean("springQueueSender");
21         sqs.jt.send(new MessageCreator(){
22             public Message createMessage(Session s) throws JMSException {
23                 TextMessage msg = s.createTextMessage("Spring send msg ----> Hello activeMQ");
24                 return msg;
25             }
26         });
27     }
28 }
4.创建一个queue的消息接收者程序
 1 import org.springframework.beans.factory.annotation.Autowired;
 2 import org.springframework.context.ApplicationContext;
 3 import org.springframework.context.support.ClassPathXmlApplicationContext;
 4 import org.springframework.jms.core.JmsTemplate;
 5 import org.springframework.stereotype.Service;
 6
 7 @Service
 8 public class SpringQueueReceiver {
 9     @Autowired
10     private JmsTemplate jt = null;
11
12     public static void main(String[] args) {
13         ApplicationContext ctx = new ClassPathXmlApplicationContext("applicationContext.xml");
14         SpringQueueReceiver sqr = (SpringQueueReceiver)ctx.getBean("springQueueReceiver");
15         String msg = (String)sqr.jt.receiveAndConvert();
16         System.out.println("receive msg = " + msg);
17     }
18 }
运行结果:

Spring结合ActiveMQ开发 : 发送和接收topic
1.在Spring的配置文件applicationContext.xml中配置topic
 1 <bean id="jmsFactory" class="org.apache.activemq.pool.PooledConnectionFactory"
 2         destroy-method="stop">
 3         <property name="connectionFactory">
 4             <bean class="org.apache.activemq.ActiveMQConnectionFactory">
 5                 <property name="brokerURL">
 6                     <value>tcp://120.76.123.81:61616</value>
 7                 </property>
 8             </bean>
 9         </property>
10         <property name="maxConnections" value="100"></property>
11     </bean>
12
13     <bean id="jmsTemplate" class="org.springframework.jms.core.JmsTemplate">
14         <property name="connectionFactory" ref="jmsFactory"></property>
15         <property name="defaultDestination" ref="destinationTopic"></property>
16         <property name="messageConverter">
17             <bean class="org.springframework.jms.support.converter.SimpleMessageConverter"/>
18         </property>
19     </bean>
20
21     <bean id="destinationTopic" class="org.apache.activemq.command.ActiveMQTopic">
22         <constructor-arg index="0" value="spring-topic"/>
23     </bean>
topic消息发送者和接收者 程序和上面一样。
Spring结合ActiveMQ开发 : 在Spring中配置消费者
Spring的applicationContext.xml配置
 1     <bean id="jmsFactory" class="org.apache.activemq.pool.PooledConnectionFactory"
 2         destroy-method="stop">
 3         <property name="connectionFactory">
 4             <bean class="org.apache.activemq.ActiveMQConnectionFactory">
 5                 <property name="brokerURL">
 6                     <value>tcp://192.168.1.81:61616</value>
 7                 </property>
 8             </bean>
 9         </property>
10         <property name="maxConnections" value="100"></property>
11     </bean>
12
13     <bean id="jmsTemplate" class="org.springframework.jms.core.JmsTemplate">
14         <property name="connectionFactory" ref="jmsFactory"></property>
15         <property name="defaultDestination" ref="destination"></property>
16         <property name="messageConverter">
17             <bean class="org.springframework.jms.support.converter.SimpleMessageConverter"/>
18         </property>
19     </bean>
20
21     <bean id="destination" class="org.apache.activemq.command.ActiveMQQueue">
22         <constructor-arg index="0" value="spring-queue"/>
23     </bean>
24
25     <bean id="jmsContainer" class="org.springframework.jms.listener.DefaultMessageListenerContainer">
26         <property name="connectionFactory" ref="jmsFactory"/>
27         <property name="destination" ref="destination"/>
28         <property name="messageListener" ref="messageListener"/>
29     </bean>
30
31     <bean id="messageListener" class="com.test.spring.MyMessageListener">
32     </bean>
消费发送者程序
 1 import javax.jms.JMSException;
 2 import javax.jms.Message;
 3 import javax.jms.Session;
 4 import javax.jms.TextMessage;
 5
 6 import org.springframework.beans.factory.annotation.Autowired;
 7 import org.springframework.context.ApplicationContext;
 8 import org.springframework.context.support.ClassPathXmlApplicationContext;
 9 import org.springframework.jms.core.JmsTemplate;
10 import org.springframework.jms.core.MessageCreator;
11 import org.springframework.stereotype.Service;
12
13 @Service
14 public class SpringQueueSender {
15     @Autowired
16     private JmsTemplate jt = null;
17
18     public static void main(String[] args) {
19         ApplicationContext ctx = new ClassPathXmlApplicationContext("applicationContext.xml");
20         SpringQueueSender sqs = (SpringQueueSender)ctx.getBean("springQueueSender");
21         sqs.jt.send(new MessageCreator(){
22             public Message createMessage(Session s) throws JMSException {
23                 TextMessage msg = s.createTextMessage("在Spring中配置消息接收者 ----> Hello activeMQ");
24                 return msg;
25             }
26         });
27     }
28 }
消息接受者程序
 1 import javax.jms.Message;
 2 import javax.jms.MessageListener;
 3 import javax.jms.TextMessage;
 4
 5 public class MyMessageListener implements MessageListener{
 6
 7     public void onMessage(Message msg) {
 8         TextMessage txtMsg = (TextMessage)msg;
 9         try{
10             System.out.println("reveive txt msg = " + txtMsg);
11         }catch(Exception e){
12             e.printStackTrace();
13         }
14     }
15 }
标签:rgs 消息 ann 添加 开发 struct 文件中 blog lis
原文地址:http://www.cnblogs.com/xinhuaxuan/p/6111604.html