标签:基础知识 成就 源码 demo 变量 图片 .com 方法 abs
下面我来一步步说明我做的一些小的项目:
制作一个轮播图,制作方法我前面写了一篇博客,传送门-->http://www.cnblogs.com/yewenxiang/p/6100206.html
需要的JQ知识点:
然后需要点JS的基础知识,如变量 if语句 等,然后就可以去做一个简单的轮播图了。
做一个小图变大图效果
 1 <!DOCTYPE html>
 2 <html lang="en">
 3 <head>
 4     <meta charset="UTF-8">
 5     <title>Document</title>
 6 </head>
 7 <script src="jq.js"></script>
 8 <style>
 9     .box img{
10         float: left;
11         width: 300px;
12     }
13     .bigImg{
14         position: absolute;
15         display: none;
16     }
17 </style>
18 <body>
19     <div class="box">
20         <img src="img/1.jpg" alt="">
21         <img src="img/2.jpg" alt="">
22         <img src="img/3.jpg" alt="">
23         <img src="img/4.jpg" alt="">
24     </div>
25     <img src="" alt="" class="bigImg">
26     <script>
27         $(".box img").mousemove(function(event){
28             var x = event.pageX + 15+"px";
29             var y = event.pageY + 15+"px";
30             console.log(x,y)
31             var add=$(this).attr("src");
32             $(".bigImg").attr("src",add).stop().fadeIn().css({"left":x,"top":y});
33         })
34         $(".box img").mouseout(function(){
35             $(".bigImg").stop().fadeOut();
36         })
37     </script>
38 </body>
39 </html>
这里面包含新的事件方法 event.pageX和event.pageY. 需要理解$(this)指的是当前点击的元素对象.上面代码中指的是当前点击的$(".box img")元素
添加删除操作
 1 <!DOCTYPE html>
 2 <html lang="en">
 3 <head>
 4     <meta charset="UTF-8">
 5     <title>Document</title>
 6 </head>
 7 <script src="jq.js"></script>
 8 <body>
 9     <input type="text">
10     <input type="button" value="添加">
11     <ul>
12         <li>第1个<button class="btn">删除</button></li>
13         <li>第2个<button class="btn">删除</button></li>
14         <li>第3个<button class="btn">删除</button></li>
15     </ul>
16     <script>
17         $("[type=‘button‘]").click(function(){
18             var val=$("[type=‘text‘]").val();
19             var content="<li>"+val+"<button class=‘btn‘>删除</button>"+"</li>";
20             $("ul").append(content);
21             $(".btn").click(function(){
22             $(this).parent().remove();
23             })
24         })
25         $(".btn").click(function(){
26             $(this).parent().remove();
27         })
28     </script>
29 </body>
30 </html>

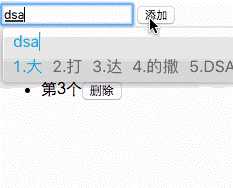
需要去学习-获取HTML元素.text() .html() .val() 添加元素.append() .prepend() .after() .before() 删除元素 .remove() .empty()。做完这个小demo后对这些属性有了较深的认识。
滚动事件,点击中间按钮页面向下滑动一定距离,显示出回到顶部按钮,点击回到顶部的一个功能
  1 <!DOCTYPE html>
  2 <html lang="en">
  3 <head>
  4     <meta charset="UTF-8">
  5     <title>Document</title>
  6     <script src="jq.js"></script>
  7     <style>
  8         img{
  9             width: 100%;
 10             display: block;
 11         }
 12         body{
 13             padding: 0;
 14             margin: 0;
 15         }
 16         ul{
 17             list-style: none;
 18             position: fixed;
 19             left: 0;
 20             top: 50%;
 21             transform: translate(0,-50%);
 22         }
 23         ul li{
 24             width: 10px;
 25             height: 10px;
 26             border-radius: 50%;
 27             background-color: white;
 28             margin-top: 10px;
 29             cursor: pointer;
 30         }
 31         .active{
 32             background-color: red;
 33         }
 34         .top{
 35             width: 25px;
 36             height: 125px;
 37             background-color: #008090;
 38             position: fixed;
 39             right: 40px;
 40             bottom: 20px;
 41             font-size: 24px;
 42             color: white;
 43             padding-left: 20px;
 44             padding-right: 20px;
 45             border-radius: 10px;
 46             cursor: pointer;
 47             display: none;
 48         }
 49         .top p{
 50             margin: 0;
 51             position: relative;
 52             top: 50%;
 53             transform: translate(0,-50%);
 54         }
 55     </style>
 56     <script>
 57         $(document).ready(function(){
 58             $("ul li").click(function(){
 59                 var    num=$(this).index();
 60                 var height = $("img").css("height");
 61                 var heightInt=parseInt(height);
 62                 var px=num*heightInt;
 63                 $("body").stop().animate({"scrollTop":px},200);
 64                 $(this).addClass("active").siblings().removeClass("active");
 65             })
 66         })
 67         $(document).ready(function(){
 68             $(".top").click(function(){
 69             $("body").scrollTop(0);
 70         })
 71         })
 72         var timer=null;
 73         $(document).scroll(function(){
 74             var px=$(document).scrollTop();
 75             var height = $("img").css("height");
 76             var heightInt=parseInt(height);
 77             var    index=px/heightInt;
 78             var num=Math.round(index);
 79             console.log(num);
 80             if(px>400){
 81                 $(".top").css("display","block");
 82             }else{
 83                 $(".top").css("display","none");
 84             }
 85             if(num==0||num==1||num==2||num==3||num==4){
 86                 if(timer){
 87                     clearTimeout(timer);
 88                     timer=null;
 89                 }
 90                 timer=setTimeout(function(){$("ul li").eq(num).addClass("active").siblings().removeClass("active");
 91             },200)
 92             }
 93         })
 94     </script>
 95 </head>
 96 <body>
 97     <img src="img/1.jpg" alt="">
 98     <img src="img/2.jpg" alt="">
 99     <img src="img/3.jpg" alt="">
100     <img src="img/4.jpg" alt="">
101     <img src="img/5.jpg" alt="">
102     <ul>
103         <li class="active"></li>
104         <li></li>
105         <li></li>
106         <li></li>
107         <li></li>
108     </ul>
109     <div class="top"><p>回到顶部</p></div>
110 </body>
111 </html>
需要知道几个事件scroll scrollTop(),注意这里的事件对象为document或者window,开始我写的body没有效果。
没有啥demo 哈哈就是学习了 JQuery隐藏显示 淡入淡出 滑动 动画 停止动画 把上面的方法自己随便练练
 1 <!DOCTYPE html>
 2 <html lang="en">
 3 <head>
 4     <meta charset="UTF-8">
 5     <title>Document</title>
 6 </head>
 7 <script src="http://libs.baidu.com/jquery/1.10.2/jquery.min.js"></script>
 8 <style>
 9     .box{
10         width: 500px;
11         height: 500px;
12         background-color: #00635a;
13     }
14 </style>
15 <body>
16     <input type="button" id="hide" value="hide">
17     <input type="button" id="show" value="show">
18     <input type="button" id="toggle" value="toggle">
19     <input type="button" id="fadeIn" value="fadeIn">
20     <input type="button" id="fadeOut" value="fadeOut">
21     <input type="button" id="fadeToggle" value="fadeToggle">
22     <input type="button" id="fadeTo" value="fadeTo">
23     <input type="button" id="slideDown" value="slideDown">
24     <input type="button" id="slideUp" value="slideUp">
25     <input type="button" id="slideToggle" value="slideToggle">
26     <div class="box"></div>
27     <script>
28         $("#hide").click(function(){
29             $(".box").hide();
30         })
31         $("#show").click(function(){
32             $(".box").show();
33         })
34         $("#toggle").click(function(){
35             $(".box").toggle();
36         })
37         $("#fadeIn").click(function(){
38             $(".box").fadeIn();
39         })
40         $("#fadeOut").click(function(){
41             $(".box").fadeOut();
42         })
43         $("#fadeToggle").click(function(){
44             $(".box").fadeToggle();
45         })
46         $("#fadeTo").click(function(){
47             $(".box").fadeTo("slow",0.5);
48         })
49         $("#slideDown").click(function(){
50             $(".box").slideDown();
51         })
52         $("#slideUp").click(function(){
53             $(".box").slideUp();
54         })
55         $("#slideToggle").click(function(){
56             $(".box").slideToggle();
57         })
58     </script>
59 </body>
60 </html>
 1 <!DOCTYPE html>
 2 <html lang="en">
 3 <head>
 4     <meta charset="UTF-8">
 5     <title>Document</title>
 6 </head>
 7 <style>
 8     .box{
 9         margin: 0 auto;
10         position: relative;
11         width: 500px;
12         overflow: hidden;
13         height: 200px;
14     }
15     .box img{
16         position: absolute;
17         width: 300px;
18     }
19     .box img:nth-child(1){
20         left: 0;
21     }
22     .box img:nth-child(2){
23         left: 100px;
24     }
25     .box img:nth-child(3){
26         left: 200px;
27     }
28     .box img:nth-child(4){
29         left: 300px;
30     }
31     .box img:nth-child(5){
32         left: 400px;
33     }
34 </style>
35 <script src="jq.js"></script>
36 <body>
37     <div class="box">
38         <img src="img/1.jpg" alt="">
39         <img src="img/2.jpg" alt="">
40         <img src="img/3.jpg" alt="">
41         <img src="img/4.jpg" alt="">
42         <img src="img/5.jpg" alt="">
43     </div>
44     <script>
45         $(".box img").mouseover(function(){
46             var index=$(this).index();
47             var px=200/4;
48             for(var i=0;i<=4;i++){
49                 if(i<=index){
50                     $("img").eq(i).stop().animate({"left":px*i},500);
51                 }else if(i>index){
52                     $("img").eq(i).stop().animate({"left":px*(i-1)+300},500);
53                 }
54             }
55         })
56         $(".box img").mouseout(function(){
57             for(var i=0;i<=4;i++){
58                 $("img").eq(i).stop().animate({"left":100*i},500);
59             }
60         })
61     </script>
62 </body>
63 </html>

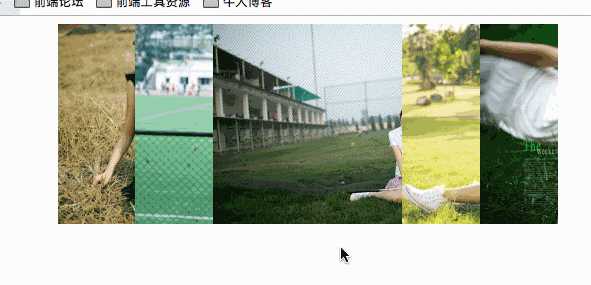
这个需要用到JS的for循环,可以先不用循环写出一张悬浮时的效果,会发现一个规律,这张图片之前的图片移动有一个规律,之后又是一个规律,这就可以用for循环来解决了
<!DOCTYPE html>
<html lang="en">
<head>
    <meta charset="UTF-8">
    <title>Document</title>
    <script src="jq.js"></script>
    <style>
        input{
            width: 150px;
            height: 24px;
            line-height: 24px;
            margin-left: 20px;
        }
        .password2{
            margin-top: 10px;
        }
        label{
            display: inline-block;
            width: 120px;
            line-height: 24px;
            text-align: right;
        }
        .erro{
            background-color:#590b05;
            color: #f66156;
            width: 150px;
        }
        .true{
            background-color:#2b3e14;
            color: #9bcb64;
            width: 100px;
        }
        .info{
            display: inline-block;
            height: 24px;
            margin-left: 20px;
            line-height: 24px;
            border-radius: 5px;
            text-align: center;
        }
    </style>
</head>
<body>
    <label>密码:</label><input type="password" placeholder="请输入密码" class="password1"><br>
    <label>再次输入密码:</label><input type="password" placeholder="请再次输入密码" class="password2"><span class="info"></span><br>
    <script>
        $(".password2").blur(function(){
            var val1 = $(".password1").val();
            var val2 = $(".password2").val();
            if(val1==val2){
                $(".info").text("输入正确").addClass("true").removeClass("erro");
            }else{
                $(".info").text("两次密码输入不同").addClass("erro").removeClass("true");
            }
        })
    </script>
</body>
</html>

需要去知道焦点事件 .blur() ,获取Input输入的值做一个if判断。
通过这些个小的demo去学习JQ会发现学习的过程非常有趣,做出来一个demo都有种成就感,对这些demo中涉及的知识也加深了理解。这是我这几天学习JQ的一些总结。
上面的代码中用到的图片我是从慕课网上下载,自从用了这5张图片,腰不疼了,腿不酸了,写代码呗有劲。
附上下载地址:http://www.imooc.com/learn/18
右侧源码下载,img文件夹。
标签:基础知识 成就 源码 demo 变量 图片 .com 方法 abs
原文地址:http://www.cnblogs.com/yewenxiang/p/6120366.html