标签:des android style blog http color java 使用
章节:自动化基础篇——MonkeyRunner原理初步
网易云课堂:
http://study.163.com/course/courseLearn.htm?courseId=712011#/learn/video?lessonId=877115&courseId=712011
主要讲解内容及笔记:
一、理论知识和脚本演示
最佳方式是上官网文档去查看monkeyrunner的介绍,官网上不去,就找了一个本地的android 4.2 的查看,基本内容没啥变化
First,什么是MonkeyRunner?
英文文档如下:
The monkeyrunner tool provides an API for writing programs that control an Android device or emulator from outside of Android code. With monkeyrunner, you can write a Python program that installs an Android application or test package, runs it, sends keystrokes to it, takes screenshots of its user interface, and stores screenshots on the workstation. The monkeyrunner tool is primarily designed to test applications and devices at the functional/framework level and for running unit test suites, but you are free to use it for other purposes.
翻译过来就是:
这个monkeyrunner的工具,提供了一个API来供大家编程啦,用以控制一个android设备或者模拟器,而不用了解这个android的源码。有了这个monkeyrunner,我们可以写一个Python的程序来安装android程序或者测试包,运行它,给它发送一些键盘控制事件,进行用户界面的截图,并将截图存储在工作站。monkeyrunner的工具的作用是在功能/框架层上测试应用和设备,跑单元测试用例,当然你也可以用它做其他的,我们就管不着了。
并且monkeyrunner与monkey不同哦,monkey是用adb shell的这个命令行,发送一堆来自用户或者系统的随机模拟事件,主要是用来做压力测试的。
Second,MonkeyRunner能做什么?
英文文档如下:
The monkeyrunner tool provides these unique features for Android testing:
os and subprocess modules to call Android tools such as Android Debug Bridge.
You can also add your own classes to the monkeyrunner API. This is described in more detail in the section Extending monkeyrunner with plugins.
翻译过来就是:
monkeyrunner提供了如下一些android测试的独特功能:
1、多设备控制:那就是说可以跨设备。
2、功能测试:可在一个android的应用上自动跑一次从头到尾的测试,需要提供键盘或者touch 事件的值,通过截屏方式查看结果。
3、回归测试:monkeyrunner可通过跑一个应用程序,并将它的输出与标准的正确输出集合相对比来测试应用程序的稳定性。一般在功能比较稳定的时候,下次回归的时候,做一个基本的功能回归是必须的,并且通过自动化会很节省资源。
4、可扩展的自动化测试:monkeyruner本身就是一个API的小工具,我们当然可以开发一个基于python的模块或者程序来控制android设备。当然也可以利用标准Python的os或者subprocess模块来调用android工具,如adb。
Third,MonkeyRunner怎么用?
官网提供的具体代码示例如下:
 1 # Imports the monkeyrunner modules used by this program
 2 from com.android.monkeyrunner import MonkeyRunner, MonkeyDevice
 3
 4 # Connects to the current device, returning a MonkeyDevice object
 5 device = MonkeyRunner.waitForConnection()
 6
 7 # Installs the Android package. Notice that this method returns a boolean, so you can test
 8 # to see if the installation worked.
 9 device.installPackage(‘myproject/bin/MyApplication.apk‘)
10
11 # sets a variable with the package‘s internal name
12 package = ‘com.example.android.myapplication‘
13
14 # sets a variable with the name of an Activity in the package
15 activity = ‘com.example.android.myapplication.MainActivity‘
16
17 # sets the name of the component to start
18 runComponent = package + ‘/‘ + activity
19
20 # Runs the component
21 device.startActivity(component=runComponent)
22
23 # Presses the Menu button
24 device.press(‘KEYCODE_MENU‘, MonkeyDevice.DOWN_AND_UP)
25
26 # Takes a screenshot
27 result = device.takeSnapshot()
28
29 # Writes the screenshot to a file
30 result.writeToFile(‘myproject/shot1.png‘,‘png‘)
OK,具体步骤如下:
(1)先去import一下MonkeyRuner和MonkeyDevice类
(2)连接设备,device = MonkeyRunner.waitForConnection(),等待设备连接,并返回一个device的实例
(3)安装一下安装包(写上绝对路径就好啦),这里会返回布尔型变量,可通过这个值,写一个if语句,判断是否安装成功
(4)搞到安装后的包名(在manifest.xml中配置的),搞到包内的Activity的名字,这个是如何获取的?
这里插进来一段话,用Python获取包名和主Activity的名字:
http://blog.csdn.net/pugongying1988/article/details/7349068
这里讲解了如何获取,但是需要在手机或者模拟器上配置android环境;这里用到了python for android的内容,能够通过一些线程的api接口获取到;当然也可以用java程序来编写获取
(5)使用包名加Activity的名字运行,通过startActivity跑起来
(6)开始按键啦,或者touch事件啦
(7)将(6)中的结果截个图
(8)写到一个目录下,保存起来,之后就可以与正确的结果做对比了。但是结果如何对比目前还不知道。?????
自己搞一个apk程序,用python写一段测试代码,跑一下自动化:
1 # coding=utf-8
2
3 from com.android.monkeyrunner import MonkeyRunner, MonkeyDevice
4 device = MonkeyRunner.waitForConnection()
5 device.shell("monkey -p com.qihoo.linker -v 1000")
比如像上面这样的,但是
(1)目前有一个问题就是页面很多的话,各个界面之间会有跳转,这种情况如何做monkey的压力测试呢?
因为我在测试的过程中,随机生成的一些事件是应该可以点击home键或者是返回键的,这样可能导致应用退出,如何处理?
(2)针对单个页面,可以通过坐标点方式对其进行DOWN_AND_UP,或者是其他一些操作。
二、封装MonkeyRunner录制
开始实例代码:
java调用android自动化的monkeyrunner,具体程序结构为:
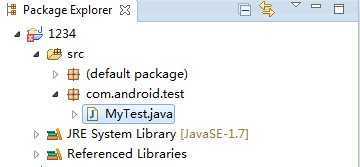

首先,因为我的是高版本的jar包,因此需要首先从sdk/tools/lib下导入chimpchat.jar包(用来定义AdbBackend实例和AdbChimpDevice实例,建立adb桥接和生成设备实例),另外需要导入monkeyrunner.jar(用来定义MonkeyRecorederFrame实例,这个是用来录制的),之后在下面直接输入你需要定义的对象,就能够import上对应的class类
源码MyTest.java如下,测试过程如下:
 1 package com.android.test;
 2
 3 import com.android.chimpchat.adb.AdbBackend;
 4 import com.android.chimpchat.adb.AdbChimpDevice;
 5 import com.android.monkeyrunner.recorder.MonkeyRecorderFrame;
 6
 7
 8 public class MyTest {
 9
10     /**
11      * @param args
12      */
13
14     private static AdbChimpDevice device;
15     private static AdbBackend adb;
16
17     public static void main(String[] args) {
18         // TODO Auto-generated method stub
19
20         if (adb==null){
21             adb = new AdbBackend();
22             // 参数分别为自己定义的等待连接时间和设备id;当然也可为空
23             // 这里需要注意一下adb的类型
24             device = (AdbChimpDevice) adb.waitForConnection();
25
26             if (device != null)
27             {
28                 MonkeyRecorderFrame frame = new MonkeyRecorderFrame(device);
29                 frame.setVisible(true);
30             }
31         }
32
33     }
34
35 }
接下来是测试过程,右键MyTest.java,Run as->Java Application即可,可能启动起来会比较慢(需要连接上自己的手机,可使用cmd命令下adb devices查看是否连接成功了,如果出现unauthorized问题,可以找到开发者选项,选择“撤回USB除错授权”即可,本人所有手机为三星Galaxy S3,其他手机也类似;之后重新插拔手机,连接后就会出现是否授权提示,点击确定即可)
然后程序运行起来就是这个效果图:
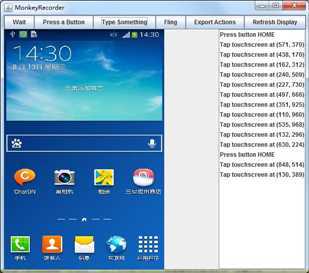
点击屏幕或者是选择Press a Button之后都会有响应,能够在右边看到点击了哪些位置
之后点击上面的Export Actions,输入文件名如a,不用要后缀名,保存在自己可以记得目录下即可,之后用notepad++打开,如下:
PRESS|{‘name‘:‘HOME‘,‘type‘:‘downAndUp‘,}
TOUCH|{‘x‘:571,‘y‘:370,‘type‘:‘downAndUp‘,}
TOUCH|{‘x‘:438,‘y‘:170,‘type‘:‘downAndUp‘,}
TOUCH|{‘x‘:162,‘y‘:312,‘type‘:‘downAndUp‘,}
TOUCH|{‘x‘:240,‘y‘:509,‘type‘:‘downAndUp‘,}
TOUCH|{‘x‘:227,‘y‘:730,‘type‘:‘downAndUp‘,}
TOUCH|{‘x‘:497,‘y‘:666,‘type‘:‘downAndUp‘,}
TOUCH|{‘x‘:351,‘y‘:925,‘type‘:‘downAndUp‘,}
TOUCH|{‘x‘:110,‘y‘:960,‘type‘:‘downAndUp‘,}
TOUCH|{‘x‘:535,‘y‘:968,‘type‘:‘downAndUp‘,}
TOUCH|{‘x‘:132,‘y‘:296,‘type‘:‘downAndUp‘,}
TOUCH|{‘x‘:630,‘y‘:224,‘type‘:‘downAndUp‘,}
PRESS|{‘name‘:‘HOME‘,‘type‘:‘downAndUp‘,}
TOUCH|{‘x‘:848,‘y‘:514,‘type‘:‘downAndUp‘,}
TOUCH|{‘x‘:130,‘y‘:389,‘type‘:‘downAndUp‘,}
三、A模式(坐标点)的特点<注:还有基于控件的B模式>
下面讲解一下针对不同的分辨率怎么做处理:
如320*480的,怎么移植到480*600的上面?
device.touch(340,580,‘DOWN_AND_UP‘)
320/x = 480/newx, x = 340
480/y = 600/newy, y = 580
这样就能求得一个比例关系了,用这个比例关系做一个类似宏替换就行,代码基本不用动;甚至可以写一个方法,获取到像素后,与基础的计算后,直接替换即可。
除以上方式,还可以运用hierarchyviewer获取控件,通过控件找到坐标。缺点:要开root,4.1.2以下要开root。所以俺的手机显示不了了!之后用UIAutomator就可以了,不用开root也可以。
四、后续持续集成
这里讲了一个Robotium的Recorder工具,是用来进行脚本录制的,只有30天试用期。
1、官网: www.goldensunshine.cc
2、百度搜:金阳光测试,找到金阳光学习资料和官网、视频。
3、官方新浪微博:金阳光woody
4、官方qq:212260449
6、官方YY教育频道:74894998
7、官方CSDN技术资料:http://blog.csdn.net/haorenmin2008
【金阳光测试】Android自动化 -- 学习历程:MonkeyRunner原理初步,布布扣,bubuko.com
【金阳光测试】Android自动化 -- 学习历程:MonkeyRunner原理初步
标签:des android style blog http color java 使用
原文地址:http://www.cnblogs.com/keke-xiaoxiami/p/3904307.html