标签:总结 有用 添加 line 通过 draw horizon 使用 ges
引言
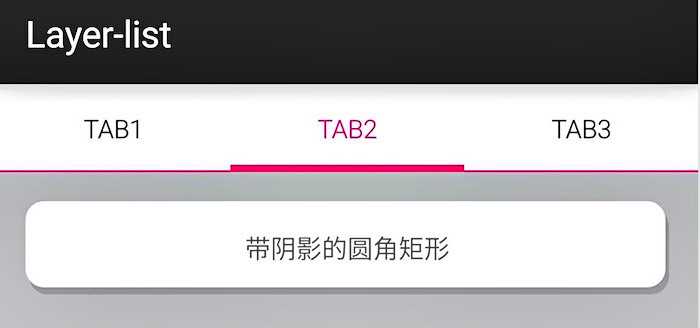
在开发某些有层叠效果App时,我们第一个想到的就是让UI进行切图。下面我们来这样的一个例子。如图所示:

上图Tab的背景效果,和带阴影的圆角矩形,是怎么实现的呢?大部分的人会让美工切图,用点九图做背景。但是,如果只提供一张图,会怎么样呢?比如,中间的Tab背景红色底线的像素高度为4px,那么,在mdpi设备上显示会符合预期,在hdpi设备上显示时会细了一点点,在xhdpi设备上显示时会再细一点,在xxhdpi上显示时又细了,在xxxhdpi上显示时则更细了。因为在xxxhdpi上,1dp=4px,所以,4px的图,在xxxhdpi设备上显示时,就只剩下1dp了。所以,为了适配好各种分辨率,必须提供相应的多套图片。如果去查看android的res源码资源,也会发现,像这种Tab的背景点九图,也根据不同分辨率尺寸提供了不同尺寸的点九图片。
但是,在这个demo里,都没有用到任何实际的图片资源,都是用shape、selector,以及本篇要讲解的layer-list完成的。
layer-list叠加效果
使用layer-list可以将多个drawable按照顺序层叠在一起显示,像上图中的Tab,是由一个红色的层加一个白色的层叠在一起显示的结果,阴影的圆角矩形则是由一个灰色的圆角矩形叠加上一个白色的圆角矩形。
下面我们先来看一下Tab背景的代码:
 1 <?xml version="1.0" encoding="utf-8"?>
 2 <selector xmlns:android="http://schemas.android.com/apk/res/android">
 3
 4     <!-- 选中时候的样式 -->
 5     <item android:state_checked="true">
 6         <layer-list>
 7             <!-- 红色背景 -->
 8             <item>
 9                 <color android:color="#E4007F" />
10             </item>
11             <!-- 白色背景 -->
12             <item android:bottom="4dp" android:drawable="@android:color/white" />
13         </layer-list>
14     </item>
15
16     <!--未选中时候的样式-->
17     <item>
18         <layer-list>
19             <!-- 红色背景 -->
20             <item>
21                 <color android:color="#E4007F" />
22             </item>
23             <!-- 白色背景 -->
24             <item android:bottom="1dp" android:drawable="@android:color/white" />
25         </layer-list>
26     </item>
27
28 </selector>
我们看到我们在样式文件定义了两个item,第一个是选中时item就是bottom向上4dp。第二个item就是正常情况下的样式。
下面我们再来看一下圆角带阴影的按钮样式
 1 <?xml version="1.0" encoding="utf-8"?>
 2 <layer-list  xmlns:android="http://schemas.android.com/apk/res/android">
 3
 4     <!--绘制矩形的灰色阴影-->
 5     <item
 6         android:left="2dp"
 7         android:top="4dp">
 8         <shape>
 9             <solid android:color="#929397"/>
10             <corners android:radius="10dp"/>
11         </shape>
12     </item>
13
14     <!--绘制矩形的白色主体-->
15     <item
16         android:right="2dp"
17         android:bottom="4dp">
18         <shape>
19             <solid android:color="#ffffff"/>
20             <corners android:radius="10dp" />
21         </shape>
22     </item>
23
24 </layer-list >
从上面的示例代码可以看到,layer-list可以作为根节点,也可以作为selector中item的子节点。layer-list可以添加多个item子节点,每个item子节点对应一个drawable资源,按照item从上到下的顺序叠加在一起,再通过设置每个item的偏移量就可以看到阴影等效果了。layer-list的item可以通过下面四个属性设置偏移量:
这四个偏移量和控件的margin设置差不多,都是外间距的效果。如何不设置偏移量,前面的图层就完全挡住了后面的图层,从而也看不到后面的图层效果了。比如上面的例子,Tab背景中的白色背景设置了android:bottom之后才能看到一点红色背景。
总结
完整样例
下面我给出以上效果完整的XML代码,Tab页使用的是RadioButton。完整布局如下:
 1 <?xml version="1.0" encoding="utf-8"?>
 2 <RelativeLayout
 3     xmlns:android="http://schemas.android.com/apk/res/android"
 4     android:layout_width="match_parent"
 5     android:layout_height="match_parent"
 6     android:background="#bababc">
 7
 8     <RadioGroup
 9         android:layout_width="match_parent"
10         android:layout_height="wrap_content"
11         android:orientation="horizontal"
12         android:id="@+id/line1">
13
14         <RadioButton
15             android:layout_width="0dp"
16             android:layout_height="60dp"
17             android:layout_weight="1"
18             android:button="@null"
19             android:text="Tab1"
20             android:textColor="@drawable/text_style"
21             android:textSize="18dp"
22             android:gravity="center"
23             android:paddingTop="12dp"
24             android:paddingBottom="12dp"
25             android:background="@drawable/layer_list_sample_style"/>
26
27         <RadioButton
28             android:layout_width="0dp"
29             android:layout_height="60dp"
30             android:layout_weight="1"
31             android:button="@null"
32             android:text="Tab2"
33             android:textColor="@drawable/text_style"
34             android:textSize="18dp"
35             android:gravity="center"
36             android:paddingTop="12dp"
37             android:paddingBottom="12dp"
38             android:background="@drawable/layer_list_sample_style"/>
39
40         <RadioButton
41             android:layout_width="0dp"
42             android:layout_height="60dp"
43             android:layout_weight="1"
44             android:button="@null"
45             android:text="Tab3"
46             android:textColor="@drawable/text_style"
47             android:textSize="18dp"
48             android:gravity="center"
49             android:paddingTop="12dp"
50             android:paddingBottom="12dp"
51             android:background="@drawable/layer_list_sample_style"/>
52
53     </RadioGroup>
54
55
56     <TextView
57         android:layout_width="match_parent"
58         android:layout_height="wrap_content"
59         android:layout_below="@+id/line1"
60         android:text="带阴影的圆角矩形"
61         android:textColor="#333333"
62         android:textSize="18dp"
63         android:gravity="center"
64         android:paddingTop="18dp"
65         android:paddingBottom="18dp"
66         android:layout_margin="30dp"
67         android:background="@drawable/button_style"/>
68
69 </RelativeLayout>
参考文档
http://keeganlee.me/post/android/20150909
标签:总结 有用 添加 line 通过 draw horizon 使用 ges
原文地址:http://www.cnblogs.com/dreamGong/p/6196504.html