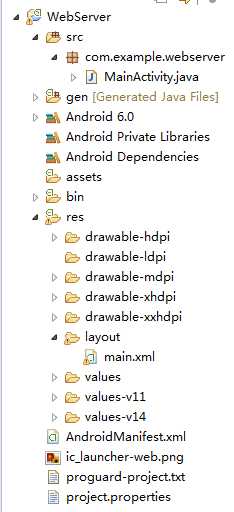
标签:get tor lock 数据 blocks window input gecko puts


MainActivity.java

  1 package com.example.webserver;
  2
  3 import java.io.ByteArrayOutputStream;
  4 import java.io.InputStream;
  5 import java.io.OutputStream;
  6 import java.net.HttpURLConnection;
  7 import java.net.URL;
  8 import java.net.URLEncoder;
  9
 10 import android.app.Activity;
 11 import android.os.Bundle;
 12 import android.text.TextUtils;
 13 import android.view.View;
 14 import android.view.View.OnClickListener;
 15 import android.widget.Button;
 16 import android.widget.EditText;
 17 import android.widget.TextView;
 18 import android.widget.Toast;
 19
 20 public class MainActivity extends Activity implements OnClickListener{
 21     // 声明控件对象
 22     private EditText et_name, et_pass;
 23     // 声明显示返回数据库的控件对象
 24     private TextView tv_result;
 25     private  Button login;
 26     @Override
 27     protected void onCreate(Bundle savedInstanceState) {
 28         super.onCreate(savedInstanceState);
 29         // 设置显示的视图
 30         setContentView(R.layout.main);
 31         // 通过 findViewById(id)方法获取用户名的控件对象
 32         et_name = (EditText) findViewById(R.id.username);
 33         // 通过 findViewById(id)方法获取用户密码的控件对象
 34         et_pass = (EditText) findViewById(R.id.password);
 35         login=(Button) findViewById(R.id.ok);
 36         // 通过 findViewById(id)方法获取显示返回数据的控件对象
 37         tv_result = (TextView) findViewById(R.id.backdata);
 38         login.setOnClickListener(this);
 39     }
 40
 41     /**
 42      * 通过android:onClick="login"指定的方法 , 要求这个方法中接受你点击控件对象的参数v
 43      *
 44      * @param v
 45      */
 46 /*    public void login(View v) {
 47
 48
 49     }
 50   */
 51     /**
 52      * POST请求操作
 53      *
 54      * @param userName
 55      * @param userPass
 56      */
 57     public void loginByPost(String userName, String userPass) {
 58         try {
 59             // 请求的地址
 60             String spec = "http://10.28.197.117:8080/test/LoginServlet";
 61             // 根据地址创建URL对象
 62             URL url = new URL(spec);
 63             // 根据URL对象打开链接
 64             HttpURLConnection urlConnection = (HttpURLConnection) url
 65                     .openConnection();
 66             // 设置请求的方式
 67             urlConnection.setRequestMethod("POST");
 68             // 设置请求的超时时间
 69             urlConnection.setReadTimeout(5000);
 70             urlConnection.setConnectTimeout(5000);
 71             // 传递的数据
 72             String data = "username=" + URLEncoder.encode(userName, "UTF-8")
 73                     + "&userpass=" + URLEncoder.encode(userPass, "UTF-8");
 74             // 设置请求的头
 75             urlConnection.setRequestProperty("Connection", "keep-alive");
 76             // 设置请求的头
 77             urlConnection.setRequestProperty("Content-Type",
 78                     "application/x-www-form-urlencoded");
 79             // 设置请求的头
 80             urlConnection.setRequestProperty("Content-Length",
 81                     String.valueOf(data.getBytes().length));
 82             // 设置请求的头
 83             urlConnection
 84                     .setRequestProperty("User-Agent",
 85                             "mozilla/5.0 (windows nt 6.1; win64; x64) applewebkit/537.36 (khtml, like gecko) chrome/55.0.2883.87 safari/537.36");
 86
 87             urlConnection.setDoOutput(true); // 发送POST请求必须设置允许输出
 88             urlConnection.setDoInput(true); // 发送POST请求必须设置允许输入
 89                                             //setDoInput的默认值就是true
 90             //获取输出流
 91             OutputStream os = urlConnection.getOutputStream();
 92             os.write(data.getBytes());
 93             os.flush();
 94             if (urlConnection.getResponseCode() == 200) {
 95                 // 获取响应的输入流对象
 96                 InputStream is = urlConnection.getInputStream();
 97                 // 创建字节输出流对象
 98                 ByteArrayOutputStream baos = new ByteArrayOutputStream();
 99                 // 定义读取的长度
100                 int len = 0;
101                 // 定义缓冲区
102                 byte buffer[] = new byte[1024];
103                 // 按照缓冲区的大小,循环读取
104                 while ((len = is.read(buffer)) != -1) {
105                     // 根据读取的长度写入到os对象中
106                     baos.write(buffer, 0, len);
107                 }
108                 // 释放资源
109                 is.close();
110                 baos.close();
111                 // 返回字符串
112                 final String result = new String(baos.toByteArray());
113
114                 // 通过runOnUiThread方法进行修改主线程的控件内容
115                 MainActivity.this.runOnUiThread(new Runnable() {
116                     @Override
117                     public void run() {
118                         // 在这里把返回的数据写在控件上 会出现什么情况尼
119                         tv_result.setText(result);
120                     }
121                 });
122
123             } else {
124                 System.out.println("链接失败.........");
125             }
126         } catch (Exception e) {
127             e.printStackTrace();
128         }
129     }
130
131     @Override
132     public void onClick(View v) {
133         // TODO Auto-generated method stub
134         // 获取点击控件的id
135         int id = v.getId();
136         // 根据id进行判断进行怎么样的处理
137         switch (id) {
138         // 登陆事件的处理
139         case R.id.ok:
140             // 获取用户名
141             final String userName = et_name.getText().toString();
142             // 获取用户密码
143             final String userPass = et_pass.getText().toString();
144             if (TextUtils.isEmpty(userName) || TextUtils.isEmpty(userPass)) {
145                 Toast.makeText(this, "用户名或者密码不能为空", Toast.LENGTH_LONG).show();
146             } else {
147                 // 开启子线程
148                 System.out.println("发送到服务器");
149                 new Thread() {
150                     public void run() {
151                         loginByPost(userName, userPass); // 调用loginByPost方法
152                     };
153                 }.start();
154             }
155             break;
156         }
157
158     }
159
160 }
LoginServlet.java

 1 package test;
 2 import java.io.IOException;
 3 import javax.servlet.ServletException;
 4 import javax.servlet.http.HttpServlet;
 5 import javax.servlet.http.HttpServletRequest;
 6 import javax.servlet.http.HttpServletResponse;
 7
 8 public class LoginServlet extends HttpServlet {
 9
10     /**
11      *  cvcjh11
12      */
13     private static final long serialVersionUID = 1L;
14
15     protected void doGet(HttpServletRequest request, HttpServletResponse response) throws ServletException, IOException {
16         //获取请求的参数值
17         String userName = request.getParameter("username");
18         String userPass = request.getParameter("userpass");
19
20         System.out.println("在没有转码之前的"+userName+"---"+userPass);
21         //GET方式的请求乱码处理
22         userName = new String(userName.getBytes("ISO8859-1"),"UTF-8");
23         userPass = new String(userPass.getBytes("ISO8859-1"),"UTF-8");
24
25         System.out.println("在转码之后---"+userName+"---"+userPass);
26         if("111".equals(userName)&&"111".equals(userPass)){
27             //响应登陆成功的信息
28             response.getOutputStream().write("ok".getBytes());
29         }else{
30             //相应登陆失败的信息
31             response.getOutputStream().write("fail".getBytes());
32         }
33
34     }
35
36     protected void doPost(HttpServletRequest request, HttpServletResponse response) throws ServletException, IOException {
37         this.doGet(request, response);
38     }
39
40 }
web.xml

 1 <?xml version="1.0" encoding="UTF-8"?>
 2 <web-app xmlns:xsi="http://www.w3.org/2001/XMLSchema-instance" xmlns="http://java.sun.com/xml/ns/javaee" xsi:schemaLocation="http://java.sun.com/xml/ns/javaee http://java.sun.com/xml/ns/javaee/web-app_3_0.xsd" id="WebApp_ID" version="3.0">
 3   <display-name>test</display-name>
 4   <servlet>
 5     <description></description>
 6     <display-name>LoginServlet</display-name>
 7     <servlet-name>LoginServlet</servlet-name>
 8     <servlet-class>test.LoginServlet</servlet-class>
 9   </servlet>
10
11   <servlet-mapping>
12     <servlet-name>LoginServlet</servlet-name>
13     <url-pattern>/LoginServlet</url-pattern>
14   </servlet-mapping>
15 </web-app>
Androidmanifest.xml

 1 <?xml version="1.0" encoding="utf-8"?>
 2 <manifest xmlns:android="http://schemas.android.com/apk/res/android"
 3     package="com.example.webserver"
 4     android:versionCode="1"
 5     android:versionName="1.0" >
 6
 7     <uses-sdk
 8         android:minSdkVersion="18"
 9         android:targetSdkVersion="23" />
10
11     <application
12         android:allowBackup="true"
13         android:icon="@drawable/ic_launcher"
14         android:label="@string/app_name"
15         android:theme="@style/AppTheme" >
16         <activity
17             android:name=".MainActivity"
18             android:label="@string/app_name" >
19             <intent-filter>
20                 <action android:name="android.intent.action.MAIN" />
21                 <category android:name="android.intent.category.LAUNCHER" />
22             </intent-filter>
23         </activity>
24     </application>
25     <uses-permission android:name="android.permission.INTERNET"/>
26 </manifest>
采用HttpURLConnection的POST方式实现登陆案例
标签:get tor lock 数据 blocks window input gecko puts
原文地址:http://www.cnblogs.com/luomi/p/6196802.html