标签:tiff concat ret nim code 匹配 html 旋转 ref
一.重现问题:
拍照获得的图片,由于尺寸不对,需要拆切.但是有的图片拆切出来,方向就乱了.查找了一些质量才知道.图片还有个方向属性! imageOrientation.
二.一个图片包含两个方面的信息:
1.数据本身: 每个像素的颜色值.
2.文件头: 图片的基本信息.比如:图片的宽高.图片的方向信息.
三: 为什么会有图片方向?
为了让照片可以真实的反应人们拍摄时看到的场景,现在很多相机中就加入了方向传感器,它能够记录下拍摄时相机的方向,并将这一信息保存在照片中。照片的存储方式还是没有任何改变,它仍然是以相机的坐标系来保存,只是当相机来浏览这些照片时,相机可以根据照片中的方向信息,结合此时相机的方向,对照片进行旋转,从而转到适合人们观看的角度。
四: 什么叫EXIF?
维基百科上对其的解释为:
可交换图像文件格式常被简称为Exif(Exchangeable image file format),是专门为数码相机的照片设定的,可以记录数码照片的属性信息和拍摄数据… Exif可以附加于JPEG、TIFF、RIFF等文件之中.
什么叫Orientation?
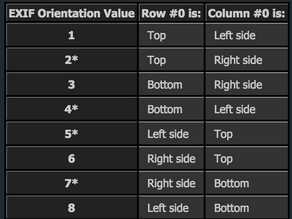
在EXIF涵盖的各种信息之中,其中有一个叫做Orientation (rotation)的标签,用于记录图像的方向,这便是相机写入方向信息的最终位置。它总共定义了八个值:

注意:对于上面的八种方向中,加了*的并不常见,因为它们代表的是镜像方向,如果不做任何的处理,不管相机以任何角度拍摄,都无法出现镜像的情况。
这个表格代表什么意义?我们来看第一行,值为1时,右边两列的值分别为:Row #0 is Top,Column #0 is Left side,其实很好理解,它表示照片的第一行位于顶端,而第一列位于左侧,那么这张照片自然就是以正常角度拍摄的。
五: 什么时候会造成图片方向不对?
用相机拍摄出来的照片含有EXIF信息,UIImage的imageOrientation属性指的就是EXIF中的orientation信息。
如果我们忽略orientation信息,而直接对照片进行像素处理或者drawInRect等操作,得到的结果是翻转或者旋转90之后的样子。这是因为我们执行像素处理或者drawInRect等操作之后,imageOrientaion信息被删除了,imageOrientaion被重设为0,造成照片内容和imageOrientaion不匹配。
所以,在对照片进行处理之前,先将照片旋转到正确的方向,并且返回的imageOrientaion为0。
六: 解决办法:
下面这个方法就是一个UIImage category中的方法,用它可以达到以上目的。
方法一: 最直观的方法.
- (UIImage *)fixOrientation {

    // No-op if the orientation is already correct
    if (self.imageOrientation == UIImageOrientationUp) return self;

    // We need to calculate the proper transformation to make the image upright.
    // We do it in 2 steps: Rotate if Left/Right/Down, and then flip if Mirrored.
    CGAffineTransform transform = CGAffineTransformIdentity;

    switch (self.imageOrientation) {
        case UIImageOrientationDown:
        case UIImageOrientationDownMirrored:
            transform = CGAffineTransformTranslate(transform, self.size.width, self.size.height);
            transform = CGAffineTransformRotate(transform, M_PI);
            break;

        case UIImageOrientationLeft:
        case UIImageOrientationLeftMirrored:
            transform = CGAffineTransformTranslate(transform, self.size.width, 0);
            transform = CGAffineTransformRotate(transform, M_PI_2);
            break;

        case UIImageOrientationRight:
        case UIImageOrientationRightMirrored:
            transform = CGAffineTransformTranslate(transform, 0, self.size.height);
            transform = CGAffineTransformRotate(transform, -M_PI_2);
            break;
        case UIImageOrientationUp:
        case UIImageOrientationUpMirrored:
            break;
    }

    switch (self.imageOrientation) {
        case UIImageOrientationUpMirrored:
        case UIImageOrientationDownMirrored:
            transform = CGAffineTransformTranslate(transform, self.size.width, 0);
            transform = CGAffineTransformScale(transform, -1, 1);
            break;

        case UIImageOrientationLeftMirrored:
        case UIImageOrientationRightMirrored:
            transform = CGAffineTransformTranslate(transform, self.size.height, 0);
            transform = CGAffineTransformScale(transform, -1, 1);
            break;
        case UIImageOrientationUp:
        case UIImageOrientationDown:
        case UIImageOrientationLeft:
        case UIImageOrientationRight:
            break;
    }

    // Now we draw the underlying CGImage into a new context, applying the transform
    // calculated above.
    CGContextRef ctx = CGBitmapContextCreate(NULL, self.size.width, self.size.height,
                                             CGImageGetBitsPerComponent(self.CGImage), 0,
                                             CGImageGetColorSpace(self.CGImage),
                                             CGImageGetBitmapInfo(self.CGImage));
    CGContextConcatCTM(ctx, transform);
    switch (self.imageOrientation) {
        case UIImageOrientationLeft:
        case UIImageOrientationLeftMirrored:
        case UIImageOrientationRight:
        case UIImageOrientationRightMirrored:
            // Grr...
            CGContextDrawImage(ctx, CGRectMake(0,0,self.size.height,self.size.width), self.CGImage);
            break;

        default:
            CGContextDrawImage(ctx, CGRectMake(0,0,self.size.width,self.size.height), self.CGImage);
            break;
    }

    // And now we just create a new UIImage from the drawing context
    CGImageRef cgimg = CGBitmapContextCreateImage(ctx);
    UIImage *img = [UIImage imageWithCGImage:cgimg];
    CGContextRelease(ctx);
    CGImageRelease(cgimg);
    return img;
}
方法二: 这里是利用了UIImage中的drawInRect方法,它会将图像绘制到画布上,并且已经考虑好了图像的方向.
- (UIImage *)normalizedImage {
    if (self.imageOrientation == UIImageOrientationUp) return self;

    UIGraphicsBeginImageContextWithOptions(self.size, NO, self.scale);
    [self drawInRect:(CGRect){0, 0, self.size}];
    UIImage *normalizedImage = UIGraphicsGetImageFromCurrentImageContext();
    UIGraphicsEndImageContext();
    return normalizedImage;
}
技术支持: http://www.cocoachina.com/ios/20150605/12021.html
iOS_UIImage的方向(imageOrientation)
标签:tiff concat ret nim code 匹配 html 旋转 ref
原文地址:http://www.cnblogs.com/mancong/p/6208682.html