标签:des style blog http color 使用 os io
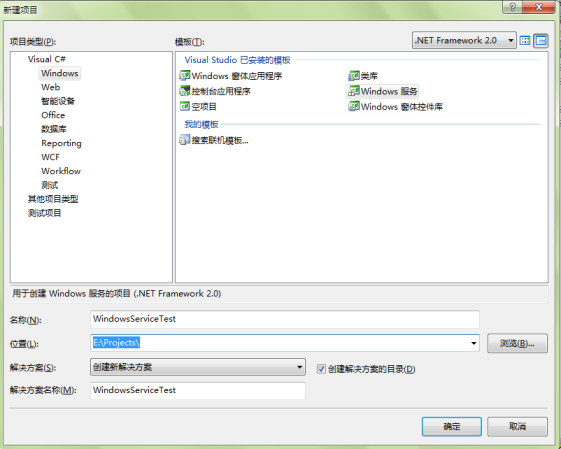
1、首选我们需要打开VS2008,然后点击文件--》新建--》项目,选择Visual C#--》windows--》windows服务。如下图所示:

2、然后修改Service1.cs类。
我们需要重写OnStart和OnStop方法。代码如下所示:
[csharp] view plaincopy
using System;
using System.Collections.Generic;
using System.ComponentModel;
using System.Data;
using System.Diagnostics;
using System.ServiceProcess;
using System.IO;
using System.Text;
using System.Timers;
using System.Threading;
//=================================================================================
//
// Copyright (C) 2011, 飞龙在天
// All rights reserved
//
// FileName: Class1
// Created by draonpeng2008 at 11-08-02 10:40:57
// Email: liufeilong1983@163.com
// http://blog.csdn.net/dragonpeng2008
//
//==================================================================================
namespace WindowsServiceTest
{
public partial class Service1 : ServiceBase
{
public Service1()
{
InitializeComponent();
}
protected override void OnStart(string[] args)
{
EventLog.WriteEntry("我的服务启动--飞龙在天");//在系统事件查看器里的应用程序事件里来源的描述
writestr("服务启动");//自定义文本日志
System.Timers.Timer t = new System.Timers.Timer();//定时器
t.Interval = 1000;//设置定时器时间间隔为1000毫秒
t.Elapsed += new System.Timers.ElapsedEventHandler(ChkSrv);//到达时间的时候执行事件(每隔一秒)
t.AutoReset = true;//设置是执行一次(false)还是一直执行(true);
t.Enabled = true;//是否执行System.Timers.Timer.Elapsed事件;
}
protected override void OnStop()
{
writestr("服务停止");
EventLog.WriteEntry("我的服务停止");
}
/// <summary>
/// 定时执行程序代码
/// </summary>
/// <param name="source"></param>
/// <param name="e"></param>
public void ChkSrv(object source, System.Timers.ElapsedEventArgs e)
{
int intSecond = e.SignalTime.Second;
try
{
//这里执行你的东西
writestr("服务运行中:"+intSecond);
Thread.Sleep(10000);
}
catch (Exception err)
{
writestr(err.Message);
}
}
/// <summary>
/// 将信息输出到文本文件
/// </summary>
/// <param name="readme"></param>
public void writestr(string readme)
{
StreamWriter dout = new StreamWriter(@"D:\" + "WindowsServiceTestLog.txt", true);
dout.Write("\r\n事件:" + readme + "\r\n操作时间:" + System.DateTime.Now.ToString("yyy-MM-dd HH:mm:ss"));
dout.Close();
}
}
}
3、在Service1.cs的设计视图上右键“添加安装程序”。系统会自动生成“ProjectInstaller.cs”文件,在该文件的设计视图界面会有两个控件,一个是serviceProcessInstaller1,一个是serviceInstaller1。
如下图:

4、在ProjectInstaller.cs设计界面中,我们设置serviceProcessInstaller1和serviceInstaller1的属性。
serviceInstaller1属性中设置:
Description(系统服务的描述)
DisplayName (系统服务中显示的名称)
ServiceName(系统事件查看器里的应用程序事件中来源名称)
StartType(启动服务的方式,分为手动、自动和禁用)

serviceProcessInstaller1属性设置:
Account 下拉设置成 LocalSystem
5、注意:我们无法在VS2008中调试该工程,会弹出错误信息,如下图:

6、我们需要用InstallUtil.exe进行服务的安装,该文件可以在
C:\WINDOWS\Microsoft.NET\Framework\v2.0.50727\
文件夹下找到。
7、我们将InstallUtil.exe复制到源程序的Debug文件夹下,然后我们以管理员身份运行VS2008命令提示。

注意:这里必须以管理员的身份运行,否则在安装服务时会出现以下错误:
在“安装”阶段发生异常。
System.Security.SecurityException: 未找到源,但未能搜索某些或全部事件日志。不可访问的日志: Security。
8、然后我们执行CMD命令,定位到源程序的Debug文件夹下,因为我的Debug文件夹在E盘,所以使用的dos命令如下:
[sql] view plaincopy
E:
cd E:\Projects\WindowsServiceTest\WindowsServiceTest\bin\Debug
InstallUtil WindowsServiceTest.exe
执行结果如下图所示:

9、然后我们在控制面板--》管理工具--》服务中会看到多了一个MyService的服务。我们可以看到服务名称为:ServiceTest,服务描述为:我的测试服务。

10、我们启动服务,然后打开D盘根目录,会看到多了一个名为:WindowsServiceTestLog.txt的文本文件。
打开该文本文件,会看到我们新建的服务每秒往该文本文件中写入了一行文本。

11、最后我们就可以卸载该服务了,我们在命令行中输入:
[sql] view plaincopy
InstallUtil -u WindowsServiceTest.exe
可以看到执行结果如下:

我们再到服务中查看,就会发现“MyService”已经被卸载掉了。
win7下用c#开发windows服务,布布扣,bubuko.com
标签:des style blog http color 使用 os io
原文地址:http://my.oschina.net/bv10000/blog/303810