标签:out jquer .com toolbar 动画效果 tar 技术分享 代码 position
看到了一个轮播图的思路,就想的自己动手实践一下,总体来说用jQuery实现起来简单多了
如果对代码中使用的方法有疑问,可以参考我的jQuery学习之路(持续更新),里面有讲解;或者你和我一样学习jQuery不久,那你可以看看我的jQuery小案例(持续更新),互相学习!
预览:优酷首页轮播图
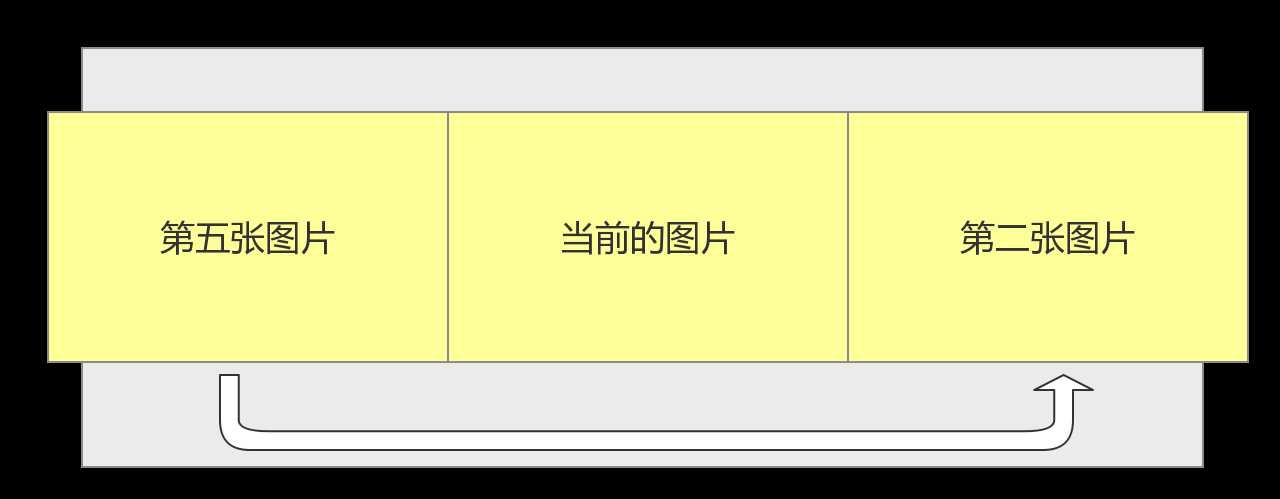
思路其实非常简单,就是当点击图片下面的圆点或者图片两边的箭头时,让想要看到的图片走到它的位置,然后当前的图片和想要看到的图片按照一个方向运动就可以了
例如:我们点击第五个小圆点,让第五个图片跑到当前图片的后面,然后一起向左运动

当然了,如果你想要看前面的图片,让图片先跑到当前图片的左边,然后和当前图片一起向右运动


 1     <div class="lunbo">
 2         <div class="picture">
 3             <ul>
 4                 <li><img src="img/1.jpg"></li>
 5                 <li><img src="img/2.jpg"></li>
 6                 <li><img src="img/3.jpg"></li>
 7                 <li><img src="img/4.jpg"></li>
 8                 <li><img src="img/5.jpg"></li>
 9             </ul>
10         </div>
11         <ul class="btn">
12             <li id="active"><div></div></li>
13             <li><div></div></li>
14             <li><div></div></li>
15             <li><div></div></li>
16             <li><div></div></li>
17         </ul>
18         <div id="left"><img src="img/left.png"></div>
19         <div id="right"><img src="img/right.png"></div>
20     </div>


 1 *{
 2     margin: 0;
 3     padding: 0;
 4 }
 5 .lunbo{
 6     width: 100%;
 7     height: 410px;
 8     position: relative;
 9     text-align: center;
10
11 }
12 .picture{
13     width: 1190px;
14     height: 480px;
15     position: absolute;
16     top: 0;
17     left: 88px;
18     overflow: hidden;
19 }
20 .picture li{
21     width: 1190px;
22     height: 410px;
23     margin: 0 auto;
24     list-style-type: none;
25     margin-top: 70px;
26     position: absolute;
27     overflow: hidden;
28     top: ;
29     left: ;
30
31 }
32 .picture  img{
33     cursor: pointer;
34 }
35 .btn{
36     display: block;
37     width: 150px;
38     height: 30px;
39     position: absolute;
40     top: 460px;
41     left: 130px;
42 }
43
44 .btn li{
45     display: block;
46     width: 10px;
47     height: 10px;
48     background-color:white;
49     list-style-type: none;
50     position: absolute;
51     top: 0px;
52     left: 0px;
53     border-radius: 10px;
54     cursor: pointer;
55 }
56 #active{
57     background-color: #03A9F4;
58 }
59 .btn li:hover{
60     background-color:#9e9e9e;
61 }
62
63 #left{
64     position: absolute;
65     top: 240px;
66     left: 90px;
67     cursor: pointer;
68 }
69 #right{
70     position: absolute;
71     top: 240px;
72     left: 1220px;
73     cursor: pointer;
74 }
然后我们用jQuery来设置初始图片的位置和小圆点的位置


 1     function setCirPos(){
 2         // 设置圆点的位置
 3         $cir.each(function(){
 4             $(this).css({
 5                 left:$(this).index()*25 + 500
 6             })
 7         });
 8         // 设置刚开始不显示的图片的位置
 9         $pic.slice(1).each(function(){
10             $(this).css({
11                 left:$picW
12             })
13         })
14     }
先来看看定义的全局变量


 1     var $cir = $(‘.btn li‘);
 2     var $pic = $(‘.picture li‘);
 3     var $picW = $pic.width();
 4     var $oLeft = $(‘#left‘);
 5     var $oRight = $(‘#right‘);
 6
 7     // 当前图片
 8     var nowPic = 0;
 9     // 防止用户连续的点击
10     var canClick = true;
11     // 定时器
12     var timer = null;
设置nowPic是为了记录当前显示的图片,因为这个轮播图一共有三种触发图片切换的方法,所以这个变量是三个方法要共享的
设置canClick变量是为了防止用户在图片切换动画效果还未完成的时候在进行点击


 1     // 设置定时器自动切换
 2     timer = setInterval(function(){
 3         auto();
 4     },2000);
 5
 6     //自动切换
 7     function auto(){
 8         var index = nowPic + 1;
 9         if(index < 0){
10             index = 4;
11         }else if(index > 4){
12             index = 0;
13         }
14         $pic.eq(index).css(‘left‘,$picW);
15         $pic.eq(nowPic).animate({left:-$picW}, 400);
16         $pic.eq(index).animate({left:0}, 400);
17
18         nowPic = index;
19         // 设置当前图片的圆点的样式
20         $cir.eq(nowPic).attr(‘id‘,‘active‘).siblings().attr(‘id‘,‘‘);
21     }
图片切换的方法都是一样的但是要注意,当点击小圆点时要清楚图片自动切换的定时器,在图片切换完成后,在设置自动切换的定时器


 1     function lunbo(){
 2         $cir.click(function(){
 3             clearInterval(timer);
 4             var index = $(this).index();
 5
 6             if(index > nowPic){
 7                 // 点击的值大于当前的值
 8                 $pic.eq(index).css(‘left‘,$picW);
 9                 $pic.eq(nowPic).animate({left:-$picW},400);
10             }else if(index < nowPic){
11                 // 点击的值小于当前的值
12                 $pic.eq(index).css(‘left‘,-$picW);
13                 $pic.eq(nowPic).animate({left:$picW},400);
14             }
15
16             $pic.eq(index).animate({left:0},400,function(){
17                 timer = setInterval(function(){
18                     auto();
19                 },3000);
20             });
21             nowPic = index;
22             // 设置当前图片的圆点的样式
23             $cir.eq(nowPic).attr(‘id‘,‘active‘).siblings().attr(‘id‘,‘‘);
24         });
25     }
当点击箭头时,我们为了防止用户多次连续的点击,所以设置了canClick这个全局变量,当点击了箭头时,要首先判断是否有为完成的动画即canClick是否为true,如果为true,就将canCilck设置为false,防止再次点击箭头,然后进行图片切换的动画,同样不要忘了清楚定时器,最后当切换图片的动画完成时,animate()方法的回调函数执行,将canClick设置为true


 1     // 点击左箭头
 2     $oLeft.click(function(){
 3
 4         if(canClick){
 5             clearInterval(timer);
 6             canClick = false;
 7             var index = nowPic - 1;
 8             if(index < 0){
 9                 index = 4;
10             }else if(index > 4){
11                 index = 0;
12             }
13             $pic.eq(index).css(‘left‘,-$picW);
14             $pic.eq(nowPic).animate({left:$picW}, 400);
15             $pic.eq(index).animate({left:0}, 400,function(){
16                 canClick = true;
17                 timer = setInterval(function(){
18                     auto();
19                 },3000);
20             });
21
22             nowPic = index;
23             // 设置当前图片的圆点的样式
24             $cir.eq(nowPic).attr(‘id‘,‘active‘).siblings().attr(‘id‘,‘‘);
25         }
26     })


 1     // 点击右箭头
 2     $oRight.click(function(){
 3
 4         if(canClick){
 5             clearInterval(timer);
 6             canClick = false;
 7             var index = nowPic + 1;
 8             if(index < 0){
 9                 index = 4;
10             }else if(index > 4){
11                 index = 0;
12             }
13             $pic.eq(index).css(‘left‘,$picW);
14             $pic.eq(nowPic).animate({left:-$picW}, 400);
15             $pic.eq(index).animate({left:0}, 400,function(){
16                 canClick = true;
17                 timer = setInterval(function(){
18                     auto();
19                 },3000);
20             });
21
22             nowPic = index;
23             // 设置当前图片的圆点的样式
24             $cir.eq(nowPic).attr(‘id‘,‘active‘).siblings().attr(‘id‘,‘‘);
25         }
26     })
这个效果实现起来很简单,就是刚开始没有想到实现的思路(笨)。
标签:out jquer .com toolbar 动画效果 tar 技术分享 代码 position
原文地址:http://www.cnblogs.com/alinaxia/p/6263120.html