标签:text instance abi style system 目录 web 分享 classpath
Spring框架是一个分层的JavaSE/EEfull-stack(一站式) 轻量级开源框架,也是现在最流的框架之一,Spring的核心就是IOC(控制反转)和AOP(切面编程),极大的方便了开发使用和后期的维护测试。
工具:Myeclipse 10,JDK1.7 Spring3
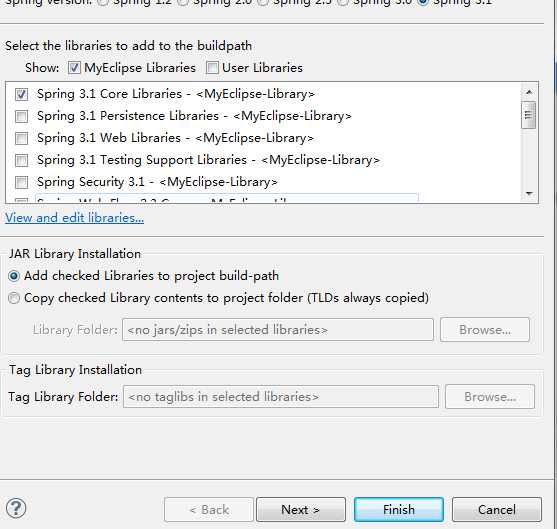
首先创建web项目,创建好之后,右键项目选择myeclipse选项,选择Add Spring capabilities选项,点击finish完成。如图:

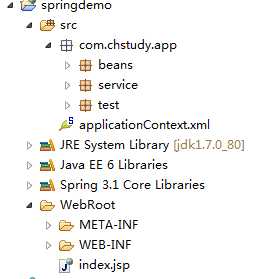
然后创建好需要的包,至此一个简单的spring项目就已经搭建好了。附上项目结构图:

IOC(控制反转):控制反转, 解决程序对象紧密耦合问题(工厂+反射+ 配置文件), 将程序中原来构造对象的权限,交给IoC容器来构造,当程序需要对象,找IoC容器获取。
代码:首先创建bean文件。
 1 package com.chstudy.app.beans;
 2
 3 public class Product {
 4     private Integer pid;
 5     private String pname;
 6     private Double price;
 7
 8     public Product() {
 9
10     }
11
12     public Product(Integer pid, String pname, Double price) {
13         super();
14         this.pid = pid;
15         this.pname = pname;
16         this.price = price;
17     }
18
19     public Integer getPid() {
20         return pid;
21     }
22
23     public void setPid(Integer pid) {
24         this.pid = pid;
25     }
26
27     public String getPname() {
28         return pname;
29     }
30
31     public void setPname(String pname) {
32         this.pname = pname;
33     }
34
35     public Double getPrice() {
36         return price;
37     }
38
39     public void setPrice(Double price) {
40         this.price = price;
41     }
42
43 }
创建service文件:接口ComputerService和实现service类DellService,HPService。
1 package com.chstudy.app.service;
2
3 public interface ComputerService {
4     void printInfo();
5 }
1 package com.chstudy.app.service;
2
3 public class DellService implements ComputerService{
4     public void printInfo(){
5         System.out.println("这是一台戴尔电脑!");
6     }
7 }
1 package com.chstudy.app.service;
2
3 public class HPService implements ComputerService{
4     public void printInfo(){
5         System.out.println("这是一台惠普电脑!");
6     }
7 }
接下来就该编写Spring的配置文件了,项目Str目录下有生成的applicationContext.xml文件。
 1 <?xml version="1.0" encoding="UTF-8"?>
 2 <beans
 3     xmlns="http://www.springframework.org/schema/beans"
 4     xmlns:xsi="http://www.w3.org/2001/XMLSchema-instance"
 5     xmlns:p="http://www.springframework.org/schema/p"
 6     xsi:schemaLocation="http://www.springframework.org/schema/beans http://www.springframework.org/schema/beans/spring-beans-3.1.xsd">
 7     <!--设置id,class属性  -->
 8     <bean id="pc" class="com.chstudy.app.service.HPService"></bean>
 9     <bean id="mac" class="com.chstudy.app.service.DellService"></bean>
10
11     <bean id="person" class="com.chstudy.app.beans.PersonUse">
12         <property name="cs" ref="mac"></property>
13     </bean>
14     <!--通过映射设置Product的属性值, scope="prototype"设置多例 -->
15     <bean id="product1" class="com.chstudy.app.beans.Product" scope="prototype">
16         <property name="pid" value="1"></property>
17         <property name="pname" value="第一个产品"></property>
18         <property name="price" value="100"></property>
19     </bean>
20     <bean id="product2" class="com.chstudy.app.beans.Product">
21         <constructor-arg name="pid" value="2"></constructor-arg>
22         <constructor-arg name="pname" value="第二个产品"></constructor-arg>
23         <constructor-arg name="price" value="200"></constructor-arg>
24     </bean>
25
26 </beans>
编写测试类:
 1 package com.chstudy.app.test;
 2
 3 import org.springframework.context.support.ClassPathXmlApplicationContext;
 4
 5 import com.chstudy.app.beans.Product;
 6
 7
 8 public class ProductTest {
 9     public static void main(String[] args) {
10         // 声明Spring容器,读取配置文件
11         ClassPathXmlApplicationContext ctx = new ClassPathXmlApplicationContext("applicationContext.xml");
12         // 根据bean的id获得一个bean对象
13         //Product p = (Product) ctx.getBean("product1");
14         Product p = (Product) ctx.getBean("product2");
15         // 回收资源
16         ctx.close();
17         System.out.println(p.getPname());
18         System.out.println(p.getPrice());
19     }
20 }
运行结果:

刚接触spring,记录一下,下次在记录AOP。继续努力学习。
一份汗水一份收获!
标签:text instance abi style system 目录 web 分享 classpath
原文地址:http://www.cnblogs.com/chstudy/p/6274564.html