标签:xaml windows 内容 裁剪 idt 也会 canvas 用户 rtu
Canvas:画布面板
画布,用于完全控制每个元素的精确位置。他是布局控件中最为简单的一种,直接将元素放到指定位置,主要来布置图面。使用Canvas,必须指定一个子元素的位置(相对于画布),否则所有元素都将出现在画布的左上角。调整位置用Left、Right、Top和Bottom四个附加属性。如果Canvas是窗口主元素(即最外层的布局面板是Canvas),用户改变窗口大小时,Canvas也会随之变化,子元素的位置也会随之移动,以保证相对于Canvas的位置属性不变。
Canvas允许子元素的部分或全部超过其边界,默认不会裁剪子元素,同时可以使用负坐标,即溢出的内容会显示在Canvas外面,这是因为默认 ClipToBounds=”False”,因此画布不需要指定大小。如果想复制画布内容,将ClipToBounds设为true即可。
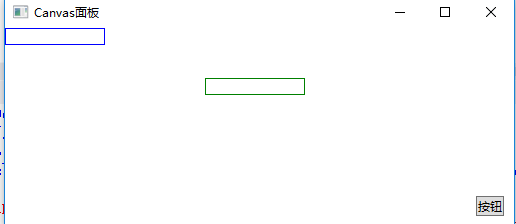
1、子元素不超出边界

使用XAML代码实现:
 1 <Window x:Class="WpfDemo.MainWindow"
 2         xmlns="http://schemas.microsoft.com/winfx/2006/xaml/presentation"
 3         xmlns:x="http://schemas.microsoft.com/winfx/2006/xaml"
 4         Title="Canvas面板" Height="237" Width="525" WindowStartupLocation="CenterScreen">
 5     <Canvas>
 6         <TextBox Width="100" BorderBrush="Blue"></TextBox>
 7         <TextBox Canvas.Left="200" Canvas.Top="50" Width="100" BorderBrush="Green"></TextBox>
 8         <Button Height="20" Canvas.Right="10" Canvas.Bottom="10" Content="按钮"></Button>
 9     </Canvas>
10 </Window>
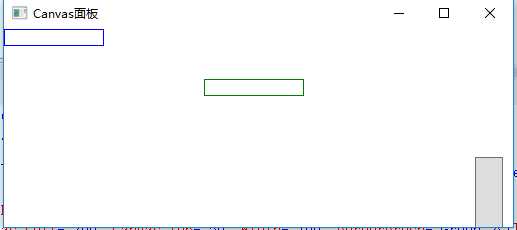
2、子元素超出边界

使用XAML代码实现:
 1 <Window x:Class="WpfDemo.MainWindow"
 2         xmlns="http://schemas.microsoft.com/winfx/2006/xaml/presentation"
 3         xmlns:x="http://schemas.microsoft.com/winfx/2006/xaml"
 4         Title="Canvas面板" Height="237" Width="525" WindowStartupLocation="CenterScreen">
 5     <Canvas>
 6         <TextBox Width="100" BorderBrush="Blue"></TextBox>
 7         <TextBox Canvas.Left="200" Canvas.Top="50" Width="100" BorderBrush="Green"></TextBox>
 8         <Button Height="200" Canvas.Right="10" Canvas.Bottom="-130" Content="按钮"></Button>
 9     </Canvas>
10 </Window>
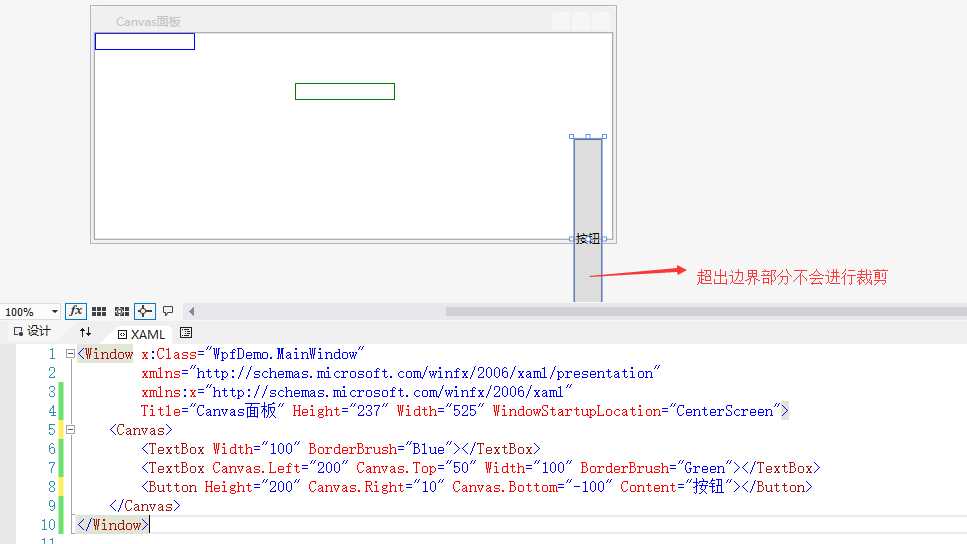
在XAML设计界面,超出的部分不会进行裁剪,如图所示:

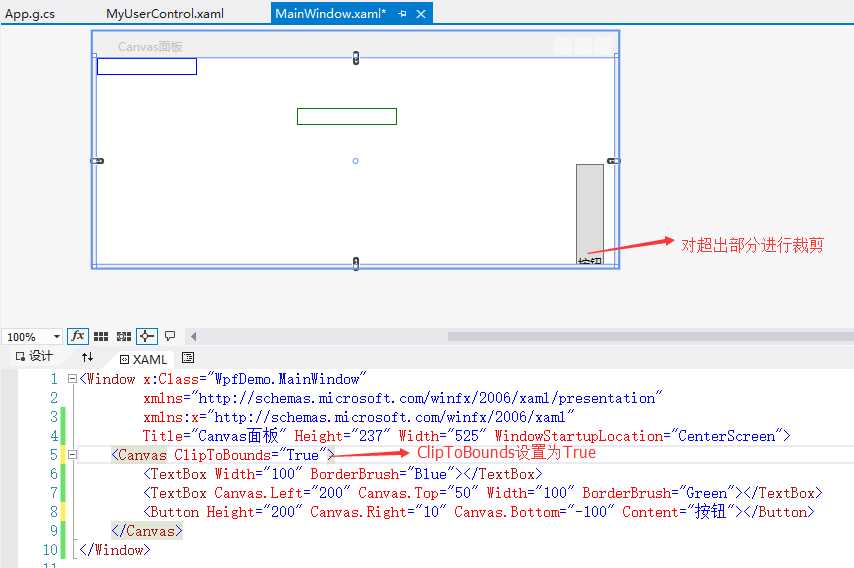
如果将ClipToBounds属性设为true,在设计界面将会对子元素的超出部分进行裁剪:

注意:要说明一点Canvas内的子控件不能使用两个以上的Canvas附加属性,如果同时设置Canvas.Left和Canvas.Right属性,那么后者将会被忽略。
标签:xaml windows 内容 裁剪 idt 也会 canvas 用户 rtu
原文地址:http://www.cnblogs.com/dotnet261010/p/6280364.html