标签:数据读取 取图 页面 char 语句 button sys response nec
当我们有大量的图片或者图片比较大时,我们常规的做法可能是保存图片路径,但是也不排除需要将图片直接存放到数据库的情况,此时就需要保存图片到数据库了。这篇文章我会向大家介绍:
具体步骤如下:
保存图片到数据库
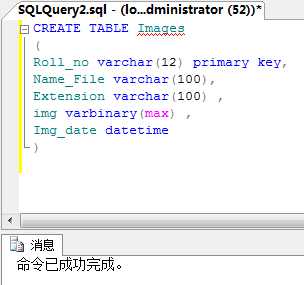
第一步:首先在数据库创建一个名为“Images”的表,代码如下:
CREATE TABLE Images
(
Roll_no varchar(12) primary key,
Name_File varchar(100),
Extension varchar(100) ,
img varbinary(max) ,
Img_date datetime
)
可以看到这个表存储了这些内容:图片的登记号、文件名、文件扩展名、二进制数据以及上传时间。
第二步:然后打开Visual Studio,创建一个空网站,命名为”ImageToBinary”。
第三步:再添加一个新页面,命名为“Conversion.aspx”
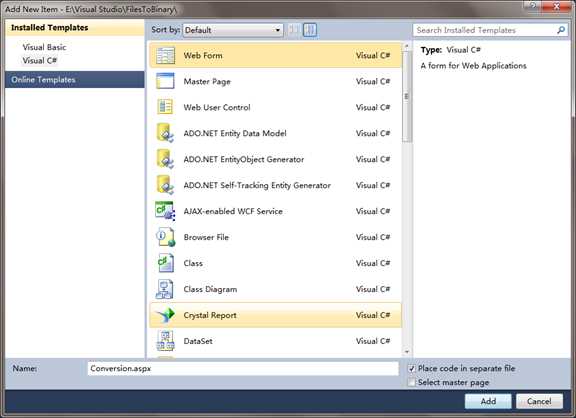
在这个页面我们拖进TextBox , FileUpload, Button这三个控件。
界面如图:
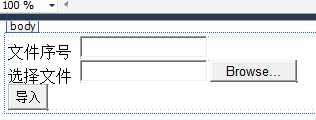
当然你也可以选择在Conversion.apsx文件直接输入这串代码:
文件序号
<asp:TextBox ID="txtrollno" runat="server">
</asp:TextBox>
<br />

选择文件
<asp:FileUpload ID="FileUpload1" runat="server" />
<br />

<asp:Button ID="Button1" runat="server"
Text="上传" OnClick="Button1_Click" />
第四步:控件添加后,双击Button,进入Conversion.apxs.cs文件,添加以下命名空间:
using System;
using System.Data;
using System.Data.SqlClient;
using System.IO;
using System.Web;
然后在Button1_Click内编写代码,将图片转换为二进制流并通过SQL语句保存到数据库中。
代码如下:

protected void Button1_Click(object sender, EventArgs e)
{
  if (!FileUpload1.HasFile)
            {
                Response.Write("未选择文件");
                return;
            }


            else
            {
                //创建访问上传文件的对象,并获取上传的文件
                HttpPostedFile file = FileUpload1.PostedFile;

                //获取上传文件的文件名和扩展名
                string filename = Path.GetFileName(FileUpload1.PostedFile.FileName);
                string extension = Path.GetExtension(filename);

                //实例化一个byte数组,其长度等于上传文件的长度
                byte[] imagetype = new byte[file.ContentLength];

                //将文件数据读取到byte数组中
                file.InputStream.Read(imagetype, 0, file.ContentLength);

                //判断图片格式
                if ((extension == ".jpg") || (extension == ".png") || (extension == ".gif") || (extension == ".bmp"))
                {
                    //表里写入数据
                    using (SqlConnection connection = new SqlConnection("Data Source=AFOD3-609221015;Initial Catalog=MyData;Integrated Security=True"))
                    {

                        connection.Open();
                        SqlCommand cmd = new SqlCommand();
                        cmd.Connection = connection;

                        string commandText = "Insert into Images values (@image, @Rollno,@img,getdate())";

                        cmd.CommandText = commandText;
                        cmd.CommandType = CommandType.Text;

                        cmd.Parameters.Add("@image", SqlDbType.VarBinary);
                        cmd.Parameters["@image"].Value = imagetype;

                        cmd.Parameters.Add("@Rollno", SqlDbType.VarChar);
                        cmd.Parameters["@Rollno"].Value = txtrollno.Text;

                        cmd.Parameters.Add("@img", SqlDbType.VarChar);
                        cmd.Parameters["@img"].Value = txtrollno.Text;


                        cmd.ExecuteNonQuery();
                        cmd.Dispose();
                        connection.Close();

                        Response.Write("导入成功");
                    }
                }
                else
                {
                    Response.Write("导入失败"); return;
                }
            }
运行结果如图:

这时我们就可以浏览文件夹添加需要存入的图片:
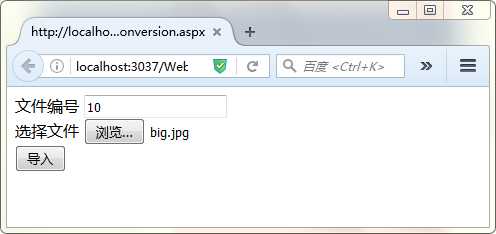
文件成功导入

如果选择了不符合条件的文件后,显示结果:

返回数据库,可以看到图片已经成功添加到数据库中了:
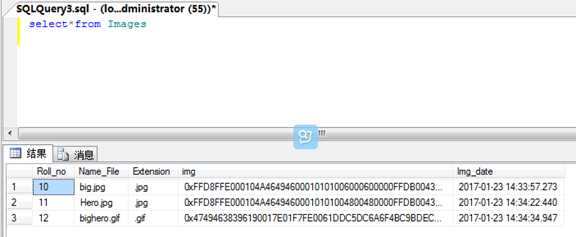
导出图片
现在我们看如何从数据库导出图片的,这里我会只使用Button控件,简单概述一下。
第一步:在Visual Studio创建一个空网站,命名为“ImageToBinary”。
第二步:再添加一个新页面,命名为"GetImage.aspx"。在这个页面拖放一个Button控件。
第三步: 双击Button,进入”GetImage.aspx.cs”,添加命名空间。
using System;
using System.Configuration;
using System.Data.SqlClient;
using System.IO;
Button1_Click内编写代码:

protected void Button1_Click(object sender, EventArgs e)
 {
        string sConn = ConfigurationManager.AppSettings["ConnectionString"];

        SqlConnection objConn = new SqlConnection(sConn);

        objConn.Open();

        string sql = "select * from Images";

        SqlCommand cmd = new SqlCommand(sql, objConn);

        SqlDataReader dr = cmd.ExecuteReader();

        while (dr.Read())

        {

           byte[] bytes = (byte[])dr["img"];

           FileStream fs = new FileStream(@"E:\Images\" + dr["roll_no"] + ".jpg" , FileMode.Create, FileAccess.Write);

           fs.Write(bytes, 0, bytes.Length);

           fs.Flush();

           fs.Close();

        }

      dr.Close();

      objConn.Close();

       Response.Write("成功导出");


   }
运行结果:

点击“导出”:

打开指定的文件夹,图片已经保存在里面了:

最后,如果有需要,你还可以参考这篇文章:如何保存PDF、Word和Excel文件到数据库中
谢谢浏览!
标签:数据读取 取图 页面 char 语句 button sys response nec
原文地址:http://www.cnblogs.com/Yesi/p/6347320.html