标签:ict figure resource target rbac shrink phi initial activex
?
ActiveX is a Microsoft technology developed in the mid 90‘s, that allows for the creation of applet-like applications that can be downloaded and run within Microsoft‘s Web browser. This article is intended for Visual C++ developers who are trying to learn how to develop their first ActiveX control for a web application but finding it difficult. While trying to learn this technology myself, I found much of the information available on ActiveX was either no longer available, out of date, or missing critical information, making it extremely difficult for me to create an ActiveX control necessary for my development project. This article is intended to help you get up to speed quickly with developing an ActiveX control. It will show you the basic concepts you need to know about ActiveX, such as methods, properties, and events, and how to communicate between an ActiveX control and a web page. You will learn how to implement the control for use with default security settings in Internet Explorer on Windows XP, without getting unsigned or unsafe control warning messages.
For this tutorial, we will create an ActiveX control that displays a progress bar animated GIF when the control is loaded as a way to indicate to users that the control is loading and processing information. The control will contain functionality to demonstrate how to pass information between the control and the web page. You will be guided step by step on creating the control using Microsoft Visual Studio 2005.
To create an ActiveX control, use Microsoft Visual Studio 2005 to perform the following steps:
Figure 1. New Project Dialog
Figure 2. MFC ActiveX Control Wizard Dialog
In order to implement support for displaying a progress bar animated GIF from the ActiveX control, we will use the?CPictureEx?class presented by Oleg Bykov in a CodeProject article. Refer to the?References?section for more details. First, add the source files?pictureex.cpp?and?pictureex.h?to your project, by selecting the?Solution Explorer?tab in VS 2005, then right click on the?Header Files?or?Source Files?in the source tree, and then?Add, Existing Item?to select the appropriate source file.
To add an animated GIF resource to the project, we have to work around a defect in Visual Studio 2005 (and VS 2003) that does not allow importing a GIF image file. If you try it, you will get an error reporting that the file is not a valid GIF file. You can work around this defect as follows:
Now, we will add a dialog for the progress bar graphic.
Figure 3. MFC Class Wizard –?CMainDialog
Now, we add the member variables for the classes. The member variable?m_MainDialog?is associated with the?CMainDialog?class, and?m_ProgressBar?is associated with the progress bar control we added to the main dialog.
Figure 4. Add Member Variable Wizard –?m_ProgressBar
Now, we get our hands dirty with adding some code to support drawing the main dialog and the progress bar control.
Hide???Copy Code
m_MainDialog.Create(IDD_MAINDIALOG, this);
Add the following code to the?OnDraw?method to size the main dialog window and fill the background:
Hide???Copy Code
m_MainDialog.MoveWindow(rcBounds, TRUE);
CBrush brBackGnd(TranslateColor(AmbientBackColor()));
pdc->FillRect(rcBounds, &brBackGnd);
Hide???Copy Code
if (m_ProgressBar.Load(MAKEINTRESOURCE(IDR_PROGRESSBAR),_T("GIF")))
m_ProgressBar.Draw();
Make sure the build configuration is set to the Release configuration, and build the MyActiveX ActiveX application.
The tool of choice for quickly creating a default web page to test your control is Microsoft‘s ActiveX Control Pad. It is available for?download from Microsoft.
You will also find it available for download at various other sites on the Internet. Install it and run it on the same system you are using to develop the control with Microsoft Visual Studio. To make it easier for initial testing of the application, you should make sure that the Microsoft IIS web server is installed on this same system.
When you first run the ActiveX Control Pad, it will create a default HTML web page for you. To insert an ActiveX control, right click within the?<BODY>?tag of the HTML source, and select?Insert ActiveX Control. In the Insert ActiveX Control dialog, scroll down and select?MyActiveX Control?that you have created with Visual Studio, and click OK.
Figure 5. ActiveX Control Pad – Insert ActiveX Control
Two dialog boxes will be displayed in the ActiveX Control Pad, enabling you to modify the control. The?Properties?dialog is for modifying properties of the control, the?Edit ActiveX Control?dialog is for manually editing the control. You can close both of these dialogs as we can make any further changes necessary by manually editing the HTML code. You should now find an?OBJECT ID?tag inserted in the HTML code, similar to that shown in Figure 6. Change the size parameters of the control by changing to?"WIDTH=350"?and?"HEIGHT=50"?in the?OBJECT IDtag. Save the HTML file for the web page to the file?myactivex.htm?in the root folder?wwwroot?of IIS web server.
Figure 6. ActiveX Control Pad – MyActiveX ActiveX Control
To test the ActiveX control, load the web page?http://localhost/myactivex.htm?with Internet Explorer. If you get any warning messages, just click OK to proceed. This should result in a progress bar animated GIF displayed within the web page. If not, or if you get a red X displayed where the ActiveX control should be, then it is most likely due to the security settings of the browser which is preventing the ActiveX control from loading and running. To correct this, modify the security settings in Internet Explorer to change all the settings that have to do with ActiveX to?enabled.
Figure 7. MyActiveX Control in Internet Explorer
Next, we need to build the ActiveX control so loading it from Internet Explorer browser does not result in annoying error messages complaining that it is an unsigned or unsafe control.
To create a signed ActiveX control, you must purchase a Code Signing Certificate from one of the certificate providers such as Thawte, Verisign, or GeoTrust. With this service, they will verify your identity and provide you certificate files you use to sign the ActiveX application. I chose Thawte for a Code Signing Certificate, who provided two files for signing the application,?mycert.spc?and?mykey.pvk.
To sign the ActiveX application, we package the components of the application into a CAB file, which is downloaded from the web site and the ActiveX control is installed on the system. Part of installing the ActiveX control requires registering the control. To enable that to happen, the control must be built with the?OLESelfRegister?value defined in the?VERSIONINFO?structure of the ActiveX control. Versions of Microsoft Visual Studio up to VS 2003 inserted this entry, but Visual Studio 2005 does not. To add the entry, edit the resource file?myactivex.rc?to add the?OLESelfRegister?value, as shown below:
Hide???Shrink? ???Copy Code
VS_VERSION_INFO VERSIONINFO
FILEVERSION 1,0,0,1
PRODUCTVERSION 1,0,0,1
FILEFLAGSMASK 0x3fL
#ifdef _DEBUG
FILEFLAGS 0x1L
#else
FILEFLAGS 0x0L
#endif
FILEOS 0x4L
FILETYPE 0x2L
FILESUBTYPE 0x0L
BEGIN
BLOCK "StringFileInfo"
BEGIN
BLOCK "040904e4"
BEGIN
VALUE "CompanyName", "TODO: <Company name>"
VALUE "FileDescription", "TODO: <File description>"
VALUE "FileVersion", "1.0.0.1"
VALUE "InternalName", "MyActiveX.ocx"
VALUE "LegalCopyright",
"TODO: (c) <Company name>. All rights reserved."
VALUE "OLESelfRegister", "\0"
VALUE "OriginalFilename", "MyActiveX.ocx"
VALUE "ProductName", "TODO: <Product name>"
VALUE "ProductVersion", "1.0.0.1"
END
END
BLOCK "VarFileInfo"
BEGIN
VALUE "Translation", 0x409, 1252
END
END
Before signing the application, the ActiveX control should be packaged into a CAB file. This CAB file will also contain an INF file that is used for installing your ActiveX control. To build a CAB file, you need the?cabarc.exe?tool available in the Microsoft Cabinet Software Development Kit. The following is an example of a simple INF file that can be used for packaging the MyActiveX control into a CAB file. For the CLSID line item, you should change the value to the same value as that in the?OBJECT ID?tag in the HTML web page you created earlier with the ActiveX Control Pad.
Hide???Copy Code
[Add.Code]
myactivex.ocx=myactivex.ocx
myactivex.inf=myactivex.inf
?
[myactivex.ocx]
file=thiscab
clsid={36299202-09EF-4ABF-ADB9-47C599DBE778}
RegisterServer=yes
FileVersion=1,0,0,0
?
[myactivex.inf]
file=thiscab
To create a CAB file, run?cabarc?as shown below.?Important: Make sure the OCX and INF files are in same directory where you are running?cabarc.exe, otherwise the CAB will not be extracted correctly after downloading from the web server. This is one of the problems that will cause a red X on the web page where the ActiveX control should be.
Hide???Copy Code
cabarc -s 6144 N myactivex.cab myactivex.ocx myactivex.inf
To sign the CAB file you created, you need the?signcode.exe?tool from Microsoft MSDN. Refer to the "Signing and Checking with Authenticode" reference at the end of this article. You use the?signcode?tool with the certificate files you obtained from purchasing a Coding Signing Certificate to sign the CAB file. The following is an example use of?signcode?to sign?myactivex.cab:
Hide???Copy Code
signcode -n "myactivex" -i
http://www.myactivex.com -spc mycert.spc -v mykey.pvk -t
<A href="http://timestamp.verisign.com/scripts/timstamp.dll%20myactivex.cab" target=_blank>http://timestamp.verisign.com/scripts/timstamp.dll myactivex.cab</A>
In the above example,?http://www.myactivex.com?should be replaced with a web page that provides users further information about your signed ActiveX control.
To use the signed CAB file in your web page, first copy the?myactivex.cab?to a folder on your web site, then you must modify the?OBJECT ID?tag on your web page with a?CODEBASE?parameter to reference this CAB file. Refer to Figure 8 for an example. If you load this page in Internet Explorer, it should download the CAB file and install your ActiveX control with no warning about an unsigned ActiveX control.
Figure 8. ActiveX Control Pad – MyActiveX with CODEBASE
To make a control that will load in Internet Explorer with no unsafe control warning or error messages, you must implement code that ensures safe initialization and safe scripting for an ActiveX control. Detailed information for doing that can be found in the article "Safe Initialization and Scripting for ActiveX Controls" on Microsoft MSDN. Refer to References at the end of this article for details. I found omissions and mistakes in this article that I have corrected for presentation in this article. Basically, all that needs to be done is to add code to the?DllRegisterServer?and?DllUnregisterServer?methods. The following is a step-by-step guide for making your ActiveX control safe:
Hide???Shrink? ???Copy Code
#include "comcat.h"
#include "strsafe.h"
#include "objsafe.h"
?
// CLSID_SafeItem - Necessary for safe ActiveX control
// Id taken from IMPLEMENT_OLECREATE_EX function in xxxCtrl.cpp
?
const CATID CLSID_SafeItem =
{ 0x36299202, 0x9ef, 0x4abf,{ 0xad, 0xb9, 0x47, 0xc5, 0x99, 0xdb, 0xe7, 0x78}};
?
// HRESULT CreateComponentCategory - Used to register ActiveX control as safe
?
HRESULT CreateComponentCategory(CATID catid, WCHAR *catDescription)
{
ICatRegister *pcr = NULL ;
HRESULT hr = S_OK ;
?
hr = CoCreateInstance(CLSID_StdComponentCategoriesMgr,
NULL, CLSCTX_INPROC_SERVER, IID_ICatRegister, (void**)&pcr);
if (FAILED(hr))
return hr;
?
// Make sure the HKCR\Component Categories\{..catid...}
// key is registered.
CATEGORYINFO catinfo;
catinfo.catid = catid;
catinfo.lcid = 0x0409 ; // english
size_t len;
// Make sure the provided description is not too long.
// Only copy the first 127 characters if it is.
// The second parameter of StringCchLength is the maximum
// number of characters that may be read into catDescription.
// There must be room for a NULL-terminator. The third parameter
// contains the number of characters excluding the NULL-terminator.
hr = StringCchLength(catDescription, STRSAFE_MAX_CCH, &len);
if (SUCCEEDED(hr))
{
if (len>127)
{
len = 127;
}
}
else
{
// TODO: Write an error handler;
}
// The second parameter of StringCchCopy is 128 because you need
// room for a NULL-terminator.
hr = StringCchCopy(catinfo.szDescription, len + 1, catDescription);
// Make sure the description is null terminated.
catinfo.szDescription[len + 1] = ‘\0‘;
?
hr = pcr->RegisterCategories(1, &catinfo);
pcr->Release();
?
return hr;
}
?
// HRESULT RegisterCLSIDInCategory -
// Register your component categories information
?
HRESULT RegisterCLSIDInCategory(REFCLSID clsid, CATID catid)
{
// Register your component categories information.
ICatRegister *pcr = NULL ;
HRESULT hr = S_OK ;
hr = CoCreateInstance(CLSID_StdComponentCategoriesMgr,
NULL, CLSCTX_INPROC_SERVER, IID_ICatRegister, (void**)&pcr);
if (SUCCEEDED(hr))
{
// Register this category as being "implemented" by the class.
CATID rgcatid[1] ;
rgcatid[0] = catid;
hr = pcr->RegisterClassImplCategories(clsid, 1, rgcatid);
}
?
if (pcr != NULL)
pcr->Release();
?
return hr;
}
?
// HRESULT UnRegisterCLSIDInCategory - Remove entries from the registry
?
HRESULT UnRegisterCLSIDInCategory(REFCLSID clsid, CATID catid)
{
ICatRegister *pcr = NULL ;
HRESULT hr = S_OK ;
?
hr = CoCreateInstance(CLSID_StdComponentCategoriesMgr,
NULL, CLSCTX_INPROC_SERVER, IID_ICatRegister, (void**)&pcr);
if (SUCCEEDED(hr))
{
// Unregister this category as being "implemented" by the class.
CATID rgcatid[1] ;
rgcatid[0] = catid;
hr = pcr->UnRegisterClassImplCategories(clsid, 1, rgcatid);
}
?
if (pcr != NULL)
pcr->Release();
?
return hr;
}
Hide???Shrink? ???Copy Code
STDAPI DllRegisterServer(void)
{
HRESULT hr; // HResult used by Safety Functions
?
AFX_MANAGE_STATE(_afxModuleAddrThis);
?
if (!AfxOleRegisterTypeLib(AfxGetInstanceHandle(), _tlid))
return ResultFromScode(SELFREG_E_TYPELIB);
?
if (!COleObjectFactoryEx::UpdateRegistryAll(TRUE))
return ResultFromScode(SELFREG_E_CLASS);
?
// Mark the control as safe for initializing.
?
hr = CreateComponentCategory(CATID_SafeForInitializing,
L"Controls safely initializable from persistent data!");
if (FAILED(hr))
return hr;
?
hr = RegisterCLSIDInCategory(CLSID_SafeItem,
CATID_SafeForInitializing);
if (FAILED(hr))
return hr;
?
// Mark the control as safe for scripting.
?
hr = CreateComponentCategory(CATID_SafeForScripting,
L"Controls safely scriptable!");
if (FAILED(hr))
return hr;
?
hr = RegisterCLSIDInCategory(CLSID_SafeItem,
CATID_SafeForScripting);
if (FAILED(hr))
return hr;
?
return NOERROR;
}
Hide???Copy Code
STDAPI DllUnregisterServer(void)
{
HRESULT hr; // HResult used by Safety Functions
?
AFX_MANAGE_STATE(_afxModuleAddrThis);
?
if (!AfxOleUnregisterTypeLib(_tlid, _wVerMajor, _wVerMinor))
return ResultFromScode(SELFREG_E_TYPELIB);
?
if (!COleObjectFactoryEx::UpdateRegistryAll(FALSE))
return ResultFromScode(SELFREG_E_CLASS);
?
// Remove entries from the registry.
?
hr=UnRegisterCLSIDInCategory(CLSID_SafeItem,
CATID_SafeForInitializing);
if (FAILED(hr))
return hr;
?
hr=UnRegisterCLSIDInCategory(CLSID_SafeItem,
CATID_SafeForScripting);
if (FAILED(hr))
return hr;
?
return NOERROR;
}
Communication between an ActiveX control and a web page is done through ActiveX control properties, methods, and events. In order to demonstrate these concepts, we will create a simple web page with a form entry to enter a text string. When a Submit button is pressed, the text entered is passed to the ActiveX control through an input parameter custom property. A method of the control is called which copies this text to an output parameter custom property, and then fires an event for this text to be displayed on the web page. Simply follow these steps in Visual Studio to implement this:
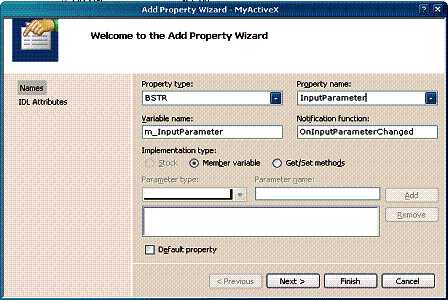
Figure 9. Add Property Wizard
Figure 10. Add Method Wizard
Figure 11. Add Event Wizard
With the above, the wizard has created a majority of the code for you. We only need to add two lines of code to implement the functionality for the ActiveX control to copy the text and notify the web page code through an event. Edit the source file?MyActiveXCtrl.cpp, and add the following code to the?LoadParameter?method.
Hide???Copy Code
// Copy text from the input parameter to the output parameter
m_OutputParameter = m_InputParameter;
// Fire an event to notify web page
FireParameterLoaded();
To test, use the ActiveX Control Pad to create the following HTML code:
Hide???Shrink? ???Copy Code
<HTML>
<HEAD>
<TITLE>MyActiveX - Methods, Properties, and Events</TITLE>
?
<SCRIPT
									LANGUAGE="JavaScript">
?
function PassParameter()
{
if (StringInput.value != " ")
{
MyActiveX1.InputParameter = StringInput.value;
MyActiveX1.LoadParameter();
}
}
</SCRIPT>
?
</HEAD>
<BODY>
<center>
MyActiveX - Methods, Properties, and Events Example
<p></p>
?
<OBJECT ID="MyActiveX1" WIDTH=350 HEIGHT=50
CLASSID="CLSID:36299202-09EF-4ABF-ADB9-47C599DBE778">
<PARAM NAME="_Version" VALUE="65536">
<PARAM NAME="_ExtentX" VALUE="2646">
<PARAM NAME="_ExtentY" VALUE="1323">
<PARAM NAME="_StockProps" VALUE="0">
</OBJECT>
<p></p>
?
Input Parameter: <INPUT TYPE ="text" NAME="StringInput" VALUE=" ">
<p></p>
<INPUT TYPE="button" NAME="Submit"
VALUE="Submit" ONCLICK=PassParameter()>
?
<SCRIPT
									FOR=MyActiveX1 EVENT=ParameterLoaded()>
<!-- {
window.document.write("The parameter you entered is:<br> "
+ MyActiveX1.OutputParameter + " ")
-->
</SCRIPT>
?
</center>
</BODY>
Save this HTML code to your web server, and run it. You should see a web page with a progress bar displayed and a form entry to enter the Input Parameter text. Enter text in the field, and press Submit. This should result in a new page with "The parameter you entered is: ", followed by the text you entered on the next line. A brief explanation of the HTML code follows.
When you press the Submit button, the JavaScript function?PassParameter?is invoked. This function copies text from the?StringInput?form field to the?InputParameter?property of the ActiveX control. It then calls the?LoadParameter?method of the control which copies the text from?InputParameter?to?OutputParameter?and calls?FireParameterLoaded()?to cause an ActiveX event. The following HTML code then responds to this event:
Hide???Copy Code
<SCRIPT
FOR=MyActiveX1 EVENT=ParameterLoaded()>
<!-- {
window.document.write("The parameter you entered is:<br> " +
MyActiveX1.OutputParameter + " ")
-->
</SCRIPT>
A Complete ActiveX Web Control Tutorial
标签:ict figure resource target rbac shrink phi initial activex
原文地址:http://www.cnblogs.com/time-is-life/p/6353852.html