标签:简化 private ext 访问 实现 location set get 下载
时间:2017-1-29 02:15
Spring的IOC
Spring的AOP,AspectJ
Spring的事务管理,三大框架的整合
——什么是Spring
1、Spring是分层的JavaSE/EE full-stack(一站式)轻量级开源框架。
1)分层:
* SUN公司提供的EE的三层结构:Web层、业务层、数据访问层(持久层)
* Struts2是Web层基于MVC设计模式框架。
* Hibernate是持久层的一个ORM框架。
2)一站式
* Spring框架对以上三层的每一层都有解决方案:
> Web层:Spring MVC
> 持久层:JDBC Template
> 业务层:Spring的Bean管理
2、官网:http://www.springsource.org
3、Spring的出现是为了取代EJB的臃肿、低效、脱离现实。
1)EJB
SUN公司提出的EE解决方案
2)推荐书籍:
* Expert One-to-One J2EE Design and Development
* Expert One-to-One J2EE Development without EJB
4、Spring的版本
3.x和4.x
Spring4需要整合Hibernate4
——Spring核心
1、IoC
1)控制反转:
* Inverse of Control反转控制
* 将对象的创建权交由Spring完成。
2)在早期开发中,需要在Web层注入Service层的对象,需要在Service层注入Dao层的对象,这样做耦合度太高,不容易扩展。后来出现了面向接口编程方式,增强了可扩展性,但是把程序的具体实现编写到程序中后,如果需要切换底层的实现,需要修改源代码,耦合性依然非常高。
Java中有一个原则:OCP原则,open - close,扩展功能时尽量不要修改源代码,而是提供新的方法属性的形式扩展其功能,所以出现了工厂模式,对具体对象的创建进行了扩展。
出现了工厂模式后,把原本程序与实现类的耦合转成了程序与工厂的耦合,如果修改实现类,则依然需要修改工厂类的源码,可以通过配置文件的形式,在配置文件中修改实现类,在工厂类中通过反射+配置文件的方式来获得一个类的实例。
2、AOP
Aspect Oriented Programming,面向切面编程。
是面向对象功能的延伸,不是替代面向对象,而是用来解决OO中的一些问题。
——Spring的优点
1、方便解耦,简化开发
Spring就是一个大工厂,可以将所有对象创建和依赖关系的维护交给Spring管理
2、AOP编程的支持
Spring提供面向切面编程,可以方便的实现对程序进行权限拦截、运行监控等功能。
3、声明式事务的支持
只需要通过配置就可以完成对事物的管理,而无需手动编程。
4、方便程序的测试
Spring对Junit4支持,可以通过注解方便的测试Spring程序。
5、方便集成各种优秀框架
Spring不排斥各种优秀的开源框架,其内部提供了对各种优秀框架(如Struts2、Hibernate、MyBatis、Quartz等)的直接支持。
6、降低JavaEE API的使用难度
Spring对JavaEE开发中非常难用的一些API(JDBC、JavaMail、远程调用等),都提供了封装,使这些API应用难度大大降低。
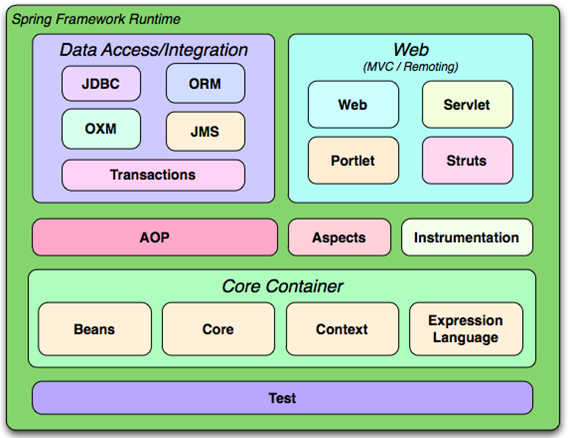
——Spring体系结构
Spring框架是一个分层架构,它包含一系列的功能要素并被分为大约20个模块。
这些模块分为Core Container、Data Access/Integration、Web、AOP(Aspect Oriented Programming)、Instrumentation和测试部分,如下图所示:
——Spring快速入门
1、下载Spring开发包
1)spring-framework-3.2.0.RELEASE-dist.zip
Spring开发包
* docs:Spring API和开发规范
* libs:Spring开发jar包
* schema:XML的约束文件
2)spring-framework-3.0.2.RELEASE-dependencies.zip
Spring开发依赖包
2、创建一个Web工程
3、导入相应jar包
Spring核心开发包:
spring-beans-3.2.0.RELEASE.jar
spring-context-3.2.0.RELEASE.jar
spring-core-3.2.0.RELEASE.jar
spring-expression-3.2.0.RELEASE.jar
导入开发的日志记录包:
com.springsource.org.apache.commons.logging-1.1.1.jar
用于整合其他日志的包(类似于Hibernate中的slf4j.jar)
导入日志包:
com.springsource.org.apache.log4j-1.2.15.jar
4、创建Spring的配置文件
1)在src下创建一个applicationContext.xml配置文件。
2)引入约束:
找到xsd-config.html,引入beans的约束:
</beans>
3)在约束中配置HelloServiceImpl类
<!-- 通过bean标签来设置类的信息,通过id属性为类起一个标识 -->
<bean id="userService" class="com.wyc.spring3.demo1.HelloServiceImpl"></bean>
5、示例代码:
HelloService接口:
/**
* 入门案例
*/
public interface HelloService {
public void sayHello();
}
----------------------------------------------------------------------------------------------------------------------------
HelloServiceImpl实现类:
/**
* 入门案例的实现类
*
* @author WYC
*
*/
public class HelloServiceImpl implements HelloService {
public void sayHello() {
System.out.println("Hello Spring");
}
}
----------------------------------------------------------------------------------------------------------------------------
配置文件:
<?xml version="1.0" encoding="UTF-8"?>
<!-- 通过bean标签来设置类的信息,通过id属性为类起一个标识 -->
<bean id="userService" class="com.wyc.spring3.demo1.HelloServiceImpl"></bean>
</beans>
----------------------------------------------------------------------------------------------------------------------------
测试类:
import org.junit.Test;
import org.springframework.context.ApplicationContext;
import org.springframework.context.support.ClassPathXmlApplicationContext;
public class SpringDemo1 {
@Test
/*
* 传统方式的开发
* 会造成程序的紧密耦合
*/
public void fun1(){
HelloService helloService = new HelloServiceImpl();
helloService.sayHello();
}
@Test
/*
* Spring中的开发
*/
public void fun2(){
/*
* 创建Spring的工厂类来解析XML,获得配置文件中的类
* 如果不写applicationContext.xml配置文件的路径,默认会到WEB-INF下去找
*/
ApplicationContext applicationContext = new ClassPathXmlApplicationContext("applicationContext.xml");
HelloService helloService = (HelloService) applicationContext.getBean("userService");
helloService.sayHello();
}
}
——IoC和DI的区别
IoC控制反转:说的是创建对象实例的控制权从代码控制剥离到IOC容器控制,实际就是你在xml文件控制,侧重于原理。
DI依赖注入:DependencyInjection 创建对象实例时,为这个对象注入属性值或其它对象实例,侧重于实现。
面向对象中对象之间的关系:
* 依赖
public class A {
private B b;
public void method(B b){
}
}
A类依赖B类。
* 继承
* 聚合
ioc是目的,di是手段。ioc是指让生成类的方式由传统方式(new)反过来,既程序员不调用new,需要类的时候由框架注入(di)。
——Spring框架加载配置文件
ApplicationContext应用上下文,这是一个接口,用来加载Spring框架配置文件。
该接口有两个实现类:
* ClassPathXmlApplicationContext("applicationContext.xml");
用于加载classpath下的配置文件(src下)
示例代码:ApplicationContext applicationContext = new ClassPathXmlApplicationContext("applicationContext.xml");
* FileSystemXmlApplicationContext("applicationContext.xml");
用于加载磁盘下的配置文件
示例代码:ApplicationContext applicationContext = new FileSystemXmlApplicationContext("G:\\MyEclipse Professional 2014 Projects\\Spring3_day01\\src\\com\\wyc\\spring3\\demo1/applicationContext.xml");
——引入配置文件
当一个配置文件中的配置信息过多的情况下,可以使用多个配置文件,加载方法如下:
1)ApplicationContext context = new ClassPathXmlApplicationContext("bean1.xml", "bean2.xml");
可以一次加载多个配置文件。
2)在要加载的配置文件中引入其他配置文件:
使用import标签<import resource="applicationContext2.xml"/>
——ApplicationContext和BeanFactory的区别
ApplicationContext类继承了BeanFactory。
BeanFactory采用延迟加载,第一次调用getBean()方法时才会加载BeanFactory。
ApplicationContext类加载配置文件的时候,就会创建所有类。
ApplicationContext对BeanFactory提供了扩展:
* 国际化处理
* 事件传递
* Bean自动装配
* 各种不同应用层的Context实现
早期开发时,可以使用BeanFactory来完成以上功能:
/*
* 使用BeanFactory完成操作
*/
public void fun4(){
BeanFactory bean = new XmlBeanFactory(new ClassPathResource("applicationContext.xml"));
HelloService helloService = (HelloService) bean.getBean("userService");
helloService.sayHello();
}
——MyEclipse配置XML提示(Schema约束)
window —— 搜索xml catalog —— add —— 找到Schema的位置 —— 选择URI —— 赋值约束中的URI —— 选择Schema location
——IoC如何实例化Bean
1、Spring框架创建Bean的方式:
提供了三种方式实例化Bean:
* 使用构造方法实例化(默认无参)
* 使用静态工厂方法实例化(简单工厂模式)
* 使用实例工厂方法实例化(工厂方法模式)
----------------------------------------------------------------------------------------------------------------------------
2、无参构造方法实例化
实体类:
public class Bean1 {
public Bean1(){
System.out.println("Bean1无参构造方法被执行");
}
}
测试方法:
public void fun1(){
/*
* 如果Bean1类中的无参构造方法不存在,则会抛出异常
*/
ApplicationContext context = new ClassPathXmlApplicationContext("applicationContext.xml");
Bean1 bean1 = (Bean1) context.getBean("bean1");
System.out.println(bean1);
}
XML配置:
<!-- 第一种方式:默认情况下使用无参构造方法 -->
<bean id="bean1" class="com.wyc.spring3.demo2.Bean1"></bean>
----------------------------------------------------------------------------------------------------------------------------
3、静态工厂实例化对象
通过工厂的静态方法实例化对象。
实体类:
public class Bean2Factory {
public static Bean2 getBean2(){
System.out.println("Bean2静态工厂被执行");
return new Bean2();
}
}
测试方法:
public void fun2(){
/*
* 如果Bean1类中的无参构造方法不存在,则会抛出异常
*/
ApplicationContext context = new ClassPathXmlApplicationContext("applicationContext.xml");
Bean2 bean2 = (Bean2) context.getBean("bean2");
System.out.println(bean2);
}
XML配置:
<!-- 第二种方式:使用静态工厂实例化对象 -->
<bean id="bean2" class="com.wyc.spring3.demo2.Bean2Factory" factory-method="getBean2"></bean>
----------------------------------------------------------------------------------------------------------------------------
4、实例工厂实例化对象
通过工厂类的实例来实例化对象。
实体类:
public class Bean3Factory {
public Bean3 getBean3(){
System.out.println("Bean3实例工厂被执行");
return new Bean3();
}
}
测试方法:
public void fun3(){
/*
* 如果Bean1类中的无参构造方法不存在,则会抛出异常
*/
ApplicationContext context = new ClassPathXmlApplicationContext("applicationContext.xml");
Bean3 bean3 = (Bean3) context.getBean("bean3");
System.out.println(bean3);
}
XML配置:
<!-- 第三种方式:使用实例工厂来实例化对象 -->
<bean id="bean3" factory-bean="bean3Factory" factory-method="getBean3"></bean>
<bean id="bean3Factory" class="com.wyc.spring3.demo2.Bean3Factory"></bean>
——Bean标签的其他配置
1、name和id的区别
* id:遵守了XML中id的约束,来保证属性是唯一的:id唯一,并且不能出现特殊字符。
* name:name无要求
如果bean标签上没有配置id,那么name属性就可以作为id属性来获取了。
2、类的作用域
* scope属性:
> singleton:(单例,是默认属性)
在Spring IoC容器中仅存在一个Bean实例,Bean以单例方式存在。
> prototype:(多例)
每次从容器中调用Bean时,都返回一个新的实例,即每次调用getBean()时,相当于执行new XxxBean()。
> request:(Web开发中,创建一个对象,将对象保存到request域中,调用request.setAttribute())
每次执行HTTP请求都会创建一个新的Bean,该作用域仅适用于WebApplicationContext环境。
> session:(Web开发中,床一个对象,将对象保存到session域中,调用session.setAttribute())
同一个HTTP Session共享一个Bean,不同Session使用不同的Bean,仅适用于WebApplicationContext环境。
> globalSession:
一般用于Porlet应用环境,该作用域仅适用于WebApplicationContext环境。
Porlet应用环境一般指分布式开发,只要登录一个系统之后,其他系统都会获得用户信息。
如果不是Prolet环境,则globalSession等同于Session。
在实际的开发中,主要使用Singleton和Prototype。
3、示例代码
验证单例与多例:
配置信息:
<bean id="customer" class="com.wyc.sprint3.demo3.Customer" scope="prototype"></bean>
测试代码:
public void fun1(){
ApplicationContext context = new ClassPathXmlApplicationContext("applicationContext.xml");
Customer c1 = (Customer) context.getBean("customer");
System.out.println(c1);
/*
* 当scope的值为singleton时,两个对象是相同的,当创建第二个对象时不会再调用构造方法,而是直接获取已存在实例
* 当scope的值为prototype时,会调用多次构造方法,创建多个实例
*/
Customer c2 = (Customer) context.getBean("customer");
System.out.println(c2);
}
——Spring容器中Bean的生命周期
Spring初始化Bean或销毁Bean时,有时需要做一些处理工作,因此Spring可以在创建和销毁Bean的时候调用Bean的两个生命周期方法:
<bean id="bean" class="...Bean" init-method="setup" destory-method="shutdown" />
setup:
当Bean被载入到容器的时候调用setup方法。
shutdown:
当Bean从容器中删除的时候调用shutdown方法。
destory-method仅在scope=singleton时有效。
销毁方法必须手动关闭容器(工厂)。
Bean生命周期的11个步骤:
1)instantiate bean对象实例化(构造方法)
2)populate properties封装属性(属性注入,set()方法)
3)如果Bean实现BeanNameAware,则执行setBeanName
4)如果Bean实现beanFactoryAware或者ApplicationContextAware,则执行setBeanFactory或者设置上下文对象setApplicationContext。
5)如果存在实现类BeanPostProcessor(后处理Bean),则执行postProcessBeforeInitialization。
6)如果Bean实现InitializingBean,则执行afterPropertiesSet。
7)调用<bean init-method="init">执行指定初始化方法:init。
8)如果存在类实现BeanPostProcessor(处理Bean),执行postProcessAfterInitialization。
9)执行业务处理
10)如果Bean实现DisposableBean,则执行destory方法。
11)调用<bean destory-method="destory">,执行指定销毁方法。
示例代码:
CustomerService类实体类:
import org.springframework.beans.BeansException;
import org.springframework.beans.factory.BeanFactory;
import org.springframework.beans.factory.BeanFactoryAware;
import org.springframework.beans.factory.BeanNameAware;
import org.springframework.beans.factory.DisposableBean;
import org.springframework.beans.factory.InitializingBean;
public class CustomerService implements BeanNameAware, BeanFactoryAware, InitializingBean, DisposableBean {
private String name;
public void setName(String name) {
System.out.println("第二步:属性注入");
this.name = name;
}
public CustomerService(){
System.out.println("第一步:实例化Customer类");
}
public void add(){
System.out.println("添加客户");
}
public void find(){
System.out.println("查询客户");
}
public void setBeanName(String name) {
System.out.println("第三步:实现BeanNameAware,注入配置的类的名称:" + name);
}
public void setBeanFactory(BeanFactory beanFactory) throws BeansException {
System.out.println("第四步:实现BeanFactoryAware,注入applicationContext:" + beanFactory);
}
public void afterPropertiesSet() throws Exception {
System.out.println("第六步:设置完属性后执行的方法");
}
public void init(){
System.out.println("第七步:执行自定义初始化方法");
}
public void destory(){
System.out.println("第十一步:执行自定义销毁方法");
}
public void destroy() throws Exception {
System.out.println("第十步:执行DisposableBean的destory方法");
}
}
——MyBeanPostProcessor后处理Bean
对指定Bean的指定方法进行统一操作。
import org.springframework.beans.BeansException;
import org.springframework.beans.factory.config.BeanPostProcessor;
/**
* 后处理Bean类必须配置到xml配置文件中,不需要写id,因为是由Spring容器自动调用的
* @author WYC
*
*/
public class MyBeanPostProcessor implements BeanPostProcessor{
/**
* bean:实例对象
* beanName:配置文件中配置的类的标识,id或者name
*/
public Object postProcessBeforeInitialization(Object bean, String beanName) throws BeansException {
System.out.println("第五步:初始化之前的操作");
return bean;
}
public Object postProcessAfterInitialization(Object bean, String beanName) throws BeansException {
System.out.println("第八步:初始化结束后的操作");
return bean;
}
}
------------------------------------------------------------------------------------------------------------------------------------
配置文件:
<bean id="customerService" class="com.wyc.spring3.demo4.CustomerService" init-method="init" destroy-method="destory">
<property name="name" value="张三"></property>
</bean>
<!-- 配置后处理Bean,不需要写id,因为是由Spring容器自动调用 -->
<bean class="com.wyc.spring3.demo4.MyBeanPostProcessor"></bean>
------------------------------------------------------------------------------------------------------------------------------------
测试类:
public class SpringDemo4 {
@Test
public void fun1(){
ApplicationContext context = new ClassPathXmlApplicationContext("applicationContext.xml");
CustomerService customerService = (CustomerService) context.getBean("customerService");
customerService.add();
customerService.find();
((ClassPathXmlApplicationContext)context).close();
}
}
------------------------------------------------------------------------------------------------------------------------------------
打印结果:
第一步:实例化Customer类
第二步:属性注入
第三步:实现BeanNameAware,注入配置的类的名称:customerService
第四步:实现BeanFactoryAware,注入applicationContext:
第五步:初始化之前的操作
第六步:设置完属性后执行的方法
第七步:执行自定义初始化方法
第八步:初始化结束后的操作
添加客户
查询客户
第十步:执行DisposableBean的destory方法
第十一步:执行自定义销毁方法
==================================================================================
使用后处理Bean添加权限校验:
修改以上代码:
1)添加CustomerService接口
2)将原CustomerService类改为CustomerServiceImpl类并实现CustomerService接口
3)将配置文件修改为:
<bean id="customerService" class="com.wyc.spring3.demo4.CustomerServiceImpl" init-method="init" destroy-method="destory">
<property name="name" value="张三"></property>
</bean>
<!-- 配置后处理Bean -->
<bean class="com.wyc.spring3.demo4.MyBeanPostProcessor"></bean>
示例代码:
import java.lang.reflect.InvocationHandler;
import java.lang.reflect.Method;
import java.lang.reflect.Proxy;
import org.springframework.beans.BeansException;
import org.springframework.beans.factory.config.BeanPostProcessor;
/**
* 后处理Bean类必须配置到xml配置文件中,不需要写id,因为是由Spring容器自动调用的
* @author WYC
*
*/
public class MyBeanPostProcessor implements BeanPostProcessor{
/**
* bean:实例对象
* beanName:配置文件中配置的类的标识,id或者name
*/
public Object postProcessBeforeInitialization(Object bean, String beanName) throws BeansException {
System.out.println("第五步:初始化之前的操作");
return bean;
}
public Object postProcessAfterInitialization(final Object bean, String beanName) throws BeansException {
System.out.println("第八步:初始化结束后的操作");
/*
* 验证权限操作
*/
/*
* 只对CustomerServiceImpl类进行权限验证
*/
if(beanName.equals("customerService")){
// 如果是CustomerServiceImpl类,则执行动态代理
Object proxy = Proxy.newProxyInstance(bean.getClass().getClassLoader(), bean.getClass().getInterfaces(), new InvocationHandler(){
// 在调用目标方法时,都相当于调用invoke()方法
public Object invoke(Object proxy, Method method, Object[] args) throws Throwable {
// 只对add方法添加校验,对add方法进行增强
String name = method.getName();
if(name.equals("add")){
System.out.println("执行权限验证操作");
Object result = method.invoke(bean, args);
return result;
}
// 如果不是add方法,则不进行增强
return method.invoke(bean, args);
}
});
return proxy;
}
return bean;
}
}
——总结
1、Spring的概述
2、Spring环境的搭建
3、Spring中的IoC
3、IoC和DI的区别
* IoC:控制反转,将对象的创建权交给Spring
* DI:依赖注入,DI需要有IoC的环境,在创建对象的时候,DI将对象的依赖属性一并注入到类中。
4、Bean的生命周期
* 后处理Bean:BeanPostProcessor类
Spring快速入门
标签:简化 private ext 访问 实现 location set get 下载
原文地址:http://www.cnblogs.com/wwwwyc/p/6375480.html