码迷,mamicode.com
首页 > 编程语言 > 详细

swift设计模式学习 - 装饰模式代码大全

时间:2017-02-09 21:45:51      阅读:214      评论:0      收藏:0      [点我收藏+]

标签:print   class   action   shanghai   .net   ase   cti   alt   缺点   

装饰模式

在不必改变原类文件和使用继承的情况下,动态地扩展一个对象的功能。它是通过创建一个包装对象,也就是装饰来包裹真实的对象。

装饰模式的特点

  1. 装饰对象和真实对象有相同的接口。这样客户端对象就能以和真实对象相同的方式和装饰对象交互。
  2. 装饰对象包含一个真实对象的引用(reference)
  3. 装饰对象接受所有来自客户端的请求。它把这些请求转发给真实的对象。
  4. 装饰对象可以在转发这些请求以前或以后增加一些附加功能。这样就确保了在运行时,不用修改给定对象的结构就可以在外部增加附加的功能。在面向对象的设计中,通常是通过继承来实现对给定类的功能扩展。

装饰模式的基本实现

技术分享

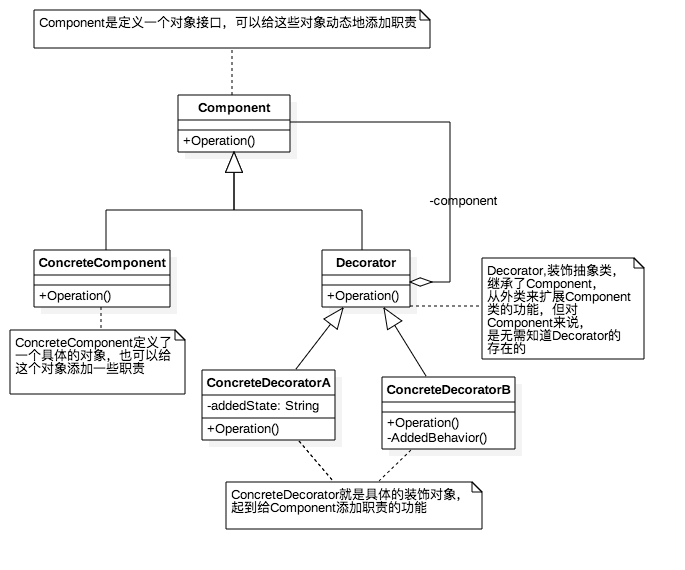
上图是最基本的装饰模式的结构图,下面将用Swift代码来实现一个基本装饰模式:

1).先写一个Component接口

protocol Component {
    func operation()
}
  • 1
  • 2
  • 3
  • 1
  • 2
  • 3

2).写一个具体的Component对象

class ConcreteComponent: Component {
    func operation() {
        // 具体操作的实现
    }
}
  • 1
  • 2
  • 3
  • 4
  • 5
  • 1
  • 2
  • 3
  • 4
  • 5

3).写一个装饰抽象类

class Decorator: Component {
    var component: Component?
    func operation() {
        component?.operation()
    }
}
  • 1
  • 2
  • 3
  • 4
  • 5
  • 6
  • 1
  • 2
  • 3
  • 4
  • 5
  • 6

4).写具体的装饰对象

// 装饰对象A
class ConcreteDecoratorA: Decorator {
    private var addedState: String?
    override func operation() {
        super.operation()
        addedState = "ConcreteDecoratorA独有的功能,用来区分ConcreteDecoratorB"
        // 具体装饰对象A的操作
    }
}
// 装饰对象B
class ConcreteDecoratorB: Decorator {
    override func operation() {
        super.operation()
        addedBehavior()
        // 具体装饰对象B的操作
    }
    // ConcreteDecoratorB独有的方法,用来区分ConcreteDecoratorA
    private func addedBehavior() {

    }
}
  • 1
  • 2
  • 3
  • 4
  • 5
  • 6
  • 7
  • 8
  • 9
  • 10
  • 11
  • 12
  • 13
  • 14
  • 15
  • 16
  • 17
  • 18
  • 19
  • 20
  • 21
  • 1
  • 2
  • 3
  • 4
  • 5
  • 6
  • 7
  • 8
  • 9
  • 10
  • 11
  • 12
  • 13
  • 14
  • 15
  • 16
  • 17
  • 18
  • 19
  • 20
  • 21

通过以上代码我们就能简单了解装饰模式的基本实现于过程,它的主要的目的就是:在不必改变原类文件和使用继承的情况下,动态地扩展一个对象的功能,就像以上示例代码一样,通过ConcreteDecoratorAConcreteDecoratorB去扩展ConcreteComponent这个对象的功能,这样不用去改变ConcreteComponent这个类的源文件,也可以达到扩展的效果。

用装饰模式解决实际问题(买车选配的问题)

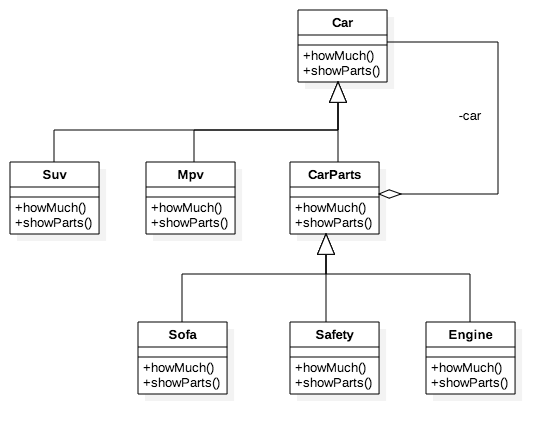
下面通过一个实际的例子来看看,比如我们在买车的时候一般会选配很多配件,下面我们通过策略模式来实现这一过程,下上个结构图:

技术分享

下面贴上代码:

// Component
protocol Car {
    // 多少钱
    func howMuch()-> Int
    // 展示装配的配件
    func showParts()
}

// ConcreteComponents
class Suv: Car {
    init(owner: String) {
        print("\(owner)买了一辆Suv,10W")
    }

    func howMuch() -> Int {
        return 10
    }

    func showParts() {}
}

class Mpv: Car {
    init(owner: String) {
        print("\(owner)买了一辆Mpv,15W")
    }
    func howMuch() -> Int {
        return 15
    }
    func showParts() {}
}

// Decorator
class CarParts: Car {
    var car: Car?
    func howMuch() -> Int {
        return car?.howMuch() ?? 0
    }
    func showParts() {
        car?.showParts()
    }
    func decorator(_ car: Car) -> Car {
        self.car = car
        return self
    }
}

// ConcreteDecorators 
class Sofa: CarParts {
    override func howMuch() -> Int {
        return super.howMuch() + 1
    }
    override func showParts() {
        super.showParts()
        print("选配了真皮沙发,1W")
    }
}

class Safety: CarParts {
    override func howMuch() -> Int {
        return super.howMuch() + 3
    }

    override func showParts() {
        super.showParts()
        print("选配了全套安全系统,3W")
    }
}

class Engine: CarParts {
    override func howMuch() -> Int {
        return super.howMuch() + 5
    }
    override func showParts() {
        super.showParts()
        print("选配了V8发动机,5W")
    }
}
  • 1
  • 2
  • 3
  • 4
  • 5
  • 6
  • 7
  • 8
  • 9
  • 10
  • 11
  • 12
  • 13
  • 14
  • 15
  • 16
  • 17
  • 18
  • 19
  • 20
  • 21
  • 22
  • 23
  • 24
  • 25
  • 26
  • 27
  • 28
  • 29
  • 30
  • 31
  • 32
  • 33
  • 34
  • 35
  • 36
  • 37
  • 38
  • 39
  • 40
  • 41
  • 42
  • 43
  • 44
  • 45
  • 46
  • 47
  • 48
  • 49
  • 50
  • 51
  • 52
  • 53
  • 54
  • 55
  • 56
  • 57
  • 58
  • 59
  • 60
  • 61
  • 62
  • 63
  • 64
  • 65
  • 66
  • 67
  • 68
  • 69
  • 70
  • 71
  • 72
  • 73
  • 74
  • 75
  • 76
  • 77

下面我们使用一下以上代码看看:

//wcl买一辆suv
var suv: Car = Suv(owner: "wcl")
//装配沙发
suv = Sofa().decorator(suv)
//装配发动机
suv = Engine().decorator(suv)
//装配安全系统
suv = Safety().decorator(suv)
suv.showParts()
print("一共花了\(suv.howMuch())W")
print("\n")
//wcl买一辆mpv
var mpv: Car = Mpv(owner: "wcl")
//装配发动机
mpv = Engine().decorator(mpv)
//装配安全系统
mpv = Safety().decorator(mpv)
mpv.showParts()
print("一共花了\(mpv.howMuch())W")
  • 1
  • 2
  • 3
  • 4
  • 5
  • 6
  • 7
  • 8
  • 9
  • 10
  • 11
  • 12
  • 13
  • 14
  • 15
  • 16
  • 17
  • 18
  • 19
  • 1
  • 2
  • 3
  • 4
  • 5
  • 6
  • 7
  • 8
  • 9
  • 10
  • 11
  • 12
  • 13
  • 14
  • 15
  • 16
  • 17
  • 18
  • 19

以下是代码打印的结果:

wcl买了一辆Suv,10W
选配了真皮沙发,1W
选配了V8发动机,5W
选配了全套安全系统,3W
一共花了19W

wcl买了一辆Mpv,15W
选配了V8发动机,5W
选配了全套安全系统,3W
一共花了23W
  • 1
  • 2
  • 3
  • 4
  • 5
  • 6
  • 7
  • 8
  • 9
  • 10
  • 1
  • 2
  • 3
  • 4
  • 5
  • 6
  • 7
  • 8
  • 9
  • 10

这样就用装饰模式简单了实现了一下这个过程,在不改变SuvMpv这两个类的源文件的情况下对它进行操作。

总结

我们先看看装饰模式的优点:

  1. 可以将类中装饰功能从类中搬出移除,这样可以简化原有的类
  2. 有效的将核心职责和装饰功能区分开来,而且可以除去相关类中重复的装饰逻辑

装饰模式的缺点:

  1. 装饰模式虽然扩展性较高,类的数量略多,如何取舍可扩展性和简洁性是个问题,有所选择就要有所牺牲
  2. 很难搞清楚一个类究竟被装饰了多少层,可能是1层,也可能是100层

swift设计模式学习 - 装饰模式代码大全

标签:print   class   action   shanghai   .net   ase   cti   alt   缺点   

原文地址:http://www.cnblogs.com/chengyu891/p/6383809.html

(0)
(0)
   
举报
评论 一句话评论(0
登录后才能评论!
© 2014 mamicode.com 版权所有  联系我们:gaon5@hotmail.com
迷上了代码!