标签:des style blog http color 使用 io 文件
1.安装nodejs
2.安装grunt-cli
npm install -g grunt-cli
3.进入到项目目录,同时准备好package.json和Gruntfile.js文件
//package.json文件内容,其中alias指定了jquery的路径,后面一坨是需要用到的grunt插件

{
  "name": "seajs_test",
  "version": "1.0.0",
  "spm": {
    "alias": {
      "jquery": "lib/jquery-debug"
    }
  },
  "devDependencies": {
    "grunt": "^0.4.5",
    "grunt-cmd-transport": "~0.3.0",
    "grunt-cmd-concat": "~0.2.5",
    "grunt-contrib-uglify": "~0.2.4",
    "grunt-contrib-clean": "~0.5.0"
  }
}
//gruntfile.js文件内容
module.exports = function(grunt) {
    grunt.initConfig({
        pkg: grunt.file.readJSON(‘package.json‘),
        transport: {
          options: {
            paths: [‘js‘], // where is the module, default value is [‘sea-modules‘]
            alias:‘<%= pkg.spm.alias %>‘
          },
          helloworld: {
            options: {
              idleading: ‘helloworld/‘
            },
            files: [
              {
                cwd: ‘js/helloworld‘,
                src: ‘**/*.js‘,
                dest: ‘.build/helloworld‘
              }
            ]
          },
          main: {
            options: {
              idleading: ‘main/‘
            },
            files: [
              {
                cwd: ‘js/main‘,
                src: ‘**/*.js‘,
                dest: ‘.build/main‘
              }
            ]
          },
          lib: {
            options: {
              idleading: ‘lib/‘
            },
            files: [
              {
                cwd: ‘js/lib‘,
                src: ‘**/*.js‘,
                dest: ‘.build/lib‘
              }
            ]
          }
        },
        concat: {
          options: {
            include: ‘relative‘
          },
          build: {
            files: {
              ‘dist/helloworld/klass.js‘: [‘.build/helloworld/klass.js‘, ‘.build/helloworld/circle.js‘],
              ‘dist/main/index.js‘: [‘.build/main/index.js‘],
              ‘dist/lib/jquery-debug.js‘:[‘.build/lib/jquery-debug.js‘]
            }
          }
        },
        uglify: {
          main: {
            files: {
              ‘dist/helloworld/klass.js‘: [‘dist/helloworld/klass.js‘],
              ‘dist/main/index.js‘: [‘dist/main/index.js‘],
              ‘dist/lib/jquery-debug.js‘:[‘dist/lib/jquery-debug.js‘]
            }
          }
        },
        clean:  {
          build: [‘.build‘] // clean .build directory
        }
    });
    grunt.loadNpmTasks(‘grunt-cmd-transport‘);
    grunt.loadNpmTasks(‘grunt-contrib-concat‘);
    grunt.loadNpmTasks(‘grunt-contrib-uglify‘);
    grunt.loadNpmTasks(‘grunt-contrib-clean‘);
    grunt.registerTask("test","my custom task",function(){
      console.log("hello grunt");
    });
    grunt.registerTask(‘default‘, [‘transport‘, ‘concat‘, ‘uglify‘, ‘clean‘,‘test‘]);
};
4.执行命令
grunt default
其中default就是Gruntfile最后定义的任务名称。
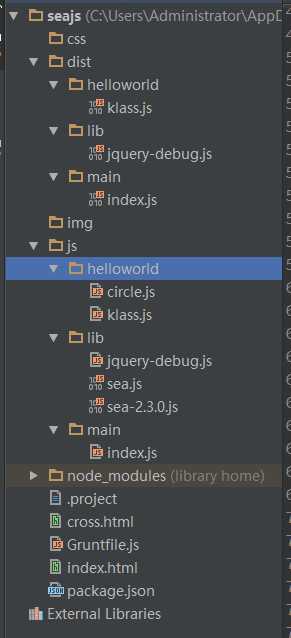
5. 项目目录结构

使用grunt构建seajs项目,布布扣,bubuko.com
标签:des style blog http color 使用 io 文件
原文地址:http://www.cnblogs.com/hongchenok/p/3924633.html