标签:jpg compute 预算 world advance ons auth use inf
使用预计算光照需要在Window/Lighting面板下找到预计算光照选项,保持勾选预计算光照并保证场景中有一个光照静态的物体
此时在编辑器内构建后,预计算光照开始生效。
相关的文章有很多,unity官方有一系列文章不错:
https://unity3d.com/cn/learn/tutorials/topics/graphics/introduction-precomputed-realtime-gi
在Lighting面板的Scene页签下可以设置全局光照的整体参数,这个是叠加在基本值上的属性
并且你也可以设置统一的光照参数LightmapParameters。这里不多说了
唯一需要注意是分辨率设置

在1单位=1米的情况下,室内场景是2-3,室外场景是0.5-1。
texels是PRGI里的单位,具体unity这篇文章有讲解:https://unity3d.com/cn/learn/tutorials/topics/graphics/understanding-charts?playlist=17102
在Lighting面板的Object页签下,可以对单独对象设置光照属性,这个比较重要
这里说一下光照参数:
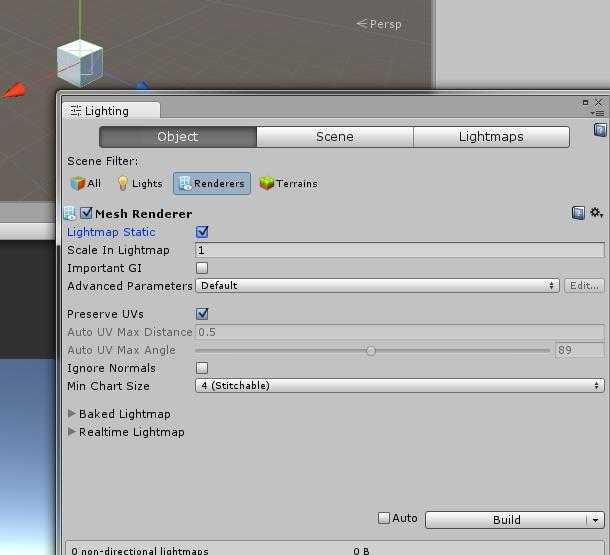
Scale In Lightmap - 由于预计算光照使用的不是Lightmap,所以这个选项在PRGI中似乎是无效的(测了下,似乎是)
Important GI - 用于标识是否是重要物体,对于自发光物体可以增加它的亮度,确保一些物体可以被其照亮。(Make all other objects dependent upon this object.Useful for objects that will be strongly emissive to make sure that other objects will be illuminated by)
Advanced Parameters - 对光照进行单独的高级设置,会链接到LightmapParameters文件.一会单独说
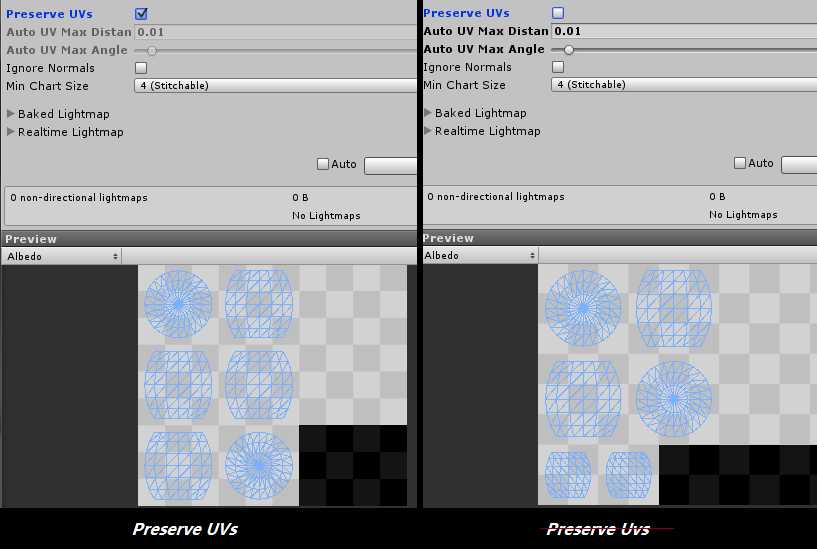
Preserve UVs - 勾选后可以保持原有UV,不够选uv则会受到改变。
但需要注意自动UV只有在一些特殊情况下才会改变原有uv的形态,如果原有uv本身没有问题,还会保持原状
Ignore Normals - 和手动配置的uv有关,如果出现一些错误情况可以勾选该选项重新烘培。(Do not compare normals when detecting charts for realtime gi.
this can be necessary when using hand authored uvs to avoid unnecessary chart splits.)
Min Chart Size - 有两个选项,2和4,4(Stitchable)是默认状态,如果为了速度可以选择2(Minimumu),但会有效果缺失。
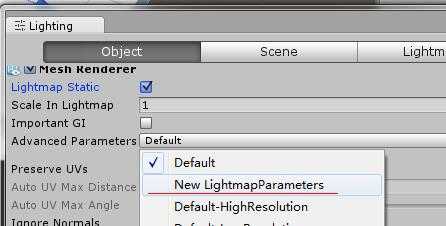
使用LightmapParameters可以将光照参数对单个对象进行单独覆写
创建一个LightmapParameters在Assets->Create->Lightmap Parameters
然后在Lighting的Object页签下选择相应的LightmapParameters进行设置
来看一下LightmapParameters

这里只看预计算GI的相关选项
Resolution
Realtime lightmap resolution in texels per world unit.this value is multiplied by the realtime resolution in the
lighting window to give the output lightmap resolution.this should generally be an order of magnitude less than what is
common for baked lightmaps to keep the precompute timemanageable and the performance at runtime acceptable.
Note that if this is made more fine-grained,then the irradiance budget will often need to be increased too,
to fully take advantage of this increased detail.

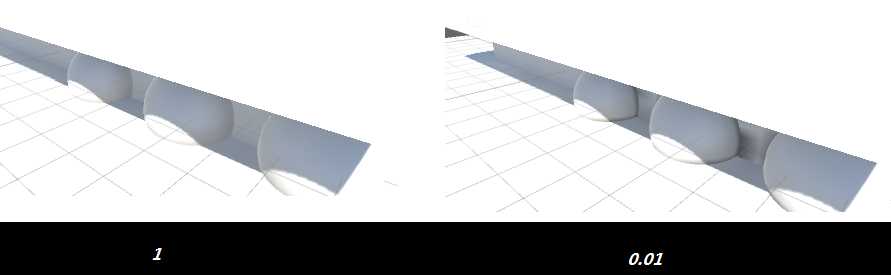
这个分辨率是每世界单位的texels值,他乘以原始分辨率的值,如上图的测试,值越高则分辨率越高
注意如果需要更多的粒度,irradiance辐照度也需要适当增加才行。
经过实际测试,这个值是数值越大越精确,烘培速度也越慢
并且这个参数也其他的参数是互相影响的,这相当于一个整体调节吧。
Cluster Resolution
the ratio between the resolution of the clusters with which light bounce is calculated and the resolution of the output lightmaps that sample from these.
可以叫做光照集群,或者丛集?
具体看unity这篇文章
https://unity3d.com/cn/learn/tutorials/topics/graphics/understanding-clusters
具体大意是,每一个Cluster块都是储存光照信息的具体单元,通过这些单元所存放信息的插值,得到最终效果
所以Cluster块越大越不精确,速度也就越快,反之精确度也就越高。
这个应该和Resolution一样,是乘以的这个值,也是值越大越精确

Irradiance Budget
The amount of data used by each texel in the output lightmap.specifies how fine-grained a view of the scene an output texel has. small values mean more averaged out lighting,since the light contributions from more clusters are treated as one.affects runtime memory usage and to a lesseer degree runtime cpu usage
辐照度预算,会被应用到texel当中,小的值可以得到更平均的光照,并且这个值会影响到运行时内存的占用和cpu占用
在Lighting Optimisation Tutorial这个demo当中,该值被设置的非常低。
Irradiance Quality
the number of rays to cast to compute which clusters affect a given output lightmap texel - the granularity of how this is saved is defined by the irradiance budget. affects the speed of the precomputation but has no influence on runtime performance.
辐照度品质,这个值只影响预计算光照的构建速度,对于运行时并无影响。
Backface Tolerance
the percentage of rays shot from an output texel that must hit front faces to be considered usable.
allows a texel it hit back faces(the texel is inside some geometry). in that case artfacts are avoided by cloning valid values from surrounding texels.for example,if backface tolerance is 0.0,the texel is rejected only if it sees nothing but backfaces. if it is 1.0, the ray origin is rejected if it has even one ray that hits a backface.
背面容差,允许射线穿过一些多边形的内部采样到背面,对于遮蔽处,给遮蔽物提高这个值可以得到更明亮的效果。
Modeling Tolerance
Maximum size of gaps that can be ignored for gi
模型容差,最大尺寸的间距能被GI忽略掉
这个值不能设置为0,不然会出错,理论上值越小越不会被GI忽略,最终效果也就越好
这个值在光照不充足的情况下表现的尤为明显,下面就因为这个参数太高而导致‘坏面‘问题:

Edge Stitching
If enabled,ensures hat uv charts(aka uv island) in the generated lighmaps blend together where they meet so there is no visible seam between them.
边缝合。开启后UV接缝会变得不明显,如果想要故意留有接缝效果就关闭它

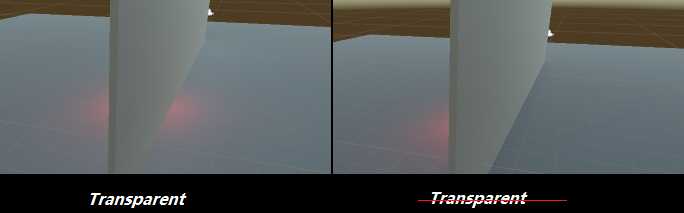
Is Transparent
If enabled,the object appears transparent during GlobalIllumination lighting calculations.Backfaces are not contributing to and light travels through the surface.This is useful for emissive invible surfaces.
这个参数好像只对自发光的物体有效,当勾选这个值这个物体会被当作透明的。自发光会穿透它。默认是不勾选。
System Tag
System are groups of objects whose lightmaps are in the same atlas.it is also the granularity at which dependencies are calculated.multiple systems are created automatically if the scene is big enough,but it can be helpful to be able to split them up manually for e.g. streaming in sections of a level. the system tag lets you force an object into a different realtime systrem even though all the other parameters are the same.
这个似乎是图集ID,一般不需要设置。(我个人觉得,如果设置到一个全新的ID上,似乎可以解决某些UV问题)。
官方有3个demo演示了unity5光照系统。
The Courtyard https://www.assetstore.unity3d.com/en/#!/content/49377
Corridor Lighting Example https://www.assetstore.unity3d.com/en/#!/content/33630
Lighting Optimisation Tutorial https://www.assetstore.unity3d.com/en/#!/content/73563
前两个demo可以看作是光照参数的使用演示,第三个是真正指导如何对烘培速度进行优化
以unity5.4版本为例,有两个查看GI的重要指标
一个叫做UV Charts(https://unity3d.com/cn/learn/tutorials/topics/graphics/understanding-charts)
一个叫做Clustering(https://unity3d.com/cn/learn/tutorials/topics/graphics/understanding-clusters)
他们分别是不同的网格,在构建预计算光照的时候你可以看见构建中的这些信息。
UV Charts是光照uv自身的大小,包括Albedo,Emissive,Irradiance...之类的通道,都依据这个的大小
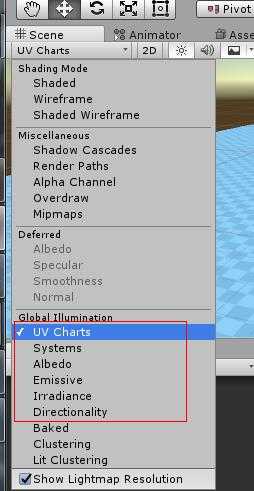
而Clustering可以翻译成丛集,这里面每一块包含了一些该区域的光照信息,最后通过这些块与块进行插值,得到具体的光照。
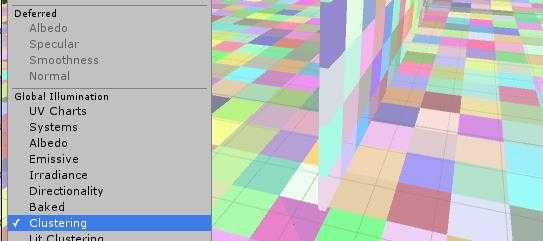
在修改参数的同时,不断的比对这两个通道,才能找到问题。一般远处不可接近的物体分辨率会设置的低一些
在Lighting Optimisation Tutorial这个案例中,unity对远山近处的房屋等用了不同的光照配置
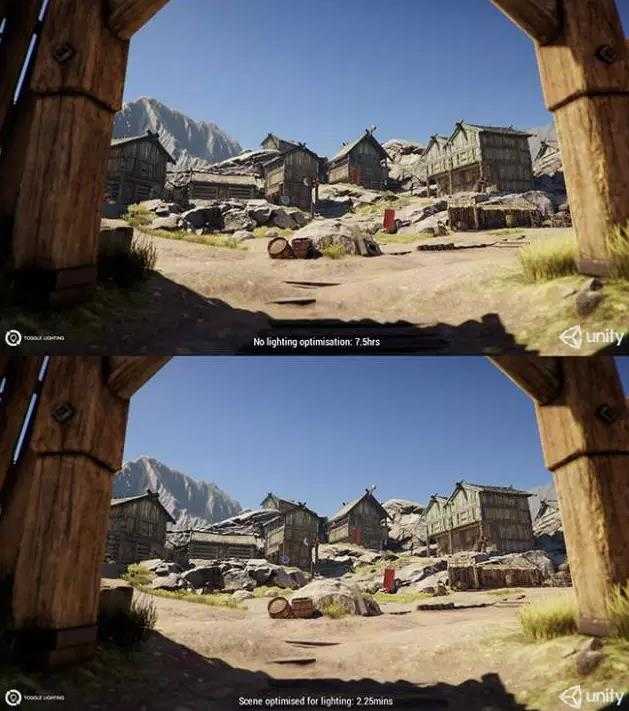
经过优化,将7.5个小时的构建时间变为了2.25分钟
这篇文章翻译版的链接:http://forum.china.unity3d.com/thread-22730-1-4.html
光照探头其实算不上新功能,但不管是烘培光照还是预计算光照都需要它
过于平均分布的光照探头是不科学的,实际上应该在光源变化较多的地方放置多的光照探头
在光照平均的地方放置比较少的探头。
选中光照探头,点击编辑图标即进入编辑模式
选中光照点,按Ctrl+D复制,拖拽,即可操作光照探头
虽然unity不支持动态的自发光物体,但通过光照探头烘培保存的信息,动态的物体也可以受到自发光物体的影响
(可以在延迟渲染下尝试自定义光照外形,Adam的demo中就自定义了两种光照)
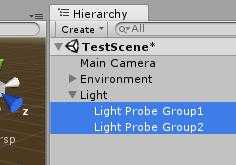
你也可以在场景中设置多组光照探头,以方便编辑,最后他们都会生效
另外如果需要进一步提升光照构建速度,可以对橡木桶,石块之类的物件设置为非光照静态物体
用光照探头来处理其光照,这样可减少光照图的数量,加快预计算时间。
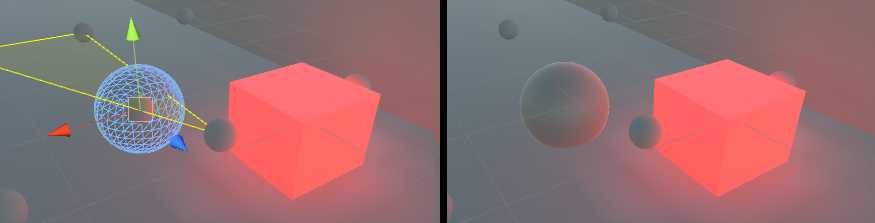
这是unity5.4新加入的功能,对于大的物体和粒子对象,应当考虑使用LPPV
unity关于LPPV的文章:https://blogs.unity3d.com/cn/2016/02/03/light-probe-proxy-volume-5-4-feature-showcase/
LPPV必须在有光照探头的情况下放置
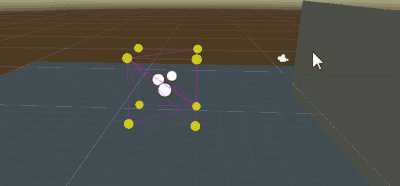
这里演示如何给粒子添加LPPV
1.首先保证场景中分布有光照探头

2.粒子需要使用自定义shader,并且通过ShadeSHPerPixel拿到一些特殊光照信息
具体看那篇unity的文章,这里列出关键部分
fixed4 frag(v2f i) : SV_Target
{
    half3 currentAmbient = half3(0, 0, 0);
    half3 ambient = ShadeSHPerPixel(i.worldNormal, currentAmbient, i.worldPos);
    fixed4 col = _TintColor * i.color * tex2D(_MainTex, i.texcoord);
    col.xyz = ambient;
    UNITY_APPLY_FOG_COLOR(i.fogCoord, col, fixed4(0,0,0,0)); // fog towards black due to our blend mode
    return col;
}
然后配置好粒子,并为其指定LPPV,然后设置好采样密度信息
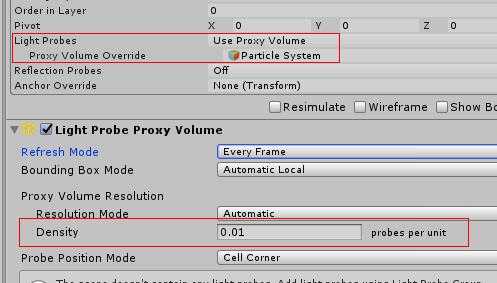
完成:
总之PRGI还有许多局限性,比如巫师3那样的实时天气。
但对于较为静态的场景,通过配置好参数所达到的效果还是不错的,相信unity未来也会不断完善这套系统
Unity预计算全局光照的学习(速度优化,LightProbe,LPPV)
标签:jpg compute 预算 world advance ons auth use inf
原文地址:http://www.cnblogs.com/hont/p/6399790.html