标签:ict 注解 mvc ase cache sse navigate 流操作 inf
by Kenny Bastani
Sunday, July 12, 2015
转自:http://www.kennybastani.com/2015/07/spring-cloud-docker-microservices.html
This blog series will introduce you to some of the foundational concepts of building a microservice-based platform using Spring Cloud and Docker.
本系列文章将向你介绍一些有关使用Spring Cloud和Docker搭建微服务平台的基本概念。
What is Spring Cloud?
Spring Cloud is a collection of tools from Pivotal that provides solutions to some of the commonly encountered patterns when building distributed systems. If you’re familiar with building applications with Spring Framework, Spring Cloud builds upon some of its common building blocks.
Among the solutions provided by Spring Cloud, you will find tools for the following problems:
l Configuration management
l Service discovery
l Circuit breakers
l Distributed sessions
Spring Cloud是一组由Pivotal公司开发的工具集,为搭建分布式系统提供一些常见模式的解决方案。如果你熟悉使用Spring Framework来搭建应用程序的话,会发现,Spring Cloud是构建在它的一些常用构建块的基础上的。
在Spring Cloud提供的众多解决方案中,你会找到能够解决如下问题的工具:
l 配置管理
l 服务发现
l 断路器
l 分布式会话
Spring Boot
The great part about working with Spring Cloud is that it builds on the concepts of Spring Boot.
Spring Cloud中的绝大部分,是构建在Spring Boot的概念之上的。
For those of you who are new to Spring Boot, the name of the project means exactly what it says. You get all of the best things of the Spring Framework and ecosystem of projects, tuned to perfection, with minimal configuration, all ready for production.
对于那些刚接触Spring Boot的人来说,这个项目的名字就是它的含义。你将会得到Spring Framework和项目生态系统最好的东西,经过最少的配置,调整到完美,做好生产前的所有准备。
Service Discovery and Intelligent Routing
服务发现和智能路由
Each service has a dedicated purpose in a microservices architecture. When building a microservices architecture on Spring Cloud, there are a few primary concerns to deal with first. The first two microservices you will want to create are the Configuration Service, and the Discovery Service.
在微服务框架下,每个服务都只专注于一个目标。用Spring Cloud搭建微服务框架的时候,有几个先要处理的关键点。首先要创建的两个微服务是:配置服务(configuration service)和发现服务(discovery service)。
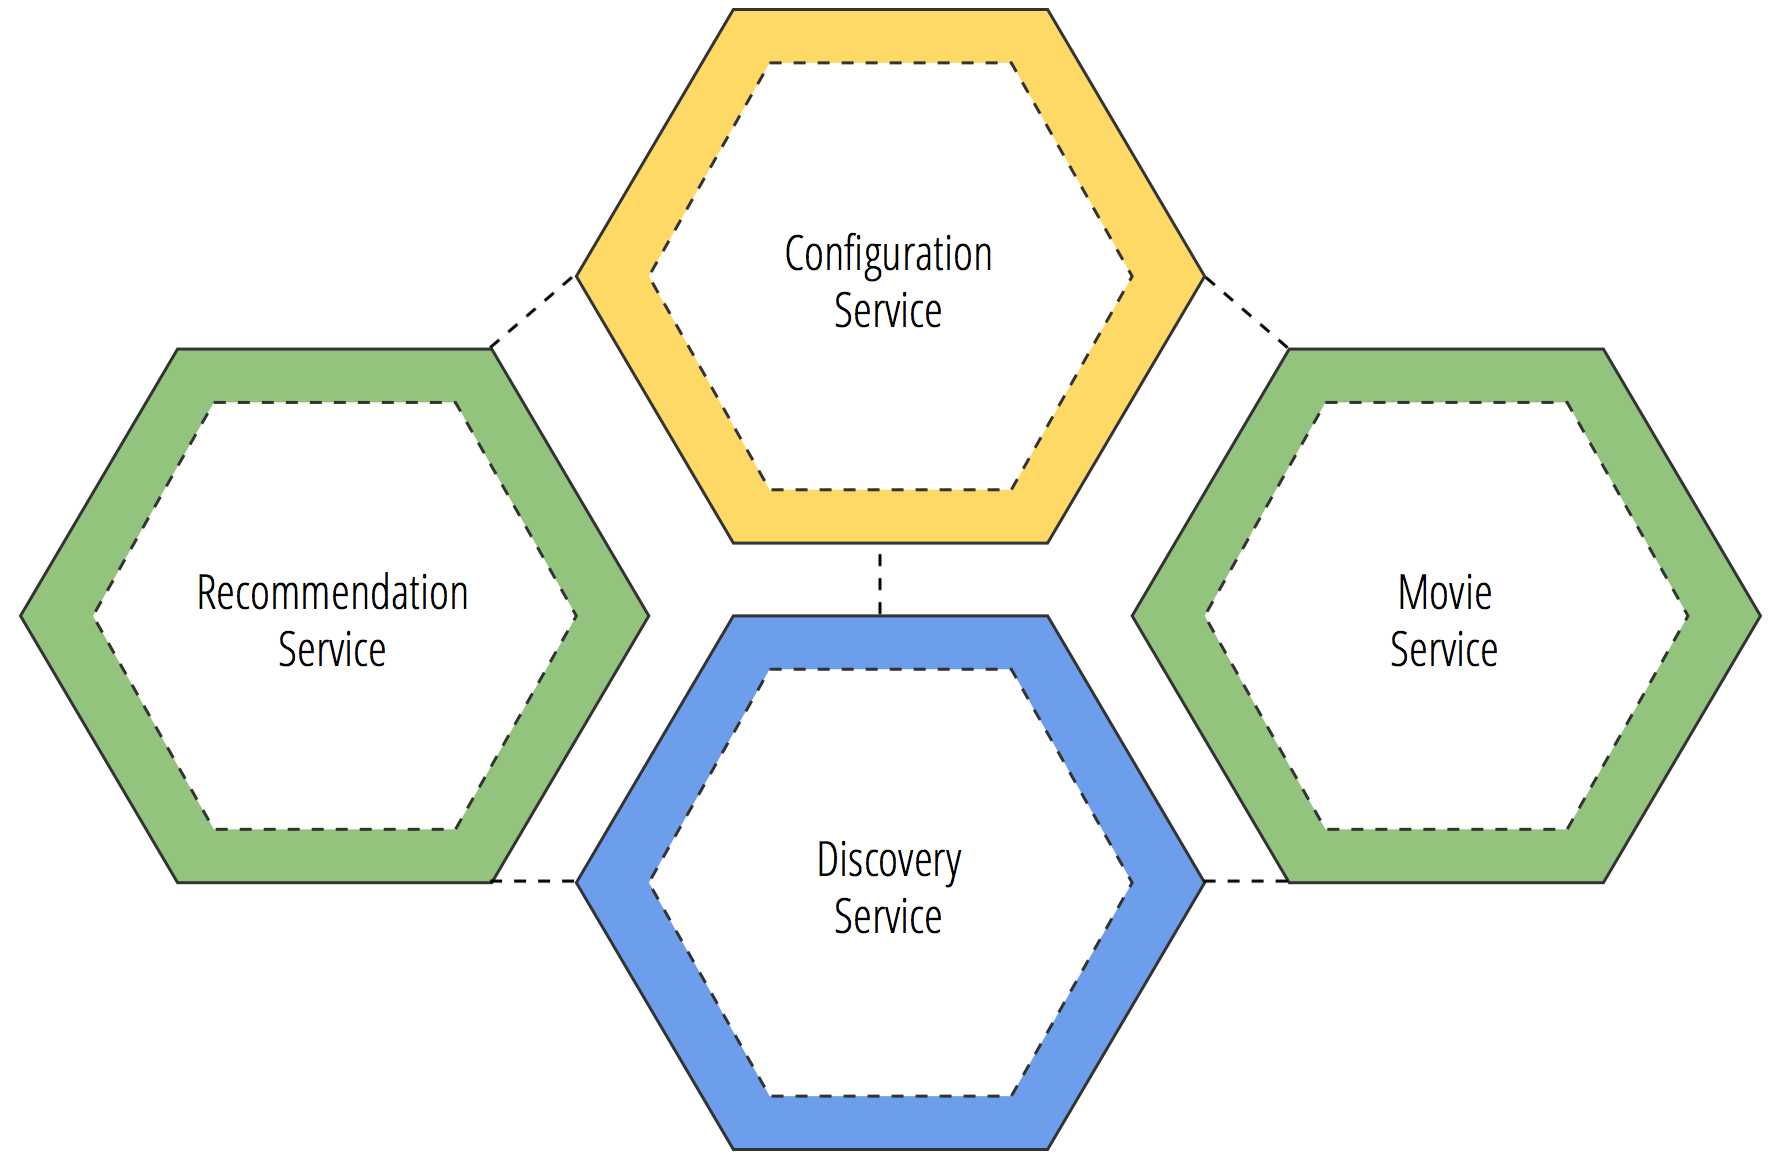
The graphic above illustrates a 4-microservice setup, with the connections between them indicating a dependency.
上面的图片演示了一个由4个微服务组成的系统,以及他们之间的依赖关系。
The configuration service sits at the top, in yellow, and is depended on by the other microservices. The discovery service sits at the bottom, in blue, and also is depended upon by the other microservices.
在最上面的黄色标记的配置服务(configuration service),被其他所有的微服务所依赖。最下面的蓝色标记的发现服务(discovery service),同样是被其他所有的微服务所依赖。
In green, we have two microservices that deal with a part of the domain of the example application I will use throughout this blog series: movies and recommendations.
绿色的两个微服务将会作为例子,贯穿整篇文章。他们分别提供电影播放和简介的服务。
Configuration Service
The configuration service is a vital component of any microservices architecture. Based on the twelve-factor app methodology, configurations for your microservice applications should be stored in the environment and not in the project.
配置服务(configuration service)对所有微服务框架都是一个只管重要的组件。基于“12-factor app”方法论(附2),微服务应用程序的配置信息被保存在系统环境中,而不是工程文件里。
The configuration service is essential because it handles the configurations for all of the services through a simple point-to-point service call to retrieve those configurations. The advantages of this are multi-purpose.
配置服务(configuration service)很重要的原因是:通过一个简单的点对点服务调用,所有的服务就可以通过它获取自己的配置信息。这样做的好处就是:多用途(一次配置多处使用)。
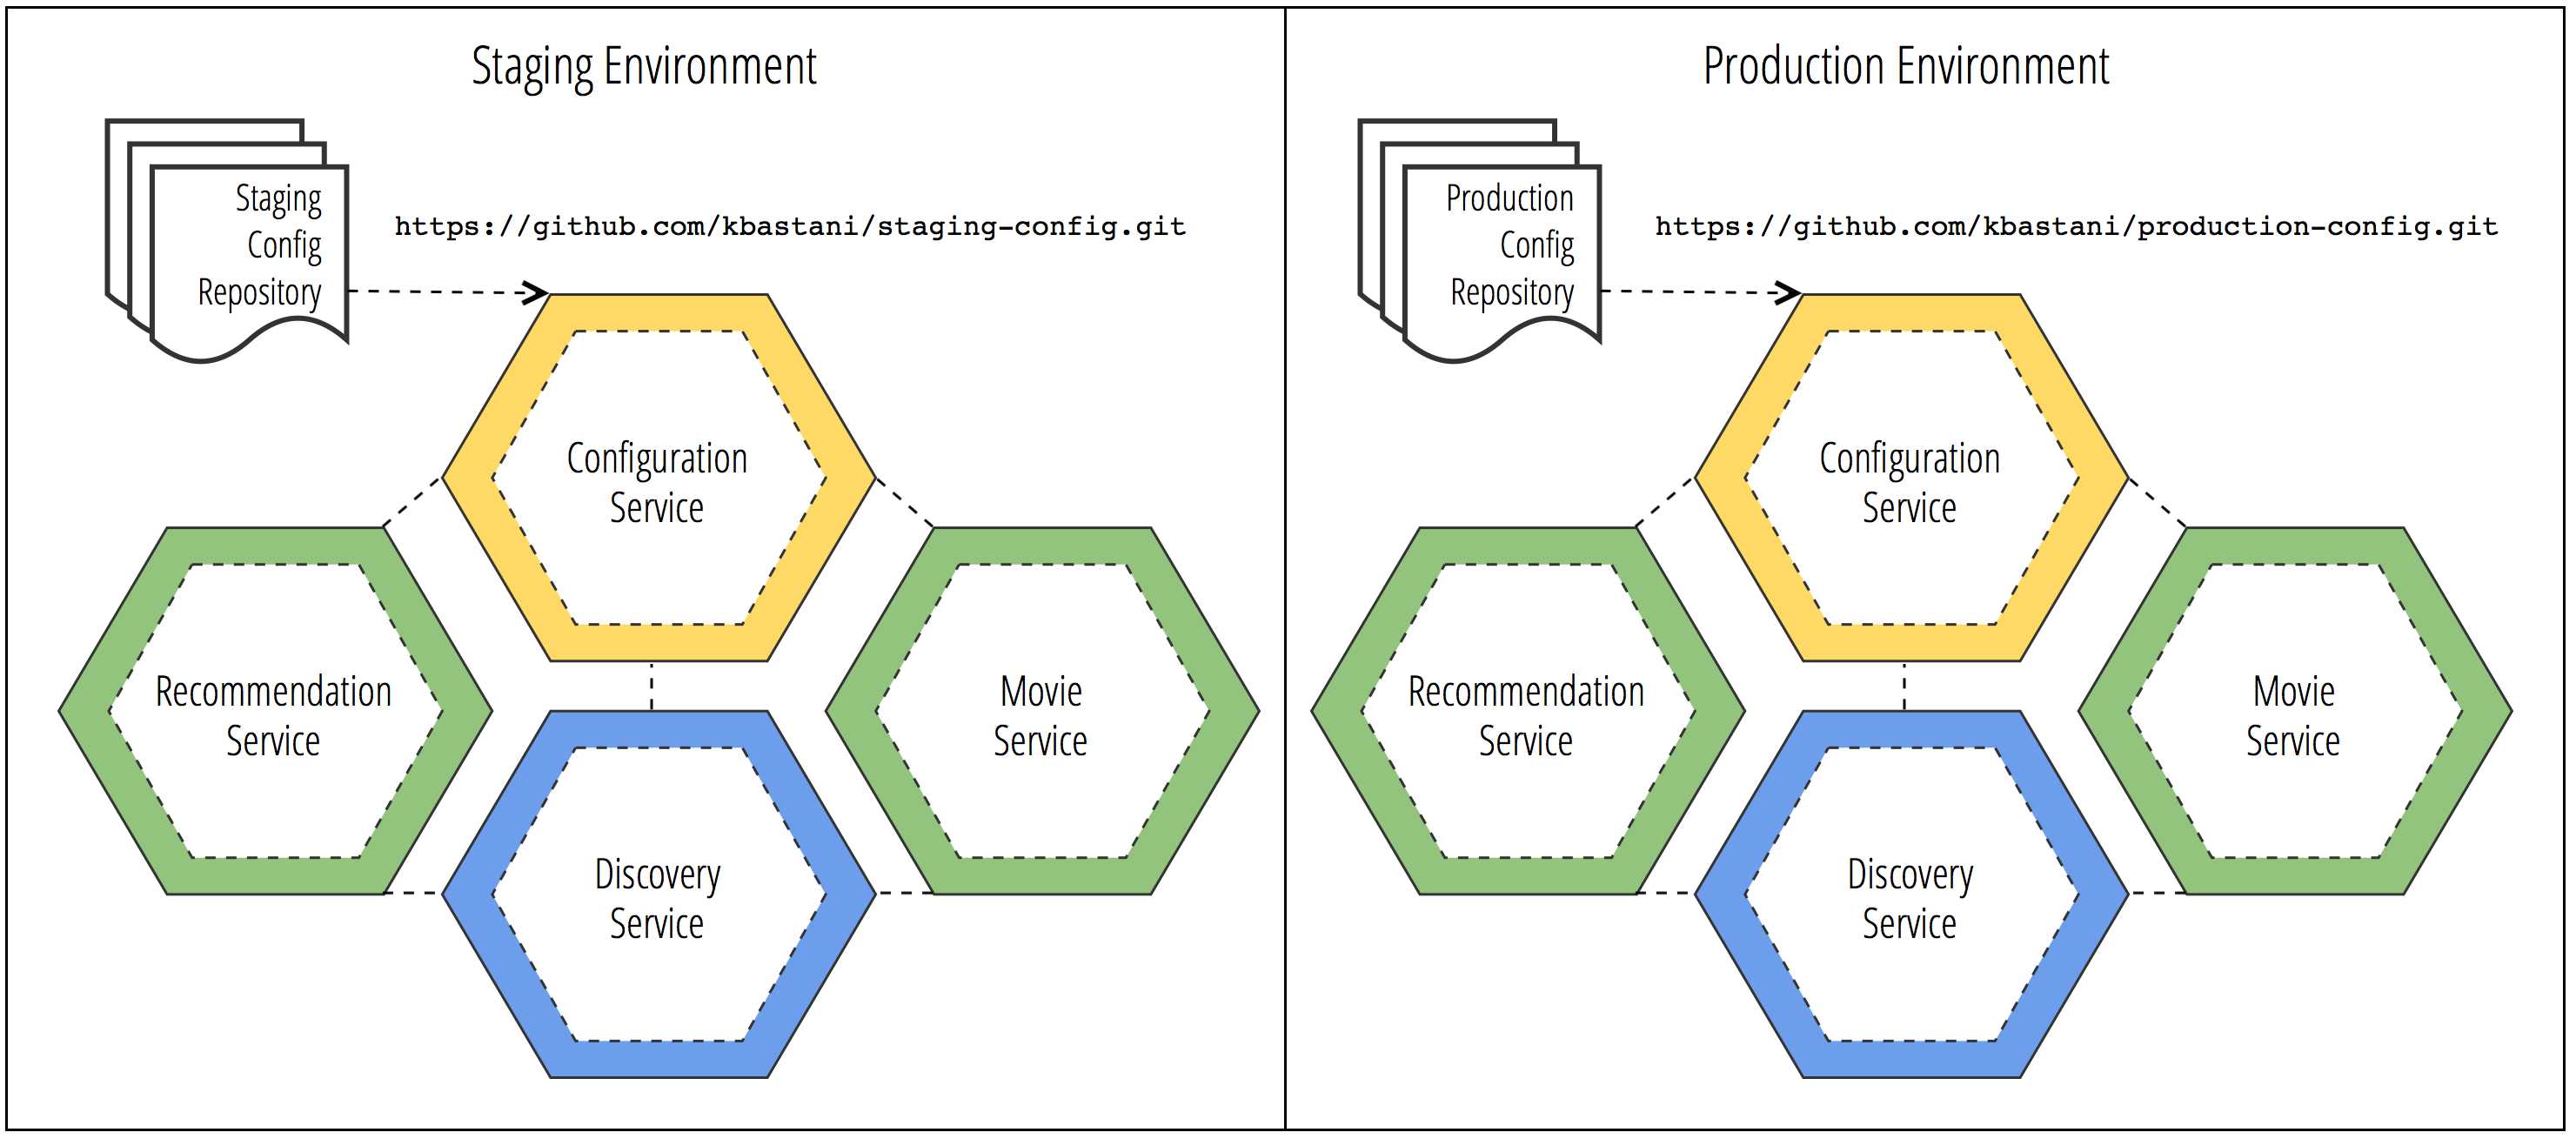
Let‘s assume that we have multiple deployment environments. If we have a staging environment and a production environment, configurations for those environments will be different. A configuration service might have a dedicated Git repository for the configurations of that environment. None of the other environments will be able to access this configuration, it is available only to the configuration service running in that environment.
假设我们有多个部署环境。一个测试环境,一个生产环境,他们的配置信息肯定是不一样的。配置服务(configuration service)会有一个独立的Git仓库,每个环境只会读取自己专属的配置信息。
When the configuration service starts up, it will reference the path to those configuration files and begin to serve them up to the microservices that request those configurations. Each microservice can have their configuration file configured to the specifics of the environment that it is running in. In doing this, the configuration is both externalized and centralized in one place that can be version-controlled and revised without having to restart a service to change a configuration.
当配置服务(configuration service)启动之后,他会根据路径为其他的微服务们提供读取配置文件的服务。每个微服务都拥有它正在运行的环境所使用的配置文件。实现了配置信息的外置化、集中化,并将它们置于版本控制下。这样一来,修改配置信息也就不用重启(配置)服务了。
With management endpoints available from Spring Cloud, you can make a configuration change in the environment and signal a refresh to the discovery service that will force all consumers to fetch the new configurations.
基于Spring Cloud对端点的管理,你可以在修改配置信息之后,刷新发现服务(discovery service),即实现了调用者(consumers)去提取新的配置信息。
Discovery Service
The discovery service is another vital component of our microservice architecture. The discovery service handles maintaining a list of service instances that are available for work within a cluster. Within applications, service-to-service calls are made using clients. For this example project, I used Spring Cloud Feign, a client-based API for RESTful microservices that originated from the Netflix OSS project.
发现服务(discovery service)是微服务架构中另一个必不可少的组件。它负责维护集群里所有正在运行中的服务实例的列表。在应用程序内部,用客户端的方式来实现服务间的调用。这里,我用的是Spring Cloud Feign, 一个基于RESTful客户端的API,源自于Netflix OSS项目。
@FeignClient("movie")
public interface MovieClient {
@RequestMapping(method = RequestMethod.GET, value = "/movies")
PagedResources findAll();
@RequestMapping(method = RequestMethod.GET, value = "/movies/{id}")
Movie findById(@RequestParam("id") String id);
@RequestMapping(method = RequestMethod.POST, value = "/movies",
produces = MediaType.APPLICATION_JSON_VALUE)
void createMovie(@RequestBody Movie movie);
}
In the code example above, I am creating a Feign client that maps to the REST API methods that are exposed by the movie service. Using the @FeignClient annotation, I first specify that I want to create a client API for the movie microservice. Next I specify the mappings of the service that I want to consume. I do this by declaring a URL pattern over the methods that describes a route for a REST API.
在上面的代码里,我创建了一个Feign客户端,把movie服务中暴露的接口,映射成REST API。首先,我用@FeignClient注解指明,我要创建一个针对movie微服务的客户端API。然后,我在函数的前面,以URL的形式,具体说明了哪些是接口函数——将它们定义成了REST API的路径。
The wonderfully easy part of creating Feign clients is that all I need to know is the ID of the service that I would like to create a client on. The URL of the service is automatically configured at runtime because each microservice in the cluster will register with the discovery service with its serviceId at startup.
要创建一个Feign客户端,我只需要知道我要访问的服务的ID。因为,每个微服务的URL在发现服务(discovery service)启动的时候,就被注册在了各自的服务ID上。
The same is true for all other services of my microservice architecture. All I need to know is the serviceId of the service I want to communicate with, and everything else will be autowired by Spring.
在我搭建的微服务架构里的其他服务也都一样的。我想要跟哪个服务通讯,只要知道它的服务ID就可以了,其他的事情由Spring自动装配。
API Gateway
API 网关服务
The API gateway service is another vital component if we are going to create a cluster of services managing their own domain entities. The green hexagons below are our data-driven services that manage their own domain entities and even their own databases. By adding an API gateway service, we can create a proxy of each API route that are exposed by the green services.
如果我们想要创建一个服务集群来管理他们自己的域实体(注),那么,API网关服务(API Gateway)也是一个必不可少的组件。
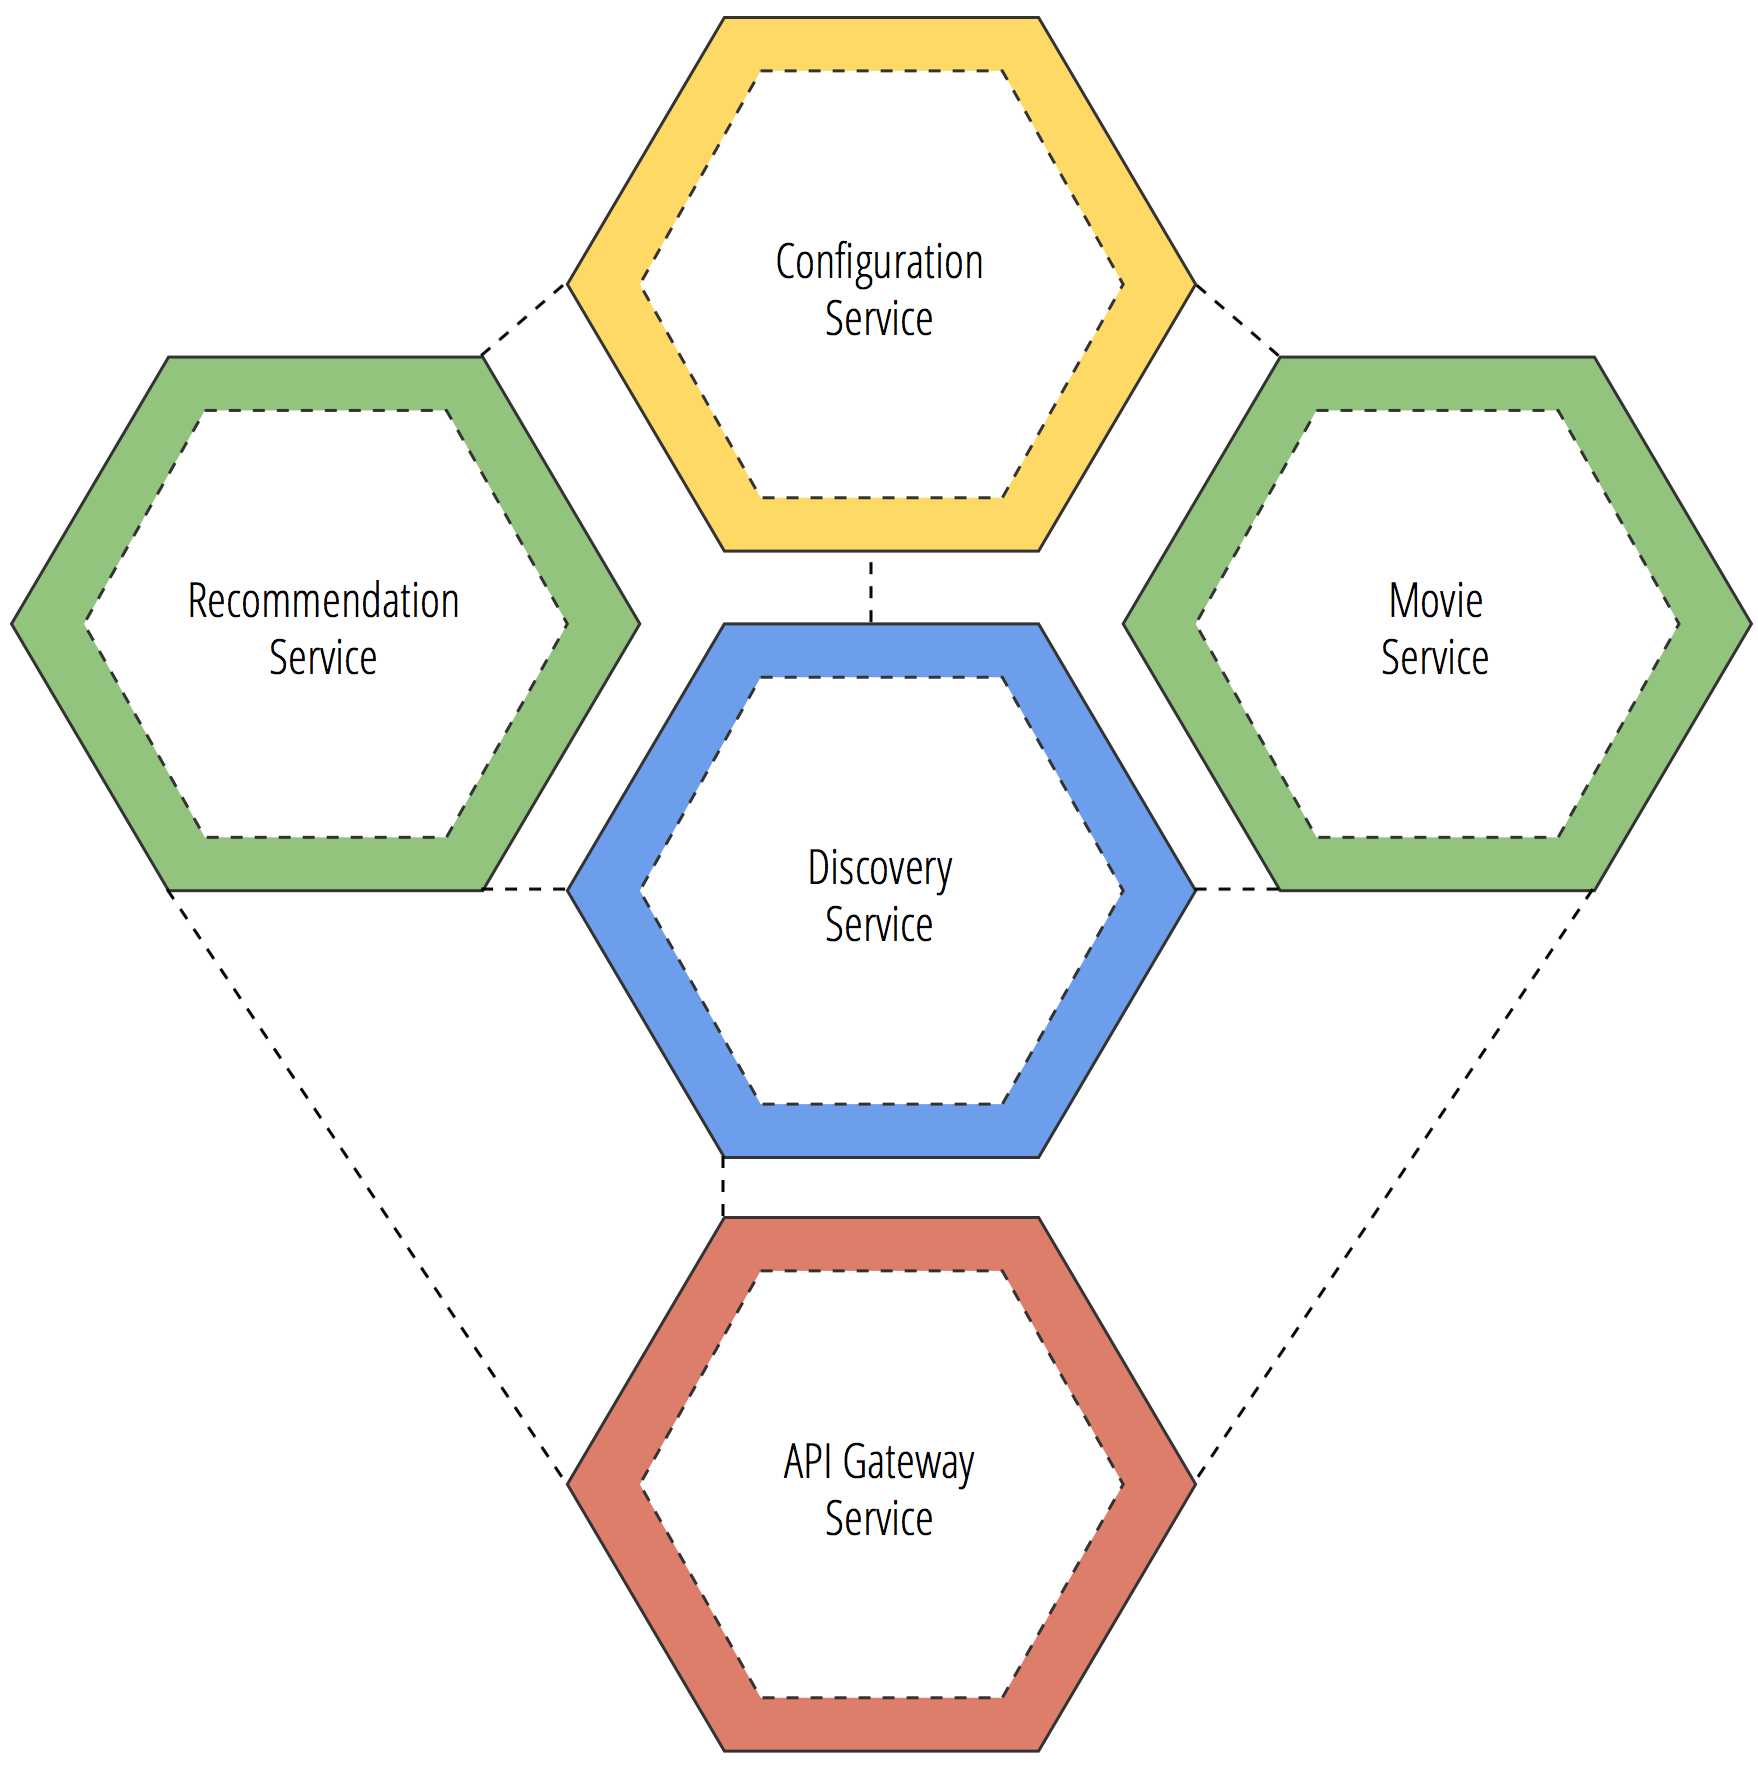
Let’s assume that both the recommendation service and the movie service expose their own REST API over the domain entities that they manage. The API gateway will discover these services through the discovery service and inject a proxy-based route of the API methods from the other services. In this way, both the recommendation and movie microservice will have a full definition of routes available locally from all the microservices that expose a REST API. The API Gateway will re-route the request to the service instances that own the route being requested through HTTP.
让我们假设刚才介绍的两个服务和movie服务已经通过域实体暴露了REST API。API网关服务(API Gateway)会通过发现服务(discovery service)发现这些服务,并且将它们的接口函数,从其他服务那里注入基于代理的路由。这样,上面说的三个服务就具有了完整的REST API的路由(serviceID+apiUrl)。API网关服务(API Gateway)将接口调用重定向成HTTP请求到对应的服务实例上。
Example Project
实例
I’ve put together an example project that demonstrates an end-to-end cloud-native platform using Spring Cloud for building a practical microservices architecture.
Demonstrated concepts:
l Integration testing using Docker
l Polyglot persistence
l Microservice architecture
l Service discovery
l API gateway
下面,我将用一个端到端的原生云(cloud-native)平台系统,来演示怎样用SpringCloud搭建真实的微服务框架。
演示中涉及的相关概念:
l 用Docker进行集成测试
l 混合持久化
l 微服务框架
l 服务发现
l API网关
Docker
Each service is built and deployed using Docker. End-to-end integration testing can be done on a developer’s machine using Docker compose.
每个服务都是Docker编译和部署的。开发人员在自己的开发环境就可以用Docker实现端到端的集成测试。
Polyglot Persistence
混合持久化
One of the core concepts of this example project is how polyglot persistence can be approached in practice. Microservices in the project use their own database while integrating with the data from other services through REST or a message bus. For example, you could have a microservice for each of the following databases.
l Neo4j (graph)
l MongoDB (document)
l MySQL (relational)
例子工程里一个核心概念,就是要探讨如何实现“混合持久化”(注4)。在整合其他服务的数据时(通过REST或是消息总线),工程中的微服务各自使用独立的数据库。举个例子,每个微服务都可以选择下面不同的数据库:
? Neo4j (图形数据库,注5)
? MongoDB (文档导向型数据库)
? MySQL (关系型数据库)
Microservice architecture
微服务框架
This example project demonstrates how to build a new application using microservices, as opposed to a monolith-first strategy. Since each microservice in the project is a module of a single parent project, developers have the advantage of being able to run and develop with each microservice running on their local machine. Adding a new microservice is easy, as the discovery microservice will automatically discover new services running on the cluster.
例子工程演示了怎样用微服务搭建一个应用程序,而不是采用“整体架构先行”的策略。正是因为每个微服务都是一个“单父项目”,开发人员可以在本机上很方便地单独运行和开发任何一个微服务。添加一个新的微服务也很简单,就像发现服务会自动找到集群里新近运行的服务一样。
Service discovery
服务发现
This project contains two discovery services, one on Netflix Eureka, and the other uses Consul from Hashicorp. Having multiple discovery services provides the opportunity to use one (Consul) as a DNS provider for the cluster, and the other (Eureka) as a proxy-based API gateway.
本工程有两个发现服务,一个是Netflix Eureka,另一个是Hashicorp的Consul。用多个发现服务,是为了实现:一个为集群提供DNS功能(Consul),一个作为API网关服务(Eureka)。
API gateway
API 网关服务
Each microservice will coordinate with Eureka to retrieve API routes for the entire cluster. Using this strategy each microservice in a cluster can be load balanced and exposed through one API gateway. Each service will automatically discover and route API requests to the service that owns the route. This proxying technique is equally helpful when developing user interfaces, as the full API of the platform is available through its own host as a proxy.
每一个微服务都是通过Eureka在整个集群范围内进行协调获取API路由的。在此策略下,微服务间实现了负载均衡,并且向外暴露了一同个接口网关。服务会自动发现,并分配到所以求的API自己的路由上。这种代理技术在开发用户接口的时候同样有用,作为平台完整的API通过自己的主机映射为代理服务。
Docker Demo
The example project uses Docker to build a container image of each of our microservices as a part of the Maven build process. We can easily orchestrate the full microservice cluster on our own machine using Docker compose.
例子工程用Docker为我们的每一个微服务创建一个容器镜像,作为maven部署的一部分。我们甚至可以很轻松地把整个微服务集群都部署(orchestrate编配)到我们的开发机上。
Getting Started
开始吧
To get started, visit the GitHub repository for this example project.
在开始之前,先到GitHub资源库上下载例子工程:
https://github.com/kbastani/spring-cloud-microservice-example
Clone or fork the project and download the repository to your machine. After downloading, you will need to use both Maven and Docker to compile and build the images locally.
把工程下载到本地之后(克隆或建立分支),你需要用Maven和Doker在本地进行编译并生成镜像文件。
Download Docker
下载Docker
First, download Docker if you haven’t already. Follow the instructions found here, to get Docker up and running on your development machine.
首先,若本地没有Docker的话,要先下载。根据docs.docker.com/installation/上面的说明,获取Docker,在开发机上运行。
You will also need to install Docker Compose, the installation guide can be found here. If you are using Mac OSX and boot2docker, make sure that you provision the boot2docker-vm on VirtualBox with at least 5GB of memory. The following command will allow you to do this.
你还需要安装Docker Compose,安装指导详见docs.docker.com/compose/install/。如果你使用的是Mac OSX和boot2docker,确认好你在VirtualBox上创建的boot2docker虚拟机的内存是5GB以上。下面是设置内存的命令:
$ boot2docker init --memory=5000
Requirements
需求
The requirements for running this demo on your machine are found below.
在开发机上运行本实例的前提是已安装如下软件:
l Maven 3
l Java 8
l Docker
l Docker Compose
Building the project
编译工程
To build the project, from the terminal, run the following command at the root of the project.
开始编译:打开终端(命令行),在工程的根目录下运行如下命令:
$ mvn clean install
The project will then download all of the needed dependencies and compile each of the project artifacts. Each service will be built, and then a Maven Docker plugin will automatically build each of the images into your local Docker registry. Docker must be running and available from the command line where you run the mvn clean install command for the build to succeed.
After the project successfully builds, you’ll see the following output:
工程将会下载所有的依赖,并依次编译每一个服务(artifacts)。编译完之后,Maven上的Docker插件会自动将这些镜像文件拷贝到你本地的Docker资源库里。在运行mvn clean install这个命令的时候,Docker必须是运行并可用的,才能保证编译成功。成功之后,你将会看到如下输出:
[INFO] ------------------------------------------------------------------------
[INFO] Reactor Summary:
[INFO]
[INFO] spring-cloud-microservice-example-parent .......... SUCCESS [ 0.268 s]
[INFO] users-microservice ................................ SUCCESS [ 11.929 s]
[INFO] discovery-microservice ............................ SUCCESS [ 5.640 s]
[INFO] api-gateway-microservice .......................... SUCCESS [ 5.156 s]
[INFO] recommendation-microservice ....................... SUCCESS [ 7.732 s]
[INFO] config-microservice ............................... SUCCESS [ 4.711 s]
[INFO] hystrix-dashboard ................................. SUCCESS [ 4.251 s]
[INFO] consul-microservice ............................... SUCCESS [ 6.763 s]
[INFO] movie-microservice ................................ SUCCESS [ 8.359 s]
[INFO] movies-ui ......................................... SUCCESS [ 15.833 s]
[INFO] ------------------------------------------------------------------------
[INFO] BUILD SUCCESS
[INFO] ------------------------------------------------------------------------
Start the Cluster with Docker Compose
用Docker Compose运行集群
Now that each of the images has been built successfully, we can using Docker Compose to spin up our cluster. I’ve included a pre-configured Docker Compose yaml file with the project.
From the project root, navigate to the spring-cloud-microservice-example/docker directory.
Now, to startup the microservice cluster, run the following command:
所有的镜像都已编译成功,我们可以用Docker Compose把集群运转起来了。我已经在工程里引入了一个预编译的Docker Compose yaml文件。
从工程根目录进入spring-cloud-microservice-example/docker目录,运行如下命令来启动微服务集群:
$ docker-compose up
If everything is configured correctly, each of the container images we built earlier will be launched within their own VM container on Docker and networked for automatic service discovery. You will see a flurry of log output from each of the services as they begin their startup sequence. This might take a few minutes to complete, depending on the performance of the machine you’re running this demo on.
只要正确地配置,我们编译的镜像将会在Docker容器里启动,发现服务自动加载到网络上。你会在log输出端看见一阵忙乱,是因为这些服务都在依次启动各自的应用。这可能会持续几分钟,依机器的性能而定。
Once the startup sequence is completed, you can navigate to the Eureka host and see which services have registered with the discovery service.
Copy and paste the following command into the terminal where Docker can be accessed using the $DOCKER_HOST environment variable.
启动完毕之后,你可以登陆到Eureka服务器上,查看有哪些服务被发现服务注册在了上面。
登陆Eureka的方法:在命令行终端运行下面的命令(保证可以通过环境变量 $DOCKER_HOST可以登陆Docker):
$ open $(echo \"$(echo $DOCKER_HOST)\"|
\sed ‘s/tcp:\/\//http:\/\//g‘|
\sed ‘s/[0-9]\{4,\}/8761/g‘|
\sed ‘s/\"//g‘)
If Eureka correctly started up, a browser window will open to the location of the Eureka service’s dashboard, as shown below.
如果Eureka被正常启动了,浏览器会打开Eureka的控制台,如下图所示。
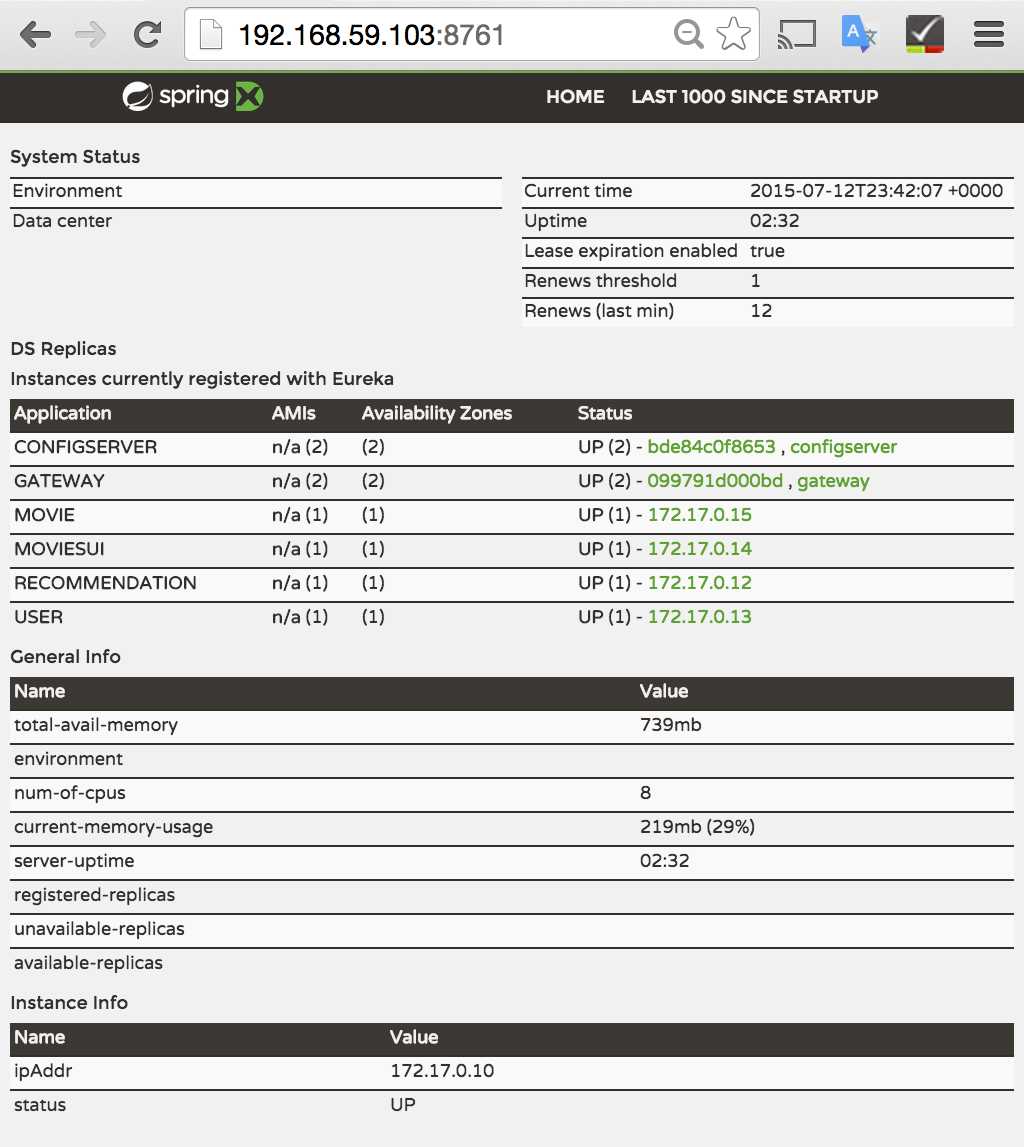
We can see each of the service instances that are running and their status. We can then access one of the data-driven services, for example the movie service.
我们可以在上看见所有已经启动的服务实例,以及他们的状态。怎样登陆一个以数据驱动的服务呢?以movie服务为例:
$ open $(echo \"$(echo $DOCKER_HOST)/movie\"|
\sed ‘s/tcp:\/\//http:\/\//g‘|
\sed ‘s/[0-9]\{4,\}/10000/g‘|
\sed ‘s/\"//g‘)
This command will navigate to the API gateway’s endpoint and proxy to the movie service’s REST API endpoints. These REST APIs have been configured to use HATEOAS, which supports the auto-discovery of all of the service’s functionality as embedded links.
上面的命令会通过API网关找到movie服务的REST API。这些REST API经过配置,使用HATEOAS来支持象内嵌连接一样找到服务提供的所有功能。
{
"_links" : {
"self" : {
"href" : "http://192.168.59.103:10000/movie"
},
"resume" : {
"href" : "http://192.168.59.103:10000/movie/resume"
},
"pause" : {
"href" : "http://192.168.59.103:10000/movie/pause"
},
"restart" : {
"href" : "http://192.168.59.103:10000/movie/restart"
},
"metrics" : {
"href" : "http://192.168.59.103:10000/movie/metrics"
},
"env" : [ {
"href" : "http://192.168.59.103:10000/movie/env"
}, {
"href" : "http://192.168.59.103:10000/movie/env"
} ],
"archaius" : {
"href" : "http://192.168.59.103:10000/movie/archaius"
},
"beans" : {
"href" : "http://192.168.59.103:10000/movie/beans"
},
"configprops" : {
"href" : "http://192.168.59.103:10000/movie/configprops"
},
"trace" : {
"href" : "http://192.168.59.103:10000/movie/trace"
},
"info" : {
"href" : "http://192.168.59.103:10000/movie/info"
},
"health" : {
"href" : "http://192.168.59.103:10000/movie/health"
},
"hystrix.stream" : {
"href" : "http://192.168.59.103:10000/movie/hystrix.stream"
},
"routes" : {
"href" : "http://192.168.59.103:10000/movie/routes"
},
"dump" : {
"href" : "http://192.168.59.103:10000/movie/dump"
},
"refresh" : {
"href" : "http://192.168.59.103:10000/movie/refresh"
},
"mappings" : {
"href" : "http://192.168.59.103:10000/movie/mappings"
},
"autoconfig" : {
"href" : "http://192.168.59.103:10000/movie/autoconfig"
}
}
}
Conclusion
总结
This has been the first part in a multi-part series about building microservice architectures with Spring Cloud and Docker. In this blog post, we went over the following concepts:
l Service Discovery
l Externalized Configuration
l API Gateway
l Service Orchestration with Docker Compose
本文是介绍如何使用Spring Cloud和Docker搭建微服务框架系列的第一篇。通过本文,我们了解了如下几个概念:
l 服务发现
l 配置外置化
l API网关
l 用Docker Compose编配服务
In the next blog post, we will go over how to build application front-ends that integrate with our backend services. We will also take a look at a use case for polyglot persistence, using both MySQL (relational) and Neo4j (graph).
下篇文章,我们将会了解怎样搭建一个前端应用,来跟本文里的后台服务进行整合。还会通过一个实例讲讲混合持久化,使用MySQL和Neo4j。
Special thanks
特别感谢
I want to give special thanks to Josh Long and the rest of the Spring team for giving me the chance to learn first-hand about the many wonderful things that the Spring Framework has to offer. Without Josh‘s mentorship I would not be able to put into words all of the amazing things that the Spring ecosystem has to offer.
特别感谢Josh Long以及Spring团队的其他成员,给我机会让我率先学习到了Spring Framework提供的美妙功能。没有Josh的指导,我更不可能把Spring生态系统提供功能写出来。
Many of the great open source tools, like Spring Cloud, wouldn‘t be possible without the thought leadership from people like Adrian Cockcroft (Netflix OSS), Martin Fowler (everything), Sam Newman (O‘Reilly‘s Building Microservices), Ian Robinson (consumer driven contracts), Chris Richardson (Cloud Foundry) and the many others who have helped to make the world of open source software what it is today.
没有Adrian Cockcroft (Netflix OSS), Martin Fowler (everything), Sam Newman (O‘Reilly‘s Building Microservices), Ian Robinson (consumer driven contracts注6), Chris Richardson (Cloud Foundry)和领导,很多像Spring Cloud这样伟大的开源工具是不可能实现的,以及其他同样在开源世界里做出贡献的人们。
注1:Spring Cloud
(摘自:http://projects.spring.io/spring-cloud/#quick-start)
Spring Cloud provides tools for developers to quickly build some of the common patterns in distributed systems (e.g. configuration management, service discovery, circuit breakers, intelligent routing, micro-proxy, control bus, one-time tokens, global locks, leadership election, distributed sessions, cluster state). Coordination of distributed systems leads to boiler plate patterns, and using Spring Cloud developers can quickly stand up services and applications that implement those patterns. They will work well in any distributed environment, including the developer‘s own laptop, bare metal data centres, and managed platforms such as Cloud Foundry.
Spring Cloud提供了一系列工具,以使开发者能够在分布式系统上快速搭建起常用的功能。比如说:配置管理、服务发现、断路器、智能路由、微代理、控制总线、one-time tokens、全局锁、leadership election、分布式会话、集群状态。分布式系统的协调导致了样板模式(boiler plate patterns),并且使用Spring Cloud开发人员可以快速地搭建起实现这些模式的服务和应用程序。
注2:一句话概括下spring框架及spring cloud框架主要组件
(转自:http://www.cnblogs.com/skyblog/p/5073843.html)
spring 顶级项目:
Spring IO platform:用于系统部署,是可集成的,构建现代化应用的版本平台,具体来说当你使用maven dependency引入spring jar包时它就在工作了。
Spring Boot:旨在简化创建产品级的 Spring 应用和服务,简化了配置文件,使用嵌入式web服务器,含有诸多开箱即用微服务功能,可以和spring cloud联合部署。
Spring Framework:即通常所说的spring 框架,是一个开源的Java/Java EE全功能栈应用程序框架,其它spring项目如spring boot也依赖于此框架。
Spring Cloud:微服务工具包,为开发者提供了在分布式系统的配置管理、服务发现、断路器、智能路由、微代理、控制总线等开发工具包。
Spring XD:是一种运行时环境(服务器软件,非开发框架),组合spring技术,如spring batch、spring boot、spring data,采集大数据并处理。
Spring Data:是一个数据访问及操作的工具包,封装了很多种数据及数据库的访问相关技术,包括:jdbc、Redis、MongoDB、Neo4j等。
Spring Batch:批处理框架,或者说是批量任务执行管理器,功能包括任务调度、日志记录/跟踪等。
Spring Security:是一个能够为基于Spring的企业应用系统提供声明式的安全访问控制解决方案的安全框架。
Spring Integration:面向企业应用集成(EAI/ESB)的编程框架,支持的通信方式包括HTTP、FTP、TCP/UDP、JMS、RabbitMQ、Email等。
Spring Social:一组工具包,一组连接社交服务API,如Twitter、Facebook、LinkedIn、GitHub等,有几十个。
Spring AMQP:消息队列操作的工具包,主要是封装了RabbitMQ的操作。
Spring HATEOAS:是一个用于支持实现超文本驱动的 REST Web 服务的开发库。
Spring Mobile:是Spring MVC的扩展,用来简化手机上的Web应用开发。
Spring for Android:是Spring框架的一个扩展,其主要目的在于简化Android本地应用的开发,提供RestTemplate来访问Rest服务。
Spring Web Flow:目标是成为管理Web应用页面流程的最佳方案,将页面跳转流程单独管理,并可配置。
Spring LDAP:是一个用于操作LDAP的Java工具包,基于Spring的JdbcTemplate模式,简化LDAP访问。
Spring Session:session管理的开发工具包,让你可以把session保存到redis等,进行集群化session管理。
Spring Web Services:是基于Spring的Web服务框架,提供SOAP服务开发,允许通过多种方式创建Web服务。
Spring Shell:提供交互式的Shell可让你使用简单的基于Spring的编程模型来开发命令,比如Spring Roo命令。
Spring Roo:是一种Spring开发的辅助工具,使用命令行操作来生成自动化项目,操作非常类似于Rails。
Spring Scala:为Scala语言编程提供的spring框架的封装(新的编程语言,Java平台的Scala于2003年底/2004年初发布)。
Spring BlazeDS Integration:一个开发RIA工具包,可以集成Adobe Flex、BlazeDS、Spring以及Java技术创建RIA。
Spring Loaded:用于实现java程序和web应用的热部署的开源工具。
Spring REST Shell:可以调用Rest服务的命令行工具,敲命令行操作Rest服务。
目前来说spring主要集中于spring boot(用于开发微服务)和spring cloud相关框架的开发,spring cloud子项目包括:
Spring Cloud Config:配置管理开发工具包,可以让你把配置放到远程服务器,目前支持本地存储、Git以及Subversion。
Spring Cloud Bus:事件、消息总线,用于在集群(例如,配置变化事件)中传播状态变化,可与Spring Cloud Config联合实现热部署。
Spring Cloud Netflix:针对多种Netflix组件提供的开发工具包,其中包括Eureka、Hystrix、Zuul、Archaius等。
Netflix Eureka:云端负载均衡,一个基于 REST 的服务,用于定位服务,以实现云端的负载均衡和中间层服务器的故障转移。
Netflix Hystrix:容错管理工具,旨在通过控制服务和第三方库的节点,从而对延迟和故障提供更强大的容错能力。
Netflix Zuul:边缘服务工具,是提供动态路由,监控,弹性,安全等的边缘服务。
Netflix Archaius:配置管理API,包含一系列配置管理API,提供动态类型化属性、线程安全配置操作、轮询框架、回调机制等功能。
Spring Cloud for Cloud Foundry:通过Oauth2协议绑定服务到CloudFoundry,CloudFoundry是VMware推出的开源PaaS云平台。
Spring Cloud Sleuth:日志收集工具包,封装了Dapper,Zipkin和HTrace操作。
Spring Cloud Data Flow:大数据操作工具,通过命令行方式操作数据流。
Spring Cloud Security:安全工具包,为你的应用程序添加安全控制,主要是指OAuth2。
Spring Cloud Consul:封装了Consul操作,consul是一个服务发现与配置工具,与Docker容器可以无缝集成。
Spring Cloud Zookeeper:操作Zookeeper的工具包,用于使用zookeeper方式的服务注册和发现。
Spring Cloud Stream:数据流操作开发包,封装了与Redis,Rabbit、Kafka等发送接收消息。
Spring Cloud CLI:基于 Spring Boot CLI,可以让你以命令行方式快速建立云组件。
注3:twelve-factor app methodology
(摘自:https://www.sitepoint.com/12-factor-apps-methodology-implement-apps-appfog/)
As made apparent by the title, the 12-Factor App methodology is a list of principles, each explaining the ideal way to handle a subset of your application. The 12 factors are as follows:
1. Codebase – One codebase tracked in revision control, many deploys
The first principle of the 12-Factor App methodology is related to your application’s codebase. The most important point here is to ensure that your application is tracked with revision control, and that it sits in a central repository that is accessible to your developers. This is most commonly handled by using Git or SVN to store your code.
2. Dependencies – Explicitly declare and isolate dependencies
There is no room for assumptions when it comes to dependencies. Anything your applications rely on to run should be controlled and managed to minimize — if not completely eliminate — conflicts.
3. Configuration – Store config in the environment
Configuration, as it relates to API keys, services, and database credentials, should never be hardcoded. This prevents your application from being at risk from both production data leaks and production errors. Instead of hardcoding this information, rely on environment variables to handle this sensitive information.
4. Backing Services – Treat backing services as attached resources
A backing service is one that requires a network connection to run. This is a very popular paradigm found in modern application development, especially prevalent with the rise in popularity of microservice architecture. The 12-Factor App methodology advises developers to treat these services agnostically, meaning changes or modifications should occur without having to make any code changes. Typically, this factor is best handled by calling each backing service through an API, with credentials stored in a configuration file that lives in your runtime environment.
5. Build, release, run – Strictly separate build and run stages
Build, release, and run stages should be treated as completely distinct from one another. Automation and tooling will help to make this principle simpler.
This can be accomplished by using existing tools to fully automate your build process. A tool like Github can be used to tag your latest build, while Jenkins can be used to automate your release stage.
6. Processes – Execute the app as one or more stateless processes
Stateless applications are designed to degrade gracefully. That means if a dependency fails, the app itself does not become a failure. Single points of failure may be difficult, but not impossible, to avoid. The 12-Factor App methodology recommends storing data outside of running code in order to prevent operational headaches and debugging nightmares.
7. Port binding – Export services via port binding
All application services should be accessible via a URL. For web applications, this process happens automatically. This enables 12-Factor Apps to be fully self-contained, avoiding the need to rely on various methods of runtime injection in order to create web facing services.
8. Concurrency – Scale out via the process model
Every process inside your application should be treated as a first-class citizen. That means that each process should be able to scale, restart, or clone itself when needed. This approach will improve the sustainability and scalability of your application as a whole.
9. Disposability – Maximize robustness with fast startup and graceful shutdown
As noted in the previous factor, treating processes as first-class citizens translates to an easier startup and shutdown process. Compare this to an application where all process are bundled together, where startup and shutdown processes can take up to several minutes depending on their size. To ensure your startup and shutdown processes remain seamless, reach for tried and true services that are optimized for speed and performance. Databases and caches like RabbitMQ, Redis, Memcached, and CenturyLink’s own Orchestrate are just a few services that are built to help with this factor.
10. Dev/prod Parity – Keep development, staging, and production as similar as possible
Consistency is key for meeting this factor. When your environments are similar, testing and developing gets much simpler. Similar environments means ensuring that areas such as your infrastructure stack, config management processes, software and runtime versions and deployment tools are the same everywhere. With this approach, fewer bugs will find their way into your production environment, since your test cases can be applied on production-level data.
11. Logs – Treat logs as event streams
Logging is important for debugging and checking up on the general health of your application. At the same time, your application shouldn’t concern itself with the storage of this information. Instead, these logs should be treated as a continuous stream that is captured and stored by a separate service.
12. Admin processes – Run admin/management tasks as one-off processes
One-off admin processes are essentially data collection jobs that are used to gather key information about your application. This information will be needed to asses the state of your production environment, so it’s important to ensure these one-off processes occur in your production environment. That way there can be no discrepancies between the data you need and the data coming from the visible long running production application.
简介
(偷个懒儿,从网上摘个中文的)
如今,软件通常会作为一种服务来交付,它们被称为网络应用程序,或软件即服务(SaaS)。12-Factor 为构建如下的 SaaS 应用提供了方法论:
l 使用标准化流程自动配置,从而使新的开发者花费最少的学习成本加入这个项目。
l 和操作系统之间尽可能的划清界限,在各个系统中提供最大的可移植性。
l 适合部署在现代的云计算平台,从而在服务器和系统管理方面节省资源。
l 将开发环境和生产环境的差异降至最低,并使用持续交付实施敏捷开发。
l 可以在工具、架构和开发流程不发生明显变化的前提下实现扩展。
这套理论适用于任意语言和后端服务(数据库、消息队列、缓存等)开发的应用程序。
12-Factor:
I. 基准代码
一份基准代码,多份部署
II. 依赖
显式声明依赖关系
III. 配置
在环境中存储配置
IV. 后端服务
把后端服务当作附加资源
V. 构建,发布,运行
严格分离构建和运行
VI. 进程
以一个或多个无状态进程运行应用
VII. 端口绑定
通过端口绑定提供服务
VIII. 并发
通过进程模型进行扩展
IX. 易处理
快速启动和优雅终止可最大化健壮性
X. 开发环境与线上环境等价
尽可能的保持开发,预发布,线上环境相同
XI. 日志
把日志当作事件流
XII. 管理进程
后台管理任务当作一次性进程运行
注4:混合持久化
(摘自:http://www.cnblogs.com/leetieniu2014/p/5153967.html)
数据库环境在过去的十多年里增长巨大。每个新的数据库相较于其它数据库,有着某些优势,但是它们做了某种折衷。
事实上,CAP定理【注2】告诉我们,不可能拥有完美的数据库,我们需要根据应用程序来选择哪种折衷是可接受的。
带有这些约束的工作场景符合Martin Fowler推广的混合持久化思路。混合持久化的思路是指,你应该根据工作选择合适的数据库,这样我们就能两者兼得了。
我们的数据库客户端应该这样做,它应该能够与很多不同的数据库交流。在代码层面看起来是这样的:
Client(mongo(details)).put(key, value);
Client(redis(details)).get(key);
注5:Neo4j简介
Neo4j是一个高性能的,NOSQL图形数据库,它将结构化数据存储在网络上而不是表中。Neo4j也可以被看作是一个高性能的图引擎,该引擎具有成熟数据库的所有特性。程序员工作在一个面向对象的、灵活的网络结构下而不是严格、静态的表中——但是他们可以享受到具备完全的事务特性、企业级的数据库的所有好处。
Neo4j因其嵌入式、高性能、轻量级等优势,越来越受到关注。
注6:Consumer-Driven Contract
(摘自:http://servicedesignpatterns.com/WebServiceEvolution/ConsumerDrivenContracts)
The Consumer-Driven Contract pattern helps service owners create service APIs that reflect client needs; it also helps service owners evolve services without breaking existing clients. Service owners receive integration tests from each client and incorporate these tests into the service‘s test suite. The set of integration tests received from all existing clients represents the service‘s aggregate obligations with respect to its client base. The service owner is then free to change and evolve the service just so long as the existing integration tests continue to pass.
“消费者驱动的契约”模式,帮助服务的提供者能够开发出反应客户端需求的API;它还帮助服务提供者在不需要关闭客户端的情况下升级服务程序。服务提供者接收来自客户端的集成测试,并将这些测试结果整合进测试套件里。这样一组来自现存客户端的集成测试报告,反应出了在客户端层面的集中反馈。随着集成测试的进行,服务提供者就可以自由地修改和升级服务端程序。
生词:
encounter 遭遇
pattern 模式,模板
circuit 回路
circuit breaker 断路器
ecosystem 生态系统
tune 调整
perfect 完美的
intelligent 聪明的,智能
illustrate (用图解等)说明
recommend 介绍,建议
methodology (从事某一活动的)方法
factor 因素、要素
multi-purpose 多用途
assume 假设
stage 舞台
externalize 外部化
centralize 集权控制
revise 修改
endpoint 端点
consumer 消费者
fetch 提取
maintain 维护,保持
originate 起源,创办
annotation 注解,注释
autowire 自动装配
hexagon 六边形
inject 注入
proxy 代理
demonstrate 演示
cloud-native 原生云
polyglot 通晓多种语言的、多种语言混合的
approach 靠近,接近
oppose 反抗,对抗
opposed 截然不同的,对立的
monolith (尤指古人凿成,有宗教意义的)单块巨石
coordinate n. 坐标;v. 协调
equally 平等地
orchestrate 编配,组织
fork 餐叉
artifact 人工制品
spin 高速旋转
flurry 一阵忙乱(或激动、兴奋等)
dashboard 控制面板,仪表盘
data-driven 数据驱动
front-end 前端
back-end 后端
mentorship 导师,指导
boiler 锅炉
plate 盘子
evolve 发展,进化
incorporate 合并
aggregate 合计,总数
obligation 义务,职责
参考:
Spring cloud项目实践(一)
http://sail-y.github.io/2016/03/21/Spring-cloud项目实践/
网上已有中文版:
手把手教你用Spring Cloud和Docker构建微服务
http://www.chinacloud.cn/show.aspx?id=20968&cid=12
【译文】用Spring Cloud和Docker搭建微服务平台
标签:ict 注解 mvc ase cache sse navigate 流操作 inf
原文地址:http://www.cnblogs.com/wangjuns8/p/6422139.html