标签:XML ext print 若是 框架 实现 开发 void property
Spring:
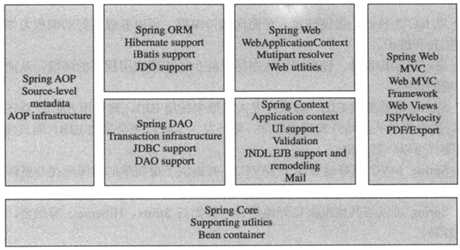
Spring 框架图:

下面我们开始 Spring 第一个经典项目:HelloWorld
普通模式的Helloworld:
 1 package com.itdjx.spring.beans;
 2
 3 /**
 4  * @author Wáng Chéng Dá
 5  * @create 2017-02-28 10:38
 6  */
 7 public class HelloWorld {
 8
 9     private String name;
10
11     public String getName() {
12         return name;
13     }
14
15     public void setName(String name) {
16         this.name = name;
17     }
18
19     public void hello() {
20         System.out.println("hello " + this.getName());
21     }
22 }
package com.itdjx.spring.beans;

/**
 * @author Wáng Chéng Dá
 * @create 2017-02-28 10:39
 */
public class Main {

    public static void main(String[] args) {

        HelloWorld helloWorld = new HelloWorld();
        helloWorld.setName("itdx");
        helloWorld.hello();

    }
}
控制台输出:
| hello itdx |
Spring 模式下的HelloWorld:
 1 <?xml version="1.0" encoding="UTF-8"?>
 2 <beans xmlns="http://www.springframework.org/schema/beans"
 3        xmlns:xsi="http://www.w3.org/2001/XMLSchema-instance"
 4        xsi:schemaLocation="http://www.springframework.org/schema/beans http://www.springframework.org/schema/beans/spring-beans.xsd">
 5
 6     <!--配饰Bean-->
 7     <bean id="helloWorld" class="com.itdjx.spring.beans.HelloWorld">
 8         <property name="name" value="String"/>
 9     </bean>
10 </beans>
 1 package com.itdjx.spring.beans;
 2
 3 import org.springframework.context.ApplicationContext;
 4 import org.springframework.context.support.ClassPathXmlApplicationContext;
 5
 6 /**
 7  * @author Wáng Chéng Dá
 8  * @create 2017-02-28 10:39
 9  */
10 public class Main {
11
12
13     public static void main(String[] args) {
14
15         //Spring模式下
16         /**
17          * 1.创建 Spring 的 IOC 容器
18          * 2.从 IOC 容器中获取 Bean 实例
19          */
20         ApplicationContext ctx = new ClassPathXmlApplicationContext("applicationContext.xml");
21         HelloWorld helloWorld = (HelloWorld) ctx.getBean("helloWorld");
22         helloWorld.hello();
23
24     }
25 }
控制台输出:
| hello String |
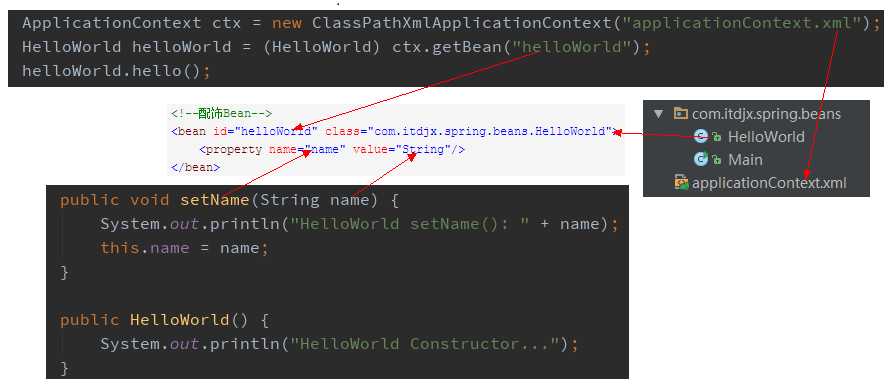
通过控制台输出可以看出,HelloWorld 中那么属性的值在配置文件 <property name="name" value="String"/> 中就已经被赋好了,所以 HelloWorld 中 name 属性值对应 value 的值。
若是修改 Helloworld 中 setName 为 SetName1 的话,配置文件 <property name="name" value="String"/> 中的 name 属性值就得需要改成 name="name1"。
下面我们更直观的看一下Spring框架的加载流程:
 1 package com.itdjx.spring.beans;
 2
 3 /**
 4  * @author Wáng Chéng Dá
 5  * @create 2017-02-28 10:38
 6  */
 7 public class HelloWorld {
 8
 9     private String name;
10
11     public String getName() {
12         return name;
13     }
14
15     public void setName(String name) {
16         System.out.println("HelloWorld setName(): " + name);
17         this.name = name;
18     }
19
20     public void hello() {
21         System.out.println("hello " + this.getName());
22     }
23
24     public HelloWorld() {
25         System.out.println("HelloWorld Constructor...");
26     }
27 }
 1 package com.itdjx.spring.beans;
 2
 3 import org.springframework.context.ApplicationContext;
 4 import org.springframework.context.support.ClassPathXmlApplicationContext;
 5
 6 /**
 7  * @author Wáng Chéng Dá
 8  * @create 2017-02-28 10:39
 9  */
10 public class Main {
11
12
13     public static void main(String[] args) {
14
15         //Spring模式下
16         /**
17          * 1.创建 Spring 的 IOC 容器
18          * 2.从 IOC 容器中获取 Bean 实例
19          */
20         ApplicationContext ctx = new ClassPathXmlApplicationContext("applicationContext.xml");
21 //        HelloWorld helloWorld = (HelloWorld) ctx.getBean("helloWorld");
22 //        helloWorld.hello();
23
24     }
25 }
控制台输出:
|
HelloWorld Constructor... |
从上面的代码和控制台输出我们可以看出:在创建 Spring 的 IOC 容器时 , Spring 就已经把 HelloWorld 初始化 。首先加载无参构造器初始化 HelloWorld 对象 , 之后调用 setName() 方法给已经初始化的对象赋值。
配置文件与类的关系:

标签:XML ext print 若是 框架 实现 开发 void property
原文地址:http://www.cnblogs.com/goodcheap/p/6478163.html