标签:view ini 子类 cat size 机制 调用 print turn


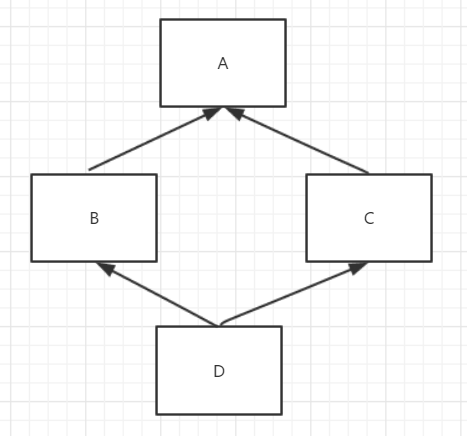
图一 图二
先测试图一结构的多继承:
 1 #include<iostream>
 2 using namespace std;
 3
 4 class Parent {
 5 public:
 6     Parent():a(100),b(200),c(300)
 7     {
 8         cout << "parent 构造。。。\n";
 9     }
10     ~Parent()
11     {
12         cout << "Parent 析构。。。\n";
13     }
14     int a;
15     int b;
16     int c;
17     void p_print()
18     {
19         cout << "a b c is" << a << " " << b << " " << c << endl;
20     }
21
22 };
23 class Child1 :virtual public Parent
24 {
25 public:
26     Child1() :Parent(), a(0), b(0), c(0) { cout << "child 构造\n"; }
27     ~Child1()
28     {
29         cout << "child 析构,,,\n";
30     }
31     void c_print()
32     {
33         cout << "a b c is" << a << " " << b << " " << c << endl;
34     }
35     int a;
36     int b;
37     int c;
38 };
39 class Child2 :virtual public Parent
40 {
41 public:
42     Child2() :Parent(), a(1), b(2), c(3) { cout << "child 构造\n"; }
43     ~Child2()
44     {
45         cout << "child 析构,,,\n";
46     }
47     void c_print()
48     {
49         cout << "a b c is" << a << " " << b << " " << c << endl;
50     }
51     int a;
52     int b;
53     int c;
54 };
55 class Child3 :public Child1,public Child2
56 {
57 public:
58     Child3() :Parent(),Child1(),Child2(), a(10), b(20), c(30)
       { cout << "child 构造\n"; }//如果前面没有使用虚继承,这里初始化Parent构造函数将出错
59     ~Child3()
60     {
61         cout << "child 析构,,,\n";
62     }
63     void c_print()
64     {
65         cout << "a b c is" << a << " " << b << " " << c << endl;
66     }
67     int a;
68     int b;
69     int c;
70 };
71 int main()
72 {
73     Child3 c3;
74
75     return 0;
76 }
虚继承的目的是令某个类做出声明,承诺愿意共享它的基类。其中,共享的基类对象称为虚基类。在这种机制下,无论虚基类在继承体系中出现多少次,在派生类中都只包含唯一一个共享的虚基类对象。
为了说明情况,我们把上述代码更改如下:

 1 #include<iostream>
 2 using namespace std;
 3
 4 class Parent {
 5 public:
 6     Parent():a(100),b(200),c(300)
 7     {
 8         cout << "parent 无参构造。。。\n";
 9     }
10     Parent(int test) :a(1000), b(2000), c(3000)
11     {
12         cout << "parent 有参构造。。。\n";
13     }
14     ~Parent()
15     {
16         cout << "Parent 析构。。。\n";
17     }
18     int a;
19     int b;
20     int c;
21     void p_print()
22     {
23         cout << "a b c is" << a << " " << b << " " << c << endl;
24     }
25
26 };
27 class Child1 :  public Parent
28 {
29 public:
30     Child1() :Parent(), b(0), c(0) { cout << "child 构造\n"; }
31     ~Child1()
32     {
33         cout << "child 析构,,,\n";
34     }
35     void c_print()
36     {
37         cout << "a b c is" << a << " " << b << " " << c << endl;
38     }
39
40     //int a;
41     int b;
42     int c;
43 };
44 class Child2 : public Parent
45 {
46 public:
47     Child2() :Parent(), b(2), c(3) { cout << "child 构造\n"; }
48     ~Child2()
49     {
50         cout << "child 析构,,,\n";
51     }
52     void c_print()
53     {
54         cout << "a b c is" << a << " " << b << " " << c << endl;
55     }
56     //int a;
57     int b;
58     int c;
59 };
60 class Child3 : public Child1,  public Child2
61 {
62 public:
63     Child3() :Child1(),Child2(), b(20), c(30) { cout << "child 构造\n"; }
64     ~Child3()
65     {
66         cout << "child 析构,,,\n";
67     }
68     //int a;
69     int b;
70     int c;
71 };
72 int main()
73 {
74     Child3 c3;
75     c3.a = 100;
76     return 0;
77 }
报错如下:

由于在parent类中a被Child1,Child2分别继承,而用Chils3类定义对象c3要去访问属性a,编译器发出抱怨也是应该的,因为它不知道这个a是Child1还是Child2还是parent中的。所以我们要去除这样的二义性。通过把parent类变成虚基类,可以做到,代码如下:

 1 #include<iostream>
 2 using namespace std;
 3
 4 class Parent {
 5 public:
 6     Parent():a(100),b(200),c(300)
 7     {
 8         cout << "parent 无参构造。。。\n";
 9     }
10     Parent(int test) :a(1000), b(2000), c(3000)
11     {
12         cout << "parent 有参构造。。。\n";
13     }
14     ~Parent()
15     {
16         cout << "Parent 析构。。。\n";
17     }
18     int a;
19     int b;
20     int c;
21     void p_print()
22     {
23         cout << "a b c is" << a << " " << b << " " << c << endl;
24     }
25
26 };
27 class Child1 : virtual public Parent
28 {
29 public:
30     Child1() :Parent(), b(0), c(0) { cout << "child 构造\n"; }
31     ~Child1()
32     {
33         cout << "child 析构,,,\n";
34     }
35     void c_print()
36     {
37         cout << "a b c is" << a << " " << b << " " << c << endl;
38     }
39
40     //int a;
41     int b;
42     int c;
43 };
44 class Child2 : virtual public Parent
45 {
46 public:
47     Child2() :Parent(), b(2), c(3) { cout << "child 构造\n"; }
48     ~Child2()
49     {
50         cout << "child 析构,,,\n";
51     }
52     void c_print()
53     {
54         cout << "a b c is" << a << " " << b << " " << c << endl;
55     }
56     //int a;
57     int b;
58     int c;
59 };
60 class Child3 : public Child1,  public Child2
61 {
62 public:
63     Child3() :Child1(),Child2(), b(20), c(30) { cout << "child 构造\n"; }
64     ~Child3()
65     {
66         cout << "child 析构,,,\n";
67     }
68     //int a;
69     int b;
70     int c;
71 };
72 int main()
73 {
74     Child3 c3;
75     c3.a = 100;
76     return 0;
77 }
其实也就是在继承时增加virtual关键字,让派生类包含唯一的共享虚基类。
问题抛出:
在child3中的构造函数:
Child3() :Child1(),Child2(), b(20), c(30) { cout << "child 构造\n"; }
我们把child1和child2的基类构造函数改成有参的,看看child3继承的老祖宗属性是如何的:

 1 #include<iostream>
 2 using namespace std;
 3
 4 class Parent {
 5 public:
 6     Parent():a(100),b(200),c(300)
 7     {
 8         cout << "parent 无参构造。。。\n";
 9     }
10     Parent(int test) :a(1000), b(2000), c(3000)
11     {
12         cout << "parent 有参构造。。。\n";
13     }
14     ~Parent()
15     {
16         cout << "Parent 析构。。。\n";
17     }
18     int a;
19     int b;
20     int c;
21     void p_print()
22     {
23         cout << "a b c is" << a << " " << b << " " << c << endl;
24     }
25
26 };
27 class Child1 : virtual public Parent
28 {
29 public:
30     Child1() :Parent(1), b(0), c(0) { cout << "child 构造\n"; }
31     ~Child1()
32     {
33         cout << "child 析构,,,\n";
34     }
35     void c1_print()
36     {
37         cout << "a b c is" << a << " " << b << " " << c << endl;
38     }
39
40     //int a;
41     int b;
42     int c;
43 };
44 class Child2 : virtual public Parent
45 {
46 public:
47     Child2() :Parent(1), b(2), c(3) { cout << "child 构造\n"; }
48     ~Child2()
49     {
50         cout << "child 析构,,,\n";
51     }
52     void c2_print()
53     {
54         cout << "a b c is" << a << " " << b << " " << c << endl;
55     }
56     //int a;
57     int b;
58     int c;
59 };
60 class Child3 : public Child1,  public Child2
61 {
62 public:
63     Child3() : Child1(),Child2(), b(20), c(30) { cout << "child 构造\n"; }
64     ~Child3()
65     {
66         cout << "child 析构,,,\n";
67     }
68     void c3_print()
69     {
70         cout << "a b c is" << a << " " << b << " " << c << endl;
71     }
72     //int a;
73     int b;
74     int c;
75 };
76 int main()
77 {
78     Child3 c3;
79     c3.c3_print();
80     c3.p_print();
81     return 0;
82 }
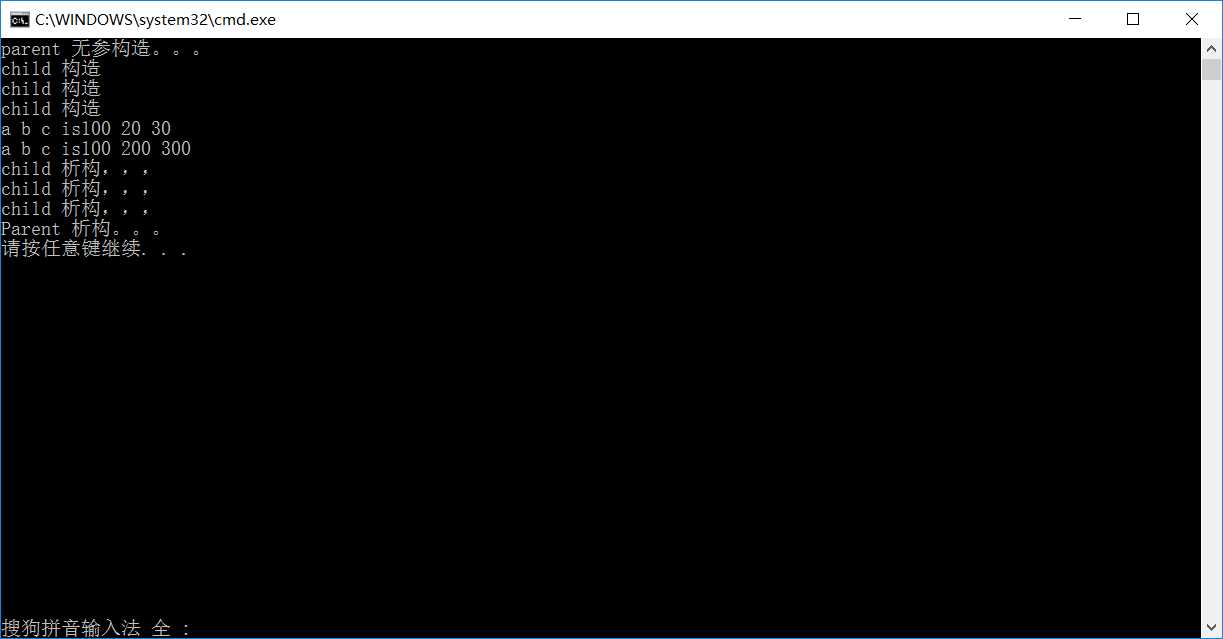
运行结果:

可以看到,child3的属性a是100,等价于parent的无参构造函数,尽管我们的child1和child2用的有参构造函数初始化,但子类child3最终继承的虚基类还是要通过自身的构造函数初始化列表来完成,要想child3中的属性a是parent有参构造的属性a,更改child3的构造函数初始化列表为:
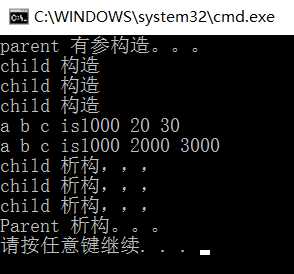
1 Child3() : Parent(1),Child1(),Child2(), b(20), c(30) { cout << "child 构造\n"; }
运行结果:

这样就调用了有参数的parent属性a了。结论:类似于初始化成员的过程,派生类构造函数同样是通过构造函数初始化列表来将实参传递给基类构造函数,在多继承中,哪怕直接基类(child1和child2)构造了间接基类(parent)的无参构造函数,但要传递给派生类child3的属性时,还是根据child3的构造函数初始化列表决定的。
对上面的访问属性a有歧义再探:
上面说得:由于在parent类中a被Child1,Child2分别继承,而用Chils3类定义对象c3要去访问属性a,编译器发出抱怨也是应该的,因为它不知道这个a是Child1还是Child2还是parent中的。所以我们要去除这样的二义性。通过把parent类变成虚基类,可以做到.
当然,问题的关键就在于编译器不知道属性a是哪个对象中,我们除了增加virtual关键字外,还可以:
在child3类中定义同名成员a,这样通过c3访问a时,默认从child3类中寻找:

 1 #include<iostream>
 2 using namespace std;
 3
 4 class Parent {
 5 public:
 6     Parent():a(100),b(200),c(300)
 7     {
 8         cout << "parent 无参构造。。。\n";
 9     }
10     Parent(int test) :a(1000), b(2000), c(3000)
11     {
12         cout << "parent 有参构造。。。\n";
13     }
14     ~Parent()
15     {
16         cout << "Parent 析构。。。\n";
17     }
18     int a;
19     int b;
20     int c;
21     void p_print()
22     {
23         cout << "a b c is" << a << " " << b << " " << c << endl;
24     }
25
26 };
27 class Child1 :  public Parent
28 {
29 public:
30     Child1() :Parent(1), b(0), c(0) { cout << "child 构造\n"; }
31     ~Child1()
32     {
33         cout << "child 析构,,,\n";
34     }
35     void c1_print()
36     {
37         cout << "a b c is" << a << " " << b << " " << c << endl;
38     }
39
40     //int a;
41     int b;
42     int c;
43 };
44 class Child2 :  public Parent
45 {
46 public:
47     Child2() :Parent(1), b(2), c(3) { cout << "child 构造\n"; }
48     ~Child2()
49     {
50         cout << "child 析构,,,\n";
51     }
52     void c2_print()
53     {
54         cout << "a b c is" << a << " " << b << " " << c << endl;
55     }
56     //int a;
57     int b;
58     int c;
59 };
60 class Child3 : public Child1,  public Child2
61 {
62 public:
63     Child3() : Child1(),Child2(), b(20), c(30) { cout << "child 构造\n"; }
64     ~Child3()
65     {
66         cout << "child 析构,,,\n";
67     }
68     void c3_print()
69     {
70         cout << "a b c is" << a << " " << b << " " << c << endl;
71     }
72     int a;
73     int b;
74     int c;
75 };
76 int main()
77 {
78     Child3 c3;
79     c3.a = 123;
80     c3.c3_print();
81
82     return 0;
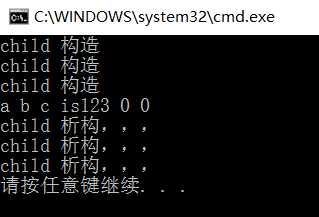
83 }
这样可以编译通过了,但此时的a是child3中的,仅仅是逃过编译器的错误检测,并没有解决多继承的问题;
我们可能在想,能否通过域作用符来访问去除歧义呢?
test:
int main()
{
    Child3 c3;
    c3.Child1::a = 123;
    c3.c3_print();

    return 0;
}
依旧报错:
由此可见,多继承时复杂繁琐的,好在一般工程中都会尽量避免使用多继承,但是多继承也是有应用的,至少Qt中就有多继承,就像C语言中的goto语句一样,一般不建议使用,但总会有它上场的时候,goto用于跳出多重循环或者检错,多继承用在一个类想用时拥有其他类的某些功能。所以,必要的多继承语法还是得了解。
对于图2:

 1 #include<iostream>
 2 using namespace std;
 3
 4 class Child1
 5 {
 6 public:
 7     Child1() :a(0), b(0), c(0) { cout << "child 构造\n"; }
 8     ~Child1()
 9     {
10         cout << "child 析构,,,\n";
11     }
12     void c1_print()
13     {
14         cout << "a b c is" << a << " " << b << " " << c << endl;
15     }
16
17     int a;
18     int b;
19     int c;
20 };
21 class Child2
22 {
23 public:
24     Child2() :a(1), b(2), c(3) { cout << "child 构造\n"; }
25     ~Child2()
26     {
27         cout << "child 析构,,,\n";
28     }
29     void c2_print()
30     {
31         cout << "a b c is" << a << " " << b << " " << c << endl;
32     }
33     int a;
34     int b;
35     int c;
36 };
37 class Child3 : public Child1,  public Child2
38 {
39 public:
40     Child3() : Child1(),Child2(), b(20), c(30) { cout << "child 构造\n"; }
41     ~Child3()
42     {
43         cout << "child 析构,,,\n";
44     }
45     void c3_print()
46     {
47         //cout << "a b c is" << a << " " << b << " " << c << endl;
48     }
49     //int a;
50     int b;
51     int c;
52 };
53 int main()
54 {
55     Child3 c3;
56     c3.a = 123;
57     //c3.Child1::a = 123;
58     //c3.c3_print();
59
60     return 0;
61 }

可以看到还是报错,继续剖析,更改代码如下:

 1 #include<iostream>
 2 using namespace std;
 3
 4 class Child1
 5 {
 6 public:
 7     Child1() :a(0), b(0), c(0) { cout << "child 构造\n"; }
 8     ~Child1()
 9     {
10         cout << "child 析构,,,\n";
11     }
12     void c1_print()
13     {
14         cout << "a b c is" << a << " " << b << " " << c << endl;
15     }
16
17     int a;
18     int b;
19     int c;
20 };
21 class Child2
22 {
23 public:
24     Child2() :a(1), b(2), c(3) { cout << "child 构造\n"; }
25     ~Child2()
26     {
27         cout << "child 析构,,,\n";
28     }
29     void c2_print()
30     {
31         cout << "a b c is" << a << " " << b << " " << c << endl;
32     }
33     int a;
34     int b;
35     int c;
36 };
37 class Child3 : public Child1,  public Child2
38 {
39 public:
40     Child3() : Child1(),Child2(), b(20), c(30) { cout << "child 构造\n"; }
41     ~Child3()
42     {
43         cout << "child 析构,,,\n";
44     }
45     void c3_print()
46     {
47         //cout << "a b c is" << a << " " << b << " " << c << endl;
48     }
49     //int a;
50     int b;
51     int c;
52 };
53 int main()
54 {
55     Child3 c3;
56     //c3.a = 123;
57     c3.Child1::a = 123;
58     c3.c1_print();
59
60     return 0;
61 }

可以看到,通过域作用符可以消除歧义,那么问题又来了;是否可以通过virtual关键字或者自己定义一个属性a达到消除错误呢?
test:

 1 #include<iostream>
 2 using namespace std;
 3
 4 class Child1
 5 {
 6 public:
 7     Child1() :a(0), b(0), c(0) { cout << "child 构造\n"; }
 8     ~Child1()
 9     {
10         cout << "child 析构,,,\n";
11     }
12     void c1_print()
13     {
14         cout << "a b c is" << a << " " << b << " " << c << endl;
15     }
16
17     int a;
18     int b;
19     int c;
20 };
21 class Child2
22 {
23 public:
24     Child2() :a(1), b(2), c(3) { cout << "child 构造\n"; }
25     ~Child2()
26     {
27         cout << "child 析构,,,\n";
28     }
29     void c2_print()
30     {
31         cout << "a b c is" << a << " " << b << " " << c << endl;
32     }
33     int a;
34     int b;
35     int c;
36 };
37 class Child3 : public Child1,  public Child2
38 {
39 public:
40     Child3() : Child1(),Child2(), b(20), c(30) { cout << "child 构造\n"; }
41     ~Child3()
42     {
43         cout << "child 析构,,,\n";
44     }
45     void c3_print()
46     {
47         //cout << "a b c is" << a << " " << b << " " << c << endl;
48     }
49     int a;
50     int b;
51     int c;
52 };
53 int main()
54 {
55     Child3 c3;
56     c3.a = 123;
57     //c3.Child1::a = 123;
58     //c3.c1_print();
59
60     return 0;
61 }
自己定义属性a,是可以做到消除歧义的,但属性a还是属于child3的而不是访问继承而来的;
增加virtual关键字
test:
1 class Child3 : virtual public Child1, virtual public Child2
还是报错,因为virtual的作用是产生虚基类的,virtual说明符表达了一种愿望,即在后续的派生类中共享虚基类的同一份唯一实例,至于什么样的类能作为虚基类没有明确的规定,显然这里和图一不同。
summary:
结论已经显而易见,多继承比单继承复杂,一般不使用,但语法还是得掌握,因为你又可能会用到它,存在一定有它的道理。
标签:view ini 子类 cat size 机制 调用 print turn
原文地址:http://www.cnblogs.com/yangguang-it/p/6511532.html