标签:code list 只读 each 在定义函数时 for ret gif 机器
本文为参加老男孩Python自动化运维课程第三天学习内容的总结。
大致内容如下:
1、文件操作
2、字符编码转码相关操作
3、函数
0、关于本文中所有运行Python代码的环境:
--操作系统:Ubuntu 16.10 (Linux 4.8.0)
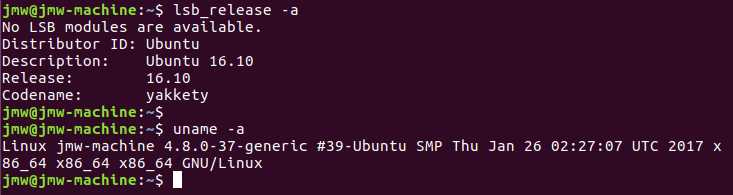
--Python版本:3.5.2
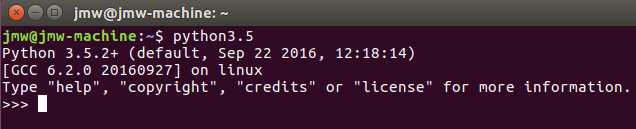
python2.7.12

--Python IDE: PyCharm 2016.3.2


  静夜思
床前明月光,
疑是地上霜。
举头望明月,
低头思故乡。
 1 # Step# 1 & 2: open a file with read mode, and assign to f
 2 f = open("LiBai_a_tranquil_night.txt", "r", encoding="utf-8")
 3
 4 # Step#3: read the content from f
 5 try:
 6     for line in f:
 7         print(line)
 8 finally:
 9     f.close()   # Step#4: close the file
10
11 --------------- 执行结果 ---------------
12   静夜思
13
14 床前明月光,
15
16 疑是地上霜。
17
18 举头望明月,
19
20 低头思故乡。
2、文件打开模式:
1)r: 只读模式,不可写。打开文件后,文件指针(光标)默认定位在文件开头。
1 f = open("LiBai_a_tranquil_night.txt", "r", encoding="utf-8")
2
3 # check the if the f is writable
4 print(f.writable())   # False
5
6 f.write("\ntry to write a new line")   # cannot write, got "io.UnsupportedOperation: not writable"
2)w:写模式,如果文件不存在,则创建;若文件已存在,则覆盖。打开文件后,文件指针(光标)默认定位在文件开头。在写模式下文件不可读。
 1 # open file with write mode
 2 f = open("LiBai_a_tranquil_night.txt", "w", encoding="utf-8")
 3
 4 # not readable
 5 print(f.readable())  # False
 6
 7 f.write("write line")
 8 f.close()
 9
10 f = open("LiBai_a_tranquil_night.txt", "r", encoding="utf-8")
11 try:
12     for line in f:
13         print(line)
14 finally:
15     f.close()   # close the file
16
17 ----------------------- 执行结果 ------------------------
18 False
19 write line
3)a:追加写模式,只能将新增的内容追加到文件末尾。此时文件不可读。 打开文件后,文件指针(光标)默认定位在文件末尾。
 1 # open a file with append mode, and assign to f
 2 f = open("LiBai_a_tranquil_night.txt", "a", encoding="utf-8")
 3
 4 # check if the f is a readable file
 5 print(f.readable())  # False
 6
 7 f.write("李白")   # write a new content
 8
 9 f = open("LiBai_a_tranquil_night.txt", "r", encoding="utf-8")
10
11 print("file content after append new content".center(60, "="))
12 # Step#3: read the content from f
13 try:
14     for line in f:
15         print(line)
16 finally:
17     f.close()   # Step#4: close the file
18
19 -------------------------- 执行结果 -----------------------
20 False
21 ===========file content after append new content============
22   静夜思
23
24 床前明月光,
25
26 疑是地上霜。
27
28 举头望明月,
29
30 低头思故乡。李白
4)r+:读写模式,打开文件后,文件指针(光标)默认定位在文件开头;如果不是在文件末尾写入,会将原来位置的字符替换。
# open file with r+ mode
f = open("LiBai_a_tranquil_night.txt", "r+", encoding="utf-8")

print(f.readable())  # True
print(f.writable())  # True

print("cursor position is : %s" % f.tell())  # cursor position after open file

try:
    f.write("aaa")  # write "aaa" in the first line
finally:
    f.close()

f = open("LiBai_a_tranquil_night.txt", "r", encoding="utf-8")
try:
    for line in f:
        print(line)
finally:
    f.close()

-------------- 执行结果 -------------
True
True
cursor position is : 0
aaa is there you when there are few people around making me feel good?

Why is there you when there are few people around making me feel good?
5)w+:写读模式,与w模式类似,打开文件后,会把文件内容清空;如果文件不存在,则创建。但是w+模式支持读、写。文件指针(光标)默认定位在文件开头。
 1 # open file with w+ mode
 2 f = open("LiBai_a_tranquil_night.txt", "w+", encoding="utf-8")
 3 print(f.readable())  # True
 4 print(f.writable())  # True
 5 print("cursor position is : %s" % f.tell())  # cursor position after open file
 6
 7 try:
 8     f.write("aaa")  # write "aaa" in the first line
 9     f.flush()
10     f.seek(0, 0)  # seek the cursor to the first line first character
11     print("after write".center(60, "="))
12     for line in f:
13         print(line)
14 finally:
15     f.close()
16
17 -------------- 执行结果 ---------------
18 True
19 True
20 cursor position is : 0
21 ========================after write=========================
22 aaa
6)a+:追加读写模式,与a模式类似,但是支持读、写。打开文件会,默认光标在文件末尾。
 1 # open file with a+ mode
 2 f = open("LiBai_a_tranquil_night.txt", "a+", encoding="utf-8")
 3 print(f.readable())  # True
 4 print(f.writable())  # True
 5 print("cursor position is : %s" % f.tell())  # cursor position after open file
 6
 7 try:
 8     f.write("bbb")  # write "aaa" in the first line
 9     f.flush()
10     f.seek(0, 0)  # seek the cursor to the first line first character
11     print("after write".center(60, "="))
12     for line in f:
13         print(line)
14 finally:
15     f.close()
16
17 -------------- 执行结果 --------------
18 True
19 True
20 cursor position is : 142
21 ========================after write=========================
22 Why is there you when there are few people around making me feel good?
23
24 Why is there you when there are few people around making me feel good?
25
26 bbb
7)b:以二进制模式读取、写入文件内容,一般与a、w、r结合使用,如rb,ab, wb,ab+。 在open方法,不要指定encoding方式,以二进制读取。
 1 # open file with ab+ mode
 2 f = open("LiBai_a_tranquil_night.txt", "ab+")
 3 print(f.readable())  # True
 4 print(f.writable())  # True
 5 print("cursor position is : %s" % f.tell())  # cursor position after open file
 6
 7 try:
 8     f.write(b"bbb")  # write "bbb" in binary
 9     f.flush()
10     f.seek(0, 0)  # seek the cursor to the first line first character
11     print("after write".center(60, "="))
12     for line in f:
13         print(line)
14 finally:
15     f.close()
16
17 --------------- 执行结果 ---------------
18 True
19 True
20 cursor position is : 145
21 ========================after write=========================
22 b‘Why is there you when there are few people around making me feel good?\n‘
23 b‘Why is there you when there are few people around making me feel good?\n‘
24 b‘bbbbbb‘
8)U:与r、r+结合作用,在读取时,自动过滤到\r、\n、\r\n等为\n。
3、文件操作:
f.close(): 关闭打开过的文件。
f.fileno(): 返回文件在内存中编号。
f.tell(): 返回当前光标所在位置。
f.isatty(): 如果打开的文件是一个终端文件(如打印机文件),返回真;
f.read(): 读取文件所有内容。对于大文件不要用read()方法,会把内存占满。
f.write(): 写入文件内容。
f.readable(): 判断打开的文件是否可读取。
f.writeable(): 判断打开的文件是否可写。
f.seek(offset, whence): 重新定位光标位置,whence表示当前光标位置,有3个值(1表示当前光标所在位置开始算起,offset只能为0; 2表示文件结束位置开始算起,offset只能为0; 0表示从文件天头位置开始算起);offset表示偏移量。
 1 f = open("LiBai_a_tranquil_night.txt", "r", encoding="utf-8")
 2 print("current cursor is : %s" % f.tell())
 3
 4 f.seek(0, 1)  # move the cursor to current position
 5 print("current cursor is : %s" % f.tell())
 6
 7 f.seek(3, 0)  # move the cursor to the first line 3rd character
 8 print("current cursor is : %s" % f.tell())
 9
10 f.seek(0, 2)  # move the cursor to the last character
11 print("current cursor is : %s" % f.tell())
12
13 f.close()
14
15 ------------------ 执行结果 ------------------
16 current cursor is : 0
17 current cursor is : 0
18 current cursor is : 3
19 current cursor is : 153
f.seekable(): 是否可以改变光标位置
f.truncate(): 清空从光标位置开始之后的所有文件内容,返回光标所在位置,与r+、a+结合使用。
 1 f = open("LiBai_a_tranquil_night.txt", "a+", encoding="utf-8")
 2 print("current cursor is : %s" % f.tell())
 3
 4 f.seek(12, 0)  # move the cursor to 12th character
 5
 6 print(f.truncate())  # truncate the file content from cursor positon
 7
 8 print("current cursor is : %s" % f.tell())
 9
10 f.close()
11
12 ------------ 执行结果 -----------
13 current cursor is : 153
14 12
15 current cursor is : 12
4、with语句:可以自动关闭打开的文件,不用手动关闭,即当with代码块执行完毕时,python内部会自动关闭并释放文件资源
1 with open("LiBai_a_tranquil_night.txt", "r", encoding="utf-8") as f:
2     print(f.readline())  # print the 1st line
3
4 with open("LiBai_a_tranquil_night.txt", "r", encoding="utf-8") as f1, 5         open("LiBai_a_tranquil_night11.txt", "r", encoding="utf-8") as f2:
6     print(f1.readline())  # print the 1st line
7     print(f2.readline())  # print the 1st line
5、文件操作练习:模拟sed命令替换文件内容
 1 # replace the "我爱北京天安门" to "我爱 Beijing" in the file "sed_text.txt"
 2
 3 # the string will be replaced
 4 find_str = "北京天安门"
 5 # new string
 6 new_str = " Beijing"
 7
 8 list_lines = list([])
 9
10 with open("sed_text.txt", ‘r+‘, encoding="utf-8") as f:
11     print("Before replace".center(60, "*"))
12     for line in f:  # read each line in the file
13         print(line.strip())
14         if line.find(find_str) >= 0:  # find the content which need to be replaced
15             line = line.replace(find_str, new_str)
16         list_lines.append(line)
17
18     f.seek(0, 0)   # go back to the 1st character
19     f.truncate()   # truncate the file content
20     for i in range(len(list_lines)):  # write the new content to the file
21         f.write(list_lines[i])
22
23     print("After replace".center(60, "*"))
24     f.seek(0, 0)
25     for line in f:
26         print(line.strip())
27
28 --------------- 执行结果 ------------------------
29 ***********************Before replace***********************
30 我爱北京天安门
31 天安门上太阳升
32 伟大领袖毛主席
33 指引我们向前进
34 我爱北京天安门
35 天安门上太阳升
36 伟大领袖毛主席
37 指引我们向前进
38 ***********************After replace************************
39 我爱 Beijing
40 天安门上太阳升
41 伟大领袖毛主席
42 指引我们向前进
43 我爱 Beijing
44 天安门上太阳升
45 伟大领袖毛主席
46 指引我们向前进
1、在python2中 , 默认的字符编码为ASCII(仅限英文);要输入中文时,需要在python代码开头加上“-*- coding:utf-8 -*-”声明语句。
在python3中默认为UTF-8(属于unicode的一种, 是unicode的扩展),可不需要加“-*- coding:utf-8 -*-” 语句;
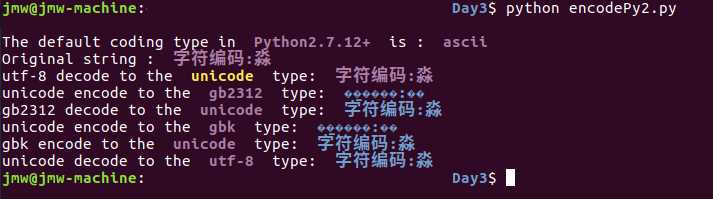
2、在python2中,将ASCII编码(英文)、GB2312(中文)等 转换成机器能识别的unicode编码(这个过程称为decode),然后再转换成用户想要看到的编码类型如GBK、UTF-8等,(这个过程称为encode)。

 1 #!/usr/bin/python
 2 # -*- coding:utf-8 -*-
 3 # encoding & decoding in Python2
 4 # transfer from UTF-8 to GB2312, then to GBK; then Transfer back to UTF-8
 5 # Spencer Jiang
 6 # 2017-03-21
 7
 8 import sys
 9
10 # default coding type in Python2 is ASCII
11 print("\nThe default coding type in \033[1;35m Python%s \033[0m is : \033[1;35m %s \033[0m" % (sys.version[:7], sys.getdefaultencoding()))
12
13 # s = "字符编码:尛"
14 s = "字符编码:淼"
15 print("Original string : \033[1;35m %s \033[0m" % s)
16
17 s_to_unicode = s.decode("utf-8") # utf-8 is extended from unicode
18 print("utf-8 decode to the \033[1;33m unicode \033[0m type: \033[1;35m %s \033[0m" % s_to_unicode)
19
20 # 尛 doesn‘t in gb2312, it added in gbk
21 s_to_gb2312 = s_to_unicode.encode("gb2312")
22 print("unicode encode to the \033[1;35m gb2312 \033[0m type: \033[1;34m %s \033[0m" % s_to_gb2312)
23
24 s_to_unicode2 = s_to_gb2312.decode("gb2312")
25 print("gb2312 decode to the \033[1;35m unicode \033[0m type: \033[1;34m %s \033[0m" % s_to_unicode2)
26
27 s_to_gbk = s_to_unicode2.encode("gbk")
28 print("unicode encode to the \033[1;35m gbk \033[0m type: \033[1;34m %s \033[0m" % s_to_gbk)
29
30 s_backto_unicode = s_to_gbk.decode("gbk")
31 print("gbk encode to the \033[1;35m unicode \033[0m type: \033[1;34m %s \033[0m" % s_backto_unicode)
32
33 s_backto_utf8 = s_backto_unicode.encode("utf-8")
34 print("unicode decode to the \033[1;35m utf-8 \033[0m type: \033[1;34m %s \033[0m" % s_backto_utf8)
35
36 # End Of File
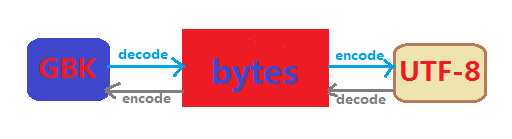
3、在Python3中,添加了bytes类型,将用户输入的字符编码GBK、GB2312等,先转换为 bytes类型(decode),然后再转换为用户想要的编码(utf-8等)。
 1 #!/usr/bin/python3.5
 2 # -*- coding:utf-8 -*-
 3 # encoding & decoding in Python3
 4 # transfer from UTF-8 to GB2312, then to GBK; then Transfer back to UTF-8
 5 # Spencer Jiang
 6 # 2017-03-21
 7
 8 import sys
 9
10 # default coding type in Python3 is utf-8
11 print("\nThe default coding type in \033[1;35m Python%s \033[0m is: \033[1;35m %s \033[0m" % (sys.version[:7], sys.getdefaultencoding()))
12
13 # s = "字符编码:尛"
14 s = "字符编码:淼"
15 print("Original string : \033[1;35m %s \033[0m" % s)
16
17 # 尛 doesn‘t in gb2312, it added in gbk
18 s_to_gb2312 = s.encode("gb2312")
19 print("utf8 encode to the \033[1;35m gb2312 (bytes) \033[0m type: \033[1;34m %s \033[0m" % s_to_gb2312)
20
21 s_to_unicode2 = s_to_gb2312.decode("gb2312")
22 print("gb2312 decode to the \033[1;35m unicode \033[0m type: \033[1;34m %s \033[0m" % s_to_unicode2)
23
24 s_to_gbk = s_to_unicode2.encode("gbk")
25 print("unicode encode to the \033[1;35m gbk (bytes) \033[0m type: \033[1;34m %s \033[0m" % s_to_gbk)
26
27 s_backto_unicode = s_to_gbk.decode("gbk")
28 print("gbk encode to the \033[1;35m unicode \033[0m type: \033[1;34m %s \033[0m" % s_backto_unicode)
29
30 s_backto_utf8 = s_backto_unicode.encode("utf-8")
31 print("unicode decode to the \033[1;35m utf-8 (bytes) \033[0m type: \033[1;34m %s \033[0m" % s_backto_utf8)
32
33 # End Of File

在Python中,函数以 def 关键字来进行定义:(根据PEP8规则,定义函数前面要有2行空行)
 1 #!/usr/bin/python3.5
 2 # -*- coding:utf-8 -*-
 3 # Function: function invoke
 4 # Author: Spencer J
 5 # Date: 2017-03-24
 6
 7
 8 # use ‘def‘ to define a function
 9 def func_hello():
10     # print Hi
11     print("Hello, I am Spencer!")
12
13 # invoke the function name to execute
14 func_hello()
15
16 ------------ 执行结果 ----------
17 Hello, I am Spencer!
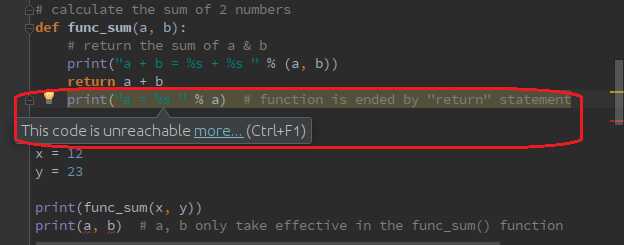
函数可以有返回值,也可以没有返回值;通过return关键字返回一个具体的值。对于有返回值的函数来说,函数结束于return语句。在return语句后的所有代码都是无效的。
减少重复代码; 可扩展; 易于维护。
1)形参: 形参只在函数内部有效,因为只有在调用到函数时才会分配内存空间,在函数执行完成后即刻释放。当有多个形参时,形参之间是有顺序(位置)的(此时也可称为位置参数)。
2)实参: 在调用函数时,需要传递给函数的参数即为实参。实参可以是常量、变量、表达式、函数等任何类型的数据,但是在调用函数时实参的值必须是确定的。
示例:下面定义一个求两个数的和的函数func_sum(a, b)。 其中a和b就是形参,只在函数内有效; x 和y 就是实参,在调用函数传递给函数的形参。
 1 # calculate the sum of 2 numbers
 2 def func_sum(a, b):
 3     print("a + b = %s + %s " % (a, b))
 4    # return the sum of a & b
 5     return a + b
 6
 7 x = 12
 8 y = 23
 9
10 print(func_sum(x, y))
11 print(a, b)    # a, b only take effective in the func_sum() function
12
13 ------------------ 执行结果 ----------
14 a + b = 12 + 23
15 35
16 Traceback (most recent call last):
17   File "/home/jmw/PycharmProjects/SpencerProjects/Day3/func_test1.py", line 18, in <module>
18     print(a, b)
19 NameError: name ‘a‘ is not defined
3)默认参数:在定义函数时,可以对某个形参指定默认的值,当调用函数时,可以不传实参给该形参,也可以传实参给该形参。此种函数一般用于软件的默认安装路径及选项等。因为形参是有顺序概念的,所以 默认参数必须在所有位置参数的后面。
在第2行定义函数时,将“install_dir”形参设置了一个默认的路径; 在第13行中,只传入一个参数给shortcut,不传入install_dir参数,就打印默认的install_dir路径;在第17行,传入了两个参数,就改变了install_dir的值。
 1 # function parameters with a default value
 2 def func_install_options(shortcut_pos, install_dir="c:/program file/python/"):
 3     ‘‘‘
 4     :param shortcut_pos:  where you want to create a shortcut for the application
 5     :param install_dir:   where you want to install the application
 6     :return:
 7     ‘‘‘
 8     print("Will create a shortcut on %s " % shortcut_pos)
 9     print("Will be installed in %s " % install_dir)
10
11 print("default param".center(80, "*"))
12 # invoke function without pass a install_dir param
13 func_install_options("Desktop")
14
15 print("not default param".center(80, "*"))
16 # invoke function with a new install_dir param
17 func_install_options("Desktop", "c:/python/")
18
19
20 ----------------- 执行结果 -----------------
21 *********************************default param**********************************
22 Will create a shortcut on Desktop
23 Will be installed in c:/program file/python/
24 *******************************not default param********************************
25 Will create a shortcut on Desktop
26 Will be installed in c:/python/
4)参数组|非固定参数:在定义函数时,形参的个数是不确定的时候就可以用参数组(也叫可变参数、非固定参数)。参数组一般用“*args”来定义,如 def func_test(a, b, *args), 可以传空。
 1 # *args
 2 def func_user_info(name, sex, *args):
 3     print(name, sex, args)      # args是个tuple
 4
 5 func_user_info("test", "boy", "23", "IT")
 6
 7 func_user_info("test", "boy")
 8
 9
10 ----------------------- 执行结果 ---------------------------
11 test boy (‘23‘, ‘IT‘)
12 test boy ()
当要传入的非固定参数为key-value对(字典)时,用“**kwargs”来定义,如 def_test(a, b=32, **kwargs)。
 1 def func_dict2(name, **kwargs):
 2     print(name, kwargs)
 3
 4 func_dict2("test")   # **kwargs is {}
 5 func_dict2("test", sex="boy", age=22)  # **kwargs is {‘sex‘: ‘boy‘, ‘age‘: 22}
 6
 7 func_dict2({‘name‘: "alex", "sex": 1, "age": 22})  # name is {‘name‘: "alex", "sex": 1, "age": 22}, **kwargs is {}
 8
 9 func_dict2(**{‘name‘: "alex", "sex": 1, "age": 22}) # name is ‘alex‘; **kwargs is {‘sex‘: 1, ‘age‘: 22}
10
11
12 ------------------------ 执行结果 -------------------------
13 test {}
14 test {‘age‘: 22, ‘sex‘: ‘boy‘}
15 {‘age‘: 22, ‘name‘: ‘alex‘, ‘sex‘: 1} {}
16 alex {‘age‘: 22, ‘sex‘: 1}
5)关键字参数:在调用函数时,传递实参给形参时,如果不想按顺序,可以指定形参名进行赋值传递参数,如 def func_test(a, b, c, d) 调用时func_test(b=1, c=3, d=123, a=2)
 1 def func_print(x, y, z):
 2     print("x = %s " % x)
 3     print("y = %s " % y)
 4     print("z = %s " % z)
 5
 6 print("**************************")
 7 # 位置调用: 按参数的顺序位置调用函数
 8 func_print(1, 2, 3)  # x=1, y=2, z=3
 9 print("**************************")
10 # 关键字调用: 按参数名赋值后进行调用
11 func_print(y=3, x=2, z=1)  # x=2, y=3, z=1
12 print("**************************")
13 # 位置调用 + 关键字调用:
14 func_print(1, z=5, y=2)  # x=1, y=2, z=5
15 print("**************************")
16 # 关键字调用 + 位置调用:关键字调用后不能放在位置调用前。
17 # func_print(x=3, 2, z=1)  # SyntaxError: positional argument follows keyword argument
18
19
20 -------------------------- 执行结果 --------------------------------
21 **************************
22 x = 1
23 y = 2
24 z = 3
25 **************************
26 x = 2
27 y = 3
28 z = 1
29 **************************
30 x = 1
31 y = 2
32 z = 5
33 **************************
1)局部变量: 在子程序里面(函数里)定义的变量,只在函数体内(子程序里)起作用。
2)全局变量: 在程序开头定义的变量,在整个程序中都起作用。
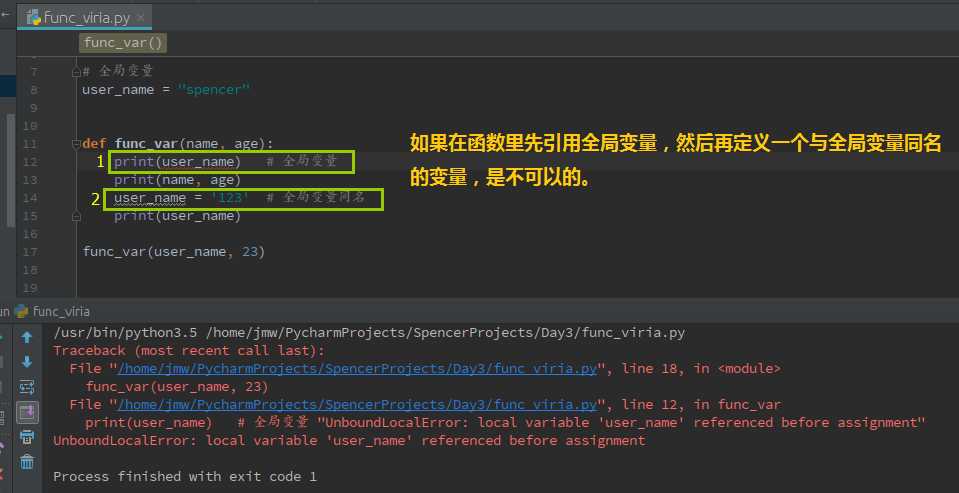
# 全局变量
user_name = "spencer"


def func_var(name, age):
    user_name = ‘John Spencer‘  # 与全局变量同名
    print(user_name)   # 局部变量
    print(name, age)
    _user_name = "jmw"  # 局部变量
    print(_user_name)


func_var(user_name, 23)

print(user_name)


------------------------ 执行结果 ------------------
John Spencer
spencer 23
jmw
spencer
当全局变量与局部变量同名时:在定义局部变量的子程序内,局部变量起作用【局部变量要先定义,然后才能再引用,否则会报“UnboundLocalError: local variable ‘user_name‘ referenced before assignment”错误】;在其它地方全局变量起作用。
一个函数可以调用另外一个函数,也可以调用函数本身,就变成一个递归函数。递归函数一般用于数学运算,如斐波拉契数列(示例代码)等。递归函数有以下特性:
1)有明确的结束递归的条件。
2)在每次递归后,递归的规模就缩小。
3) 递归层次要尽量少。因为递归的效率低下,递归层次太多容易导致栈溢出。
 1 # fibonacci--an = a(n-1) + a(n-2): a0=0, a1=0, a2=1, a3=2, a4=5...
 2 def fibonacci(n):
 3     if n > 1:
 4         return fibonacci(n-1) + fibonacci(n-2)
 5     elif n == 1:
 6         return 1
 7     elif n == 0:
 8         return 0
 9
10 for i in range(10):
11     print(fibonacci(i))
12
13 --------------------- 执行结果 -------------------
14 0
15 1
16 1
17 2
18 3
19 5
20 8
21 13
22 21
23 34
函数式编程主要是将代码变成调用一系列函数的过程(嵌套的函数调用过程)。可能通过这篇文章了解函数式编程。
python现在也支持函数式编程(lambda,面向对象的编程语言,如C#,也是通过lambda来实现函数式编程)。
本周作业:
HAproxy配置文件操作:配置文件内容参考 http://www.cnblogs.com/alex3714/articles/5717620.html
1. 根据用户输入输出对应的backend下的server信息
2. 可添加backend 和sever信息
3. 可修改backend 和sever信息
4. 可删除backend 和sever信息
5. 操作配置文件前进行备份
6 添加server信息时,如果ip已经存在则修改;如果backend不存在则创建;若信息与已有信息重复则不操作
标签:code list 只读 each 在定义函数时 for ret gif 机器
原文地址:http://www.cnblogs.com/spencer-Oprations/p/6621129.html
