标签:字节 fragment 方法 dex 设置 gre single lis cal
感谢@chuyao抛出的这些问题,平时业务代码写多了,很多基础的东西变得含糊不清了,这次裸辞出来找工作确实没有之前顺利,顺便求上海Android开发的坑。
我自己整理了些答案,不对或者不妥的地方请大家指出,谢谢。
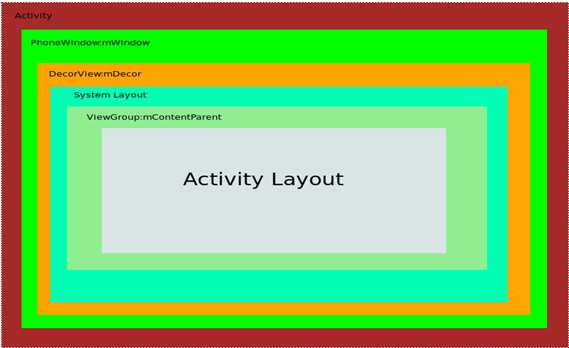
没读懂问题,=。=不知道是不是问Activity的UI结构,如果是可以参考这篇文章。

对于View的事件传递,则可以从 Activity --> ViewGroup --> ...... --> Activity 的** U型 **消费结构去说。
当此Activity的实例已经存在,并且此时的启动模式为SingleTask和SingleInstance,另外当这个实例位于栈顶且启动模式为SingleTop时也会触发onNewInstent()。
startActivity()方法,最终都是调用startActivityForResult()方法。默认的requestCode = -1 resultCode = RESULT_CANCELED = 0,当你的requestCode != -1时,onActivityResult()一定会被调用。
Fragment不能独立存在,它必须嵌入到activity中,而且Fragment的生命周期直接受所在的activity的影响。
// Create new fragment and transaction
Fragment newFragment = new ExampleFragment();
FragmentTransaction transaction = getFragmentManager().beginTransaction();

// Replace whatever is in the fragment_container view with this fragment,
// and add the transaction to the back stack
transaction.replace(R.id.fragment_container, newFragment);
transaction.addToBackStack(null);

// Commit the transaction
transaction.commit();
transaction只是记录了从一个状态到另一个状态的变化过程,即比如从FragmentA替换到FragmentB的过程,当通过函数transaction.addToBackStack(null)将这个事务添加到回退栈,则会记录这个事务的状态变化过程,如从FragmentA —>FragmentB,当用户点击手机回退键时,因为transaction的状态变化过程被保存,则可以将事务的状态变化过程还原,即将FragmentB —> FragmentA.
添加到回退栈的函数:transaction.addToBackStack(null);
参考文章: http://blog.csdn.net/u011026329/article/details/47903177
我印象中是可以做到了,平时没用到,知道的同学请@我,谢谢!能
服务基本上分为两种形式:
启动
当应用组件(如 Activity)通过调用 startService() 启动服务时,服务即处于“启动”状态。一旦启动,服务即可在后台无限期运行,即使启动服务的组件已被销毁也不受影响。 已启动的服务通常是执行单一操作,而且不会将结果返回给调用方。例如,它可能通过网络下载或上传文件。 操作完成后,服务会自行停止运行。
绑定
当应用组件通过调用 bindService() 绑定到服务时,服务即处于“绑定”状态。绑定服务提供了一个客户端-服务器接口,允许组件与服务进行交互、发送请求、获取结果,甚至是利用进程间通信 (IPC) 跨进程执行这些操作。 仅当与另一个应用组件绑定时,绑定服务才会运行。 多个组件可以同时绑定到该服务,但全部取消绑定后,该服务即会被销毁。虽然本文档是分开概括讨论这两种服务,但是您的服务可以同时以这两种方式运行,也就是说,它既可以是启动服务(以无限期运行),也允许绑定。问题只是在于您是否实现了一组回调方法:onStartCommand()(允许组件启动服务)和 onBind()(允许绑定服务)。
来自官方文档
这个问题不知道问的具体是什么,如果是要 IntentService那么可以参考官方文档的解释与使用说明:
扩展 IntentService 类
由于大多数启动服务都不必同时处理多个请求(实际上,这种多线程情况可能很危险),因此使用 IntentService 类实现服务也许是最好的选择。
IntentService 执行以下操作:
创建默认的工作线程,用于在应用的主线程外执行传递给 onStartCommand() 的所有 Intent。
创建工作队列,用于将 Intent 逐一传递给 onHandleIntent() 实现,这样您就永远不必担心多线程问题。
在处理完所有启动请求后停止服务,因此您永远不必调用 stopSelf()。
提供 onBind() 的默认实现(返回 null)。
提供 onStartCommand() 的默认实现,可将 Intent 依次发送到工作队列和 onHandleIntent() 实现。
综上所述,您只需实现 onHandleIntent() 来完成客户端提供的工作即可。(不过,您还需要为服务提供小型构造函数。)
以下是 IntentService 的实现示例:
public class HelloIntentService extends IntentService {

  /**
   * A constructor is required, and must call the super IntentService(String)
   * constructor with a name for the worker thread.
   */
  public HelloIntentService() {
      super("HelloIntentService");
  }

  /**
   * The IntentService calls this method from the default worker thread with
   * the intent that started the service. When this method returns, IntentService
   * stops the service, as appropriate.
   */
  @Override
  protected void onHandleIntent(Intent intent) {
      // Normally we would do some work here, like download a file.
      // For our sample, we just sleep for 5 seconds.
      try {
          Thread.sleep(5000);
      } catch (InterruptedException e) {
          // Restore interrupt status.
          Thread.currentThread().interrupt();
      }
  }
}
您只需要一个构造函数和一个 onHandleIntent() 实现即可。
如果您决定还重写其他回调方法(如 onCreate()、onStartCommand() 或 onDestroy()),请确保调用超类实现,以便 IntentService 能够妥善处理工作线程的生命周期。
例如,onStartCommand() 必须返回默认实现(即,如何将 Intent 传递给 onHandleIntent()):
@Override
public int onStartCommand(Intent intent, int flags, int startId) {
    Toast.makeText(this, "service starting", Toast.LENGTH_SHORT).show();
    return super.onStartCommand(intent,flags,startId);
}
除 onHandleIntent() 之外,您无需从中调用超类的唯一方法就是 onBind()(仅当服务允许绑定时,才需要实现该方法)。
不会,最终还是handler发送消息,执行在UI线程。
如下是源码和注释:
    /**
     * <p>Causes the Runnable to be added to the message queue.
     * The runnable will be run on the user interface thread.</p>
     *
     * @param action The Runnable that will be executed.
     *
     * @return Returns true if the Runnable was successfully placed in to the
     *         message queue.  Returns false on failure, usually because the
     *         looper processing the message queue is exiting.
     *
     * @see #postDelayed
     * @see #removeCallbacks
     */
    public boolean post(Runnable action) {
        final AttachInfo attachInfo = mAttachInfo;
        if (attachInfo != null) {
            return attachInfo.mHandler.post(action);
        }

        // Postpone the runnable until we know on which thread it needs to run.
        // Assume that the runnable will be successfully placed after attach.
        getRunQueue().post(action);
        return true;
}new Thread(){
public void run(){
Looper.prepare();//给当前线程初始化Looper
Toast.makeText(getApplicationContext(),"更新UI",0).show();//Toast初始化的时候会new Handler();无参构造默认获取当前线程的Looper,如果没有prepare过,则抛出题主描述的异常。上一句代码初始化过了,就不会出错。
Looper.loop();//这句执行,Toast排队show所依赖的Handler发出的消息就有人处理了,Toast就可以吐出来了。但是,这个Thread也阻塞这里了,因为loop()是个for (;;) ...
}
}.start();参考:
https://www.zhihu.com/question/51099935
https://www.zhihu.com/question/34652589
按照顺序:onMeasure() --> onLayout() --> onDraw().其他的自己扩展吧。
参考文章 http://blog.csdn.net/linglongxin24/article/details/53020164
对Bitmap的理解,然后就是压缩图片。
| 名称 | 像素密度范围 | 图片大小 |
|---|---|---|
| mdpi | 120dp~160dp | 48×48px |
| hdpi | 160dp~240dp | 72×72px |
| xhdpi | 240dp~320dp | 96×96px |
| xxhdpi | 320dp~480dp | 144×144px |
| xxxhdpi | 480dp~640dp | 192×192px |
以 720*1080 5英寸为例:
(720^2 + 1080^2)开方=260
放在xhdpi中。
本题中同理可以算得 293,还是xhdpi中。
这个。。。没什么好说的,真正了解的很好说,不了解的话就有点绕。
写各种精通其实是可以的,要么真牛x,如果不是很牛x那就在最后加上一条精通----精通各种被打脸。
EventBus是采用观察者模式实现的事件订阅总线,可以用在应用程序中,组件之间,线程之间的通信,并且由于事件可以是任意类型的对象,所以使用起来更加的方便快捷。
Handler是 Android 的消息机制,集中解决线程间通信问题。
RxJava是使用Java语言,以响应式编程思维来进行编程的Java类库。参考ReactiveX。
Java Annotation Processing技术,在Java代码编译成Java字节码的时候就已经处理了@Bind、@OnClick(ButterKnife还支持很多其他的注解)这些注解了。
Annotation processing 是javac中用于编译时扫描和解析Java注解的工具
Annotation processing是在编译阶段执行的,它的原理就是读入Java源代码,解析注解,然后生成新的Java代码。新生成的Java代码最后被编译成Java字节码,注解解析器(Annotation Processor)不能改变读入的Java 类,比如不能加入或删除Java方法。
参考:ButterKnife框架原理
基于Http的。
我熟悉的两种GreenDao3和AndroidActive,GreenDao 比较常规,注解不多(我这里都是指3.0版本后,之前的版本在生存实体的时候略显麻烦。),AndroidActive 相对而言注解较多,最后的综合性能上 GreenDao 排第一毫无争议。硬要说缺点的话就是 GreenDao 体积稍大。
标签:字节 fragment 方法 dex 设置 gre single lis cal
原文地址:http://www.cnblogs.com/android-blogs/p/6646354.html