标签:square 使用 动画 图形 常用指令 包含 off apk font
Google在Android 5.x中增加了对svg矢量图形的支持,这对于创建新的高效率动画具有非常重大的意义。首先,我们来看看什么是svg。
1.什么是svg图形
A.可伸缩矢量图形(Scalable Vector Graphics)
B.定义用于网络的基于矢量的图形
C.使用XML格式定义图形
D.图像在放大或改变尺寸的情况下其图形质量不会有所损失
E.万维网联盟的标准
F.与诸如DOM和XML之类的W3C标准是一个整体
在Android 5.x之前,我们使用svg必须通过第三方的库来实现;而在Android 5.x之后,Android中添加了对<path>标签的支持,从而能够使开发者使用svg来创建更加丰富的动画效果。
2.svg与Bitmap的区别
Bitmap(位图)是通过在每个像素点上存储色彩信息来表达图像,而svg是一个绘图标准。与Bitmap相比,svg最大的优点就是放大不会失真。而且Bitmap需要为不同分辨率设计多套图标,而矢量图则不需要。
3.<path>标签
使用<path>标签来创建svg,就像用指令的方式来控制一只画笔,例如移动画笔到某一坐标位置,画一条直线,画一条曲线,结束。<pah>标签所支持的指令有以下几种:
A. M = moveto(x, y):将画笔移动到指定的坐标位置上,但是并没有发生绘制。
B. L = lineto(x, y):画一条直线到指定的坐标位置上。
C. H = horizontal lineto(x):画水平线在指定的x坐标位置。
D. V = vertical lineto(y):画一条垂直线在指定的y坐标位置。
E. C = curveto(x1, y1, x2, y2, endX, endY):三次贝赛曲线
F. S = smooth curveto(x2, y2, endX, endY):三次贝赛曲线
G. G = quadratic Belzier curveto(x, y, endX, endY):二次贝赛曲线
H. T = smooth quadratic Belizer curveto(endX, endY):映射前面路径后的终点
I. A = elliptical Arc(rx, ry, xRotation, flag1, flag2, x, y):弧线
J. Z = colsepath():关闭路径
在使用上面的指令的时候,我们还需要注意几点:
A. 坐标轴是以(0,0)为中心的, x轴水平向右,y轴水平向下。
B. 所有指令大小写均可。大写表示绝对坐标,参照全局坐标系;小写表示相对坐标,参照父容器的坐标系。
C. 指令和数据间的空格可以省略。
D. 同一个指令可以使用多次。
4.svg常用指令
A.L指令
绘制直线的指令时“L”,代表从当前点绘制直线到指定点。“L”之后的参数是一个点坐标,例如:“L 200 400”绘制直线。同时还可以使用“H”和“V”指令来绘制水平、竖直线,后面的参数是X坐标(H指令) 或者y坐标(V指令)。
B.M指令
M指令类似于Android绘图中Path类中的moveto方法,即代表将画笔移动到某一点,但并不发生绘制的动作
C.A指令
A指令是用来绘制一段弧线的,且允许弧线不闭合。可以把A指令绘制的弧线想象成是椭圆的某一段,A指令一下有七个参数
1) rx, ry 表示的是椭圆的半轴大小
2) xRotation 指椭圆的X轴与水平方向顺时针方向的夹角,可以想象成一个水平的椭圆绕中心点顺时针旋转xRotation的角度。
3) flag1 只有两个值,1表示绘制大弧度弧线,0表示绘制小弧度弧线
4) flag2 只有两个值,确定从起点到终点的方向,1为顺时针,0为逆时针。
5) x,y 表示的终点坐标
5.Android中使用svg
Google在Android 5.x中提供了下面两个新的API来帮助支持svg:
A.VectorDrawable
B.AnimatedVectorDrawable
其中,VectorDrawable让你可以创建基于XML的svg图形,并且结合AnimatedVectorDrawable来实现动画效果。
6.VectorDrawable的相关属性和作用
在Android中,我们可以使用XMl文件来创建SVG图形,在XML文件中,必须将其根元素设置为<vector>才行。
下面介绍一下在XML文件中的相关属性的作用
<vector>:定义一个vector类型的可绘制的对象。
| 属性名 | 解释 |
| Android:name | 定义该对象的名字 |
| Android:width | 定义该对象的宽,该属性支持所有的像素单位,通常使用dp |
| Android:height | 定义该对象的高,同上 |
| Android:viewportWidth | 视口的宽,视口通常是设备上用于绘制图形的画布 |
| Android:tint | 该对象的着色色彩,默认是没有色彩的 |
| Android:tintMode | 该对象的着色模式,默认为src_in |
| android:autoMirrored | 当该对象的布局是RTL(right-to-left),是否需要一个镜像。默认是false |
| android:alpha | 该对象的透明度。默认为1,表示不透明 |
<group>:定义一个路径的组或者是一个子组,包含图形的转换信息。这些转换信息定义在与视口相同的坐标系中,同时转换信息支持缩放、旋转以及移动。
| 属性名 | 解释 |
| Android:name | 定义group的名字 |
| Android:rotation | 定义group的旋转角度。默认为0 |
| Android:pivotX | 定义group旋转和缩放的中心点X坐标,该坐标在视口(viewport)的坐标系中。默认为0 |
| Android:pivotY | 同上 |
| Android:scaleX | X坐标上的缩放度。默认为1 |
| Android:scaleY | 同上 |
| Android:translateX | X坐标上的移动,该坐标在视口的坐标系中。默认为0 |
| Android:translateY | 同上 |
<path>:定义绘制的路径
| 属性名 | 解释 |
| Android:name | 定义路径的名字 |
| Android:pathData | 使用svg属性来绘制路径。路径定在视口(viewport)里面 |
| Android:fillColor | 定义填充路径的颜色。可以是颜色,或者在API 23+中,颜色状态列表或者渐变颜色 |
| Android:strokeColor | 定义填充路径轮廓的颜色。其余的同上 |
| Android:strokeWidth | 定义路径线条的宽度。默认为0 |
| Android:strokeAlpha | 定义路径线条的透明度。默认为1 |
| Android:fillAlpha | 定义填充路径的透明度。默认为1 |
| Android:trimPathStart | 从路径开始的地方,截取路径一部分,范围是0到1。默认为0 |
| Android:trimPathEnd | 从路径结束的地方,截取路径的一部分,范围是0到1。默认为1 |
| Android:trimPathOffset | 移动修剪的区域(显示区域包括开始和结束),范围是0到1。默认为0 |
| Android:strokeLineCap | 定义线的两端的样式,有 butt, round, square三种模式。默认为butt |
| Android:strokeLineJin | 定义线段连接处的样式,有miter,round,bevel三种模式。默认为miter |
| Android:strokeMiterLimit | 设置斜角的上限。默认为4 |
| Android:fillType | 定义填充模式,有evenOdd、nonZero两种模式。默认为nonZero |
<clip-path>:给一个绘制的路径定义一个特定的截取路线,也就是说在已经存在的路线上定义它的截取路线,不绘制截取的部分。注意:截取路径只能定义在特定的group中或者是group的子组中。
| 属性名 | 解释 |
| Android:name | 定义截取路径的名字 |
| Android:pathData | 同path中的pathData |
7.在Android使用相关的属性来绘制图形
Android中使用svg绘制的图形也是Drawable对象,不过是VectorDrawable对象。因此,我们可以在Drawable文件夹中定义相关的XML文件来绘制我们的图形,跟平常的Drawable对象绘制方式是一样的,只是相关的属性是不同的。
 1 <?xml version="1.0" encoding="utf-8"?>
 2 <vector xmlns:android="http://schemas.android.com/apk/res/android"
 3     android:height="200dp"
 4     android:width="200dp"
 5     android:viewportWidth="110"
 6     android:viewportHeight="110"
 7
 8     >
 9     <group
10         android:name="test"
11         android:pivotX="55"
12         android:pivotY="55"
13         >
14         <path android:strokeColor="@android:color/holo_blue_bright"
15             android:strokeWidth="2"
16             android:pathData="M 26,50
17                               a 25,25, 0,0,0,25,25"
18             />
19     </group>
20 </vector>
如上面的例子,我们就绘制了一条弧线。
经过上面的定义,就绘制了一个svg图形。关于它的引用,就像使用平常的Drawable一样。
1     <ImageView
2
3         android:id="@+id/id_imageView"
4         android:layout_width="match_parent"
5         android:layout_height="match_parent"
6         android:src="@drawable/demo"
7         />
8.给svg图形增加动画
通过上面的步骤,我们定义了一个svg图形,将其设置给一个ImageView。但是有没有发现,这并没有什么特点啊?好像跟我们平常使用的Drawable是一样的。其实并不是这样的,我们还可以将一个动态的svg图形设置给一个控件,也就是要说的,给一个svg图形增加动画,也就是之前说的AnimatedVectorDrawable。
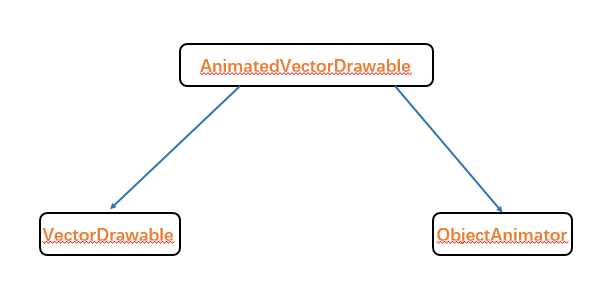
AnimatedVectorDrawable的作用就是给一个VectorDrawable增加动画效果。Google将AnimatedVectorDrawable比喻成胶水,通过AnimatedVectorDrawable来连接静态的VectorDrawable和动态的ObjectDrawable。
静态的VectorDrawable:
 1 <?xml version="1.0" encoding="utf-8"?>
 2 <vector xmlns:android="http://schemas.android.com/apk/res/android"
 3     android:height="200dp"
 4     android:width="200dp"
 5     android:viewportWidth="110"
 6     android:viewportHeight="110"
 7
 8     >
 9     <group
10         android:name="test"
11         android:pivotX="55"
12         android:pivotY="55"
13         >
14         <path android:strokeColor="@android:color/holo_blue_bright"
15             android:strokeWidth="2"
16             android:pathData="M 26,50
17                               a 25,25, 0,0,0,25,25"
18             />
19     </group>
20 </vector>
动态的ObjectorAnimator:
 1 <?xml version="1.0" encoding="utf-8"?>
 2 <set xmlns:android="http://schemas.android.com/apk/res/android">
 3     <objectAnimator
 4         android:duration="500"
 5         android:propertyName="rotation"
 6         android:valueFrom="0"
 7         android:valueTo="360"
 8         android:repeatCount="100"
 9         android:startOffset="-1"
10         android:interpolator="@android:anim/overshoot_interpolator"
11         />
12 </set>
粘合起来的AnimatedVectorDrawable:
1 <?xml version="1.0" encoding="utf-8"?>
2 <animated-vector xmlns:android="http://schemas.android.com/apk/res/android"
3     android:drawable="@drawable/demo"
4     >
5     <target
6         android:animation="@animator/anim"
7         android:name="test"/>
8 </animated-vector>
需要的注意的是:AnimatedVectorDrawable中指定的target的name属性的内容必须与VectorDrawable中需要作用的name属性必须保持一致,这样系统才能找到要实现动画效果的元素。最后,通过AnimatedVectorDrawable中target的animation属性,将一个动画作用到对应name的元素上。
在<group>标签和<path>标签中,添加了rotation、fillColor、pathData等属性,那么在ObjectAnimator中,就可以通过指定Android:propertyName="XXXX"属性来选择控制哪一种属性,通过Android:valueFrom="XXXX"和Android:valueTo="XXXX"属性,可以控制动画的起始值。唯一需要注意的是:如果指定控制的属性为pathData,那么需要添加一个属性--Android:valueType="pathType"来告诉系统进行pathData变换。
在控件引用Drawable的时候,记住引用的是AnimatedVectorDrawable,而不是VectorDrawable。
 1 <?xml version="1.0" encoding="utf-8"?>
 2 <LinearLayout xmlns:android="http://schemas.android.com/apk/res/android"
 3     android:layout_width="match_parent"
 4     android:layout_height="match_parent"
 5     android:gravity="center"
 6     android:orientation="vertical">
 7     <ImageView
 8
 9         android:id="@+id/id_imageView"
10         android:layout_width="match_parent"
11         android:layout_height="match_parent"
12         android:src="@drawable/demo1"
13         />
14 </LinearLayout>
当我们引用一个动态的AnimatedVectorDrawable后,就可以在Java代码中使用动画效果了。
1 mImageView = (ImageView) findViewById(R.id.id_imageView);
2         ((Animatable)mImageView.getDrawable()).start();
标签:square 使用 动画 图形 常用指令 包含 off apk font
原文地址:http://www.cnblogs.com/Stay-Hungry-Stay-Foolish/p/6652723.html