标签:view array init cep vax framework row dap chm
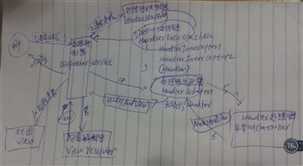
0.springmvc请求流程图


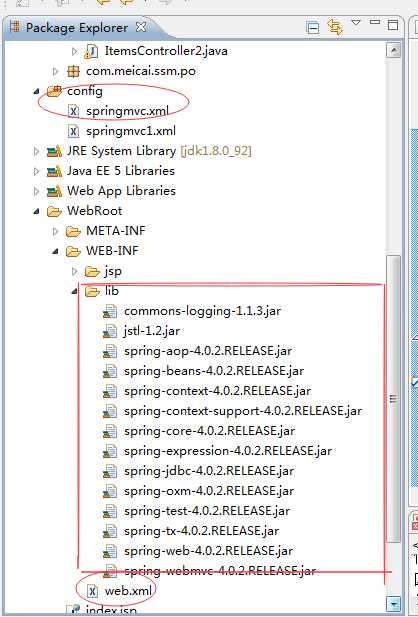
1.使用的jia包及要写的配置文件如图

2.web.xml 配置前端控制器

<?xml version="1.0" encoding="UTF-8"?>
<web-app version="2.5"
    xmlns="http://java.sun.com/xml/ns/javaee"
    xmlns:xsi="http://www.w3.org/2001/XMLSchema-instance"
    xsi:schemaLocation="http://java.sun.com/xml/ns/javaee
    http://java.sun.com/xml/ns/javaee/web-app_2_5.xsd">

    <!-- springmvc 前端控制器 -->
    <servlet>
        <servlet-name>springmvc</servlet-name>
        <servlet-class>org.springframework.web.servlet.DispatcherServlet</servlet-class>
        <!-- contextConfigLocation配置springmvc加载的配置文件(处理器映射器、适配器等) -->
        <init-param>
            <param-name>contextConfigLocation</param-name>
            <param-value>classpath:springmvc.xml</param-value>
        </init-param>
    </servlet>
    <servlet-mapping>
        <servlet-name>springmvc</servlet-name>
        <!--
        第一种:*.action 访问.action结尾都由DispatcherServlet解析
        第二种:/ 所有访问的地址都由DispatcherServlet解析,对于静态文件的解析需要配置不让DispatcherServlet解析
                 使用这种方式可以实现RESTful风格的url
        第三种:/* 这样配置不对,使用
         -->
        <url-pattern>*.action</url-pattern>
    </servlet-mapping>


  <display-name></display-name>
  <welcome-file-list>
    <welcome-file>index.jsp</welcome-file>
  </welcome-file-list>
</web-app>
3.springmvc.xml 配置处理器映射器、处理器适配器、处理器、试图解析器

<?xml version="1.0" encoding="UTF-8"?>

<beans xmlns:xsi="http://www.w3.org/2001/XMLSchema-instance"
    xmlns="http://www.springframework.org/schema/beans" xmlns:aop="http://www.springframework.org/schema/aop"
    xmlns:context="http://www.springframework.org/schema/context" xmlns:tx="http://www.springframework.org/schema/tx"
    xmlns:cache="http://www.springframework.org/schema/cache" xmlns:p="http://www.springframework.org/schema/p"
    xsi:schemaLocation="http://www.springframework.org/schema/beans
     http://www.springframework.org/schema/beans/spring-beans-4.0.xsd
     http://www.springframework.org/schema/aop
     http://www.springframework.org/schema/aop/spring-aop-4.0.xsd
     http://www.springframework.org/schema/context
     http://www.springframework.org/schema/context/spring-context-4.0.xsd
     http://www.springframework.org/schema/tx
     http://www.springframework.org/schema/tx/spring-tx-4.0.xsd
     http://www.springframework.org/schema/cache http://www.springframework.org/schema/cache/spring-cache-4.0.xsd">
<!-- 处理器映射器 将bean的name作为url进行查找 ,需要在配置handler是自定beanname(就是url)-->
    <bean class="org.springframework.web.servlet.handler.BeanNameUrlHandlerMapping"/>
<!-- 处理器适配器 -->
    <!-- 这个适配器能解析的Handler需要实现Controller接口 -->
    <bean class="org.springframework.web.servlet.mvc.SimpleControllerHandlerAdapter"/>
<!-- 视图解析器 (解析jsp,默认使用jstl标签,所以jstl下需要有jstl的包)-->
<bean class="org.springframework.web.servlet.view.InternalResourceViewResolver"/>
<!-- 配置Handler -->
<bean name="/queryItems.action" class="com.meicai.ssm.controller.ItemsController1"/>

</beans>
4.编写实现了Controller接口的类

package com.meicai.ssm.controller;

import java.util.List;
import java.util.ArrayList;

import javax.servlet.http.HttpServletRequest;
import javax.servlet.http.HttpServletResponse;

import org.springframework.web.servlet.ModelAndView;
import org.springframework.web.servlet.mvc.Controller;

import com.meicai.ssm.po.Items;

/**
 *
 *
 * @author Administrator
 *
 */
public class ItemsController1 implements Controller {

    @Override
    public ModelAndView handleRequest(HttpServletRequest request,
            HttpServletResponse response) throws Exception {
        // TODO Auto-generated method stub
        List<Items> itemsList=new ArrayList<Items>();
        Items items1=new Items();
        items1.setName("联想笔记本chm1");
        items1.setPrice(6000f);

        items1.setDetail("tinkpadT430");

        Items items2=new Items();
        items2.setName("苹果手机");
        items2.setPrice(5000f);
        items2.setDetail("ipone7");
        itemsList.add(items1);
        itemsList.add(items2);

        ModelAndView mav=new ModelAndView();
        mav.addObject("itemsList", itemsList);
        mav.setViewName("/WEB-INF/jsp/itemsList.jsp");
        return mav;
    }

}
5.部署和调试:http://localhost:8080/springmvc04-01/queryItems1.action
标签:view array init cep vax framework row dap chm
原文地址:http://www.cnblogs.com/caohuimingfa/p/6670968.html