标签:管理器 pass pytho 第三方 ons web服务 onkeyup server cordova
一、简单介绍树莓派的GPIO口

上图是树莓派2代的接口(不同型号接口会有差异),我们就以此为例来说下这些接口。

1、GPIO介绍
GPIO 英文全称是:General-purpose input/output 通用型之输入输出的简称,其接脚可以供使用者由程控自由使用,PIN脚依现实考量可作为通用输入(GPI)或通用输出(GPO)或通用输入与输出(GPIO)。通过这些GPIO口,我们可以控制很多第三方的寄存器设备,简单来说我们可以通过这些I/O口控制一些芯片的电路、读取传感器的数值等。
2、所需材料
| 材料名称 | 数量 |
|---|---|
| 树莓派2代板子(包含电源、数据线、存储卡) | 1 |
| 智能小车底盘(包含四个直流电机) | 1 |
| 移动电源 | 1 |
| L298N电机驱动板 | 1 |
| 杜邦线母对公 | 10 |
| 杜邦线母对母 | 10 |
| 无线网卡 | 1 |
| 4孔或6孔电池盒 | 1 |
3、安装所需软件
树莓派官方有两套GPIO的python库,分别是RPi.GPIO和RPIO。现在网络上许多关于树莓派GPIO文档的教程多数是RPi.GPIO,这个是老版本的库。而RPIO是用来替代前者的新版本。后面的课程我将使用RPIO这个库,来给大家演示。下面安装RPIO:
|
1
2
|
sudo apt-get install python-dev python-pipsudo pip install RPIO |
二、 树莓派与L298N线路连接
1、第一步组装小车
组装底盘 分别用铜线连接两侧电机,并且保证同侧转向一致。如下图:

连接电机与L298N 将两侧侧的电机分别接入L298N的输出A和输出B,见下图:

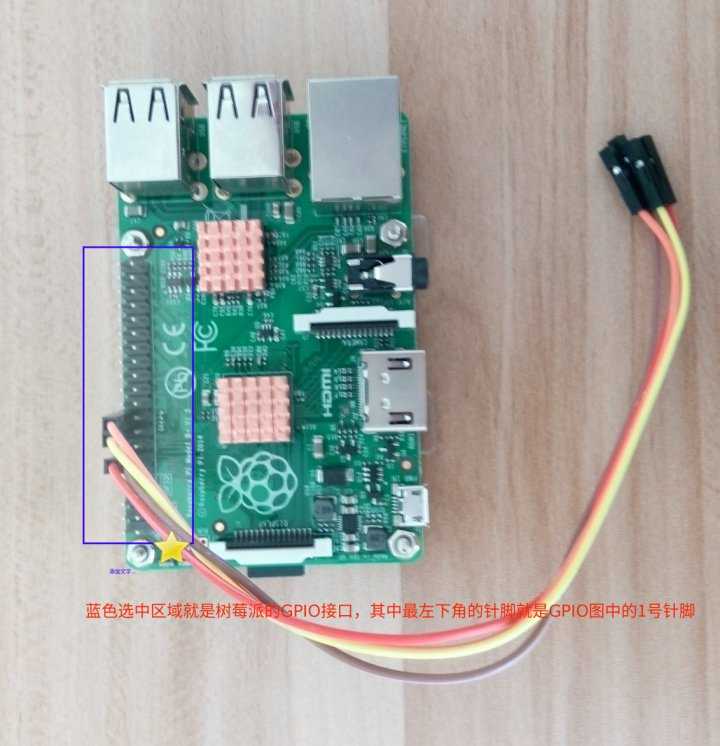
连接L298N与树莓派 见上图逻辑输入部分有4个针脚(IN1、IN2、IN3、IN4),按照顺序分别连接到树莓派接口的11、12、16、18 四个口。见下图蓝色部分:
除了上面这些,还要将L298N的供电GND和树莓派的GPIO的6号Ground连接,形成供电回路。
连接电池盒与移动电源 将电池盒的正极连接到L298N的12V供电口,负极连接到L298N的供电GND口。完成连接后,L298N的供电GND口连接了两个线,分别是电池盒的负极和树莓派的6号Ground口。
2、测试小车
登录树莓派,vim robot.py文件:
|
1
2
3
4
5
6
7
8
9
10
11
12
13
14
15
16
17
18
19
20
21
22
23
24
25
26
|
import RPIO as GPIOimport timeIN1 = 11IN2 = 12IN3 = 16IN4 = 18def init(): GPIO.setmode(GPIO.BOARD) GPIO.setup(IN1, GPIO.OUT) GPIO.setup(IN2, GPIO.OUT) GPIO.setup(IN3, GPIO.OUT) GPIO.setup(IN4, GPIO.OUT)def forward(): GPIO.output(IN1,GPIO.HIGH) GPIO.output(IN2,GPIO.LOW) GPIO.output(IN3,GPIO.HIGH) GPIO.output(IN4,GPIO.LOW)if __name__ == ‘__main__‘: init() forward() time.sleep(5) GPIO.cleanup() |
保存退出后,用sudo python robot.py执行命令,小车将会向前进5秒。
备注:1、要避免静电和短路。2、接线要小心,尤其是正负极接线。
三、使用Python控制小车
1、Tornado介绍
Tornado是使用Python编写的一个强大的、可扩展的Web服务器。它在处理严峻的网络流量时表现得足够强健,但却在创建和编写时有着足够的轻量级,并能够被用在大量的应用和工具中。
2、Tornado安装
|
1
2
3
4
5
|
$ curl -L -O https://github.com/facebook/tornado/archive/v3.1.0.tar.gz$ tar xvzf v3.1.0.tar.gz$ cd tornado-3.1.0$ python setup.py build$ sudo python setup.py install |
Tornado官方并不支持Windows,但你可以通过ActivePython的PyPM包管理器进行安装,类似如下所示:
|
1
|
C:\> pypm install tornado |
2、robot.py文件:
|
1
2
3
4
5
6
7
8
9
10
11
12
13
14
15
16
17
18
19
20
21
22
23
24
25
26
27
28
29
30
31
32
33
34
35
36
37
38
39
40
41
42
43
44
45
46
47
48
49
50
51
52
53
54
55
56
57
58
59
60
61
62
63
64
65
66
67
68
69
70
71
72
73
74
75
76
77
78
79
80
81
82
83
84
85
86
87
88
89
90
91
92
93
94
95
96
97
98
99
100
101
102
103
104
105
106
107
108
109
110
111
112
113
114
115
116
117
118
119
120
121
122
123
124
125
126
127
128
129
130
131
132
133
134
135
136
137
138
139
140
141
142
143
144
145
146
147
148
149
150
|
#!/usr/bin/python#coding: utf8import RPIO as GPIOimport timeimport sysimport threadingimport tornado.ioloopimport tornado.webimport tornado.httpserverimport tornado.optionsimport jsontornado.options.define("port",default=8000,type=int)IN1 = 11IN2 = 12IN3 = 16IN4 = 18stop_status = 0last_key = ""last_request_time = 0def init(): GPIO.setmode(GPIO.BOARD) GPIO.setup(IN1,GPIO.OUT) GPIO.setup(IN2,GPIO.OUT) GPIO.setup(IN3,GPIO.OUT) GPIO.setup(IN4,GPIO.OUT)# 前进def forward(): global stop_status GPIO.output(IN1,GPIO.HIGH) GPIO.output(IN2,GPIO.LOW) GPIO.output(IN3,GPIO.HIGH) GPIO.output(IN4,GPIO.LOW) # print "forward" # time.sleep(0.1)# 后退def reverse(): global stop_status GPIO.output(IN1,GPIO.LOW) GPIO.output(IN2,GPIO.HIGH) GPIO.output(IN3,GPIO.LOW) GPIO.output(IN4,GPIO.HIGH)# 左转弯def left(): global stop_status GPIO.output(IN1,GPIO.LOW) GPIO.output(IN2,GPIO.HIGH) GPIO.output(IN3,GPIO.HIGH) GPIO.output(IN4,GPIO.LOW)# 右转弯def right(): global stop_status GPIO.output(IN1,GPIO.HIGH) GPIO.output(IN2,GPIO.LOW) GPIO.output(IN3,GPIO.LOW) GPIO.output(IN4,GPIO.HIGH)#停止def stop_car(): GPIO.output(IN1,False) GPIO.output(IN2,False) GPIO.output(IN3,False) GPIO.output(IN4,False) global stop_status stop_status = 1#关闭GPIO接口def close_car(): global stop_status stop_status = 1 GPIO.cleanup()class IndexHandler(tornado.web.RequestHandler): def set_default_headers(self): self.set_header(‘Access-Control-Allow-Origin‘, ‘*‘) self.set_header(‘Access-Control-Allow-Methods‘, ‘POST, GET, OPTIONS‘) self.set_header(‘Access-Control-Allow-Headers‘, ‘*‘) def get(self): self.render("index.html") def post(self): global stop_status global last_key global last_request_time old_request_time = last_request_time init() sleep_time = 0.1 try: arg = self.get_argument(‘k‘) new_request_time = self.get_argument(‘time‘) print ‘get last time‘,new_request_time except Exception, e: arg = json.loads(self.request.body)[‘k‘] new_request_time = json.loads(self.request.body)[‘time‘] print ‘json last time‘, new_request_time print "==new time ==", new_request_time print "==old time ==", old_request_time if(arg==‘w‘ and last_key!=‘w‘ and new_request_time >= old_request_time): print "forward" stop_status = 0 autoThread = threading.Thread(target = forward) autoThread.start() last_key = ‘w‘ elif(arg==‘s‘ and last_key!=‘s‘ and new_request_time >= old_request_time): print "reverse" stop_status = 0 autoThread = threading.Thread(target = reverse) autoThread.start() last_key = ‘s‘ elif(arg==‘a‘ and last_key!=‘a‘ and new_request_time >= old_request_time): print "left" stop_status = 0 autoThread = threading.Thread(target = left) autoThread.start() last_key = ‘a‘ elif(arg==‘d‘ and last_key!=‘d‘ and new_request_time >= old_request_time): print "right" stop_status = 0 autoThread = threading.Thread(target = right) autoThread.start() last_key = ‘d‘ elif(arg==‘stop‘ and new_request_time >= old_request_time): print "stop" last_key = "stop" time.sleep(0.3) stop_car() else: print "error" last_request_time = new_request_time self.write(arg) def options(self): passif __name__ == ‘__main__‘: tornado.options.parse_command_line() app = tornado.web.Application(handlers=[(r"/",IndexHandler)]) http_server = tornado.httpserver.HTTPServer(app) http_server.listen(tornado.options.options.port) tornado.ioloop.IOLoop.instance().start() |
3、index.html文件:
|
1
2
3
4
5
6
7
8
9
10
11
12
13
14
15
16
17
18
19
20
21
22
23
24
25
26
27
28
29
30
31
32
33
34
35
36
37
38
39
40
41
42
43
44
45
46
47
48
49
50
51
52
53
54
55
56
57
58
59
60
61
62
63
64
65
66
67
68
69
70
71
72
73
74
75
76
77
78
79
80
81
82
83
84
85
86
87
88
89
90
91
|
<!DOCTYPE html><html><head> <meta charset="utf-8" /> <title>WIFI小车客户端</title> <script src="http://libs.baidu.com/jquery/1.9.0/jquery.js"></script></head><body><script type="text/javascript"> function go(k){ var requestTime= new Date().getTime(); $.post(‘/‘,{k:k,time:requestTime},function(){},"json"); } $(function(){ var i = null; window.document.onkeydown = keyDown; function keyDown(env){ env = (env) ? env : window.event; if(env.keyCode==‘87‘){ go(‘w‘); } if(env.keyCode==‘83‘){ go(‘s‘); } if(env.keyCode==‘65‘){ go(‘a‘); } if(env.keyCode==‘68‘){ go(‘d‘); } }; window.document.onkeyup = keyUp; function keyUp(env){ env = (env) ? env : window.event; if(env.keyCode==‘87‘){ go(‘stop‘); } if(env.keyCode==‘83‘){ go(‘stop‘); } if(env.keyCode==‘65‘){ go(‘stop‘); } if(env.keyCode==‘68‘){ go(‘stop‘); } } $(‘.before‘).mousedown(function(){ i = setInterval(function(){ go(‘w‘); },100); }); $(‘.left‘).mousedown(function(){ i = setInterval(function(){ go(‘a‘); },100); }); $(‘.right‘).mousedown(function(){ i = setInterval(function(){ go(‘d‘); },100); }); $(‘.cabk‘).mousedown(function(){ i = setInterval(function(){ go(‘s‘); },100); }); $(‘#main span‘).mouseup(function(){ clearInterval(i); go(‘stop‘); }); });</script><style type="text/css"> #main{width: 150px;height: 150px;background: #ccc;} #main span{width: 50px;height: 50px;float: left;z-index: 999;} #main span.on2{background: #ff00ff;}</style><div id="main"> <span></span> <span class="on2 before"></span> <span></span> <span class="on2 left"></span> <span></span> <span class="on2 right"></span> <span></span> <span class="on2 cabk"></span> <span></span></div></body></html> |
在命令行里尝试运行这个程序以测试输出:
|
1
|
$ sudo python robot.py |
在本地浏览器中打开http://localhost:8000,或者其他计算机使用浏览器中打开http://PI的IP:8000/
四、远程控制小车
ionic环境搭建
安装ionic
|
1
|
npm install -g cordova ionic |
克隆小车客户端代码
|
1
|
git clone https://github.com/jingzhaoyang/AutoClient.git |
编译代码
|
1
2
3
4
5
6
|
#添加平台ionic platform add android#编译android的apk安装包ionic build android#启动android模拟器ionic emulate android |
在build目录有编译好的apk文件,可以直接在Android平台直接使用。并且通过终端控制小车。
标签:管理器 pass pytho 第三方 ons web服务 onkeyup server cordova
原文地址:http://www.cnblogs.com/Pond-ZZC/p/6678610.html