标签:方案 笔记 验证 密码 second 守护 rc.local nop 远程连接
一. SSH
1.1 SSH介绍
SSH是Secure Shell Protocol的简称。在进行数据传输之前,SSH先对联机数据包通过加密技术进行加密处理,加密后再进行数据传输。确保了传递的数据安全。SSH是专为远程登录会话和其他网络问题提供安全性的协议。
在默认状态下,SSH协议提供两个服务功能:一个是提供类似telnet远程链接服务器的服务,即上面提到的SSH服务;另一个是类似FTP服务的stp-server,借助SSH协议来传输数据,提供更安全的FTP服务。
特别提醒:SSH客户端还包含一个很有用的远程拷贝命令scp,也是通过ssh协议工作的。
1.2 SSH结构
SSH服务由服务端软件OpenSSH和客户端组成,SSH服务默认使用22端口提供服务。它有两个不兼容的版本,分别是1.x和2.x.
SSH服务端是一个守护进程,它在后台运行并响应来自客户端的连接请求。SSH服务端的进程名为sshd,负责实时监听远程SSH客户端的连接请求,并进行处理,一般包括公共密钥认证、秘钥切换、对称密钥加密和非安全连接等。
ssh客户端包含ssh程序以及像scp、slogin、sftp等应用程序。
ssh的工作机制大致是本地的ssh客户端先发送一个连接请求到远程的ssh服务端,服务端检查连接的客户端发送的数据包和IP地址,如果确认合法,就会发送个秘钥给SSH的客户端,此时客户端本地再将秘钥发回给服务端,自此连接建立。
1.6 ssh的scp命令
scp -P [端口号] -[rp] (用户名@源主机名:)源文件名 (用户名@目标服务器名:)目标文件名
要注意在目标服务器端的权限。
-r:表示拷贝,目录
-p:表示在拷贝前后保持文件或目录属性
|
[root@test3 ~]# scp -P 19880 scp.test root@192.168.1.5:/scp root@192.168.1.5‘s password: scp.test 100% 0 0.0KB/s 00:00 |
scp出现Permission denied的两个案例(密码都是正确):
|
1.root用户 [root@test3 ~]# scp -P 19880 scp.test root@192.168.1.5:/scp root@192.168.1.5‘s password: Permission denied, please try again. root@192.168.1.5‘s password: Permission denied, please try again. root@192.168.1.5‘s password:
#-------------qinbf------------------------# 20 Port 19880 #默认端口 21 PermitRootLogin no #禁止root登陆 22 PermitEmptyPasswords no #禁止空密码登陆 23 UseDNS no #不使用DNS 24 #-------------qinbf------------------------# 将PermitRootLogin no改为yes,然后执行/etc/init.d/sshd restart即可。
2.目标文件夹无权限 [qinbf@test3 ~]$ touch scp.test3 [qinbf@test3 ~]$ scp -P 19880 scp.test3 192.168.1.5:/scp qinbf@192.168.1.5‘s password: scp: /scp/scp.test3: Permission denied
#查看目标服务器中目标文件夹的权限是root用户创建的,并且是755。对于目标服务器的qinbf用户来说,没有写入(w)的权限。 [root@test4 ~]# ll -d /scp drwxr-xr-x 2 root root 4096 08-27 08:54 /scp
#修改文件夹的权限为777测试 [root@test4 ~]# chmod 777 -R /scp [root@test4 ~]# ll -d /scp drwxrwxrwx 2 root root 4096 08-27 12:38 /scp
#现在源主机即可实现scp [qinbf@test3 ~]$ scp -P 19880 scp.test3 192.168.1.5:/scp qinbf@192.168.1.5‘s password: scp.test3 100% 0 0.0KB/s 00:00 |
1.7 sftp命令
|
用法:scp -oPort 端口号 目标服务器名 在sftp中可以使用ls,pwd等linux环境下的命令。
[root@test3 ~]# sftp -oPort=19880 192.168.1.5 Connecting to 192.168.1.5... root@192.168.1.5‘s password: Remote working directory: /root sftp> ifconfig Invalid command.
[root@test3 ~]# sftp -oPort=19880 qinbf@192.168.1.5 Connecting to 192.168.1.5... qinbf@192.168.1.5‘s password: sftp> sftp> pwd Remote working directory: /home/qinbf
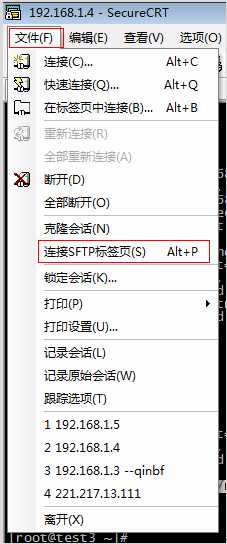
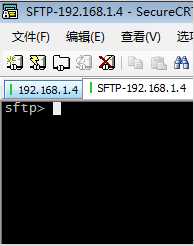
Windows环境(使用SecureCRT连接SFTP)
注意:此时的客户端是Window(即我本人使用的笔记本电脑),服务端是当前标签所打开的服务器。
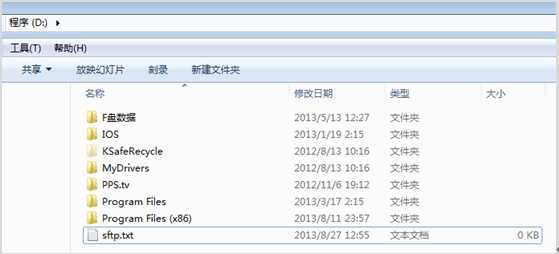
测试: put: sftp> pwd /root/sftp sftp> put D:\sftp.txt Uploading sftp.txt to /root/sftp/sftp.txt 100% 0 bytes 0 bytes/s 00:00:00 sftp> ls sftp.txt sftp> ls -l -rw-r--r-- root root 0 Aug 27, 2013 12:55 sftp.txt
get: sftp> get perl-5.10.0.tar.gz Downloading perl-5.10.0.tar.gz from /root/perl-5.10.0.tar.gz 100% 15229KB 15229KB/s 00:00:01 /root/perl-5.10.0.tar.gz: 15595020 bytes transferred in 1 seconds (15229 KB/s)
|
二.SSHKEY认证生产应用
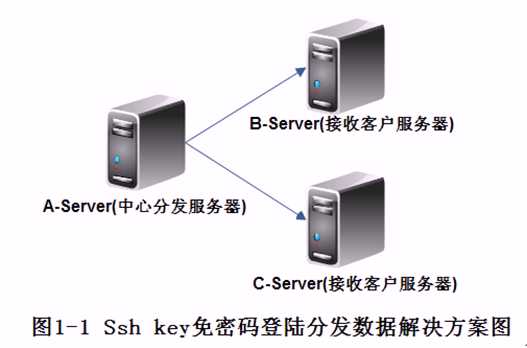
2.1 具体需求
要求所有服务器在同一用户下odlboy系统用户下,实现A机器从本地分发数据到B、C机器上,在分发过程中不需要B、C的提示系统密码验证,除了分发还需要可以批量查看客户机上的CPU,LOAD,MEM等使用信息。
2.2 实现拓扑
2.3 行前准备
2.3.1 添加系统账号
统一创建系统用户oldboy,设置密码:echo “19880328” | passwd --stdin oldboy
注意:很多公司直接用root用户操作,这样很不规范,很不安全。另外,如果禁止了root远程登录,这个方法就无法用了。
2.3.2 开始部署
因为A服务器为中心分发服务器,所以我们选择在A端建立Public key(锁)与Private key(钥匙),实际上只需要一对秘钥就可以,在哪个机器上都是一样的。
提别提示:在整个方案中,钥匙和锁,仅需要建立一次即可,可以在A、B、C任意机器上来执行,本文选择了在A服务器来生成秘钥对。
|
[root@test2 ~]# su - oldboy 1. [oldboy@test2 ~]$ ssh-keygen -t dsa #-t 指定生成的秘钥类型:rsa和dsa,对我们来说两个都可以正常使用,区别不大。 Generating public/private dsa key pair. Enter file in which to save the key (/home/oldboy/.ssh/id_dsa): #生成的私钥存放路径 Created directory ‘/home/oldboy/.ssh‘. Enter passphrase (empty for no passphrase): #空密码 Enter same passphrase again: Your identification has been saved in /home/oldboy/.ssh/id_dsa. #私钥存放路径 Your public key has been saved in /home/oldboy/.ssh/id_dsa.pub. #公钥存放路径 The key fingerprint is: 9b:42:69:1d:85:97:ec:79:16:83:13:0a:cf:10:3a:c4 oldboy@test2.localdomain
[oldboy@test2 ~]$ ll -d .ssh drwx------ 2 oldboy oldboy 4096 08-31 10:24 .ssh [oldboy@test2 ~]$ [oldboy@test2 ~]$ ll .ssh/id_dsa* -rw------- 1 oldboy oldboy 668 08-31 10:24 .ssh/id_dsa -rw-r--r-- 1 oldboy oldboy 614 08-31 10:24 .ssh/id_dsa.pub #.ssh目录的权限为700 #.ssh/id_dsa文件的权限为600而且必须为600. #.ssh/id_dsa.pub的权限为644
2. 把公钥(锁)从A服务器考到B、C服务器的家目录各一份 在A端执行以下命令: [oldboy@test2 ~]$ cd .ssh [oldboy@test2 .ssh]$ ssh-copy-id -i id_dsa.pub "-p 19880 oldboy@192.168.1.4" [oldboy@test2 .ssh]$ ssh-copy-id -i id_dsa.pub "-p 19880 oldboy@192.168.1.5" #如果ssh是默认的端口,只需要输入ssh-copy-id -i id_dsa.pub oldboy@192.168.1.4 #文件传输过去之后更名为.ssh/authorized_keys,这是/etc/ssh/sshd/sshd_config配置文件中默认的 #要注意目录和文件的权限 #ssh-copy-id仅适合分发公钥 【测试】 [oldboy@test2 .ssh]$ ssh -p 19880 oldboy@192.168.1.4 /sbin/ifconfig |grep ^eth0 -A 2 eth0 Link encap:Ethernet HWaddr 00:0C:29:B7:92:A0 inet addr:192.168.1.4 Bcast:192.168.1.255 Mask:255.255.255.0 inet6 addr: fe80::20c:29ff:feb7:92a0/64 Scope:Link
现在还有些问题: 1) 免密码登录验证是单向的 2) 基于用户的,最好不要跨用户 3) ssh连接慢的问题 4) 批量分发1000台出示都需要输入一次密码,并且第一次连接要确认 |
操作步骤总结:
命令为:ssh-keygen -t dsa,一直回车
执行上面命令把公钥文件拷贝到B,C服务器上,此步可用except批量操作。
2.3.3 分发数据
有两种方法传输数据:(免密码)
|
[oldboy@test3 ~]$ cd /tmp/oldboy/ [oldboy@test3 oldboy]$ ll 总计 0
[oldboy@test2 .ssh]$ /usr/bin/rsync -avz --progress -e ‘ssh -p 19880‘ /tmp/oldboy/ oldboy@192.168.1.4:/tmp/oldboy sending incremental file list ./ 1.txt 0 100% 0.00kB/s 0:00:00 (xfer#1, to-check=4/6) 2.txt 0 100% 0.00kB/s 0:00:00 (xfer#2, to-check=3/6) 3.txt 0 100% 0.00kB/s 0:00:00 (xfer#3, to-check=2/6) 4.txt 0 100% 0.00kB/s 0:00:00 (xfer#4, to-check=1/6) 5.txt 0 100% 0.00kB/s 0:00:00 (xfer#5, to-check=0/6)
sent 282 bytes received 110 bytes 261.33 bytes/sec total size is 0 speedup is 0.00
[oldboy@test3 oldboy]$ ll 总计 0 -rw-rw-r-- 1 oldboy oldboy 0 2013-08-31 1.txt -rw-rw-r-- 1 oldboy oldboy 0 2013-08-31 2.txt -rw-rw-r-- 1 oldboy oldboy 0 2013-08-31 3.txt -rw-rw-r-- 1 oldboy oldboy 0 2013-08-31 4.txt -rw-rw-r-- 1 oldboy oldboy 0 2013-08-31 5.txt
#先删除本地的数据,然后才能同步删除远程客户端上的数据 [oldboy@test2 oldboy]$ rm -f * [oldboy@test2 oldboy]$ /usr/bin/rsync -avz --delete --progress -e ‘ssh -p 19880‘ /tmp/oldboy/ oldboy@192.168.1.4:/tmp/oldboy sending incremental file list ./ deleting 5.txt deleting 4.txt deleting 3.txt deleting 2.txt deleting 1.txt
sent 52 bytes received 15 bytes 134.00 bytes/sec total size is 0 speedup is 0.00 |
|
#!/bin/bash
. /etc/init.d/functions
File="$1" Remote_dir="$2"
if [ $# -ne 2 ];then echo "usage:$0 argv1 argv2" echo "must have two args!" exit fi
for ip in `cat all_iplists.txt` do scp -P 19880 -r -p $File oldboy@$ip:$Remote_dir >/dev/null 2>&1 if [ $? -eq 0 ];then action "$ip is sccessful copied!" /bin/true else action "$ip is failure cpied!" /bin/false fi done
#当参数不等于两个的时候提示: [oldboy@test2 ~]$ /bin/bash fenfa.sh usage:fenfa.sh argv1 argv2 must have two args!
[oldboy@test2 ~]$ /bin/bash fenfa.sh /tmp/oldboy /tmp/oldboy 192.168.1.4 is sccessful copied! [确定] 192.168.1.5 is sccessful copied! [确定] 192.168.1.6 is failure cpied! [失败] |
特别提示:本文免验证登陆是基于普通用户oldboy,如果要实现hosts文件等文件推送工作,需要root权限。
方法大概有三:
法一 把oldboy用户配置成sudo权限用户,然后就可以实现通过sudo功能来实现普通用户只有root才能出路的问题了。处理方法有2:
1) 执行visudo开启Default requiretty参数
2) 使用SSH的如下命令“ssh -t hostame sudo <cmd>”此法为老师推荐的方法
【测试】
|
以oldboy普通用户的身份把服务器A端的/etc/hosts文件同步到客户端机器B、C上
思路:首先把文件拷贝到客户端机器的家目录,然后再远程执行sudo拷贝到/etc/等目录。 解决:
odlboy ALL=(ALL) NOPASSWD:/usr/bin/rsync
scp -P 19880 -r -p data/hosts oldboy@$192.168.1.4:~
ssh -p 19880 -t oldboy@192.168.1.4 sudo /usr/bin/rsync /etc/hosts /etc/hosts.$(date +%F%M)
ssh -p 19880 -t oldboy@192.168.1.4 sudo /usr/bin/rsync ~/hosts /etc/hosts
将以上的步骤写成脚本: #!/bin/bash . /etc/init.d/functions
File="$1"
if [ $# -ne 1 ];then echo "usage:$0 argv1" echo "must have one args!" exit fi
for ip in `cat all_iplists.txt` do scp -P 19880 -r -p $File oldboy@$ip:~ >/dev/null 2>&1 &&\ ssh -p 19880 -t oldboy@$ip sudo /usr/bin/rsync /etc/hosts /etc/hosts.$(date +%F%M) >/dev/null 2>&1 &&\ ssh -p 19880 -t oldboy@$ip sudo /usr/bin/rsync ~/hosts /etc/host >/dev/null 2>&1 if [ $? -eq 0 ];then action "$ip is sccessful copied!" /bin/true else action "$ip is failure cpied!" /bin/false fi done
|
法二 把scp等命令设置为setuid位
|
chmod 4755 /bin/cp
命令: ssh -p 19880 -t oldboy@$ip sudo /usr/bin/rsync /etc/hosts /etc/hosts.$(date +%F%M) >/dev/null 2>&1 可以替换成: ssh -p 19880 oldboy@$ip /bin/cp -a /etc/hosts /etc/hosts.$(date +%F%M) >/dev/null 2>&1 #注意:生产环境不要使用此法 |
法三 可以配置root用户的免登录认证,但这又会带来一定的安全问题(虽然可以防火墙封堵SSH端口),而且,我们前面的禁止root远程连接的优化都要打开才行,显然法三更方便,但是从安全角度看,比使用法一sudo方法稍逊一筹。
不管使用什么方法,我们一定要管理好中心分发服务器A,因为它的权限很大。那么如何,管理好中心分发服务器A呢?
1) 取消中心分发服务器的外网IP
2) 开启防火墙禁止SSH对外用户登陆,并仅给某一台后端无外网机器访问。然后这台后端的服务器依然没外网IP。并且仅能通过VPN连接,这样中心分发服务器就相对安全了。
可能大家有疑问,为什么会有很多公司会ssh key + rsync的方式而不用cfengine/puppet方案呢?原因就是:ssh key + rsync技术实现相对简单,实施方便,功能非常强大,如果建立了普通用户加sudo权限或root的免验证连接,那几乎就是无所不能了。cfengine/puppet方案的分发文件功能还不错,但是配置起来相对复杂,尤其是批量管理功能。一般的初学者很难部署和掌控。expect也可以实现分发。
2.4 生产场景备份数据架构
备份数据则需要把中心服务器的私钥(private key)发送到其他机器上,然后把中心服务器的公钥(public key)改名为authorized_keys。需要保持各个文件的权限。
在生产场景使用ssh key备份数据的架构不推荐使用,老师给出4种方案:
方法一:使用rsync服务,在备份服务器部署rsync守护进程,把所有备份节点作为rsync客户端,此方案是老男孩老师在生产环境常用的备份方案,推荐大家使用该方案,对于特别碎的文件,要进行打包,再传输。
方法二:ftp的方式,在备份服务器部署ftp守护,把所有备份节点作为ftp客户端,在本地备份完毕,把数据通过ftp的方式推送到备份服务器上。此法是老师多年前的备份方案读者也可以采用。
方法三:NFS方式,在备份服务器部署NFS服务,把所有备份节点作为NFS客户端,在本地备份完毕(甚至可以直接备份到远端的NFS SEVER上),把数据通过挂载的方式把数据推送到NFS备份服务器上。此法也是个方案,机器数量少(10台以内)时,可以采用。当前,最好不要用此方案。
方法四:scp加ssh key或except交互式的方法备份,作为一个备份思路列在这里,不推荐使用。
2.5 SSH登陆服务器慢的问题解决
SSH登录服务器慢可能的原因:
解决:
1. 在server上/etc/hosts文件中把你本机的ip和hostname加入
2. 在server上/etc/sshd_config文件中修改或加入UseDNS=no
3. 修改server上/etc/nsswitch.conf中hosts为hosts:files
4. authentication gssapi-with-mic也有可能出现问题,在server上/etc/ssh/sshd_config文件中修改GSSAPIAuthentication no。然后重启ssh进程,使配置生效。
2.6 批量分发、部署、管理的十种解决方案
1) secboy
老男孩老师自己开发的分发工具
2) SecureCRT
打开多个标签页,使用交互窗口,使一条命令在多窗口执行
3) ssh免秘钥的方案
1通过root用户直接建立秘钥认证
2普通用户建立秘钥(需要时通过sudo提权操作)
3普通用户建立秘钥(setuid对命令提权操作)
4) expect
这里可以直接用expect做批量分发管理,省了秘钥认证。交互式命令(结合rsync+scp+sudo),可实现普通用户,root用户之间文件分发,批量部署及配置管理,查看信息
5) puppet
部署复杂
6) cfengine
部署复杂
7) rsync
分发服务器上部署rsync daemon,然后客户机上通过定时任务抓取的方式
8) lsyncd(sersync)
触发式实时的抓取或推送
9) http方式
http server +客户机cron,实现文件分发
10) nfs网络文件系统
把要分发的文件放在NFS上,然后在客户端通过定时任务,复制到需要的目录。
推荐:在服务器数量不多的情况下,可以考虑SecureCRT。服务器较多的情况下,考虑ssh key 免秘钥或者rsync的方式
三 Expect非交互脚本语言详解
3.1 Expect介绍
Expect是基于Tcl的相对简单的一个免费的脚本编程工具语言,用来实现自动和交互式任务程序进行通信,无需人手工干预。比如SSH、FTP等,这些程序正常情况下都需要手工与它们进行交互,而使用Expect就可以模拟人手工交互的过程,实现自动的和远端的程序交互,从而达到自动化运维的目的。
3.2 Expect程序工作流程
Expect的工作流程可以理解为,spawn启动进程-->Expect期待关键字-->send向进程发送字符-->退出结束
3.3 首先,配置好yum安装源,并且确保机器可以上网,然后执行yum install Expect -y即可安装Expect软件
3.4 Expect的一个实例
|
#!/usr/bin/Expect
spawn ssh -p 19880 root@192.168.1.4 /sbin/ifconfig eth0 set timeout 60 expect “*Password:” send “123456\n” expect eof exit
#使用expect 脚本名来调用这个脚本 #这个脚本的权限最好是设置为700,这样子即使脚本里面的密码是明文的,但是其他用户也看不到 |
3.5 Expect语法
命令的使用语法如下:
命令 [选项] 参数
3.5.1 spawn
spawn命令是Expect的初始命令,它用于启动一个进程,之后所有expect操作都在这个进程中进行。
spawn ssh root@192.168.1.4
在spawn命令后面,直接加上要启动的进程、命令等信息,除此之外,spawn还支持其它选项:
-open 启动文件进程
-ignore 忽略某些新号
3.5.2 expect
使用方法:
expect 表达式 动作 表达式 动作
expect命令用于等候一个相匹配内容的输出,一旦匹配上就执行expect后面的动作或命令,这个命令接受几个特有的参数,用的最多的就是-re,表示使用正则表达式匹配,使用起来就像这样:
|
spawn ssh root@192.168.1.4 expect “password:” {send “123456\r”} |
从上面的例子可以看出,expect是依附于spawn命令的,当执行ssh命令后,expect就匹配命令执行后的关键字password:如果匹配到关键字就会执行后面包含在{}括号中的send或exp_send动作,匹配以及动作可以放在第二行,这样就不需要使用括号了。就像下面这样,实际完成的功能与上面是一样的:
|
spawn ssh root@192.168.1.179 expect “password:” send “oldboy\r” |
expect命令还有一种用法,它可以在一个expect匹配中多次匹配关键字,并给出处理动作,只需要将关键字放在一个大括号中就可以了,当然还要exp_continue
|
spawn ssh root@192.168.1.4 expect { “yes/no” { exp_send “yes\r”;exp_continue } “password:” { exp_send “123456\r” } |
3.5.3 exp_send和send
send命令有几个可用的参数:
-i 指定spawn_id,这个参数用来向不同spawn_id的进程发送命令,是进行多程序控制的关键参数。
-s s代表slowly,也就是控制发送的速度,这个参数使用的时候 与expect中的变量send_slow相关联
3.5.4 exp_continue
|
[qinbf@test3 ~]$ cat qinbf01.exp #!/usr/bin/expect
spawn ssh -p19880 qinbf@192.168.1.5 /sbin/ifconfig eth0 set timeout 60 expect { "yes/no" {exp_send "yes\r";exp_continue} "password:" {exp_send "qbf19880328\r"} } expect eof exit |
|
执行结果: [qinbf@test3 ~]$ expect qinbf01.exp spawn ssh -p19880 qinbf@192.168.1.5 /sbin/ifconfig eth0 The authenticity of host ‘192.168.1.5 (192.168.1.5)‘ can‘t be established. RSA key fingerprint is 72:cb:b3:8c:ff:6a:fc:50:5b:c9:7e:51:e7:0a:ab:3a. Are you sure you want to continue connecting (yes/no)? yes Warning: Permanently added ‘192.168.1.5‘ (RSA) to the list of known hosts. qinbf@192.168.1.5‘s password: eth0 Link encap:Ethernet HWaddr 00:0C:29:D1:8D:B5 inet addr:192.168.1.5 Bcast:192.168.1.255 Mask:255.255.255.0 inet6 addr: fe80::20c:29ff:fed1:8db5/64 Scope:Link UP BROADCAST RUNNING MULTICAST MTU:1500 Metric:1 RX packets:8207 errors:0 dropped:0 overruns:0 frame:0 TX packets:7799 errors:0 dropped:0 overruns:0 carrier:0 collisions:0 txqueuelen:1000 RX bytes:3038085 (2.8 MiB) TX bytes:761074 (743.2 KiB) |
当有多个匹配关键字时,使用exp_continue命令,会继续匹配下一个关键字。否则就停止匹配,这个与C语言的continue命令类似。
就算匹配的第一个关键字不存在,这个脚本可以直接匹配第二个个关键字。
|
[qinbf@test3 ~]$ ssh -p 19880 qinbf@192.168.1.5 /sbin/ifconfig eth0 qinbf@192.168.1.5‘s password:
[qinbf@test3 ~]$ expect qinbf01.exp spawn ssh -p19880 qinbf@192.168.1.5 /sbin/ifconfig eth0 qinbf@192.168.1.5‘s password: eth0 Link encap:Ethernet HWaddr 00:0C:29:D1:8D:B5 inet addr:192.168.1.5 Bcast:192.168.1.255 Mask:255.255.255.0 inet6 addr: fe80::20c:29ff:fed1:8db5/64 Scope:Link UP BROADCAST RUNNING MULTICAST MTU:1500 Metric:1 RX packets:11091 errors:0 dropped:0 overruns:0 frame:0 TX packets:10952 errors:0 dropped:0 overruns:0 carrier:0 collisions:0 txqueuelen:1000 RX bytes:3327352 (3.1 MiB) TX bytes:1082426 (1.0 MiB) |
缺少exp_continue关键字的执行结果
|
[qinbf@test3 ~]$ expect qinbf01.exp spawn ssh -p19880 qinbf@192.168.1.5 /sbin/ifconfig eth0 The authenticity of host ‘192.168.1.5 (192.168.1.5)‘ can‘t be established. RSA key fingerprint is 72:cb:b3:8c:ff:6a:fc:50:5b:c9:7e:51:e7:0a:ab:3a. Are you sure you want to continue connecting (yes/no)? yes Warning: Permanently added ‘192.168.1.5‘ (RSA) to the list of known hosts. qinbf@192.168.1.5‘s password: #缺少exc_continue关键字,只匹配第一个关键字便停止匹配 |
3.5.5 send_user
send_user命令用来把后面的参数输出到标准输出中去,默认的send、exc_pend命令都是将参数输出到程序中去,用起来就像这样:
send_user “Please input passwd: ”
这个语句就可以在标准输出中打印Please input passwd字符了
|
if { $argc !=3 } { send_user “usage: expect scp-expect.exp file host dir\n” exit }
|
3.6 expect变量
expect中有很多有用的变量,它们的使用方法与TCL语言中的变量相同,比如:
set 变量名 变量值 #设置变量的方法
puts $变量名 #读取变量的方法
|
#define var set file [lindex $argv 0] set host [lindex $argv 1] set dir [lindex $argv 2] set password “123456” |
3.7 expect关键字
eof (end-of-file)
eof关键字用于匹配结束符,比如文件的结束符、FTP传输停止等情况,在这个关键字后跟上动作做进一步的控制,特别是FTP交互操作方面,它的作用很大。用一个例子来看看:
|
spawn ftp anonymous@192.168.1.5 expect { “password:” {exp_send “123456\r”} eof {ftp connect close} } interact {} |
timeout
timeout是expect中的一个重要变量,它是一个全局性的时间控制开关,你可以通过为这个变量赋值来规定整个expect操作的时间,注意这个变量时服务于expect全局的,它不会纠缠于某一条命令,即使命令没有任何错误,到时间仍然会激活这个变量,但到达以后除了激活一个开关之外不会做其他的事情。
|
set timeout 60 spawn ssh -p 19880 qinbf@192.168.1.4 expect “password:” { exp_send “word\r”} expect timeout {puts “Expect was timeout”;return} |
上面的处理中,首先timeout变量设置为60秒,当出现问题的程序可能会停止下来,只要到60秒,就会激活下面的timeout动作。
在另一种expect格式中,我们还有一种设置timeout变量的方法,看看下面的例子:
|
spawn ssh qinbf@192.168.1.4 expect { -timeout 60 -re “password” { exp_send “word\r”} -re “TopsecOS# { } timeout {puts “expect was timeout”;return} } 在expect命令中间加上一个小横杠,也可以设置timeout变量,设置0表示立即超时,-1 表示永不超时 |
设置参数
|
#!/usr/bin/expect
if { $argc != 3 } { send_user "usage:expect qinbf02.exp file host dir\n" exit }
set file [lindex $argv 0] set host [lindex $argv 1] set dir [lindex $argv 2] set password "qbf19880328"
spawn scp -P19880 -p $file qinbf@$host:$dir set timeout 60 expect { "yes/no" {exp_send "yes\r";exp_continue} "password:" {exp_send "qbf19880328\r"} } expect eof exit
执行结果: [qinbf@test3 ~]$ expect qinbf02.exp /data/hosts 192.168.1.5 ~ spawn scp -P19880 -p /data/hosts qinbf@192.168.1.5:/home/qinbf qinbf@192.168.1.5‘s password: hosts |
exit -onexit是结束expect后传递其他信息,比如输出结尾信息或者删除临时文件
exit -onexit { send_user “”Qinbf say good bye” }
3.8 生产实战
|
#本案例使用的是普通用户qinbf [qinbf@test3 ~]$ cat qinbf02.exp #这里是expect文件 #!/usr/bin/expect
if { $argc != 3 } { send_user "usage:expect qinbf02.exp file host dir\n" exit }
set file [lindex $argv 0] set host [lindex $argv 1] set dir [lindex $argv 2] set password "qbf19880328"
spawn scp -P19880 -p $file qinbf@$host:$dir set timeout 30 expect { "yes/no" {exp_send "yes\r";exp_continue} "password:" {exp_send "$password\r";exp_continue} timeout {puts "Expect was timeout,Please contact Qinbf!\n";return} } spawn ssh -p19880 -t qinbf@$host sudo /usr/bin/rsync ~/hosts /etc/hosts set timeout 30 expect { "password:" {exp_send "$password\r"} timeout {puts "Expect was timeout,Please contact Qinbf!\n";return} } expect eof exit |
注意:由于普通用户qinbf不能修改/etc/hosts文件,所以需要对rsync配置sudo权限。在这里的expect文件就有了两个命令,那么就需要输入两次密码,所以需要分别在expect 后面匹配两次密码,然后推送两次密码。特别注意,在第一次匹配password之后,还是需要加上exc_continue,否则不会匹配下一个命令。
|
[qinbf@test3 ~]$ cat scp.test1 #这是执行分发的脚本 #!/bin/bash . /etc/init.d/functions
for ip in `cat all_iplist.txt`
do expect qinbf02.exp /data/hosts $ip ~ >/dev/null 2>&1 #这里是省去了expect文件的输出信息
if [ $? -eq 0 ];then action "$ip" /bin/true #用[确定]或[失败]来返回执行结果 else action "$ip" /bin/false fi done
[qinbf@test3 ~]$ cat all_iplist.txt #这是ip地址列表 192.168.1.3 192.168.1.5 10.1.1.1
执行结果: [qinbf@test3 ~]$ sh scp.test1 192.168.1.3 [ 确定 ] 192.168.1.5 [ 确定 ] 10.1.1.1 [ 失败 ] |
3.8.2 用expect分发公钥,实现免密码登陆
注意到上一个脚本需要输入两次密码,如果使用expect分发了公钥,那么就不需要发送两次密码,比较方便。
|
cat fenfa_sshkey.exp #!/usr/bin/expect
if { $argc != 2 } { send_user "usage:expect fenfa_sshkey.exp file host\n" exit }
set file [lindex $argv 0] set host [lindex $argv 1] set password "19880328"
spawn ssh-copy-id -i $file "-p 19880 disdata@$host"
expect { "yes/no" {exp_send "yes\r";exp_continue} "password:" {exp_send "$password\r" } } expect eof
exit -onexit { send_user "disdata say goodbye to you!\n" }
cat fenfa_sshkey.sh #!/bin/bash
. /etc/init.d/functions
for ip in `cat iplist` do expect fenfa_sshkey.exp ~/.ssh/id_dsa.pub $ip >/dev/null 2>&1 if [ $? -eq 0 ];then action "$ip" /bin/true else action "$ip" /bin/false fi done
cat iplist 192.168.1.201 192.168.1.202 192.168.1.203 192.168.1.204 192.168.1.205
最后只需要在该脚本的目录下执行sh fenfa_sshkey.sh即可。
最关键的命令其实还是” ssh-copy-id -i $file "-p 19880 disdata@$host"” |
四.Rsync数据同步服务
4.1 Rsync介绍
Rsync具有可使本地主机不同分区或目录之间及本地和远程两台主机之间的数据快速同步镜像,远程备份等功能。
在同步备份时,默认情况下,Rsync通过独特的“quick check”算法,仅同步大小或者最后修改时间发生变化的文件或目录(也可根据权限,属主等变化同步,需要指定参数),甚至是只同步一个文件里有变化的内容部分,所以可实现快速的同步数据的功能。
4.2 Rsync的特性
4.3 Rsync的工作方式
Rsync大致使用三种主要的方法来传输数据,分别为
1. 本地数据传输
2. 通过rcp、ssh等传输通道
3. 以守护进程的方式传输数据
|
Rsync本地传输的语法为: rsync [OPTION] SRC DEST
语法说明: 1) Rsync为同步的命令 2) [OPTION]为同步时的参数选项 3) SRC为源,即待拷贝的分区、文件或目录等 4) [DEST]为目的分区、文件或目录等
特别提示:请注意以下命令的差别: 1) rsync -avz /opt/ /tmp 2) rsync -avz /opt /tmp 1)中/opt/意思是,仅把/opt/目录里的内容同步过来,opt目录本身并不同步;而后者2)中/opt表示把opt本身及其全部内容都同步到/tmp下,仅一个/之差,意义就大不同。 |
|
通过远程shell进行数据传输(remote shell mode) 通过远程shell(rcp、ssh等)传输可以分为两种情况,其语法分别为 拉取:rsync [OPTION] [USER@]HOST:SRC DEST 推送:rsync [OPTION] SRC [USER@]HOST:DEST
拉取实例: rsync -vzrtopg --progress -e ‘ssh -p 22’ oldboy@192.168.1.4:/opt /tmp -vzrtopg相当于上文的-avz,表示同步文件和目录属性不变 --progress显示同步的过程,可以用-P替换 -e ‘ssh -p 22’表示通过ssh的通道传输数据,-p 22可以省略 |
|
使用守护进程的方式数据传输: 通过守护进程方式传输同样分为两种情况,每种情况又分为两种语法: 拉取: 1)rsync [OPTION] [USER@]HOST::SRC DEST 2) rsync [OPTION] rsync:// [USER@]HOST[:PORT]/SRC [DEST]
推送: 1) rsync [OPTION] SRC [USER@]HOST::DEST 2) rsync [OPTION] SRC rsync://[USER@]HOST[:PORT]/DEST 值得注意的是,与远程shell方式的命令不同的是,第1种语法格式,均为双冒号连接。另外,这个SRC或DEST也不再是路径了,而是守护进程中配置的模块名称。 |
4.4 Rsync命令同步参数选项
常用参数选项说明:
-v,--verbose详细模式输出,传输时的进度等信息
-z,--compress传输时进行压缩以提高传输效率,--compress-level=NUM可按级别压缩
-r,--recursive对子目录以递归模式,即目录下的所有目录都同样传输,注意是小写r
-t,--times保持文件时间信息
-o,--owner保持未见属主信息
-p,--perms保持文件权限
-g,--group保持文件属组信息
-P,--progress显示同步的过程及传输时的进度等信息
-a,--archive归档模式,表示以递归方式传输文件,并保持所有文件属性,等于-rtopgDl
-e,--rsh=COMMAND使用的信道协议,指定代替rsh的shell程序
--exclude=PATTERN指定排除不需要传输的文件模式
-D,--devices保持设备文件信息
-l,--links保留软链接
4.5 开始部署rsync服务--Rsync服务端操作过程:
4.5.1 配置rsyncd.conf
1) 配置rsyncd.conf
2) 配置文件常用参数选项说明:
|
rsyncd.conf参数 |
参数说明 |
|
uid = root |
rsync使用的用户,缺省uid为-2,通常为nobody |
|
gid = root |
rsync使用的组,缺省gid为-2,通常为nobody |
|
use chroot = no |
如果为true,daemon会在客户端传输文件前“chroot to the path”。这是rsync安全的一个配置,因为我们大多数都是在内网使用,所以不配也可以 |
|
max connections = 200 |
设置最大连接数,默认为0,意味无限制,负值为关闭这个模块 |
|
timeout = 400 |
默认为0,意味着no timeout,建议为300-600(5-10分钟) |
|
pid file =/var/run/rsyncd.pid |
rsync daemon启动后将其进程PID写入此文件,如果这个文件进程不会覆盖该文件,而是会终止 |
|
lock file = /var/run/rsyncd.lock |
指定lock文件用来支持“max connection”参数,使得总连接数不会超过限制,默认为/var/run/rsyncd.lock |
|
log file = /var/run/rsyncd.log |
不设或者设置错误,rsync会使用syslog输出相关日志信息 |
|
ignore errors |
忽略I/O错误 |
|
read only |
指定客户端是否可以上传文件,默认对所有模块都为true |
|
list = false |
是否允许客户端可以查看可用模块列表,默认可以 |
|
hosts allow = 10.0.0.0/24 |
指定可以联系的客户端主机名或ip地址或地址段,默认情况没有此参数,即都可以连接 |
|
host deny = 0.0.0.0/32 |
指定不可以联系的客户端主机名和ip地址,默认情况没有此参数,即都可以连接 |
|
auth users = rsync_backup |
指定以空格或逗号分隔的用户可以哪些模块,用户不需要在本地系统中存在,默认所有用户无密码的访问(anonymous rsync) |
|
secrets file = /etc/rsyncd.password |
指定用户名和密码存放的文件,格式:用户名:密码,密码不超过8位 |
|
[oldboy] |
这里就是模块名称,需要用中括号括起来,起名没有特殊要求,但最好是有意义的名称,便于以后维护 |
|
path = /oldboy/ |
在这个模块中,daemon使用的文件系统或目录,目录的权限要注意和配置文件中的权限一直,否则会遇到读写问题 |
|
#exclude = a b c/2 |
排除的文件或目录,相对路径 |
特别说明:如果配置中的path = /oldboy/提到的路径不存在,则需要创建,命令为:
mkdir -p /oldboy/
chmod -R root.root /oldboy #授权权限可以根据配置文件中的属主来设定。
4.5.2 配置用于rsync同步的账号、密码及账号文件权限
|
#auth echo “rsync_backup:oldboy”>/etc/rsyncd.password #注意:其中rsync_backup:oldboy中的rsync_backup为同步传输用到的虚拟账号,这个账号仅为rsync的账号,不需要是系统账号,。后面的oldboy为密码,不超过8位,账号和密码中间用冒号分割。
chmod 600 /etc/rsyncd.password #必须为600权限
#check cat /etc/rsyncd.password ll /etc/rsync.password
|
4.5.3 启动rsync服务
以守护进程方式来启动rsync服务:
|
rsync --daemon #daemon表示以守护进程的方式启动rsync服务 --address #绑定指定IP地址提供服务,适用于多网卡的服务器 --config=FILE #更改配置文件路径,而不是默认的/etc/rsyncd.conf --port=Port 更改其他端口提供服务,而不是缺省的873端口 提示:以上几个选项为了解内容,生产场景使用的不多 |
4.5.4 设置rsync服务开机自启动
|
echo “/usr/bin/rsync --daemon” >> /etc/rc.local |
也可以使用chkconfig rsync on命令(适用于设置其他服务为开机自启动服务)
|
#从Windows系统拷贝到Linux系统的文件需要转换格式: [root@test2 ~]# dos2unix /etc/init.d/rsyncd dos2unix: converting file /etc/init.d/rsyncd to UNIX format ...
[root@test2 ~]# cat /etc/init.d/rsyncd #!/bin/sh #author oldboy QQ 31333741 # # rsync Start/Stop Rsync service # # chkconfig: 35 13 91 # description: This is Rsync service management shell script # processname: rsyncd
# Source function library. . /etc/rc.d/init.d/functions
start(){ rsync --daemon if [ $? -eq 0 -a `ps -ef|grep -v grep|grep rsync|wc -l` -gt 0 ];then action "Starting Rsync:" /bin/true sleep 1 else action "Starting Rsync:" /bin/false sleep 1 fi } stop(){ pkill rsync;sleep 1;pkill rsync #if [ $? -eq 0 -a `ps -ef|grep -v grep|grep rsync|wc -l` -lt 1 ];then if [ `ps -ef|grep -v grep|grep "rsync --daemon"|wc -l` -lt 1 ];then
action "Stopping Rsync: `ps -ef|grep -v grep|grep rsync|wc -l` " /bin/true sleep 1 else action "Stopping Rsync: `ps -ef|grep -v grep|grep "rsync --daemon"|wc -l` " /bin/false sleep 1 fi }
case "$1" in start) start; ;; stop) stop ;; restart|reload) $0 stop; $0 start; ;; *) echo $"Usage: $0 {start|stop|restart|reload}" ;; esac
#/etc/init.d/rsyncd文件的权限为700,root用户 [root@test2 ~]# chkconfig rsyncd on [root@test2 ~]# chkconfig --list rsyncd rsyncd 0:关闭 1:关闭 2:启用 3:启用 4:启用 5:启用 6:关闭 |
这里之所以可以使用chkconfig设置为开机自启动,是因为老师写的文件比较规范了,要学习这里的格式。
|
[root@test2 ~]# service rsyncd start Failed to parse config file: /etc/rsyncd.conf Starting Rsync: [失败] [root@test2 ~]# /etc/init.d/rsyncd start Failed to parse config file: /etc/rsyncd.conf Starting Rsync: [失败] 这里设置开机自启动失败,是因为我没有配置/etc/rsyncd.conf这个配置文件。 配置文件如下: [root@test2 ~]# cat /etc/rsyncd.conf #rsync_config_______________start #created by oldboy 15:01 2007-6-5 #QQ 31333741 blog:http://oldboy.blog.51cto.com ##rsyncd.conf start## uid = root gid = root use chroot = no max connections = 200 timeout = 300 pid file = /var/run/rsyncd.pid lock file = /var/run/rsync.lock log file = /var/log/rsyncd.log [oldboy] path = /oldboy/ ignore errors read only = false list = false hosts allow = 10.0.0.0/24 hosts deny = 0.0.0.0/32 auth users = rsync_backup secrets file = /etc/rsync.password
[root@test2 ~]# service rsyncd start Starting Rsync: [确定] [root@test2 ~]# [root@test2 ~]# [root@test2 ~]# /etc/init.d/rsyncd stop 已终止 |
重启rsync的组合命令
|
pkill rsync #关闭rsync服务 rsync --daemon #启动rsync服务 ps -ef | grep rsync #检查rsync服务 |
|
[root@test2 ~]# netstat -tupnl |grep 873 tcp 0 0 0.0.0.0:873 0.0.0.0:* LISTEN 4380/rsync tcp 0 0 :::873 :::* LISTEN 4380/rsync [root@test2 ~]# ps -ef | grep -v grep | grep rsync root 4380 1 0 16:56 ? 00:00:00 rsync --daemon |
4.6 开始部署Rsync服务--Rsync客户端操作过程
4.6.1 配置rsync账号及账号文件权限
请注意与服务端的配置的区别
|
echo “oldboy” > /etc/rsyncd.password #这里仅配置了密码,不需要账号。这是与服务端的区别。 chmod 600 /etc/rsyncd.password #必须为600权限 |
到此rsync服务配置大功告成!
4.7 检查部署的Rsync服务:
默认情况下,以下均在客户端rsync客户端执行操作:下面以[ip:192.168.1..4]为例说明:
从客户端推送/etc目录到服务器rsync指定的目录下:
|
推送方法结论:--delete参数的作用,它可以使本地的目录和rsync服务端指定的目录实现完全同步,即本地有啥远端就有啥,本地没有的,远端也必须删除。确保数据一致。推送时使用--delete命令有使远端rsync服务端的目录数据丢失的风险。 |
五 Sersync应用指南
5.1 项目简介
Sersync项目利用inotify与rsync技术实现对服务器数据实时同步解决方案,其中inotify用于监控sersync所在服务器上文件系统的事件变化,rsync是目前广泛使用的本地及异地数据同步工具
5.2 基本架构

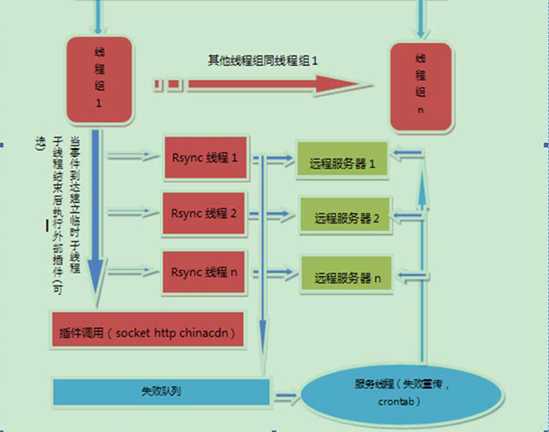
(1) 线程组是线程是等待线程队列的守护线程,设计的目的是能够同时处理多个inotify事件,从而提升服务器的并发同步能力
(2) 服务线程的三个作用:
a. 首先是处理同步失败的文件,将这些文件再次同步,对于再次同步失败的文件会生成rsync_fail_log.sh脚本,记录失败的事件
b. 每隔10个小时执行脚本,同时清空脚本
c. 第三个作用是crontab功能,可以每隔一定时间,将所有路径整体同步一次
(3) 过滤队列的建立是为了过滤短时间内产生的重复inotify信息,例如在删除文件夹的时候,inotify就会同时产生删除文件夹里的文件与删除文件夹的时间,通过过滤队列,当删除文件夹时间产生的时候,会将之前加入队列的删除文件的时间全部过滤掉,这样只产生一条删除文件夹的事件。
5.3 Sersync逻辑需求
当前版本的sersync依赖于rsync进行数据同步,在同步主服务器(Master)上开启sersync,sersync负责监控配置路径中的文件系统事件变化,然后调用rsync命令把更新的文件同步到目标服务器(Slave),因此,需要在主服务器配置sersync,在同步目标服务器配置rsync server(注意,是rsync服务)
5.4 配置同步服务器
5.4.1 Slave上部署rsync服务
(1) 升级rsync到3.0
(2) 写入配置文件/etc/rsyncd.conf
|
[root@test4 ~]# /bin/cp /etc/rsyncd.conf /etc/rsyncd.conf.qinbf_$(date +%F) [root@test4 ~]# echo >/etc/rsyncd.conf<<EOF > #Rsync server > #created by oldboy 15:01 2009-6-5 > ##rsyncd.conf start## > uid = root > gid = root > use chroot = no > max connections = 2000 > timeout = 600 > pid file = /var/run/rsyncd.pid > lock file = /var/run/rsync.lock > log file = /var/log/rsyncd.log > ignore errors > read only = false > list = false > hosts allow = 10.0.0.0/24 > hosts deny = 0.0.0.0/32 > auth users = rsync_backup > secrets file = /etc/rsync.password > ##################################### > [www] > comment = www by old0boy 14:18 2012-1-13 > path = /data0/www/www/ > ##################################### > [bbs] > comment = bbs by old0boy 14:18 2012-1-13 > path = /data0/www/bbs/ > ##################################### > [blog] > comment = blog by old0boy 14:18 2012-1-13 > path = /data0/www/blog/ > EOF |
(3)创建待同步目录
|
mkdir -p /data0/www/www /data0/www/bbs /data0/www/blog [root@test3 ~]# tree /data0/www /data0/www |-- bbs |-- blog `-- www
3 directories, 0 files [root@test3 ~]# tree /data0 /data0 `-- www |-- bbs |-- blog `-- www
4 directories, 0 files |
(4) 配置相关权限认证
|
[root@test3 ~]# echo "rsync_backup:oldboy123" >/etc/rsync.password [root@test3 ~]# chmod 600 /etc/rsync.password [root@test3 ~]# cat /etc/rsync.password #for check rsync_backup:oldboy123 [root@test3 ~]# ll /etc/rsync.password #for check -rw------- 1 root root 23 09-03 12:15 /etc/rsync.password |
(5) 开启守护进程
|
[root@test3 ~]# rsync --daemon #开启进程 [root@test3 ~]# ps -ef |grep rsync #查看rsync进程的情况 root 10005 1 0 12:18 ? 00:00:00 rsync --daemon root 10007 9887 0 12:18 pts/0 00:00:00 grep rsync [root@test3 ~]# lsof -i :873 #查看端口对应的进程 COMMAND PID USER FD TYPE DEVICE SIZE/OFF NODE NAME rsync 10005 root 3u IPv6 20111 0t0 TCP *:rsync (LISTEN) rsync 10005 root 5u IPv4 20112 0t0 TCP *:rsync (LISTEN) #pkill rsync 关闭rsync服务
echo “/usr/local/bin/rsync --daemon”>>/etc/rc.local |
5.4.2 在Master上配置rsync客户端
(1) Master上配置rsync权限
|
[root@test2 ~]# echo "oldboy123" >/etc/rsync.password [root@test2 ~]# chmod 600 /etc/rsync.password [root@test2 ~]# cat /etc/rsync.password oldboy123 [root@test2 ~]# ll /etc/rsync.password -rw------- 1 root root 10 10-02 11:46 /etc/rsync.password |
(2) Master上手工测试rsync同步情况
|
#分别创建待同步数据 [root@test2 ~]# mkdir -p /data0/www/www /data0/www/bbs /data0/www/blog [root@test2 ~]# cd /data0/www/ root@test2 www]# pwd /data0/www [root@test2 www]# ls bbs blog www [root@test2 www]# touch www/www.log [root@test2 www]# touch bbs/bbs.loog [root@test2 www]# touch blog/blog.log
[root@test2 ~]# tree /data0 /data0 `-- www |-- bbs | `-- bbs.loog |-- blog | `-- blog.log `-- www `-- www.log
4 directories, 3 files
#关闭防火墙,执行同步 [root@test2 ~]# rsync -avzP /data0/www/www/ rsync_backup@192.168.1.4::www/ --password-file=/etc/rsync.password sending incremental file list ./ www.log 0 100% 0.00kB/s 0:00:00 (xfer#1, to-check=0/2)
sent 77 bytes received 30 bytes 71.33 bytes/sec total size is 0 speedup is 0.00
#/data0/www/www/中最后的这一个“/”很关键,直接决定你是同步整个文件夹 ,还是只是同步文件夹里面的文件 …… #然后检查同步的结果 [root@test3 www]# tree /data0 /data0 `-- www |-- bbs | `-- bbs.loog |-- blog | `-- blog.log `-- www `-- www.log
4 directories, 3 files |
5.5 在Master上部署sersync
(1) 下载sersync
|
[root@test2 ~]# mkdir tools [root@test2 ~]# cd tools/ [root@test2tools]#wget https://sersync.googlecode.com/files/sersync2.5.4_64bit_binary_stable_final.tar.gz(由于防火墙的问题在虚拟机上无法直接下载) |
(2) 安装sersync
|
[root@test2 tools]# tar zxvf sersync2.5.4_64bit_binary_stable_final.tar.gz -C /usr/local/ GNU-Linux-x86/ GNU-Linux-x86/sersync2 GNU-Linux-x86/confxml.xml [root@test2 tools]# cd /usr/local/ [root@test2 local]# mv GNU-Linux-x86 sersync |
(3) 规范sersync目录结构
|
[root@test2 sersync]# mkdir bin conf logs [root@test2 sersync]# mv sersync2 bin/sersync [root@test2 sersync]# mv confxml.xml conf/ [root@test2 sersync]# tree . . |-- bin | `-- sersync |-- conf | `-- confxml.xml `-- logs
3 directories, 2 files |
(4) 配置sersync
|
[root@test2 sersync]# /bin/cp conf/confxml.xml conf/confxml.xml_qinbf_$(date +%F) 然后修改24到28行的部分,原内容为: 24 <localpath watch="/opt/tongbu"> 25 <remote ip="127.0.0.1" name="tongbu1"/> 26 <!--<remote ip="192.168.8.39" name="tongbu"/>--> 27 <!--<remote ip="192.168.8.40" name="tongbu"/>--> 28 </localpath> |
修改为:
|
24 <localpath watch="/data0/www/www"> 25 <remote ip="192.168.1.4" name="www"/> 26 <remote ip="192.168.1.5" name="www"/> 27 </localpath> 28 <!--################################--> 29 <localpath watch="/data0/www/bbs"> 30 <remote ip="192.168.1.4" name="bbs"/> 31 <remote ip="192.168.1.5" name="bbs"/> 32 </localpath> 33 <!--################################--> 34 <localpath watch="/data0/www/blog"> 35 <remote ip="192.168.1.4" name="blog"/> 36 <remote ip="192.168.1.5" name="blog"/> 37 </localpath> 38 <!--################################--> 提示:<localpath watch="/data0/www/www">中watch部分是本地待同步的目录,name是远端服务器的同步模块名 |
修改29-35行
|
29 <rsync> 30 <commonParams params="-artuz"/> 31 <auth start="false" users="root" passwordfile="/etc/rsync.pas"/> 32 <userDefinedPort start="false" port="874"/><!-- port=874 --> 33 <timeout start="false" time="100"/><!-- timeout=100 --> 34 <ssh start="false"/> 35 </rsync> |
为:
|
39 <rsync> 40 <commonParams params="-aruz"/> 41 <auth start="true" users="rsync_backup" passwordfile="/etc/rsync.password"/> 42 <userDefinedPort start="false" port="874"/><!-- port=874 --> 43 <timeout start="true" time="100"/><!-- timeout=100 --> 44 <ssh start="false"/> 45 </rsync> 提示:这几行的配置其实是在配置同步的命令参数而已 |
修改36-37行
|
36 <failLog path="/tmp/rsync_fail_log.sh" timeToExecute="60"/><!--default every 60mins execute once--> |
为:
|
46 <failLog path="/usr/local/sersync/logs/rsync_fail_log.sh" timeToExecute="60"/><!--default every 60mins execute once--> 提示:此步修改同步失败之后,日志文件路径 |
5.6 开启sersync守护进程同步数据
(1) 配置环境变量
|
[root@test2 sersync]# echo ‘export PATH=$PATH:/usr/local/sersync/bin‘ >>/etc/profile [root@test2 sersync]# tail -1 /etc/profile export PATH=$PATH:/usr/local/sersync/bin [root@test2 sersync]# source /etc/profile |
(2)启动命令
|
[root@test2 sersync]# sersync -d -r -o /usr/local/sersync/conf/confxml.xml set the system param execute:echo 50000000 > /proc/sys/fs/inotify/max_user_watches execute:echo 327679 > /proc/sys/fs/inotify/max_queued_events parse the command param option: -d run as a daemon option: -r rsync all the local files to the remote servers before the sersync work #让Master和slave的数据在初始化的时候相同 option: -o config xml name: /usr/local/sersync/conf/confxml.xml #指定配置文件 daemon thread num: 10 parse xml config file host ip : localhost host port: 8008 daemon start,sersync run behind the console use rsync password-file : user is rsync_backup #用户 passwordfile is /etc/rsync.password #密码文件 config xml parse success please set /etc/rsyncd.conf max connections=0 Manually sersync working thread 12 = 1(primary thread) + 1(fail retry thread) + 10(daemon sub threads) Max threads numbers is: 32 = 12(Thread pool nums) + 20(Sub threads) please according your cpu ,use -n param to adjust the cpu rate ------------------------------------------ rsync the directory recursivly to the remote servers once working please wait... execute command: cd /data0/www/www && rsync -aruz -R --delete ./ --timeout=100 rsync_backup@192.168.1.4::www --password-file=/etc/rsync.password >/dev/null 2>&1 [root@test2 sersync]# run the sersync: watch path is: /data0/www/www
#现在的问题是,仅能同步第一个模块的目录 |
于是,配置多实例,每个配置文件仅同步一个目录,仅记录该目录的失败日志
|
[root@test2 conf]# cp confxml.xml confxml.xml.new [root@test2 conf]# cp confxml.xml www_confxml.xml [root@test2 conf]# cp confxml.xml bbs_confxml.xml [root@test2 conf]# cp confxml.xml blog_confxml.xml 例如bbs的配置: 23 <sersync> 24 <!--################################--> 25 <localpath watch="/data0/www/bbs"> 26 <remote ip="192.168.1.4" name="bbs"/> 27 <remote ip="192.168.1.5" name="bbs"/> 28 </localpath> 29 <!--################################--> 30 <rsync> 31 <commonParams params="-aruz"/> 32 <auth start="true" users="rsync_backup" passwordfile="/etc/rsync.password"/> 33 <userDefinedPort start="false" port="874"/><!-- port=874 --> 34 <timeout start="true" time="100"/><!-- timeout=100 --> 35 <ssh start="false"/> 36 </rsync> 37 <failLog path="/usr/local/sersync/logs/bbs_rsync_fail_log.sh" timeToExecute="60"/><!--default every 60mins execute once--> |
开启多实例:
|
sersync -r -d -o /usr/local/sersync/conf/www_confxml.xml sersync -r -d -o /usr/local/sersync/conf/bbs_confxml.xml sersync -r -d -o /usr/local/sersync/conf/blog_confxml.xml
设置开机启动: cat >>/etc/rc.local <<EOF sersync -d -o /usr/local/sersync/conf/www_confxml.xml sersync -d -o /usr/local/sersync/conf/bbs_confxml.xml sersync -d -o /usr/local/sersync/conf/blog_confxml.xml EOF #在开机启动的时候一般不需要加上-r参数,因为关机之前大部分的数据是已经同步的,如果再同步,就浪费时间。 |
其实本例可以只监控上一次的目录,这样可以一次监控三个子目录,这样做是为了方便学习
写入10000个文件批量实时同步测试
|
[root@test2 www]# for i in `seq 10000`;do echo "qinbf">www/$i.txt;done [root@test2 www]# ps -ef |grep rsync root 4380 1 0 05:05 ? 00:00:00 rsync --daemon root 6246 1 0 10:06 ? 00:00:00 sersync -d -r -o /usr/local/sersync/conf/confxml.xml root 6601 1 0 10:39 ? 00:00:00 sersync -r -d -o /usr/local/sersync/conf/www_confxml.xml root 6621 1 0 10:39 ? 00:00:00 sersync -r -d -o /usr/local/sersync/conf/bbs_confxml.xml root 6641 1 0 10:39 ? 00:00:00 sersync -r -d -o /usr/local/sersync/conf/blog_confxml.xml root 12592 6601 0 10:54 ? 00:00:00 sh -c cd /data0/www/www && rsync -aruz -R --timeout=100 "./464.txt" rsync_backup@192.168.1.4::www --password-file=/etc/rsync.password >/dev/null 2>&1 root 12593 12592 0 10:54 ? 00:00:00 rsync -aruz -R --timeout=100 ./464.txt rsync_backup@192.168.1.4::www --password-file=/etc/rsync.password root 12594 6601 0 10:54 ? 00:00:00 sh -c cd /data0/www/www && rsync -aruz -R --timeout=100 "./464.txt" rsync_backup@192.168.1.5::www --password-file=/etc/rsync.password >/dev/null 2>&1 root 12599 6246 0 10:54 ? 00:00:00 sh -c cd /data0/www/www && rsync -aruz -R --timeout=100 "./461.txt" rsync_backup@192.168.1.5::www --password-file=/etc/rsync.password >/dev/null 2>&1 root 12608 6246 0 10:54 ? 00:00:00 sh -c cd /data0/www/www && rsync -aruz -R --timeout=100 "./463.txt" rsync_backup@192.168.1.4::www --password-file=/etc/rsync.password >/dev/null 2>&1
提示:当我们已经写入10000个文件,发现同步的线程,依然在同步,甚至才同步400多个文件。可见,实时同步也是相对的,如果没有海量文件的写入,同步还是比较快的。 |
5.4.2 Sersync参数说明:
|
Sersync参数 |
说明 |
|
-r |
作用是在开启实时监控之前对主服务器目录与远程目标机器目录进行一次整体同步。如果需要将sersync运行前,主服务器目录下已经存在的所有文件或目录全部同步到远端,则要以-r参数运行sersync,将本地与远程整体同步一次 特别说明:如果设置了过滤器,即在xml文件中,filter为true,则暂时不能使用-r参数进行整体同步 |
|
-o |
不指定-o参数时,sersync会使用sersync可执行文件目录下的默认配置文件confxml.xml,如果要使用其他的配置文件,则需要使用-o指定 |
|
-n |
-n参数为指定默认的线程池的线程总数。 例如./sersync -n 5则指定线程总数为5,如果不指定,默认启动线程池数量是10,如果cpu使用过高,可以通过这个参数调低,如果机器配置较高,可以用-n调高默认的线程总数,提升同步效率 |
|
-d |
-d参数为后台启动服务,在通常情况下,使用-r参数对本地到远程整体同步一遍之后,在后台运行此参数启动守护进程实时同步,在第一次整体同步时,-d和-r参数经常会联合使用 |
|
-m |
-m参数为不进行同步,只运行插件 ./sersync -m pluginName 例如./sersync -m command,则在监控到事件后,不对远程目标服务器进行同步,而是直接运行command插件 |
|
--help |
查看帮助的参数,目前还未完善 |
5.4.3 sersync配置文件说明
|
#xml配置文件注释不是”#”,而是<!--中间是注释内容--> <?xml version="1.0" encoding="ISO-8859-1"?> <head version="2.5"> <host hostip="localhost" port="8008"></host> #hostip与port是针对插件的保留字段,对于同步功能没有任何作用,保留默认即可 <debug start="false"/> #Debug开启开关,设置为true,开启debug模式,会在sersync正在运行的控制台,打印inotify时间与rsync同步命令 <fileSystem xfs="false"/> #对于xfs文件系统的用户,需要将这个选项开启,才能使sersync正常工作(ext3、ext4的用户可以不用开启) <filter start="false"> <exclude expression="(.*)\.svn"></exclude> <exclude expression="(.*)\.gz"></exclude> <exclude expression="^info/*"></exclude> <exclude expression="^static/*"></exclude> </filter> #对于sersync监控文件,会默认过滤系统的临时文件(以”.”开头,以”~”结尾),除了这些文件外,可以自定义其他需要过滤的文件。将start设置为true后开启过滤功能,在exclude标签中,填写正则表达式,默认给出两个例子分别是过滤以”.gz”结尾的文件与过滤监控目录下的info路径(监控路径/info/*),可以根据需要添加,但开启的时候,自己测试一下,正则表达式如果出现错误,控制台会有提示。 <inotify> <delete start="true"/> <createFolder start="true"/> <createFile start="false"/> <closeWrite start="true"/> <moveFrom start="true"/> <moveTo start="true"/> <attrib start="false"/> <modify start="false"/> </inotify> #对于大多数应用,可以尝试把createFile设置为false来提高性能,减少rsync通讯。因为拷贝文件到监控目录会产生create事件与close_write事件,所以如果关闭create事件,只监控文件拷贝结束时的事件close_write,同样可实现文件完整同步。
#要使得createFolder保持为true,如果将createFolder设为false,则不会对产生的目录进行监控,该目录下的子文件与子目录也不会被监控。
#默认情况下对创建文件(目录)事件与删除文件(目录)事件都进行监控,如果项目中不需要删除远程目标服务器的文件(目录),则可以将delete参数设置为false,则不会对删除事件进行监控。
<sersync> <localpath watch="/opt/tongbu"> <remote ip="127.0.0.1" name="tongbu1"/> <!--<remote ip="192.168.8.39" name="tongbu"/>--> <!--<remote ip="192.168.8.40" name="tongbu"/>--> </localpath> #/opt/tongbu目录为sersync主服务器本地待同步的目录,ip=’192.168.18.39,为从服务器的IP地址,如果有多个从服务器,依次列出来即可。name=”tongbu”,这里的tongbu为rsyncd.conf中的模块名字,即中括号的名称 <rsync> <commonParams params="-artuz"/> <auth start="false" users="root" passwordfile="/etc/rsync.pas"/> <userDefinedPort start="false" port="874"/><!-- port=874 --> <timeout start="false" time="100"/><!-- timeout=100 --> <ssh start="false"/> </rsync> <failLog path="/tmp/rsync_fail_log.sh" timeToExecute="60"/><!--default every 60mins execute once--> #失败日志配置,默认每60分重新同步 <crontab start="false" schedule="600"><!--600mins--> <crontabfilter start="false"> <exclude expression="*.php"></exclude> <exclude expression="info/*"></exclude> </crontabfilter> </crontab> #crontab整体同步,每600分同步一次 <plugin start="false" name="command"/> </sersync>
<plugin name="command"> <param prefix="/bin/sh" suffix="" ignoreError="true"/> <!--prefix /opt/tongbu/mmm.sh suffix--> <filter start="false"> <include expression="(.*)\.php"/> <include expression="(.*)\.sh"/> </filter> </plugin>
<plugin name="socket"> <localpath watch="/opt/tongbu"> <deshost ip="192.168.138.20" port="8009"/> </localpath> </plugin> <plugin name="refreshCDN"> <localpath watch="/data0/htdocs/cms.xoyo.com/site/"> <cdninfo domainname="ccms.chinacache.com" port="80" username="xxxx" passwd="xxxx"/> <sendurl base="http://pic.xoyo.com/cms"/> <regexurl regex="false" match="cms.xoyo.com/site([/a-zA-Z0-9]*).xoyo.com/images"/> </localpath> </plugin> </head> #plugin标签设置为true的时候,在同步文件或路径到远程服务器之后,会调用插件。通过name参数指定需要执行的插件。目前支持的又command refreshCDN socket http四种插件。其中http插件目前由于兼容性原因已经去除,以后会重新加入。
#模块可以单独使用(发生文件改变不同步只调用插件),只需要在命令行下使用-m参数即可。 |
六 inotify+rsync远程实时同步
|
[root@test2 ~]# ls -l /proc/sys/fs/inotify/* #如果该目录下有下面三个文件,就表示支持inotify -rw-r--r-- 1 root root 0 10-07 23:29 /proc/sys/fs/inotify/max_queued_events -rw-r--r-- 1 root root 0 10-07 23:29 /proc/sys/fs/inotify/max_user_instances -rw-r--r-- 1 root root 0 10-07 23:29 /proc/sys/fs/inotify/max_user_watches
上传inotify源软件包,解压—编译—-安装
执行脚本如下: [root@test2 inotify-tools-3.14]# cat inotify.sh #!/bin/bash #para host01=10.0.0.191 src=/data0/www/www/ dst=www user=rsync_backup rsync_passfile=/etc/rsync.password inotify_home=/usr/local/inotify-tools-3.14/
#judge if [ ! -e "$src" ] \ || [ ! -e "${rsync_passfile}" ] \ || [ ! -e "${inotify_home}/bin/inotifywait" ] \ || [ ! -e "/usr/bin/rsync" ]; then echo "Check File and Folder" exit 9 fi
${inotify_home}/bin/inotifywait -mrq --timefmt ‘%d/%m/%y %H:%M‘ --format ‘%T %w%f‘ -e close_write,delete,create,attrib $src \ | while read file do # rsync -avzP --delete --timeout=100 --password-file=${rsync_passfile} $src $user@$host01::$dst >/dev/null 2>&1 cd $src && rsync -aruz -R --delete ./ --timeout=100 $user@$host01::$dst --password-file=${rsync_passfile} >/dev/null 2>&1 done exit 0
#./ inotify.sh & 在后台运行 |
提示:sersync其实是inotify和rsync的封装
对比sersync和inotify+rsync,sersync支持过滤,但是经过压力测试sersync的实时同步测试效果没有inotify+rsync的效果好。
Linux课程笔记 Day07 课上内容总结 SSH和rsync
标签:方案 笔记 验证 密码 second 守护 rc.local nop 远程连接
原文地址:http://www.cnblogs.com/fengze/p/6725606.html