标签:自适应 text 布局管理 双击 passwd span source 窗口 port
GUI
1.分类:
一.AWT(Abstract Window Toolkit):抽象窗体工具集
java.awt.*适合做简单的图像用户界面,复杂的不行,基于底层操作系统,所以不同的操作系统显示的界面不同
二.Swing:AWT的升级
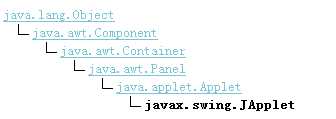
javax.swing.*可以跨平台我们一般用的就是他;都是在原来AWT的基础上开发的
 所以一般布局界面都是在原来AWT后面开发的
2.介绍
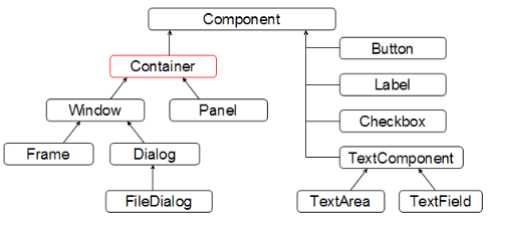
一:组成部分:组件库(component class),容器库(container class),帮助库(helper class 主要是描述控件熟悉的)
 GUI整体分类
二:运行原理:javaw.exe用于window中专门执行GUI的
3.控件使用
一:container
JFrame:

// 创建JFrame
        JFrame frame = new JFrame("我的frame");

        // 创建按钮
        JButton button = new JButton("OK");
        // 向frame中添加一个按钮
        frame.add(button);

        // 设置尺寸
        frame.setSize(200, 100);
        // JFrame在屏幕居中
        frame.setLocationRelativeTo(null);
        // JFrame关闭时的操作
        frame.setDefaultCloseOperation(JFrame.EXIT_ON_CLOSE);
        // 显示JFrame
        frame.setVisible(true);
JOptionPane:对话框
1.JOptionPane.showMessageDialog(jPanel, "提示消息", "标题",JOptionPane.WARNING_MESSAGE);
2.int n = JOptionPane.showConfirmDialog(null, "你高兴吗?", "标题",JOptionPane.YES_NO_OPTION);//i=0/1
Panel:也是容器类
二:Comonpent
JLabel,JButton ,JTextField,JPassworldField,JRadioButton,JCheckBox,JTextArea,JList(列表框),JMenuBar(菜单条),Menu,JMenultem
三:综合运用的例子

import java.awt.BorderLayout;

import javax.swing.*;

/**
 * 综合应用1
 * @author Administrator
 *
 */
public class test2 extends JFrame {

    /**
     *
     */
    private static final long serialVersionUID = 1L;


    public test2(){
        //面板
        JPanel p1=new JPanel();

        JLabel name=new JLabel("用户名:");
        // 文本域
        JTextField field = new JTextField(8);
        // 标签
        JLabel passwd = new JLabel("密码");
        //密码域
        JPasswordField pass=new JPasswordField(8);
        //单选按钮
        JRadioButton male=new JRadioButton("男");
        JRadioButton female=new JRadioButton("女");
        ButtonGroup group=new ButtonGroup();
        group.add(female);group.add(male);
        //复选框
        JLabel like = new JLabel("爱好:");
        JCheckBox eat=new JCheckBox("吃饭");
        JCheckBox sleep=new JCheckBox("睡觉");
        JCheckBox movie=new JCheckBox("看电影");
        //文本框
        JLabel info=new JLabel("简历");
        JTextArea area=new JTextArea(20,20);
        //列表
        String[] data={"one","two","three"};
        JList<String> list=new JList<String>(data);
        //普通按钮
        JButton button=new JButton("注册");
        //菜单条
        JMenuBar bar=new JMenuBar();
        //菜单
        JMenu menu=new JMenu("文件");
        //菜单选项
        JMenuItem item1=new JMenuItem("新建");
        JMenuItem item2=new JMenuItem("保存");
        JMenuItem item3=new JMenuItem("另存为");
        menu.add(item1);menu.add(item2);menu.add(item3);
        bar.add(menu);


        p1.add(name);
        p1.add(field);
        p1.add(passwd);
        p1.add(pass);
        p1.add(male);
        p1.add(female);
        p1.add(like);
        p1.add(eat);

        p1.add(sleep);
        p1.add(field);
        p1.add(movie);
        p1.add(info);
        p1.add(area);
        p1.add(list);
        p1.add(button);
        this.add(bar, BorderLayout.NORTH);//必须要写这个不然就不能显示菜单栏
        add(p1);
    }


    public static void main(String[] args) {
        test2 t=new test2();
        t.setTitle("My JFrame");
        t.setSize(400,400);
        t.setLocationRelativeTo(null);
        t.setDefaultCloseOperation(JFrame.EXIT_ON_CLOSE);
        t.pack();
        t.setVisible(true);
    }

}
4.布局管理器
一:介绍
java中的GUI都是放在容器中但是容器中的控件是怎么布局的用到的就是布局管理类
二:分类:
FlowLayout GridLayout BorderLayout一般通过setLayout()来设置运用哪个布局管理类
三:具体解释:
(一)FlowLayout流式布局
a.有三个常量可以设置组件的对齐方式:LEFT,RIGHT,CENTER
b.指定组件之间,与Container之间的距离:
int getHgap(),void setHgap(int hgap)获取设置组件之间以及组件与 Container 的边之间的水平间隙。
int getVgap(), void setVgap(int vgap)获取设置组件之间以及组件与 Container 的边之间的垂直间隙。
默认对齐方式CENTER,水平间距都是5px;
c.主要的构造函数
FlowLayout(int align, int hgap, int vgap)创建一个新的流布局管理器,它具有指定的对齐方式以及指定的水平和垂直间隙。
d.例子

public class ShowFlowLayout extends JFrame {

    public ShowFlowLayout() {
        super.setLayout(new FlowLayout(FlowLayout.LEFT, 10, 20));

        add(new JLabel("姓名:"));
        add(new JTextField(8));
        add(new JLabel("邮箱:"));
        add(new JTextField(8));
        add(new JLabel("电话:"));
        add(new JTextField(8));

    }

    public static void main(String[] args) {
        ShowFlowLayout frame = new ShowFlowLayout();
        frame.setTitle("FlowLayout");
        frame.setSize(500, 200);
        frame.setLocationRelativeTo(null);
        frame.setDefaultCloseOperation(JFrame.EXIT_ON_CLOSE);
        frame.setVisible(true);
    }
}
(二)GridLayout网格布局
a.按照添加的顺序从左到右
b.可以指定网格行数列数设置行列间距:
int getRows(),setRows(int rows)获取设置此布局中的行数。 默认值是1
int getColumns(),void setColumns(int cols)获取设置此布局中的列数。 默认值是1
int getHgap(),void setHgap(int hgap)获取设置组件之间的水平间距。 默认值是0
int getVgap(), void setVgap(int vgap)获取组件之间的垂直间距。默认值是0
c.主要构造方法
GridLayout()创建具有默认值的网格布局,即每个组件占据一行一列。
GridLayout(int rows, int cols) 创建具有指定行数和列数的网格布局。
GridLayout(int rows, int cols, int hgap, int vgap)创建具有指定行数和列数,水平间隔,垂直间隔的网格布局。
d.例子

public class ShowGridLayout extends JFrame {
    public ShowGridLayout() {
        setLayout(new GridLayout(3, 2, 5, 5));

        add(new JLabel("姓名:"));
        add(new JTextField(8));
        add(new JLabel("邮箱:"));
        add(new JTextField(8));
        add(new JLabel("电话:"));
        add(new JTextField(8));
    }

    public static void main(String[] args) {
        ShowGridLayout frame = new ShowGridLayout();
        frame.setTitle("GridLayout");
        frame.setSize(200, 125);
        frame.setLocationRelativeTo(null);
        frame.setDefaultCloseOperation(JFrame.EXIT_ON_CLOSE);
        frame.setVisible(true);
    }
}
e.注意:
如果指定一个网格有0行3列10个组件,GirdLayout会创建3个固定的列和行,最后一行只有一个组件.如果指定一个网格有3行0列10个组件,GridLayout就会创建3行4列,最后一行包含2个组件
(三)BorderLayout边框布局
a.用法:add(Component,index);
index是5个常量:EAST(容器左边),WEST(容器右边),SOUTH(下),NORTH(上),CENTER(中间)
b.方法:设置元素之间的距离
getVgap();setVgap(int vgap);getHgap();getHgap(int hgap)
c.构造方法
BorderLayout(int hgap,int vgap);
d.例子

public class ShowBorderLayout extends JFrame {
    public ShowBorderLayout() {
        setLayout(new BorderLayout(5, 10));

        add(new JButton("东"), BorderLayout.WEST);
        add(new JButton("西"), BorderLayout.EAST);
        add(new JButton("南"), BorderLayout.SOUTH);
        add(new JButton("北"), BorderLayout.NORTH);
        add(new JButton("中"), BorderLayout.CENTER);
    }

    public static void main(String[] args) {
        ShowBorderLayout frame = new ShowBorderLayout();
        frame.setTitle("BorderLayout");
        frame.setSize(300, 200);
        frame.setLocationRelativeTo(null);
        frame.setDefaultCloseOperation(JFrame.EXIT_ON_CLOSE);
        frame.setVisible(true);
    }
}
四:综合例子:

public class CommonComponent extends JFrame {
    /**
     *
     */
    private static final long serialVersionUID = 1L;

    public CommonComponent() {
        // 菜单条
        JMenuBar bar = new JMenuBar();
        // 菜单
        JMenu menu = new JMenu("文件");
        // 菜单选项
        JMenuItem myNew = new JMenuItem("新建");
        JMenuItem myOpen = new JMenuItem("打开");
        bar.add(menu);
        menu.add(myNew);
        menu.add(myOpen);
        add(bar, BorderLayout.NORTH);

        // 面板
        JPanel p1 = new JPanel();
        p1.setLayout(new GridLayout(2, 2, 5, 5));
        add(p1);

        // 标签
        JLabel name = new JLabel("用户名:");
        p1.add(name);

        // 文本域
        JTextField field = new JTextField(8);
        p1.add(field);

        // 标签
        JLabel passwd = new JLabel("密码");
        p1.add(passwd);
        // 密码域
        JPasswordField pass = new JPasswordField(8);
        p1.add(pass);

        JPanel p2 = new JPanel();
        // 单选按钮
        JLabel gender = new JLabel("性别");
        p2.add(gender);
        JRadioButton male = new JRadioButton("男");
        JRadioButton female = new JRadioButton("女");
        // 单选按钮组,同一个单选按钮组的互斥.
        ButtonGroup group = new ButtonGroup();
        group.add(male);
        group.add(female);
        // 注意,单选按钮组不能添加进容器
        p2.add(male);
        p2.add(female);

        JPanel p3 = new JPanel();
        // 复选框
        JLabel like = new JLabel("爱好:");
        p3.add(like);
        JCheckBox eat = new JCheckBox("吃饭");
        JCheckBox movie = new JCheckBox("看电影");
        JCheckBox sleep = new JCheckBox("睡觉");
        p3.add(eat);
        p3.add(movie);
        p3.add(sleep);

        JPanel p4 = new JPanel(new GridLayout(1, 0, 5, 5));
        // 文本域
        JLabel info = new JLabel("个人简介:");
        p4.add(info);
        JTextArea area = new JTextArea(50, 10);
        p4.add(area);

        JPanel p5 = new JPanel(new BorderLayout());
        // 列表
        String[] data = { "one", "two", "three" };
        JList<String> list = new JList<String>(data);
        p5.add(list, BorderLayout.WEST);

        JPanel p6 = new JPanel();
        // 普通按钮
        JButton button = new JButton("注册");
        p6.add(button);
        JButton button2 = new JButton("取消");
        p6.add(button2);

        setLayout(new GridLayout(7, 1, 5, 5));
        add(p1);
        add(p2);
        add(p3);
        add(p4);
        add(p5);
        add(p6);

    }

    public static void main(String[] args) {
        CommonComponent frame = new CommonComponent();
        frame.setTitle("常用组件");
        frame.setSize(400, 600);
        frame.setLocationRelativeTo(null);
        frame.setDefaultCloseOperation(JFrame.EXIT_ON_CLOSE);
        // 自适应
        // frame.pack();
        frame.setVisible(true);
    }
}
5.事件监听
一:事件类
根类:java.util.EventObject;getSource()获取事件源对象
EventObject子类可以描述特定类型的事件如表:
|
用户动作 |
源对象 |
触发的事件类型 |
|
点击按钮 |
JButton |
ActionEvent |
|
文本域按回车 |
JTextField |
ActionEvent |
|
窗口打开,关闭,最小化,关闭 |
Window |
WindowEvent |
|
单击,双击,移动,鼠标 |
Component |
MouseEvent |
|
点击单选框 |
JradioButton |
ItemEvent ActionEvent |
|
点击复选框 |
JcheckBox |
ItemEvent ActionEvent |
|
鼠标键盘事件 |
鼠标键盘 |
MouseEvent(重要) |
事件发生还会有一个监听器(Lister)
java组件都有事件监听器和添加事件监听器的方法
二:事件监听器
(一):用法:给控件添加事件监听器-》创建监听器对象-》重写监听器对象方法actionPerformed获取其他的监听器对象
(其实这个监听器是一个接口,这里用到的是匿名内部类实现接口的方法)

//添加事件
        b.addActionListener(new ActionListener(){

            @Override
            public void actionPerformed(ActionEvent e) {
                Object source=e.getSource();
                JButton button=(JButton)source;
                if(button.getText().equals("按钮被点击")){
                    button.setText("点我");
                } else {
                    button.setText("按钮被点击");
                }
            }

        });
三:适配器类
(一)出现原因
因为我们创建监听器对象时就会实现其接口内的所有方法,但是我们有时候只是关注一部分功能,所以就出现了适配器
实现原理:适配器对象实现了监听器对象的所有方法但都为空方法,我们以后创建自己的监听器对象时就可以用创建这个已经实现接口的适配器对象重写我们关注的那部分功能代码就好
|
适配器 接口 WindowAdapter WindowListener MouserAdapter MouserListener KeyAdapter KeyListener
|
(二)例子:
class MyAdapter extends WindowAdapter {
public void windowActivated(WindowEvent e) {
System.out.println("windowActivated....");
}
}
鼠标键盘事件
java.awt.event.MouseEvent;
java.awt.event.KeyListener接口:用于接收键盘事件(击键)的侦听器接口。
四:常见的事件监听器
WindowListener 主要用于监听窗口
ActionListener 主要用于用监听组件对象的单击动作
MouseListener 鼠标监听器
KeyListener 监听键盘
…….
五:常见的事件适配器
WindowAdapter
MouseAdapter
KeyAdapter
标签:自适应 text 布局管理 双击 passwd span source 窗口 port
原文地址:http://www.cnblogs.com/xiaoping1993/p/day14.html