标签:schema 编码 blog 配置文件 val 管理器 eal led express
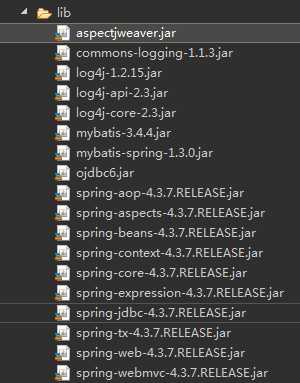
第一步、导包


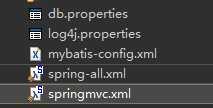
第二步、配置springmvc
springmvc.xml
<?xml version="1.0" encoding="UTF-8"?>
<beans xmlns="http://www.springframework.org/schema/beans"
	xmlns:xsi="http://www.w3.org/2001/XMLSchema-instance"
	xmlns:context="http://www.springframework.org/schema/context"
	xmlns:mvc="http://www.springframework.org/schema/mvc"
	xmlns:p="http://www.springframework.org/schema/p"
	xsi:schemaLocation="http://www.springframework.org/schema/mvc http://www.springframework.org/schema/mvc/spring-mvc-4.3.xsd
		http://www.springframework.org/schema/beans http://www.springframework.org/schema/beans/spring-beans.xsd
		http://www.springframework.org/schema/context http://www.springframework.org/schema/context/spring-context-4.3.xsd">

	<context:component-scan base-package="com.controller"></context:component-scan>
	<mvc:annotation-driven />
	<bean class="org.springframework.web.servlet.view.InternalResourceViewResolver" p:prefix="/" p:suffix=".jsp">

	</bean>
</beans>
spring-all.xml
<?xml version="1.0" encoding="UTF-8"?>
<beans xmlns="http://www.springframework.org/schema/beans"
	xmlns:xsi="http://www.w3.org/2001/XMLSchema-instance"
	xmlns:aop="http://www.springframework.org/schema/aop"
	xmlns:tx="http://www.springframework.org/schema/tx"
	xmlns:context="http://www.springframework.org/schema/context"
	xsi:schemaLocation="http://www.springframework.org/schema/beans http://www.springframework.org/schema/beans/spring-beans.xsd
		http://www.springframework.org/schema/context http://www.springframework.org/schema/context/spring-context-4.3.xsd
		http://www.springframework.org/schema/aop http://www.springframework.org/schema/aop/spring-aop-4.3.xsd
		http://www.springframework.org/schema/tx http://www.springframework.org/schema/tx/spring-tx-4.3.xsd">


	<!-- 引入外部属性文件 -->
	<context:property-placeholder location="classpath:db.properties"/>
	<!-- 配置扫描器 -->
	<context:component-scan base-package="com.util"></context:component-scan>
	<!-- 数据源 -->
	<bean id="dataSource" class="org.springframework.jdbc.datasource.DriverManagerDataSource">
		<property name="username" value="${aaaa}"></property>
		<property name="password" value="${jdbc.password}"></property>
		<property name="url" value="${jdbc.url}"></property>
		<property name="driverClassName" value="${jdbc.driver}"></property>
	</bean>
	<!-- 配置mybatis的核心,Sqlsession -->
	<bean id="sqlSessionFactory" class="org.mybatis.spring.SqlSessionFactoryBean">
		<property name="dataSource" ref="dataSource"></property>
		<property name="configLocation" value="classpath:mybatis-config.xml"></property>
		<property name="mapperLocations" value="classpath:com/mapper/*.xml"></property>
	</bean>

	<!-- 配置数据库操作接口 -->
	<bean class="org.mybatis.spring.mapper.MapperScannerConfigurer">
		<property name="basePackage" value="com.dao"></property>
		<property name="sqlSessionFactoryBeanName" value="sqlSessionFactory"></property>
	</bean>
	<!-- spring事务管理器 -->
	<bean id="transactionmanager" class="org.springframework.jdbc.datasource.DataSourceTransactionManager">
		<property name="dataSource" ref="dataSource"></property>
	</bean>
	<!-- 配置事务属性 -->
	<tx:advice id="txadvice" transaction-manager="transactionmanager">
		<tx:attributes>
			<tx:method name="*" read-only="false"/>
		</tx:attributes>
	</tx:advice>
	<!-- 配置切面 -->
	<aop:config>
		<aop:pointcut expression="execution(* com.dao.*.*(..))" id="pointcut"/>
		<aop:advisor advice-ref="txadvice" pointcut-ref="pointcut"/>

	</aop:config>


</beans>
db.properties
jdbc.driver=oracle.jdbc.OracleDriver
jdbc.url=jdbc:oracle:thin:@localhost:1521:orcl
aaaa=root
jdbc.password=123
第三步、配置mybatis
mybatis-config.xml
<?xml version="1.0" encoding="UTF-8" ?>
<!DOCTYPE configuration
  PUBLIC "-//mybatis.org//DTD Config 3.0//EN"
  "http://mybatis.org/dtd/mybatis-3-config.dtd">

  <configuration>

  	<typeAliases>
  		<package name="com.model"/>
  	</typeAliases>
  </configuration>
第四步、编写web.xml
<?xml version="1.0" encoding="UTF-8"?>
<web-app xmlns:xsi="http://www.w3.org/2001/XMLSchema-instance" xmlns="http://xmlns.jcp.org/xml/ns/javaee" xsi:schemaLocation="http://xmlns.jcp.org/xml/ns/javaee http://xmlns.jcp.org/xml/ns/javaee/web-app_3_1.xsd" id="WebApp_ID" version="3.1">
  <!-- 中文编码过滤器 -->
  <filter>
        <filter-name>characterEncodingFilter</filter-name>
        <filter-class>org.springframework.web.filter.CharacterEncodingFilter</filter-class>
        <init-param>
            <param-name>encoding</param-name>
            <param-value>UTF-8</param-value>
        </init-param>
        <init-param>
            <param-name>forceEncoding</param-name>
            <param-value>true</param-value>
        </init-param>
    </filter>
    <filter-mapping>
        <filter-name>characterEncodingFilter</filter-name>
        <url-pattern>/*</url-pattern>
    </filter-mapping>

  	<!-- SpringMVC配置 -->
	<servlet>
		<servlet-name>springDispatcherServlet</servlet-name>
		<servlet-class>org.springframework.web.servlet.DispatcherServlet</servlet-class>
		<init-param>
			<param-name>contextConfigLocation</param-name>
			<param-value>classpath:springmvc.xml</param-value>
		</init-param>
		<load-on-startup>1</load-on-startup>
	</servlet>

	<!-- Map all requests to the DispatcherServlet for handling -->
	<servlet-mapping>
		<servlet-name>springDispatcherServlet</servlet-name>
		<url-pattern>*.do</url-pattern>
	</servlet-mapping>

  	<!-- Spring配置 -->
	<context-param>
		<param-name>contextConfigLocation</param-name>
		<param-value>classpath:spring-all.xml</param-value>
	</context-param>

	<!-- Bootstraps the root web application context before servlet initialization -->
	<listener>
		<listener-class>org.springframework.web.context.ContextLoaderListener</listener-class>
	</listener>

</web-app>
接下来就参照mybatis的写法在配置文件中写sql语句以及控制实现的具体方法就可以啦。
标签:schema 编码 blog 配置文件 val 管理器 eal led express
原文地址:http://www.cnblogs.com/claricre/p/6759530.html