标签:不可编辑 close 单击 swa img opera -- 选中 jbutton
Swing中的按钮是Jbutton,它是javax.swing.AbstracButton类的子类,swing中的按钮可以显示图像,并且可以将按钮设置为窗口的默认图标,而且还可以将多个图像指定给一个按钮。
在JButton中有如下几个比较常用的构造方法。
JButton类的方法:
按钮组件是GUI中最常用的一种组件。按钮组件可以捕捉到用户的单击事件,同时利用按钮事件处理机制响应用户的请求。JButton类是Swing提供的按钮组件,在单击JButton类对象创建的按钮时,会产生一个ActionEvent事件。
代码实例:
 1 package jFrameDemo;
 2
 3 import java.applet.*;
 4 import java.awt.*;
 5 import java.awt.event.*;
 6
 7 @SuppressWarnings("all")
 8 public class ButtonDemo extends Applet implements ActionListener {
 9     String msg = "";
10     Button yes,no,undecided;
11
12     public void init() {
13         yes = new Button("Yes");
14         no = new Button("No");
15         undecided = new Button("Undecided");
16
17         add(yes);
18         add(no);
19         add(undecided);
20
21         yes.addActionListener(this);
22         no.addActionListener(this);
23         undecided.addActionListener(this);
24     }
25
26     public void actionPerformed(ActionEvent ee) {
27         String str = ee.getActionCommand();
28         if (str.equals("Yes")) {
29             msg = "您选择了Yes!";
30         }else if (str.equals("No")) {
31             msg = "您选择了No!";
32         }else {
33             msg = "您选择了Undecided!";
34         }
35         repaint();
36     }
37
38     public void paint(Graphics g){
39         g.drawString(msg, 6, 100);
40     }
41 }
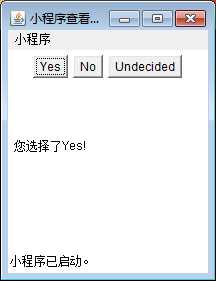
运行效果如下:
JRadioButton组件实现的是一个单选按钮。JRadioButton类可以单独使用,也可以与ButtonGroup类联合使用,当单独使用时,该单选按钮可以被选定和取消选定;当与ButtonGroup类联合使用,需要使用add()方法将JRadioButton添加到ButtonGroup中,并组成一个单选按钮组。此时用户只能选定按钮组中的一个单选按钮。
JRadioButton组件的常用方法:
【例】实例功能是选择用户所喜欢的城市。
 1 package com.sy.swing;
 2
 3 import java.awt.*;
 4 import java.awt.event.*;
 5 import javax.swing.*;
 6
 7 public class JRadioButtonTest extends JFrame {
 8
 9     /**
10      * Launch the application.
11      */
12     public static void main(String[] args) {
13         EventQueue.invokeLater(new Runnable() {
14             public void run() {
15                 try {
16                     JRadioButtonTest frame = new JRadioButtonTest();
17                                                          frame.setDefaultCloseOperation(JFrame.EXIT_ON_CLOSE);
18                     frame.setBounds(100, 100, 450, 300);
19                     frame.setTitle("单选框示例");
20                     frame.setVisible(true);
21                 } catch (Exception e) {
22                     e.printStackTrace();
23                 }
24             }
25         });
26     }
27
28     /**
29      * Create the frame.
30      */
31     public JRadioButtonTest() {
32         Container contentPane = getContentPane(); //创建一个内容面板容器
33         contentPane.setLayout(new FlowLayout()); //设置该窗口的布局
34         JPanel p1 = new JPanel(); //创建一个面板对象p1
35         p1.setLayout(new GridLayout(1, 3)); //设置布局管理器的格式
36         p1.setBorder(BorderFactory.createTitledBorder("选择你喜欢的城市"));
37         //定义3个JRadioButton单选按钮
38         JRadioButton r1 = new JRadioButton("北京");
39         JRadioButton r2 = new JRadioButton("上海");
40         JRadioButton r3 = new JRadioButton("青岛");
41         p1.add(r1);
42         p1.add(r2);
43         p1.add(r3);
44         r1.setSelected(true); //设置"北京"单选按钮的状态为被选中
45         contentPane.add(p1); // 面板对象p1加到窗口内容面板容器中
46         pack();
47         addWindowListener(new WindowAdapter() {
48             public void windowClosing(WindowEvent e){
49                 System.exit(0);
50             }
51         });
52     }
53 }
代码运行结果如下

程序运行结果如图所示。程序首先创建JFrame窗口对象,内容版面(contentPane),并设置窗口的布局格式为流布局FlowLayout();之后定义3个JRadioButton对象,并设置各自的现实文本同事添加到面板对象p1中;然后为窗口设置事件监听。
使用复选框可以完成多项选择。Swing中的复选框与awt中的复选框相比,优点是Swing复选框中可以添加图片。复选框可以为每一次的单击操作添加一个事件。
复选框的构造方法如下。
常用方法:
代码实例:
 1 package jFrameDemo;
 2
 3 import java.applet.*;
 4 import java.awt.*;
 5 import java.awt.event.*;
 6
 7 @SuppressWarnings("all")
 8 public class CheckboxDemo extends Applet implements ItemListener {
 9     String msg = "";
10     Checkbox windows,android,solaris,mac;
11
12     public void init() {
13         windows = new Checkbox("Windows",null,true);
14         android = new Checkbox("Android");
15         solaris = new Checkbox("Solaris");
16         mac = new Checkbox("Mac");
17
18         add(windows);
19         add(android);
20         add(solaris);
21         add(mac);
22
23         windows.addItemListener(this);
24         android.addItemListener(this);
25         solaris.addItemListener(this);
26         mac.addItemListener(this);
27     }
28
29     public void itemStateChanged(ItemEvent ie){
30         repaint();
31     }
32
33     public void paint(Graphics g){
34         msg = "Current state:";
35         g.drawString(msg, 6, 80);
36         msg = "Windows: " + windows.getState();
37         g.drawString(msg, 6, 100);
38         msg = "Android: " + android.getState();
39         g.drawString(msg, 6, 120);
40         msg = "Solaris: " + solaris.getState();
41         g.drawString(msg, 6, 140);
42         msg = "Mac OS: " + mac.getState();
43         g.drawString(msg, 6, 160);
44     }
45 }
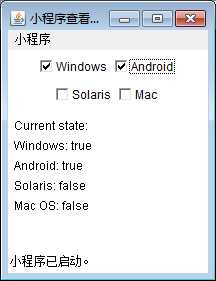
代码运行展示如下:
JComboBox组件用来创建组合框对象。通常,根据组合框是否可编辑的状态,可以将组合框分成两种常见的外观。可编辑状态外观可视为文本框和下拉列表的组合,不可编辑状态的外观可视为按钮和下拉列表的组合。在按钮或文本框的右边有一个带三角符号的下拉按钮,用户可以单击该下拉按钮,便可出现一个内容列表,这也是组合框的得名。组合框通常用于从列表的”多个项目中选择一个”的操作。
JComboBox的构造方法有如下几种:
JComboBox(Object[] items):创建一个具有数组定义列表内容的组合框。
实例代码如下
 1 package JFrameTest;
 2
 3 import java.awt.BorderLayout;
 4
 5 @SuppressWarnings("all")
 6 public class ComboBoxFrame extends JFrame {
 7
 8     private JComboBox faceCombo;
 9     private JLabel label;
10     private static final int DEFAULT_SIZE = 24;
11
12     /**
13      * Launch the application.
14      */
15     public static void main(String[] args) {
16         EventQueue.invokeLater(new Runnable() {
17             public void run() {
18                 try {
19                     ComboBoxFrame frame = new ComboBoxFrame();
20                     frame.setDefaultCloseOperation(JFrame.EXIT_ON_CLOSE);
21                     frame.setBounds(100, 100, 450, 300);
22                     frame.setVisible(true);
23                 } catch (Exception e) {
24                     e.printStackTrace();
25                 }
26             }
27         });
28     }
29
30     /**
31      * Create the frame.
32      */
33     public ComboBoxFrame() {
34         label = new JLabel("The quick brown fox jumps over the lazy dog.");
35         label.setFont(new Font("Serif",Font.PLAIN,DEFAULT_SIZE));
36         add(label,BorderLayout.CENTER);
37
38         faceCombo = new JComboBox();
39         faceCombo.addItem("Serif");
40         faceCombo.addItem("SnsSerif");
41         faceCombo.addItem("Monospaced");
42         faceCombo.addItem("Dialog");
43         faceCombo.addItem("DialogInput");
44
45         faceCombo.addActionListener(new ActionListener() {
46
47             @Override
48             public void actionPerformed(ActionEvent e) {
49                 // TODO Auto-generated method stub
50                 label.setFont(new Font((String) faceCombo.getItemAt(faceCombo.getSelectedIndex()),Font.PLAIN,DEFAULT_SIZE));
51             }
52         });
53
54         JPanel comboJPanel = new JPanel();
55         comboJPanel.add(faceCombo);
56         add(comboJPanel,BorderLayout.SOUTH);
57         pack();
58     }
59
60 }
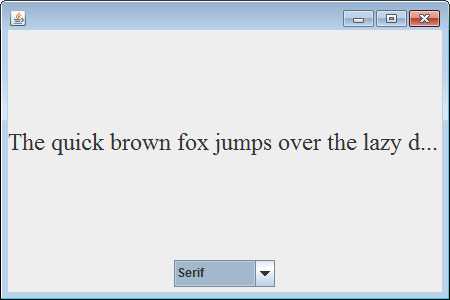
代码运行结果如图
JList组件用于定义列表,允许用户选择一个或多个项目。与JTextArea类似,JList本身不支持滚动功能,如果要显示超出显示范围的项目,可以将JList对象放置到滚动窗格JScrollPane对象中,变可以为列表对象实现滚动操作。
JList的构造方法如下:
常用方法如下:
JTextField组件用于创建文本框。文本框是用来接收用户的单行文本信息输入的区域。通常文本框用于接收用户信息或其他文本信息的输入。当用户输入文本信息后,如果为JTextField对象添加了事件处理,按回车键后就会触发一定的操作。
JPasswordField是JTextField的子类,是一种特殊的文本框,也是用来接收单行文本信息输入的区域,但是会用回显字符串代替输入的文本信息。因此,JPasswordField组件也称为密码文本框。JPasswordField默认的是回显字符是”*”,用户可以自行设置回显字符。
JTextField的常见构造方法有如下几种:
JTextField的常用方法:
JPasswordField的构造方法有如下几种:
JPasswordField是JTextField的子类,因此JPasswordField也具有与JTextField类似的名称和功能的方法,此外,它还具有与JTextField类似的名称和功能的方法,此外,它还具有自己的独特方法:
代码实例如下
 1 package dataExchange;
 2
 3 import java.awt.BorderLayout;
 4 import java.awt.EventQueue;
 5 import java.awt.event.ActionEvent;
 6 import java.awt.event.ActionListener;
 7
 8 import javax.swing.JFrame;
 9 import javax.swing.JMenu;
10 import javax.swing.JMenuBar;
11 import javax.swing.JMenuItem;
12 import javax.swing.JScrollPane;
13 import javax.swing.JTextArea;
14
15 @SuppressWarnings("all")
16 public class DataExchangeFrame extends JFrame {
17
18     public static final int TEXT_ROWS = 20;
19     public static final int TEXT_COLUMNS = 40;
20     private PasswordChooser dialog = null;
21     private JTextArea textArea;
22
23     /**
24      * Launch the application.
25      */
26     public static void main(String[] args) {
27         EventQueue.invokeLater(new Runnable() {
28             public void run() {
29                 try {
30                     DataExchangeFrame frame = new DataExchangeFrame();
31                     frame.setDefaultCloseOperation(JFrame.EXIT_ON_CLOSE);
32                     frame.setBounds(100, 100, 450, 300);
33                     frame.setVisible(true);
34                 } catch (Exception e) {
35                     e.printStackTrace();
36                 }
37             }
38         });
39     }
40
41     /**
42      * Create the frame.
43      */
44     public DataExchangeFrame() {
45         JMenuBar mbar = new JMenuBar();
46         setJMenuBar(mbar);
47         JMenu fileMenu = new JMenu("File");
48         mbar.add(fileMenu);
49
50         JMenuItem connectItem = new JMenuItem("Connect");
51         connectItem.addActionListener(new ConnectAction());
52         fileMenu.add(connectItem);
53
54         JMenuItem exitItem = new JMenuItem("Exit");
55         exitItem.addActionListener(new ActionListener() {
56             public void actionPerformed(ActionEvent e) {
57                 System.exit(0);
58             }
59         });
60
61         fileMenu.add(exitItem);
62
63         textArea = new JTextArea(TEXT_ROWS,TEXT_COLUMNS);
64         add(new JScrollPane(textArea),BorderLayout.CENTER);
65         pack();
66     }
67
68     public class ConnectAction implements ActionListener{
69         public void actionPerformed(ActionEvent e) {
70             if (dialog == null) {
71                 dialog = new PasswordChooser();
72             }
73
74             dialog.setUser(new User("yourname", null));
75
76             if (dialog.showDialog(DataExchangeFrame.this, "Connect")) {
77                 User user = dialog.getUser();
78                 textArea.append("Username = " + user.getName() + ",password = " + (new String(user.getPassword())) + "\n");
79             }
80         }
81     }
82
83 }
运行如下
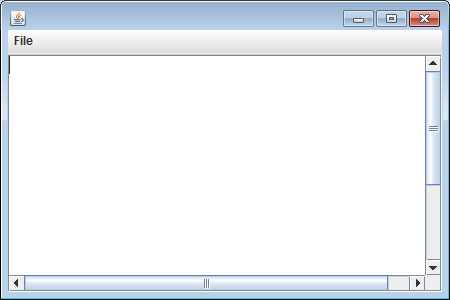
点击file,选择connect,效果如下:
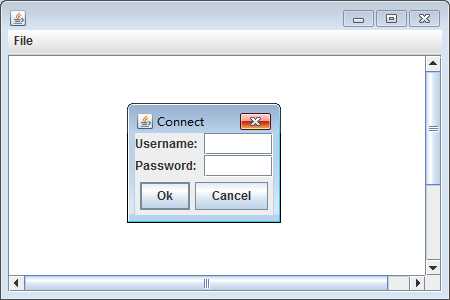
上面运行代码如下:
 1 package dataExchange;
 2
 3 import java.awt.BorderLayout;
 4
 5 @SuppressWarnings("serial")
 6 public class PasswordChooser extends JPanel {
 7
 8     private JTextField username;
 9     private JPasswordField password;
10     private JButton okButton;
11     private boolean ok;
12     private JDialog dialog;
13
14     /**
15      * Create the panel.
16      */
17     public PasswordChooser() {
18         setLayout(new BorderLayout());
19         JPanel panel = new JPanel();
20         panel.setLayout(new GridLayout(2, 2));
21         panel.add(new JLabel("Username:"));
22         panel.add(username = new JTextField());
23         panel.add(new JLabel("Password:"));
24         panel.add(password = new JPasswordField());
25         add(panel,BorderLayout.CENTER);
26
27         okButton = new JButton("Ok");
28         okButton.addActionListener(new ActionListener() {
29             public void actionPerformed(ActionEvent e) {
30                 ok = true;
31                 dialog.setVisible(true);
32             }
33         });
34
35         JButton cancelButton = new JButton("Cancel");
36         cancelButton.addActionListener(new ActionListener() {
37             public void actionPerformed(ActionEvent e) {
38                 dialog.setVisible(false);
39             }
40         });
41
42         JPanel buttonPanel = new JPanel();
43         buttonPanel.add(okButton);
44         buttonPanel.add(cancelButton);
45         add(buttonPanel,BorderLayout.SOUTH);
46     }
47
48     public void setUser(User u){
49         username.setText(u.getName());
50     }
51
52     public User getUser(){
53         return new User(username.getText(),password.getPassword());
54     }
55
56     public boolean showDialog(Component parent,String title){
57         ok = false;
58         Frame owner = null;
59         if (parent instanceof Frame) {
60             owner = (Frame)parent;
61         }else {
62             owner = (Frame)SwingUtilities.getAncestorOfClass(Frame.class, parent);
63         }
64
65         if (dialog == null || dialog.getOwner() != owner) {
66             dialog = new JDialog(owner,true);
67             dialog.add(this);
68             dialog.getRootPane().setDefaultButton(okButton);
69             dialog.pack();
70         }
71
72         dialog.setTitle(title);
73         dialog.setVisible(true);
74         return ok;
75     }
76
77 }
JPanel组件定义面板实际上是一种容器组件,用来容纳各种其他轻量级组件。此外,用户还可以用这种面板容器绘制图形。
JPanel的构造方法如下:
JPanel的 常用方法:
代码实例如下:
 1 package com.sy.swing;
 2
 3 import java.awt.BorderLayout;
 4 import java.awt.Color;
 5 import java.awt.Container;
 6 import java.awt.Dimension;
 7 import java.awt.FlowLayout;
 8 import java.awt.Graphics;
 9
10 import javax.swing.JButton;
11 import javax.swing.JFrame;
12 import javax.swing.JPanel;
13
14 public class JPanelExample extends JFrame {
15     JButton[] buttons;
16     JPanel panel1;
17     CustomPanel panel2;
18
19     public JPanelExample(){
20         super("面板实例");
21         Container container = getContentPane();
22         container.setLayout(new BorderLayout());
23         panel1 = new JPanel(new FlowLayout()); //创建一个流布局管理器的面板
24         buttons = new JButton[4];
25         for (int i = 0; i < buttons.length; i++) {
26             buttons[i]=new JButton("按钮"+(i+1));
27             panel1.add(buttons[i]); //添加按钮到面板panel1中
28         }
29         panel2 = new CustomPanel();
30         container.add(panel1,BorderLayout.NORTH);
31         container.add(panel2,BorderLayout.CENTER);
32         pack();
33         setVisible(true);
34     }
35
36     public static void main(String[] args) {
37         JPanelExample jpe = new JPanelExample();
38         jpe.setDefaultCloseOperation(JFrame.EXIT_ON_CLOSE);
39     }
40
41     class CustomPanel extends JPanel{ //定义内部类CustomPanel
42         @Override
43         protected void paintComponent(Graphics g) {
44             super.paintComponent(g);
45             g.drawString("Welcome to Java Shape World", 20, 20);
46             g.drawRect(20, 40, 130, 130);
47             g.setColor(Color.GREEN);  //设置颜色为绿色
48             g.fillRect(20, 40, 130, 130); //绘制矩形
49             g.drawOval(160, 40, 100, 100); //绘制椭圆
50             g.setColor(Color.ORANGE); //设置颜色为橙色
51             g.fillOval(160, 40, 100, 100); //绘制椭圆
52         }
53         @Override
54         public Dimension getPreferredSize() {
55             // TODO Auto-generated method stub
56             return new Dimension(200,200);
57         }
58     }
59
60 }
运行结果如下:
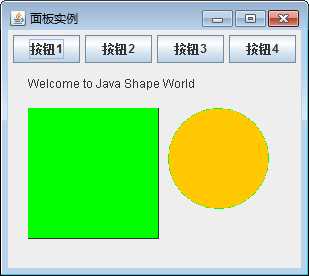
表格是Swing新增加的组件,主要功能是把数据以二维表格的形式显示出来。使用表格,一句M-V-C思想,最好先生成一个MyTableModel类型的对象来表示数据,这个类是从AbstractTableModel累中集成来的,其中有几个方法移动要重写,例如geColumnCount、getRowCount、getColumnName和getValueAt。因为JTable会从这个对象中自动获取表格显示必须的数据,AbstractTableModel类的对象负责表格大小的确定(行、列)、内容的填写、赋值、表格单元更新的检测等一切与表哥内容有关的属性及其操作。JTable类生成的对象以该TableModel为参数,并负责将TableModel对象中的数据以表格的形式显示出来。

  1 package JFrameTest;
  2
  3 /*
  4  * TableRenderDemo.java requires no other files.
  5  */
  6
  7 import javax.swing.DefaultCellEditor;
  8 import javax.swing.JComboBox;
  9 import javax.swing.JFrame;
 10 import javax.swing.JPanel;
 11 import javax.swing.JScrollPane;
 12 import javax.swing.JTable;
 13 import javax.swing.table.AbstractTableModel;
 14 import javax.swing.table.DefaultTableCellRenderer;
 15 import javax.swing.table.TableCellRenderer;
 16 import javax.swing.table.TableColumn;
 17
 18 import java.awt.Component;
 19 import java.awt.Dimension;
 20 import java.awt.GridLayout;
 21
 22 /**
 23  * TableRenderDemo is just like TableDemo, except that it
 24  * explicitly initializes column sizes and it uses a combo box
 25  * as an editor for the Sport column.
 26  */
 27 @SuppressWarnings("all")
 28 public class TableRenderDemo extends JPanel {
 29     private boolean DEBUG = false;
 30
 31     public TableRenderDemo() {
 32         super(new GridLayout(1,0));
 33
 34         JTable table = new JTable(new MyTableModel());
 35         table.setPreferredScrollableViewportSize(new Dimension(500, 70));
 36         table.setFillsViewportHeight(true);
 37
 38         //Create the scroll pane and add the table to it.
 39         JScrollPane scrollPane = new JScrollPane(table);
 40
 41         //Set up column sizes.
 42         initColumnSizes(table);
 43
 44         //Fiddle with the Sport column‘s cell editors/renderers.
 45         setUpSportColumn(table, table.getColumnModel().getColumn(2));
 46
 47         //Add the scroll pane to this panel.
 48         add(scrollPane);
 49     }
 50
 51     /*
 52      * This method picks good column sizes.
 53      * If all column heads are wider than the column‘s cells‘
 54      * contents, then you can just use column.sizeWidthToFit().
 55      */
 56     private void initColumnSizes(JTable table) {
 57         MyTableModel model = (MyTableModel)table.getModel();
 58         TableColumn column = null;
 59         Component comp = null;
 60         int headerWidth = 0;
 61         int cellWidth = 0;
 62         Object[] longValues = model.longValues;
 63         TableCellRenderer headerRenderer =
 64             table.getTableHeader().getDefaultRenderer();
 65
 66         for (int i = 0; i < 5; i++) {
 67             column = table.getColumnModel().getColumn(i);
 68
 69             comp = headerRenderer.getTableCellRendererComponent(
 70                                  null, column.getHeaderValue(),
 71                                  false, false, 0, 0);
 72             headerWidth = comp.getPreferredSize().width;
 73
 74             comp = table.getDefaultRenderer(model.getColumnClass(i)).
 75                              getTableCellRendererComponent(
 76                                  table, longValues[i],
 77                                  false, false, 0, i);
 78             cellWidth = comp.getPreferredSize().width;
 79
 80             if (DEBUG) {
 81                 System.out.println("Initializing width of column "
 82                                    + i + ". "
 83                                    + "headerWidth = " + headerWidth
 84                                    + "; cellWidth = " + cellWidth);
 85             }
 86
 87             column.setPreferredWidth(Math.max(headerWidth, cellWidth));
 88         }
 89     }
 90
 91     public void setUpSportColumn(JTable table,
 92                                  TableColumn sportColumn) {
 93         //Set up the editor for the sport cells.
 94         JComboBox comboBox = new JComboBox();
 95         comboBox.addItem("Snowboarding");
 96         comboBox.addItem("Rowing");
 97         comboBox.addItem("Knitting");
 98         comboBox.addItem("Speed reading");
 99         comboBox.addItem("Pool");
100         comboBox.addItem("None of the above");
101         sportColumn.setCellEditor(new DefaultCellEditor(comboBox));
102
103         //Set up tool tips for the sport cells.
104         DefaultTableCellRenderer renderer =
105                 new DefaultTableCellRenderer();
106         renderer.setToolTipText("Click for combo box");
107         sportColumn.setCellRenderer(renderer);
108     }
109
110     class MyTableModel extends AbstractTableModel {
111         private String[] columnNames = {"First Name",
112                                         "Last Name",
113                                         "Sport",
114                                         "# of Years",
115                                         "Vegetarian"};
116         private Object[][] data = {
117         {"Kathy", "Smith",
118          "Snowboarding", new Integer(5), new Boolean(false)},
119         {"John", "Doe",
120          "Rowing", new Integer(3), new Boolean(true)},
121         {"Sue", "Black",
122          "Knitting", new Integer(2), new Boolean(false)},
123         {"Jane", "White",
124          "Speed reading", new Integer(20), new Boolean(true)},
125         {"Joe", "Brown",
126          "Pool", new Integer(10), new Boolean(false)}
127         };
128
129         public final Object[] longValues = {"Jane", "Kathy",
130                                             "None of the above",
131                                             new Integer(20), Boolean.TRUE};
132
133         public int getColumnCount() {
134             return columnNames.length;
135         }
136
137         public int getRowCount() {
138             return data.length;
139         }
140
141         public String getColumnName(int col) {
142             return columnNames[col];
143         }
144
145         public Object getValueAt(int row, int col) {
146             return data[row][col];
147         }
148
149         /*
150          * JTable uses this method to determine the default renderer/
151          * editor for each cell.  If we didn‘t implement this method,
152          * then the last column would contain text ("true"/"false"),
153          * rather than a check box.
154          */
155         public Class getColumnClass(int c) {
156             return getValueAt(0, c).getClass();
157         }
158
159         /*
160          * Don‘t need to implement this method unless your table‘s
161          * editable.
162          */
163         public boolean isCellEditable(int row, int col) {
164             //Note that the data/cell address is constant,
165             //no matter where the cell appears onscreen.
166             if (col < 2) {
167                 return false;
168             } else {
169                 return true;
170             }
171         }
172
173         /*
174          * Don‘t need to implement this method unless your table‘s
175          * data can change.
176          */
177         public void setValueAt(Object value, int row, int col) {
178             if (DEBUG) {
179                 System.out.println("Setting value at " + row + "," + col
180                                    + " to " + value
181                                    + " (an instance of "
182                                    + value.getClass() + ")");
183             }
184
185             data[row][col] = value;
186             fireTableCellUpdated(row, col);
187
188             if (DEBUG) {
189                 System.out.println("New value of data:");
190                 printDebugData();
191             }
192         }
193
194         private void printDebugData() {
195             int numRows = getRowCount();
196             int numCols = getColumnCount();
197
198             for (int i=0; i < numRows; i++) {
199                 System.out.print("    row " + i + ":");
200                 for (int j=0; j < numCols; j++) {
201                     System.out.print("  " + data[i][j]);
202                 }
203                 System.out.println();
204             }
205             System.out.println("--------------------------");
206         }
207     }
208
209     /**
210      * Create the GUI and show it.  For thread safety,
211      * this method should be invoked from the
212      * event-dispatching thread.
213      */
214     private static void createAndShowGUI() {
215         //Create and set up the window.
216         JFrame frame = new JFrame("TableRenderDemo");
217         frame.setDefaultCloseOperation(JFrame.EXIT_ON_CLOSE);
218
219         //Create and set up the content pane.
220         TableRenderDemo newContentPane = new TableRenderDemo();
221         newContentPane.setOpaque(true); //content panes must be opaque
222         frame.setContentPane(newContentPane);
223
224         //Display the window.
225         frame.pack();
226         frame.setVisible(true);
227     }
228
229     public static void main(String[] args) {
230         //Schedule a job for the event-dispatching thread:
231         //creating and showing this application‘s GUI.
232         javax.swing.SwingUtilities.invokeLater(new Runnable() {
233             public void run() {
234                 createAndShowGUI();
235             }
236         });
237     }
238 }
代码运行结果如下:

参考:http://www.cnblogs.com/pzy4447/p/4925125.html
框架SwingGUI应用程序的主窗口,窗口包括边界、标题、关闭按钮等。
JFrame类是java.awt包中Frame类的子类,其子类创建的对象是窗体,对象(窗体)是重量容器。不能把组件直接添加到Swing窗体中,其含有内容面板容器,应该把组件添加到内容面板中;不能为Swing窗体设置布局,而应当Swing窗体的内容面板设置布局。
Swing窗体通过getContentPane()方法获得JFrame的内容面板,再对其加入组件;
JFrame frame = new JFrame();
Container ct = frame.getContentPane(); //获取内容面板容器
Ct.add(childComponent); //降内容面板容器加入组件
框架(JFrame)常用的方法和事件:
代码实例:
 1 package jFrameDemo;
 2
 3 import java.awt.EventQueue;
 4
 5 import javax.swing.JFrame;
 6
 7 public class SimpleFrameTest {
 8     public static void main(String[] args) {
 9         /*所有的Swing组件必须由事件分派线程(event dispatch thread)进行配置,
10          *线程将鼠标点击和按钮控制转移到用户接口组件。下面的代码片段是事件分派线程中的执行代码。
11          *现在,只需要将其看成是启动一个Swing程序的神器代码。
12          */
13         EventQueue.invokeLater(new Runnable(){
14             @Override
15             public void run() {
16                 // TODO Auto-generated method stub
17                 SimpleFrame frame = new SimpleFrame();
18                 frame.setTitle("JFrame测试");
19                 //定义一个用户关闭这个框架时的响应动作。
20                 frame.setDefaultCloseOperation(JFrame.EXIT_ON_CLOSE);
21                 //为了框架显示,main方法需要需要调用框架的setVisible方法
22                 frame.setVisible(true);
23             }
24         });
25     }
26 }
27
28 @SuppressWarnings("all")
29 class SimpleFrame extends JFrame{
30     private static final int DEFAULT_WIDTH = 400;
31     private static final int DEFAULT_HEIGHT = 200;
32
33     public SimpleFrame(){
34         setSize(DEFAULT_WIDTH,DEFAULT_HEIGHT);
35     }
36 }
代码实例运行结果如下:
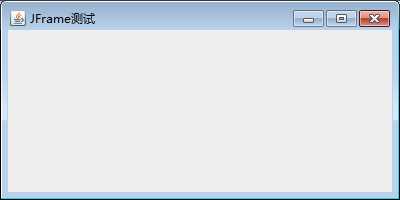
文章内容参考:《Java游戏编程原理与实践教程》
标签:不可编辑 close 单击 swa img opera -- 选中 jbutton
原文地址:http://www.cnblogs.com/symbol8888/p/6781654.html