标签:3.0 gradient 通过 art view 90度 文字 技术 graph
涉及到的几个属性:
<TextView
        android:layout_width="wrap_content"
        android:layout_height="wrap_content"
        android:layout_centerInParent="true"
        android:shadowColor="#F9F900"
        android:shadowDx="10.0"
        android:shadowDy="10.0"
        android:shadowRadius="3.0"
        android:text="带阴影的TextView"
        android:textColor="#4A4AFF"
        android:textSize="30sp" />
如果你想为TextView设置一个边框背景,普通矩形边框或者圆角边框!下面可能帮到你! 另外TextView是很多其他控件的父类,比如Button,也可以设置这样的边框! 实现原理很简单,自行编写一个ShapeDrawable的资源文件!然后TextView将blackgroung 设置为这个drawable资源即可!
简单说下shapeDrawable资源文件的几个节点以及属性:
<?xml version="1.0" encoding="utf-8"?>
<shape xmlns:android="http://schemas.android.com/apk/res/android" >

    <!-- 设置一个黑色边框 -->
    <stroke android:width="2px" android:color="#000000"/>
    <!-- 渐变 -->
    <gradient
        android:angle="270"
        android:endColor="#C0C0C0"
        android:startColor="#FCD209" />
    <!-- 设置一下边距,让空间大一点 -->
    <padding
        android:left="5dp"
        android:top="5dp"
        android:right="5dp"
        android:bottom="5dp"/>

</shape>
基本用法:
设置图片的核心其实就是:drawableXxx;可以设置四个方向的图片:drawableTop(上),drawableButtom(下),drawableLeft(左),drawableRight(右) 另外,你也可以使用drawablePadding来设置图片与文字间的间距!
效果图:(设置四个方向上的图片)
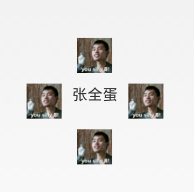
实现代码:
<RelativeLayout xmlns:android="http://schemas.android.com/apk/res/android"
    xmlns:tools="http://schemas.android.com/tools"
    android:layout_width="match_parent"
    android:layout_height="match_parent"
    tools:context="com.jay.example.test.MainActivity" >

    <TextView
        android:layout_width="wrap_content"
        android:layout_height="wrap_content"
        android:layout_centerInParent="true"
        android:drawableTop="@drawable/show1"
        android:drawableLeft="@drawable/show1"
        android:drawableRight="@drawable/show1"
        android:drawableBottom="@drawable/show1"
        android:drawablePadding="10dp"
        android:text="张全蛋" />

</RelativeLayout>
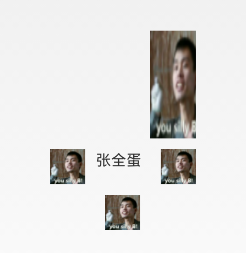
一些问题: 可能你会发现,我们这样设置的drawable并不能自行设置大小,在XML是无法直接设置的; 所以我们需要在Java代码中来进行一个修改!
示例代码如下:
package com.jay.example.test;

import android.app.Activity;
import android.graphics.drawable.Drawable;
import android.os.Bundle;
import android.widget.TextView;

public class MainActivity extends Activity {
    private TextView txtZQD;

    @Override
    protected void onCreate(Bundle savedInstanceState) {
        super.onCreate(savedInstanceState);
        setContentView(R.layout.activity_main);
        txtZQD = (TextView) findViewById(R.id.txtZQD);
        Drawable[] drawable = txtZQD.getCompoundDrawables();
        // 数组下表0~3,依次是:左上右下
        drawable[1].setBounds(100, 0, 200, 200);
        txtZQD.setCompoundDrawables(drawable[0], drawable[1], drawable[2],
                drawable[3]);
    }
}
运行效果图:
标签:3.0 gradient 通过 art view 90度 文字 技术 graph
原文地址:http://www.cnblogs.com/zc2014blog/p/6850492.html