标签:register address lib dmi live lan byte 进程 options
1.HAProxy
HAProxy提供高可用性、负载均衡以及基于TCP和HTTP应用的代理,支持虚拟主机,它是免费、快速并且可靠的一种解决方案。HAProxy特别适用于那些负载特大的web站点,这些站点通常又需要会话保持或七层处理。HAProxy运行在时下的硬件上,完全可以支持数以万计的并发连接。并且它的运行模式使得它可以很简单安全的整合进当前的架构中, 同时可以保护web服务器不被暴露到网络上。
2.Keepalived
Keepalived 是一个基于VRRP协议来实现的LVS服务高可用方案,可以利用其来避免单点故障。一个LVS服务会有2台服务器运行Keepalived,一台为主服务器(MASTER),一台为备份服务器(BACKUP),但是对外表现为一个虚拟IP,主服务器会发送特定的消息给备份服务器,当备份服务器收不到这个消息的时候,即主服务器宕机的时候,备份服务器就会接管虚拟IP,继续提供服务,从而保证了高可用性。Keepalived是VRRP的完美实现。
3.vrrp协议
在现实的网络环境中,两台需要通信的主机大多数情况下并没有直接的物理连接。对于这样的情况,它们之间路由怎样选择?主机如何选定到达目的主机的下一跳路由,这个问题通常的解决方法有两种:
在主机上使用动态路由协议(RIP、OSPF等)
在主机上配置静态路由
很明显,在主机上配置动态路由是非常不切实际的,因为管理、维护成本以及是否支持等诸多问题。配置静态路由就变得十分流行,但路由器(或者说默认网关default gateway)却经常成为单点故障。VRRP的目的就是为了解决静态路由单点故障问题,VRRP通过一竞选(election)协议来动态的将路由任务交给LAN中虚拟路由器中的某台VRRP路由器。
1.系统
CentOS Linux release 7.2.1511 (Core)
2.应用软件
haproxy-1.5.14-3.el7.x86_64
keepalived-1.2.13-7.el7.x86_64
httpd-2.4.6-45.el7.centos.x86_64
php-5.4.16-42.el7.x86_64
mariadb-server-5.5.52-1.el7.x86_64
mariadb.x86_64
wordpress-4.3.1-zh_CN.zip
nfs-utils-1.3.0-0.33.el7.x86_64
rpcbind-0.2.0-38.el7.x86_64
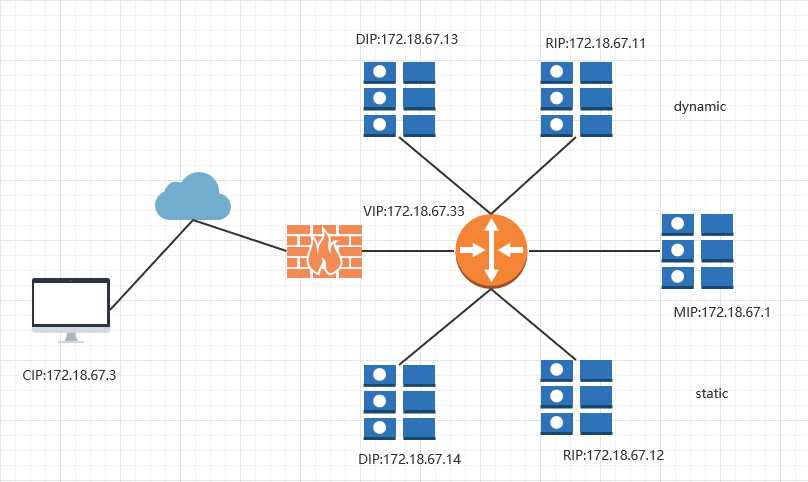
3.IP配置
负载均衡器
DIP1:172.18.67.13
DIP2:172.18.67.14
后端Real Server
RIP1:172.18.67.11
RIP2:172.18.67.12
数据库服务器
MIP:172.18.67.1
客户端IP
IP:172.18.67.3
VIP:172,.18.67.33
1.拓扑图
2.部署应用软件
在IP为172.18.67.13与172.18.67.14的服务器上安装部署haproxy、keepalived
[root@inode2 ~]# yum install haproxy keepalived -y
[root@inode3 ~]# yum install haproxy keepalived -y
在IP为172.18.67.11的服务器上安装部署httpd、php
[root@inode4 ~]# yum install httpd php -y
在IP为172.18.67.12的服务器上安装部署httpd、php、mariadb-server、php-mysql
[root@inode5 ~]# yum install httpd php mariadb mariadb-server php-mysql -y
在IP为172.18.67.1的服务器上部署mariadb、mariadb-server、php-mysql
[root@inode6 ~]# yum install mariadb mariadb-server php-mysql -y
另外由于数据库采用文件共享的方式,所以还要安装nfs,分别在Real Server端和数据库服务器端安装nfs的应用软件nfs-utils、rpcbind
[root@inode4 ~]# yum install nfs-utils rpcbind -y
[root@inode6 ~]# yum install nfs-utils rpcbind -y
1.Real Server配置
在这里我们将IP为172.18.67.11的服务器设置为动态资源站,将IP为172.18.67.12的服务器设置成静态资源栈:将wordpress应用解压至/var/www/html/下,并修改该目录的属主和属组
[root@inode4 ~]# unzip wordpress-4.3.1-zh_CN.zip -C /var/www/html/
[root@inode4 ~]# chown -R apache:apache /var/www/html/wordpress
[root@inode5 ~]# unzip wordpress-4.3.1-zh_CN.zip -C /var/www/html/
[root@inode5 ~]# chown -R apache:apache /var/www/html/wordpress
修改Server1的httpd的配置文件将网站目录从默认的/var/www/html修改为/var/www/html/wordpress,Server2的网站目录默认。
2.nfs配置
数据库端修改配置文件
[root@inode6 ~]# vim /etc/exports
/data/ 172.18.67.11(rw,async)
/var/www/html/ 172.18.67.12(rw,async)
修改保存完毕后启动Real Server和数据库服务器的nfs应用
[root@inode4 ~]# systemctl start rpcbind
[root@inode4 ~]# systemctl start nfs
[root@inode5 ~]# systemctl start rpcbind
[root@inode5 ~]# systemctl start nfs
[root@inode6 ~]# systemctl start rpcbind
[root@inode6 ~]# systemctl start nfs
创建数据存放目录及修改权
[root@inode6 ~]# mkdir /data
[root@inode6 ~]# chown -R mysql:mysql /data
修改数据库配置文件数据存储目录
[root@inode6 ~]# vim /etc/my.cnf
datadir=/data/
启动数据库
[root@inode6 ~]# systemctl start mysql-server
将数据库目录挂载至web动态资源服务器
[root@inode4 ~]# mount -t nfs 172.18.67.1:/data/ /mnt
3.keepalived配置
MASTER
[root@inode2 keepalived]# vim keepalived.conf
! Configuration File for keepalived
global_defs {
    notification_email {
 root@localhost
    }
    notification_email_from keepalived@localhost
    smtp_server 127.0.0.1 #邮件本地地址
    smtp_connect_timeout 30 #连接超时
    router_id inode2
    vrrp_mcast_group4 224.0.67.67 #多播地址
}
vrrp_script chk_down {
    script "[[ -f /etc/keepalived/down ]] && exit 1 || exit 0" #检测keepalived服务是否启用
    interval 1
    weight -5 #如果检测到down,则权重减去5
}
vrrp_script chk_nginx {
    script "killall -0 nginx && exit 0 || exit 1" #向nginx发信号检测nginx进程是否存在
    interval 1
    weight -5
    fall 2
    rise 1
}
vrrp_instance myr {
    state MASTER
    interface eno16777736
    virtual_router_id 167
    priority 100 #优先级
    advert_int 1
    authentication {
 auth_type PASS
 auth_pass 571f97b2
    }
    virtual_ipaddress {
 172.18.67.33/16 dev eno16777736
    }
    track_script {
 chk_down
 chk_nginx
    }
    notify_master "/etc/keepalived/notify.sh master" #启用脚本通知功能
    notify_backup "/etc/keepalived/notify.sh backup"
    notify_fault "/etc/keepalived/notify.sh fault"
}
BACKUP
[root@inode3 keepalived]# vim keepalived.conf
! Configuration File for keepalived
global_defs {
    notification_email {
 root@localhost
    }
    notification_email_from keepalived@localhost
    smtp_server 127.0.0.1
    smtp_connect_timeout 30
    router_id inode3
    vrrp_mcast_group4 224.0.67.67
}
vrrp_script chk_down {
    script "[[ -f /etc/keepalived/down ]] && exit 1 || exit 0"
    interval 1
    weight -5
}
vrrp_script chk_nginx {
    script "killall -0 nginx && exit 0 || exit 1"
    interval 1
    weight -5
    fall 2
    rise 1
}
vrrp_instance myr {
    state BACKUP
    interface eno16777736
    virtual_router_id 167
    priority 95
    advert_int 1
    authentication {
 auth_type PASS
 auth_pass 571f97b2
    }
    virtual_ipaddress {
 172.18.67.33/16 dev eno16777736
    }
    track_script {
 chk_down
 chk_nginx
    }
    notify_master "/etc/keepalived/notify.sh master"
    notify_backup "/etc/keepalived/notify.sh backup"
    notify_fault "/etc/keepalived/notify.sh fault"
}
通知脚本
#!/bin/bash
#
contact=‘root@localhost‘

notify() {
	mailsubject="$(hostname) to be $1, vip floating"
	mailbody="$(date +‘%F %T‘): vrrp transition, $(hostname) changed to be $1"
	echo "$mailbody" | mail -s "$mailsubject" $contact
}

case $1 in
master)
	notify master
	;;
backup)
	notify backup
	;;
fault)
	notify fault
	;;
*)
	echo "Usage: $(basename $0) {master|backup|fault}"
	exit 1
	;;
esac
4.haproxy配置
两节点的配置内容是一样的,如下:
[root@inode2 haproxy]# vim haproxy.cfg
global
    log         127.0.0.1 local2
    chroot      /var/lib/haproxy
    pidfile     /var/run/haproxy.pid
    maxconn     4000
    user        haproxy
    group       haproxy
    daemon
    stats socket /var/lib/haproxy/stats
defaults
    mode                    http #启用七层模型
    log                     global
    option                  httplog
    option                  dontlognull
    option http-server-close
    option forwardfor       except 127.0.0.0/8
    option                  redispatch
    retries                 3
    timeout http-request    10s
    timeout queue           1m
    timeout connect         10s
    timeout client          1m
    timeout server          1m
    timeout http-keep-alive 10s
    timeout check           10s
    maxconn                 3000
frontend          web *:80
    mode            http
    maxconn          2000 #最大连接数量
    acl url_static     path_beg       -i  /static /images /javascript /stylesheets #启用acl
    acl url_static     path_end       -i  .jpg .gif .png .css .js .html .txt .htm
    use_backend staticsrvs  if url_static
    default_backend    appsrvs
backend staticsrvs #静态资源
    balance      roundrobin #轮循算法
    server       stcsrvs 172.18.67.12:80 check
backend appsrvs #动态资源
    balance      roundrobin
    server       wp 172.18.67.11:80 check
listen stats
    bind :10086 #绑定端口
    stats   enable #启用stats功能
    stats   uri     /admin?stats #设置非默认uri
    stats   auth    admin:admin #认证账号密码
    stats   admin   if TRUE
1.启动haproxy和keepalived
[root@inode2 ~]# systemctl restart haproxy
[root@inode2 ~]# systemctl restart keepalived
[root@inode3 ~]# systemctl restart haproxy
[root@inode3 ~]# systemctl restart keepalived
2.测试
inode2:
[root@inode2 ~]# systemctl status -l keepalived
● keepalived.service - LVS and VRRP High Availability Monitor
   Loaded: loaded (/usr/lib/systemd/system/keepalived.service; disabled; vendor preset: disabled)
   Active: active (running) since Wed 2017-05-17 20:53:58 CST; 10min ago
  Process: 2156 ExecStart=/usr/sbin/keepalived $KEEPALIVED_OPTIONS (code=exited, status=0/SUCCESS)
 Main PID: 2157 (keepalived)
   CGroup: /system.slice/keepalived.service
           ├─2157 /usr/sbin/keepalived -D
           ├─2158 /usr/sbin/keepalived -D
           └─2159 /usr/sbin/keepalived -D
May 17 20:53:58 inode2 Keepalived_healthcheckers[2158]: Opening file ‘/etc/keepalived/keepalived.conf‘.
May 17 20:53:58 inode2 Keepalived_healthcheckers[2158]: Configuration is using : 7521 Bytes
May 17 20:53:58 inode2 Keepalived_healthcheckers[2158]: Using LinkWatch kernel netlink reflector...
May 17 20:53:59 inode2 Keepalived_vrrp[2159]: VRRP_Instance(myr) Transition to MASTER STATE
May 17 20:54:00 inode2 Keepalived_vrrp[2159]: VRRP_Instance(myr) Entering MASTER STATE
May 17 20:54:00 inode2 Keepalived_vrrp[2159]: VRRP_Instance(myr) setting protocol VIPs.
May 17 20:54:00 inode2 Keepalived_vrrp[2159]: VRRP_Instance(myr) Sending gratuitous ARPs on eno16777736 for 172.18.67.33
May 17 20:54:00 inode2 Keepalived_vrrp[2159]: Opening script file /etc/keepalived/notify.sh
May 17 20:54:00 inode2 Keepalived_healthcheckers[2158]: Netlink reflector reports IP 172.18.67.33 added
May 17 20:54:05 inode2 Keepalived_vrrp[2159]: VRRP_Instance(myr) Sending gratuitous ARPs on eno16777736 for 172.18.67.33
我们看到inode2节点进入了MASTER模式,再查看inode3的状态
[root@inode3 ~]# systemctl status -l keepalived
● keepalived.service - LVS and VRRP High Availability Monitor
   Loaded: loaded (/usr/lib/systemd/system/keepalived.service; disabled; vendor preset: disabled)
   Active: active (running) since Wed 2017-05-17 21:55:22 CST; 2s ago
  Process: 20030 ExecStart=/usr/sbin/keepalived $KEEPALIVED_OPTIONS (code=exited, status=0/SUCCESS)
 Main PID: 19577 (keepalived)
   CGroup: /system.slice/keepalived.service
           ├─19577 /usr/sbin/keepalived -D
           ├─19578 /usr/sbin/keepalived -D
           └─19579 /usr/sbin/keepalived -D

May 17 21:55:22 inode3 systemd[1]: Starting LVS and VRRP High Availability Monitor...
May 17 21:55:22 inode3 Keepalived[20030]: Starting Keepalived v1.2.13 (11/20,2015)
May 17 21:55:22 inode3 Keepalived[20030]: daemon is already running
May 17 21:55:22 inode3 systemd[1]: Started LVS and VRRP High Availability Monitor.
不难看出inode3节点处于BACKUP状态,此时我们将inode2的keepalived服务停掉
[root@inode2 ~]# systemctl stop keepalived
[root@inode3 ~]# systemctl status -l keepalived
● keepalived.service - LVS and VRRP High Availability Monitor
   Loaded: loaded (/usr/lib/systemd/system/keepalived.service; disabled; vendor preset: disabled)
   Active: active (running) since Wed 2017-05-17 20:54:37 CST; 12min ago
  Process: 1653 ExecStart=/usr/sbin/keepalived $KEEPALIVED_OPTIONS (code=exited, status=0/SUCCESS)
 Main PID: 1654 (keepalived)
   CGroup: /system.slice/keepalived.service
           ├─1654 /usr/sbin/keepalived -D
           ├─1655 /usr/sbin/keepalived -D
           └─1656 /usr/sbin/keepalived -D

May 17 20:54:38 inode3 Keepalived_healthcheckers[1655]: Registering Kernel netlink command channel
May 17 20:54:38 inode3 Keepalived_healthcheckers[1655]: Opening file ‘/etc/keepalived/keepalived.conf‘.
May 17 20:54:38 inode3 Keepalived_healthcheckers[1655]: Configuration is using : 7519 Bytes
May 17 20:54:38 inode3 Keepalived_healthcheckers[1655]: Using LinkWatch kernel netlink reflector...
May 17 21:06:34 inode3 Keepalived_vrrp[1656]: VRRP_Instance(myr) Transition to MASTER STATE
May 17 21:06:35 inode3 Keepalived_vrrp[1656]: VRRP_Instance(myr) Entering MASTER STATE
May 17 21:06:35 inode3 Keepalived_vrrp[1656]: VRRP_Instance(myr) setting protocol VIPs.
May 17 21:06:35 inode3 Keepalived_vrrp[1656]: VRRP_Instance(myr) Sending gratuitous ARPs on eno16777736 for 172.18.67.33
May 17 21:06:35 inode3 Keepalived_vrrp[1656]: Opening script file /etc/keepalived/notify.sh
May 17 21:06:35 inode3 Keepalived_healthcheckers[1655]: Netlink reflector reports IP 172.18.67.33 added
我们发现inode3节点进入了MASTER状态,因此体现出了高可用的特性
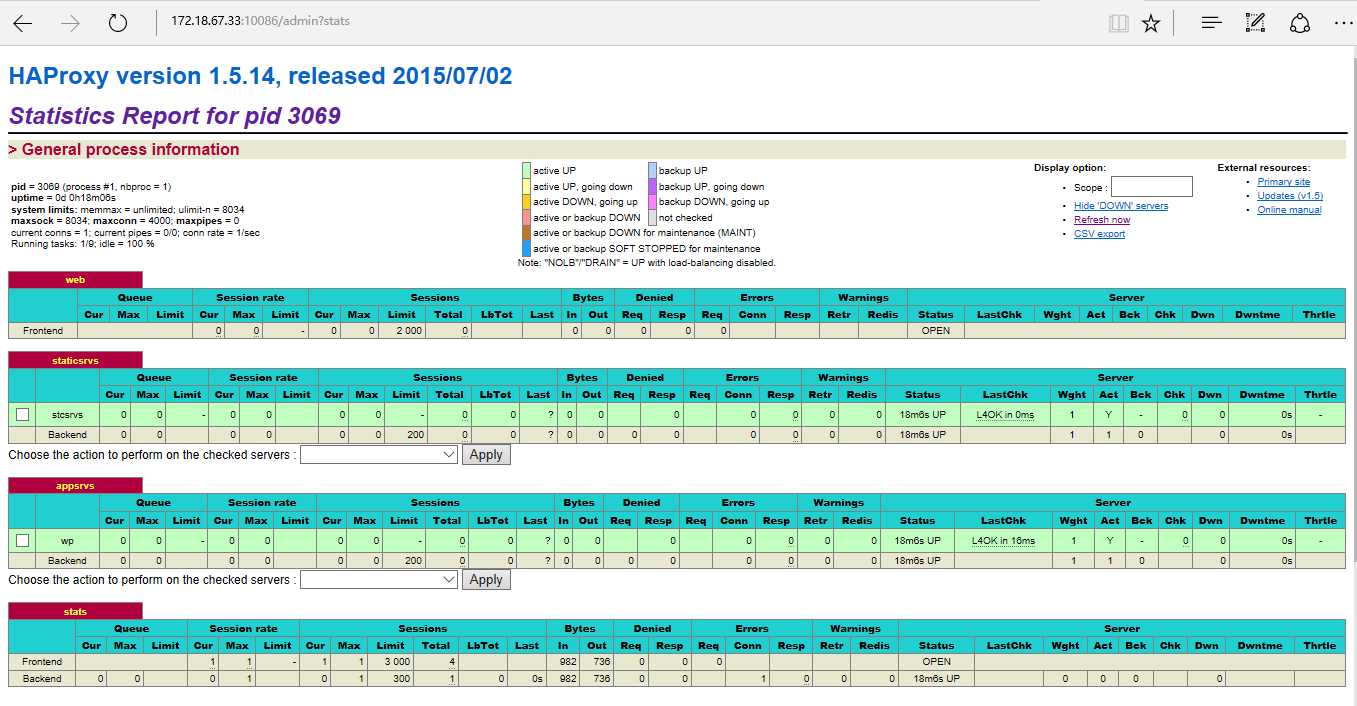
接下来我们测试haproxy的特性,在haproxy的配置文件里有下面这一段
listen stats
    bind :10086
    stats   enable
    stats   uri     /admin?stats
    stats   auth    admin:admin
    stats   admin   if TRUE
这段配置可以让我们在浏览器中查看和修改haproxy统计接口启用相关的参数,在浏览器中输入http://172.18.67.33:10086/admin?stats,就会出现下面这种状态,输入账号和密码,就进入了haproxy相关参数配置页面。

在下图中可以看出负载均衡的两台web服务器一台负责动态资源解析,另一台负责静态资源。动态资源的数据存放于后端的nfs服务器上。
接下来我们在浏览器中访问http://172.18.67.33就可以安装wordpress了。至此一个简单的高可用负载均衡服务搭建完毕。

基于HAProxy+Keepalived高可用负载均衡web服务的搭建
标签:register address lib dmi live lan byte 进程 options
原文地址:http://www.cnblogs.com/mrlapulga/p/6869807.html