标签:特定 img fill 头文件 clean up 获取对象 ref 导入 shu
iOS开发中有的时候需要将图片设置模糊,来实现特定的效果获取更好的用户体验, iOS7之后半透明模糊效果得到大范围使用的比较大,现在也可以看到很多应用局部用到了图片模糊效果,可以通过高斯模糊和毛玻璃效果达到图片模糊效果。

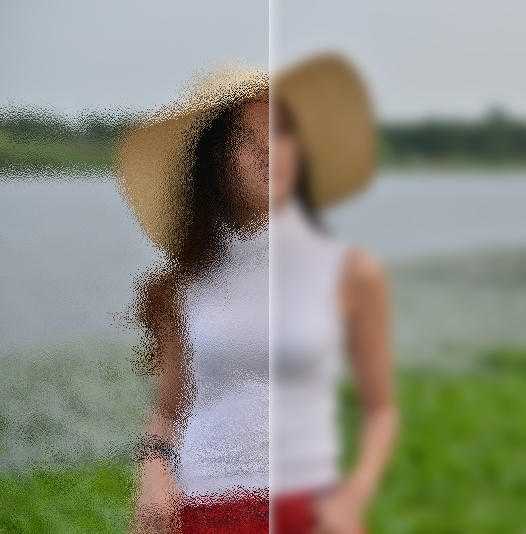
左边玻璃右边模糊
1. CoreImage:
iOS5.0之后就出现了Core Image的API,Core Image的API被放在CoreImage.framework库中, 在iOS和OS X平台上,Core Image都提供了大量的滤镜(Filter),在OS X上有120多种Filter,而在iOS上也有90多。
+(UIImage *)coreBlurImage:(UIImage *)image withBlurNumber:(CGFloat)blur
{
    CIContext *context = [CIContext contextWithOptions:nil];
    CIImage *inputImage= [CIImage imageWithCGImage:image.CGImage];
    //设置filter
    CIFilter *filter = [CIFilter filterWithName:@"CIGaussianBlur"];
    [filter setValue:inputImage forKey:kCIInputImageKey]; [filter setValue:@(blur) forKey: @"inputRadius"];
    //模糊图片
    CIImage *result=[filter valueForKey:kCIOutputImageKey];
    CGImageRef outImage=[context createCGImage:result fromRect:[result extent]];
    UIImage *blurImage=[UIImage imageWithCGImage:outImage];
    CGImageRelease(outImage);
    return blurImage;
}
2. vImage
vImage属于Accelerate.Framework,需要导入 Accelerate下的 Accelerate头文件, Accelerate主要是用来做数字信号处理、图像处理相关的向量、矩阵运算的库。图像可以认为是由向量或者矩阵数据构成的,Accelerate里既然提供了高效的数学运算API,自然就能方便我们对图像做各种各样的处理 ,模糊算法使用的是vImageBoxConvolve_ARGB8888这个函数。
+(UIImage *)boxblurImage:(UIImage *)image withBlurNumber:(CGFloat)blur
 {
     if (blur < 0.f || blur > 1.f) {
        blur = 0.5f;
     }
     int boxSize = (int)(blur * 40);
     boxSize = boxSize - (boxSize % 2) + 1;
     CGImageRef img = image.CGImage;
     vImage_Buffer inBuffer, outBuffer;
     vImage_Error error;
     void *pixelBuffer;
     //从CGImage中获取数据
     CGDataProviderRef inProvider = CGImageGetDataProvider(img);
     CFDataRef inBitmapData = CGDataProviderCopyData(inProvider);
     //设置从CGImage获取对象的属性
     inBuffer.width = CGImageGetWidth(img);
     inBuffer.height = CGImageGetHeight(img);
     inBuffer.rowBytes = CGImageGetBytesPerRow(img);
     inBuffer.data = (void*)CFDataGetBytePtr(inBitmapData);
     pixelBuffer = malloc(CGImageGetBytesPerRow(img) * CGImageGetHeight(img));
     if(pixelBuffer == NULL)
         NSLog(@"No pixelbuffer");
     outBuffer.data = pixelBuffer;
     outBuffer.width = CGImageGetWidth(img);
     outBuffer.height = CGImageGetHeight(img);
     outBuffer.rowBytes = CGImageGetBytesPerRow(img);
     error = vImageBoxConvolve_ARGB8888(&inBuffer, &outBuffer, NULL, 0, 0, boxSize, boxSize, NULL, kvImageEdgeExtend);
     if (error) {
           NSLog(@"error from convolution %ld", error);
     }
     CGColorSpaceRef colorSpace = CGColorSpaceCreateDeviceRGB();
     CGContextRef ctx = CGBitmapContextCreate( outBuffer.data, outBuffer.width, outBuffer.height, 8, outBuffer.rowBytes, colorSpace, kCGImageAlphaNoneSkipLast);
     CGImageRef imageRef = CGBitmapContextCreateImage (ctx);
     UIImage *returnImage = [UIImage imageWithCGImage:imageRef];
     //clean up CGContextRelease(ctx);
     CGColorSpaceRelease(colorSpace);
     free(pixelBuffer);
     CFRelease(inBitmapData);
     CGColorSpaceRelease(colorSpace);
     CGImageRelease(imageRef);
     return returnImage;
}
方法调用
UIImageView  *imageView=[[UIImageView alloc]initWithFrame:CGRectMake(0, 300, SCREENWIDTH, 100)];
imageView.contentMode=UIViewContentModeScaleAspectFill;
imageView.image=[UIImage boxblurImage:image withBlurNumber:0.5];
imageView.clipsToBounds=YES;
[self.view addSubview:imageView];
3.GPUImage
GPUImage是用设备的GPU来实时处理图片,给图片加各种滤镜效果的一个开源库。
可以实时地给照相机加上滤镜效果,很多App都支持这种实时滤镜。
链接地址:https://github.com/BradLarson/GPUImage
区别:
效果:第一种Core Image设置模糊之后会在周围产生白边,vImage使用不存在任何问题;
性能:图像模糊处理属于复杂的计算,大部分图片模糊选择的是vImage,性能最佳
项目地址: https://github.com/524429264/iOS-UIImageBoxBlur
参考资料:https://developer.apple.com/library/ios/documentation/GraphicsImaging/Reference/CoreImageFilterReference/index.html#//apple_ref/doc/filter/ci/CIGaussianBlur
1、苹果在iOS7.0之后,很多系统界面都使用了毛玻璃效果,增加了界面的美观性,比如通知中心界面;其实在iOS7.0(包括)之前还是有系统的类可以实现毛玻璃效果的, 就是 UIToolbar这个类
iOS7.0
毛玻璃的样式(枚举)
UIBarStyleDefault          = 0,
UIBarStyleBlack            = 1,
UIBarStyleBlackOpaque      = 1, // Deprecated. Use UIBarStyleBlack
UIBarStyleBlackTranslucent = 2, // Deprecated. Use UIBarStyleBlack and set the translucent property to YES

UIImageView *bgImgView = [[UIImageView alloc] initWithFrame:self.view.bounds];
bgImgView.image = [UIImage imageNamed:@"huoying4.jpg"];
[self.view addSubview:bgImgView];

UIToolbar *toolbar = [[UIToolbar alloc] initWithFrame:CGRectMake(0, 0, bgImgView.frame.size.width*0.5, bgImgView.frame.size.height)];
toolbar.barStyle = UIBarStyleBlackTranslucent;
[bgImgView addSubview:toolbar];
2、在iOS8.0之后,苹果新增了一个类UIVisualEffectView,通过这个类来实现毛玻璃效果与上面的UIToolbar一样,而且效率也非常之高,使用也是非常简单,几行代码搞定. UIVisualEffectView是一个抽象类,不能直接使用,需通过它下面的三个子类来实现(UIBlurEffect, UIVisualEffevt, UIVisualEffectView);
子类UIBlurEffect只有一个类方法,用来快速创建一个毛玻璃效果,参数是一个枚举,用来设置毛玻璃的样式,而UIVisualEffectView则多了两个属性和两个构造方法,用来快速将创建的毛玻璃添加到这个UIVisualEffectView上.
特别注意: 这个类是iOS8.0之后才适用, 所以如果项目要兼容iOS7.0的话, 还是要考虑其它的两种方法了.
实现代码:
同样是先快速的实例化UIBlurEffect并设置毛玻璃的样式,然后再通过UIVisualEffectView的构造方法将UIBlurEffect的实例添加上去, 最后设置frame或者是通过添加约束, 将effectView添加到要实现了毛玻璃的效果的view控件上,效果图和上面的一样.
iOS8.0
 毛玻璃的样式(枚举)
 UIBlurEffectStyleExtraLight,
 UIBlurEffectStyleLight,
 UIBlurEffectStyleDark

 UIBlurEffect *effect = [UIBlurEffect effectWithStyle:UIBlurEffectStyleDark];
 UIVisualEffectView *effectView = [[UIVisualEffectView alloc] initWithEffect:effect];
 effectView.frame = CGRectMake(0, 0, bgImgView.frame.size.width*0.5, bgImgView.frame.size.height);
 [bgImgView addSubview:effectView];
项目地址:https://github.com/524429264/EffectViewDemo
来源:http://www.jianshu.com/p/6dd0eab888a6
标签:特定 img fill 头文件 clean up 获取对象 ref 导入 shu
原文地址:http://www.cnblogs.com/GJ-ios/p/6876513.html