标签:iter pos ict str 内部使用 数据 ffffff view code
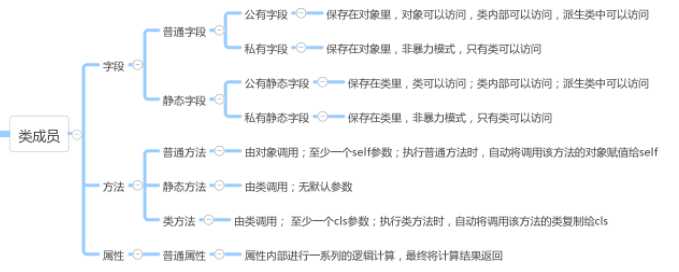
类的成员可以分为三大类:字段、方法和属性

 1 class Person(object):
 2
 3     planet = "earth"
 4
 5     def __init__(self, name, age, sex):
 6         self.name = name
 7         self.age = age
 8         self.sex = sex
 9
10 # 普通字段访问
11 p1 = Person("Breakering", 25, "M")
12 print(p1.name)
13 # ==>Breakering
14 # print(Person.name)  # 普通字段是不能通过类来访问的
15
16 # 静态字段访问
17 print(Person.planet)
18 # ==>earth
19 print(p1.planet)  # 可以通过对象来访问静态字段
20 # ==>earth
21 p1.planet = "mars"  # 此时是在p1这个对象中重新创建了一个变量planet
22 print(p1.planet)
23 # ==>mars
24 print(Person.planet)  # 类中的planet不会发生改变
25 # ==>earth
26 Person.planet = "mars"  # 只能通过类来修改静态字段
27 print(Person.planet)
28 # ==>mars
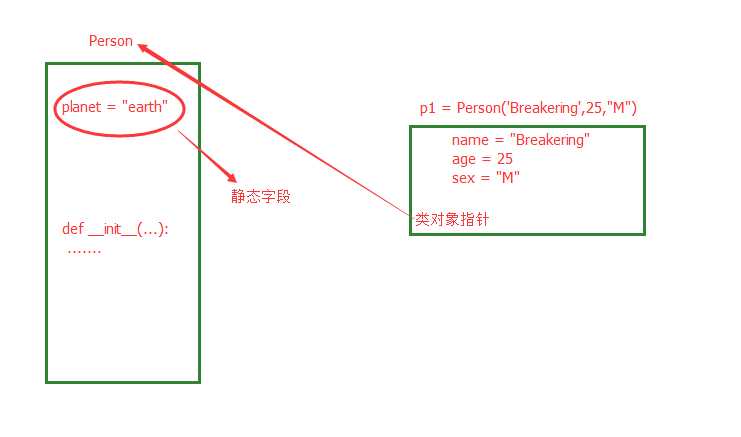
由上述代码可以看出【普通字段需要通过对象来访问】【静态字段通过类访问】,在使用上可以看出普通字段和静态字段的归属是不同的。其在内容的存储方式类似如下图:

 1 class Person(object):
 2
 3     _planet = "earth"
 4
 5     def __init__(self, name):
 6         self.name = name
 7
 8     def talk(self):  # 普通方法
 9         print("%s is say Hello!" % self.name)
10
11     @classmethod
12     def get_planet(cls):  # 类方法
13         return cls._planet
14
15     @staticmethod
16     def test():
17         print("test")
18
19 # 调用普通方法
20 p1 = Person("Breakering")
21 p1.talk()
22 print(p1.get_planet())  # 对象可以调用类方法
23 p1.test()  # 对象也可以调用静态方法
24
25 # 调用类方法
26 print(Person.get_planet())
27
28 # 调用静态方法
29 Person.test()
30
31 Person.talk()  # 类不可直接调用普通方法
32 # ==>TypeError: talk() missing 1 required positional argument: ‘self‘
33
34 def f1():
35     print("f1")
36
37 p1.f1 = f1  # 这时方法是保存在对象中的
38
39 p1.f1()
40
41 Person.f1()
42 # ==>AttributeError: type object ‘Person‘ has no attribute ‘f1‘
相同点:对于所有的方法而言,均属于类(非对象)中,所以,在内存中也只保存一份。
 1 class Dog(object):
 2     """ 这个类是描述狗这个对象的 """
 3
 4     def __init__(self, name):
 5         self.name = name
 6         self.__food = "包子"
 7
 8     @property  # attribute
 9     def eat(self):
10         print("%s is eating %s" % (self.name, self.__food))
11         return self.__food
12
13 d = Dog("flydog")
14 d.eat
属性的定义有两种方式:
 1 class Dog(object):
 2     """ 这个类是描述狗这个对象的 """
 3
 4     def __init__(self, name):
 5         self.name = name
 6         self.__food = None
 7
 8     @property  # attribute
 9     def eat(self):
10         print("%s is eating %s" % (self.name, self.__food))
11         return self.__food
12
13     @eat.setter
14     def eat(self, food):
15         print("set to food:", food)
16         self.__food = food
17
18     @eat.deleter
19     def eat(self):
20         del self.__food
21         print("删完了")
22
23     def talk(self):
24         print("%s is talking" % self.name)
25
26 d = Dog("flydog")
27 print(d)
28 d.eat = "包子"
29 d.eat
30 del d.eat
静态字段方式,创建值为property对象的静态字段
 1 class Dog(object):
 2     """ 这个类是描述狗这个对象的 """
 3
 4     def __init__(self, name):
 5         self.name = name
 6         self.__food = None
 7
 8     def get_food(self):
 9         print("%s is eating %s" % (self.name, self.__food))
10         return self.__food
11
12     def set_food(self, food):
13         print("set to food:", food)
14         self.__food = food
15
16     def del_food(self):
17         del self.__food
18         print("删完了")
19
20     def talk(self):
21         print("%s is talking" % self.name)
22
23     FOOD = property(get_food, set_food, del_food, "食物属性描述")
24
25 d = Dog("flydog")
26 d.FOOD = "包子"
27 d.FOOD
28 del d.FOOD
property的构造方法中有个四个参数
对象.属性 时自动触发执行方法对象.属性 = XXX 时自动触发执行方法del 对象.属性 时自动触发执行方法对象.属性.__doc__ ,此参数是该属性的描述信息
类的所有成员在上一步骤中已经做了详细的介绍,对于每一个类的成员而言都有两种形式:
1 class Student(object):
2
3     def __init__(self, name, age,  score):
4         self.name = name  # 公有字段
5         self.__age = age  # 私有字段
6         self.__score = score  # 私有字段
7
8     def print_score(self):
9         print(‘%s: %s‘ % (self.name, self.__score))
__score,这样的实例变量外部是可以访问的,但是,按照约定俗成的规定,当你看到这样的变量时,意思就是,“虽然我可以被访问,但是,请把我视为私有变量,不要随意访问”。__score 因为Python解释器对外把变量__score改成了 _Student__score,所以,仍然可以通过_Student__score来访问__socre变量:__score改成不同的变量名。1 >>> bart = Student(‘Bart Simpson‘, 25, 98) 2 >>> bart.print_score() 3 Bart Simpson: 98 4 >>> bart.__score = 100 # 设置__score变量! 5 >>> bart.__score 6 100
__score变量,但实际上这个变量和__score class内部的__score变量不是一个变量!内部的__score变量已经被Python解释器自动改成了_Student__score,而外部代码给bart新增了一个__score变量。不信试试:1 >>> bart.print_score() 2 Bart Simpson: 98
 1 class A(object):
 2     a = "a"
 3     __b = "b"
 4
 5     def __init__(self, name, sex):
 6         self.name = name
 7         self.__sex = sex
 8
 9     def get_a(self):
10         print(self.a)
11
12     def get_b(self):
13         print(self.__b)
14
15 class B(A):
16
17     def show_name(self):
18         print(self.name)
19
20     def show_sex(self):
21         print(self.__sex)
22
23 obj1 = A("Dog", "F")
24 obj2 = B("Wolf", "M")
25 print(obj1.a)  # 对象可以访问公有静态字段
26 # print(obj1.__b)  # 对象不可以访问私有静态字段
27 obj1.get_a()  # 类内部可以访问公有静态字段
28 obj1.get_b()  # 类内部可以访问私有静态字段
29 obj2.get_b()  # 子类可以访问父类私有静态字段
30 obj2.show_name()  # 子类可以访问父类的公有字段
31 print(obj2.a)  # 子类可以访问父类的公有静态字段
32 # print(obj2.__b)  # 子类不可以访问私有静态字段
33 print(obj2.name)  # 子类可以访问公有字段
34 # obj2.show_sex()  # 子类不能访问父类的私有字段
1 class Dog(object):
2     """ 这个类是描述狗这个对象的 """
3
4     def __init__(self, name):
5         self.name = name
6         self.__food = None
7 d = Dog("flydog")
8 print(d.__doc__)
9 # ==> 这个类是描述狗这个对象的

1 class C:
2
3     def __init__(self):
4         self.name = ‘Breakering‘

1 from lib.aa import C
2
3 obj = C()
4 print obj.__module__  # 输出 lib.aa,即:输出模块
5 print obj.__class__      # 输出 lib.aa.C,即:输出类
1 class C:
2
3     def __init__(self):
4         self.name = ‘Breakering‘
1 class Foo:
2
3     def __del__(self):
4         # 关闭服务器
5         # 关闭进程
6         ...
 1 class Foo:
 2
 3     def __init__(self):
 4         pass
 5
 6     def __call__(self, *args, **kwargs):
 7
 8         print ‘__call__‘
 9
10
11 obj = Foo() # 执行 __init__
12 obj()      # 执行 __call__
 1 class Person(object):
 2
 3     _planet = "earth"
 4
 5     def __init__(self, name):
 6         self.name = name
 7
 8     def talk(self):  # 普通方法
 9         print("%s is say Hello!" % self.name)
10
11     @classmethod
12     def get_planet(cls):  # 类方法
13         return cls._planet
14
15     @staticmethod
16     def test():
17         print("test")
18
19 print(Person.__dict__)
20 # {‘talk‘: <function Person.talk at 0x0000020E50C23510>, ‘__init__‘: <function Person.__init__ at 0x0000020E50C23488>, ‘__dict__‘: <attribute ‘__dict__‘ of ‘Person‘ objects>, ‘__module__‘: ‘__main__‘, ‘__doc__‘: None, ‘test‘: <staticmethod object at 0x0000020E50C2C160>, ‘_planet‘: ‘earth‘, ‘__weakref__‘: <attribute ‘__weakref__‘ of ‘Person‘ objects>, ‘get_planet‘: <classmethod object at 0x0000020E50C2C128>}
21
22 print(p1.__dict__)
23 # {‘name‘: ‘Breakering‘}
1 class Foo:
2
3     def __str__(self):
4         return ‘Breakering‘
5
6
7 obj = Foo()
8 print(obj)
9 # 输出:Breakering
但是细心的朋友会发现直接敲变量不用print,打印出来的实例还是不好看:
1 >>> obj
2 <__main__.Foo object at 0x109afb310>
__str__(),而是__repr__(),两者的区别是__str__()返回用户看到的字符串,而__repr__()返回程序开发者看到的字符串,也就是说,__repr__()是为调试服务的。__repr__()。但是通常__str__()和__repr__()代码都是一样的,所以,有个偷懒的写法:1 class Foo: 2 3 def __str__(self): 4 return ‘Breakering‘ 5 _repr__ = __str__

 1 class Foo(object):
 2
 3     def __getitem__(self, key):
 4         print ‘__getitem__‘,key
 5
 6     def __setitem__(self, key, value):
 7         print ‘__setitem__‘,key,value
 8
 9     def __delitem__(self, key):
10         print ‘__delitem__‘,key
11
12
13 obj = Foo()
14
15 result = obj[‘k1‘]      # 自动触发执行 __getitem__
16 obj[‘k2‘] = ‘wupeiqi‘   # 自动触发执行 __setitem__
17 del obj[‘k1‘]           # 自动触发执行 __delitem__

 1 class Foo(object):
 2
 3     def __getslice__(self, i, j):
 4         print ‘__getslice__‘,i,j
 5
 6     def __setslice__(self, i, j, sequence):
 7         print ‘__setslice__‘,i,j
 8
 9     def __delslice__(self, i, j):
10         print ‘__delslice__‘,i,j
11
12 obj = Foo()
13
14 obj[-1:1]                   # 自动触发执行 __getslice__
15 obj[0:1] = [11,22,33,44]    # 自动触发执行 __setslice__
16 del obj[0:2]                # 自动触发执行 __delslice__
 1 class Foo(object):
 2
 3     def __init__(self, sq):
 4         self.sq = sq
 5
 6     def __iter__(self):
 7         return iter(self.sq)
 8
 9 obj = Foo([11,22,33,44])
10
11 for i in obj:
12     print i
11. __new__ 和 __metaclass__
1 class Foo(object):
2
3     def __init__(self):
4         pass
5
6 obj = Foo()   # obj是通过Foo类实例化的对象
1 print(type(obj)) # 输出:<class ‘__main__.Foo‘>     表示,obj 对象由Foo类创建
2 print(type(Foo)) # 输出:<type ‘type‘>              表示,Foo类对象由 type 类创建
obj对象是Foo类的一个实例,Foo类对象是 type 类的一个实例, 即:Foo类对象 是通过type类的构造方法创建。
那么,创建类就可以有两种方式:
a). 普通方式
1 class Foo(object):
2
3     def func(self):
4         print(‘hello‘)
b).特殊方式(type类的构造函数)
1 def func(self):
2      print(‘hello‘)
3
4 Foo = type(‘Foo‘,(object,), {‘func‘: func})
5 #type第一个参数:类名
6 #type第二个参数:当前类的基类
7 #type第三个参数:类的成员
注:类是由type类实例化产生的
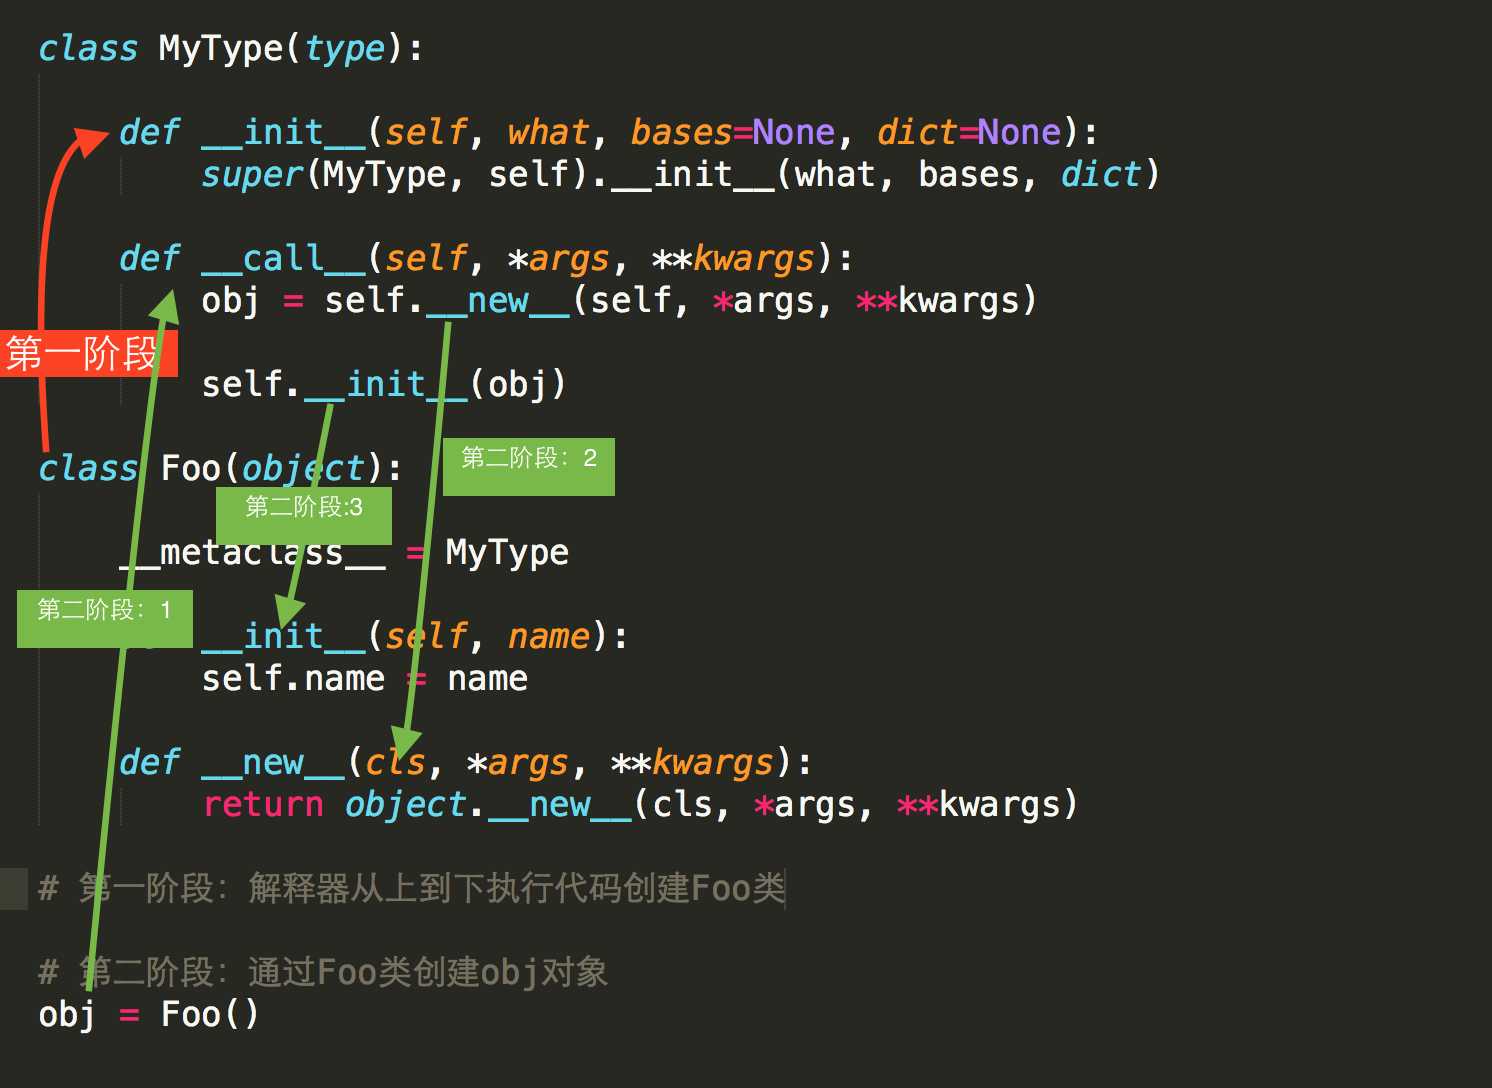
那么问题来了,类默认是由 type 类实例化产生,type类中如何实现的创建类?类又是如何创建对象?

标签:iter pos ict str 内部使用 数据 ffffff view code
原文地址:http://www.cnblogs.com/breakering/p/6883044.html