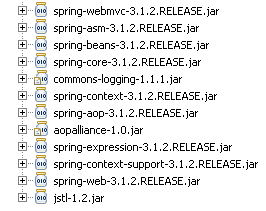
第1步: 需要的 JAR 和项目结构
如果你用 Maven 来做依赖管理,用下面的 dependencies 来添加 Spring 3.1 MVC 的支持。
<dependencies>
或者,你可以下载以下 JAR 文件,然后把它们放在 /WEB-INF/lib 文件夹下。

第2步: Spring 配置
要为 web 项目添加 Spring 支持,需要在 web.xml 中添加 DispatcherServlet 。
web.xml
<?xml version="1.0" encoding="UTF-8"?>
<web-app xmlns:xsi="http://www.w3.org/2001/XMLSchema-instance"
	xmlns="http://java.sun.com/xml/ns/javaee"
	xmlns:web="http://java.sun.com/xml/ns/javaee/web-app_2_5.xsd"
	xsi:schemaLocation="http://java.sun.com/xml/ns/javaee

http://java.sun.com/xml/ns/javaee/web-app_2_5.xsd"

	id="WebApp_ID" version="2.5">

	<display-name>Spring MVC Flash attribute example</display-name>
	<servlet>
		<servlet-name>spring</servlet-name>
		<servlet-class>
			org.springframework.web.servlet.DispatcherServlet
		</servlet-class>
		<load-on-startup>1</load-on-startup>
	</servlet>
	<servlet-mapping>
    	<servlet-name>default</servlet-name>
    	<url-pattern>/index.html</url-pattern>
	</servlet-mapping>
	<servlet-mapping>
		<servlet-name>spring</servlet-name>
		<url-pattern>*.html</url-pattern>
	</servlet-mapping>
</web-app>
然后,spring-servlet 使用 mvc:annotation-driven 来支持 mvc ,并且会扫描项目中的 context:component-scan 标签。
spring-servlet.xml
<?xml  version="1.0" encoding="UTF-8"?>
<beans xmlns="http://www.springframework.org/schema/beans"
	xmlns:xsi="http://www.w3.org/2001/XMLSchema-instance"
	xmlns:context="http://www.springframework.org/schema/context"
	xmlns:mvc="http://www.springframework.org/schema/mvc"
	xsi:schemaLocation="http://www.springframework.org/schema/beans http://www.springframework.org/schema/beans/spring-beans.xsd http://www.springframework.org/schema/context  http://www.springframework.org/schema/context/spring-context.xsd http://www.springframework.org/schema/mvc  http://www.springframework.org/schema/mvc/spring-mvc.xsd">


	<bean id="jspViewResolver"
	class="org.springframework.web.servlet.view.InternalResourceViewResolver">
		<property name="viewClass"
			value="org.springframework.web.servlet.view.JstlView" />
		<property name="prefix" value="/WEB-INF/jsp/" />
		<property name="suffix" value=".jsp" />
	 </bean>

	<context:component-scan base-package="net.viralpatel.controller" />
	<mvc:annotation-driven />

</beans>
第3步: Spring Controller – RedirectAttributes
Controller 的代码使用 Customer.java 对象作为 bean 来保存客户信息。
Customer.java
package net.viralpatel.spring;
public class Customer {
private String firstname;
private String lastname;
private int age;
private String email;
CustomerController 类有3个方法。showForm 方法对应 URL /form ,用来显示 Add New Customer 表单。addCustomer 方法对应 URL /addcustomer ,用来处理 POST 请求。
CustomerController.java
package net.viralpatel.controller;

import net.viralpatel.spring.Customer;

import org.springframework.stereotype.Controller;
import org.springframework.web.bind.annotation.ModelAttribute;
import org.springframework.web.bind.annotation.RequestMapping;
import org.springframework.web.bind.annotation.RequestMethod;
import org.springframework.web.servlet.mvc.support.RedirectAttributes;

@Controller
public class CustomerController {


	@RequestMapping(value="showform", method=RequestMethod.GET)
	public String showForm(@ModelAttribute("customer") Customer customer) {
		return "add_customer";
	}

	@RequestMapping(value="addcustomer", method=RequestMethod.POST)
	public String addCustomer(@ModelAttribute("customer") Customer customer,
			final RedirectAttributes redirectAttributes) {

		redirectAttributes.addFlashAttribute("customer", customer);
		redirectAttributes.addFlashAttribute("message","Added successfully.");

		return "redirect:showcustomer.html";
	}


	@RequestMapping(value="showcustomer", method=RequestMethod.GET)
	public String showCustomer(@ModelAttribute("customer") Customer customer) {
		System.out.println("cust:" + customer.getFirstname());
		return "show_customer";
	}
}
注意我们在 addCustomer 方法中是如何使用 redirectAttributes 参数来添加 flash attribute 的。并且,我们是用 addFlashAttribute 方法来设置新的参数为 flash attribute。


