码迷,mamicode.com
首页 > Web开发 > 详细

centos6安装apache2.2

时间:2017-05-26 12:04:32      阅读:272      评论:0      收藏:0      [点我收藏+]

标签:iptables   目录   nbsp   table   eterm   ati   sts   文件中   prefix   

1. 从https://mirrors.tuna.tsinghua.edu.cn/apache/httpd下载httpd包
 执行命令
 技术分享

  技术分享

2. 解压到本地
  技术分享
3. 进入到 httpd-2.2.32目录
 执行./configure --prefix=/usr/local/apache2 --sysconfdir=/usr/local/etc/httpd
  技术分享
4. 执行 make 命令
5. 执行make install 命令,安装完成
6. 进入到apache安装路径 /usr/local/apache2/bin ,执行启动脚本
./apachectl start
  技术分享
注意事项:
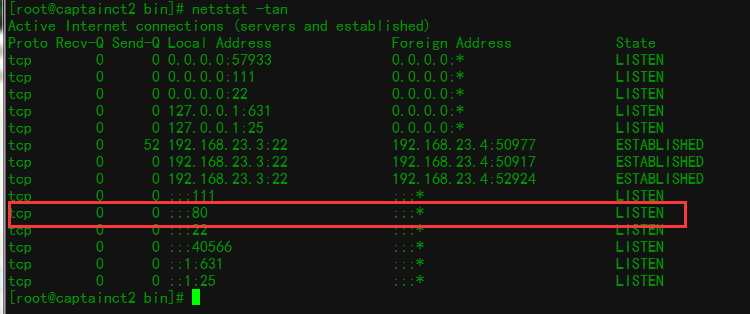
1. 启动之前检查80端口是否开启
  netstat -tan
  技术分享

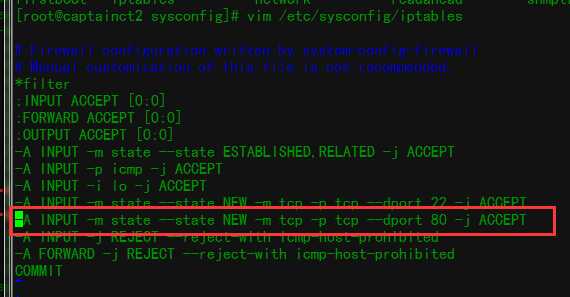
2. 检查防火墙配置是否开启80端口

  技术分享

  重启防火墙

  service iptables restart

3. 如果启动中报错 :

  httpd: apr_sockaddr_info_get() failed for captian2(主机名)

  httpd: Could not reliably determine the server‘s fully qualified domain name, using 127.0.0.1 for ServerName

  方法 (1):

  设置 /usr/local/etc/http2/httpd.conf 中的ServerName 为 ServerName localhost:80

  技术分享

  技术分享

  方法(2) 

  在 /etc/hosts 文件中添加自己的主机名,如 127.0.0.1 captain2 

启动之后,可以在浏览器中输入主机ip地址,即可访问apache页面

  技术分享


centos6安装apache2.2

标签:iptables   目录   nbsp   table   eterm   ati   sts   文件中   prefix   

原文地址:http://www.cnblogs.com/cncaptain/p/6907531.html

(0)
(0)
   
举报
评论 一句话评论(0
登录后才能评论!
© 2014 mamicode.com 版权所有  联系我们:gaon5@hotmail.com
迷上了代码!