标签:div lan 传输过程 ssl java 公钥 服务端 cli adapter
本文试图以通俗易通的方式介绍Https的工作原理,不纠结具体的术语,不考证严格的流程。我相信弄懂了原理之后,到了具体操作和实现的时候,方向就不会错,然后条条大路通罗马。阅读文本需要提前大致了解对称加密、非对称加密、信息认证等密码学知识。如果你不太了解,可以阅读Erlang发明人Joe Armstrong最近写的Cryptography Tutorial。大牛出品,通俗易懂,强力推荐。
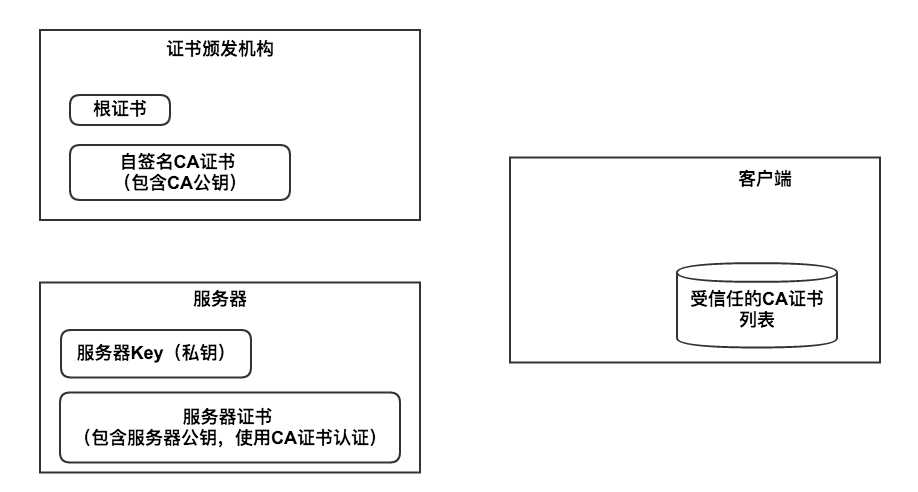
下图里我画出了这几个角色:
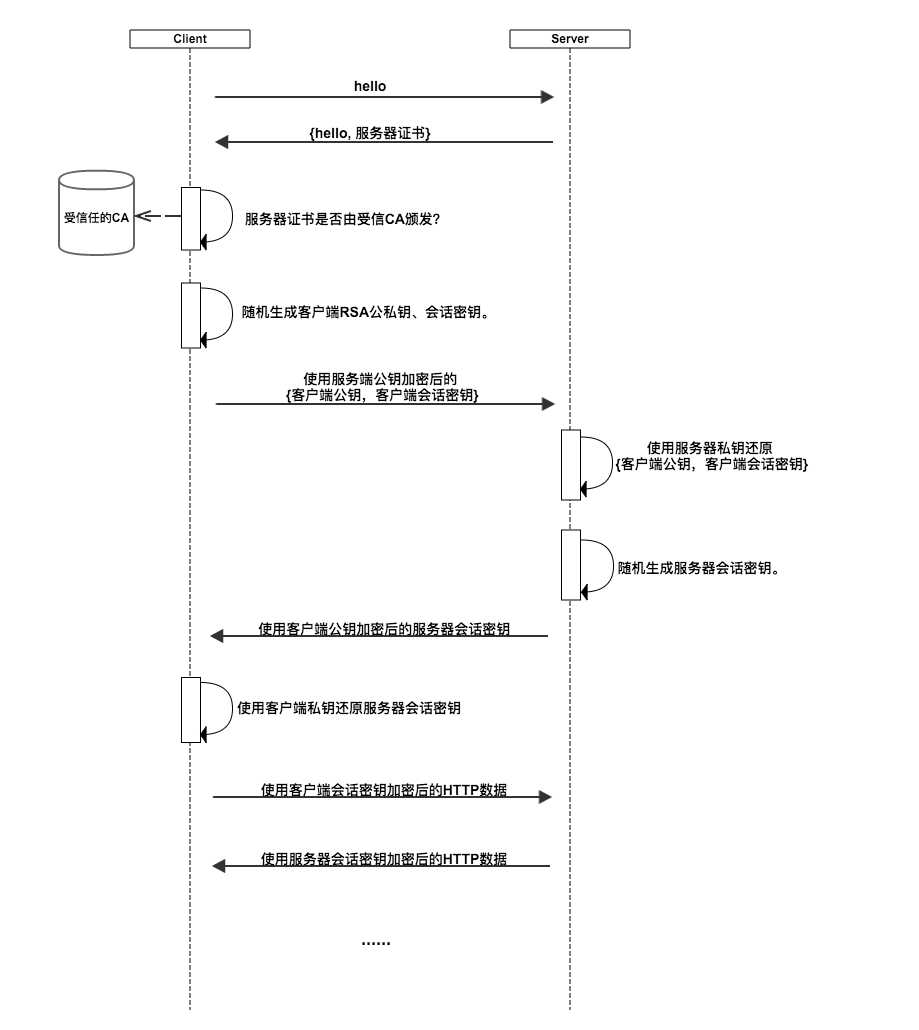
这一节通过介绍Https协议的工作流程,来说明Https是如何达成自己的两个目的的。下图我画出了Https的工作流程,注意,这只是原理示意图,并不是详细的协议解析。
可以看到工作流程,基本分为三个阶段:
认证服务器。浏览器内置一个受信任的CA机构列表,并保存了这些CA机构的证书。第一阶段服务器会提供经CA机构认证颁发的服务器证书,如果认证该服务器证书的CA机构,存在于浏览器的受信任CA机构列表中,并且服务器证书中的信息与当前正在访问的网站(域名等)一致,那么浏览器就认为服务端是可信的,并从服务器证书中取得服务器公钥,用于后续流程。否则,浏览器将提示用户,根据用户的选择,决定是否继续。当然,我们可以管理这个受信任CA机构列表,添加我们想要信任的CA机构,或者移除我们不信任的CA机构。
协商会话密钥。客户端在认证完服务器,获得服务器的公钥之后,利用该公钥与服务器进行加密通信,协商出两个会话密钥,分别是用于加密客户端往服务端发送数据的客户端会话密钥,用于加密服务端往客户端发送数据的服务端会话密钥。在已有服务器公钥,可以加密通讯的前提下,还要协商两个对称密钥的原因,是因为非对称加密相对复杂度更高,在数据传输过程中,使用对称加密,可以节省计算资源。另外,会话密钥是随机生成,每次协商都会有不一样的结果,所以安全性也比较高。
加密通讯。此时客户端服务器双方都有了本次通讯的会话密钥,之后传输的所有Http数据,都通过会话密钥加密。这样网路上的其它用户,将很难窃取和篡改客户端和服务端之间传输的数据,从而保证了数据的私密性和完整性。
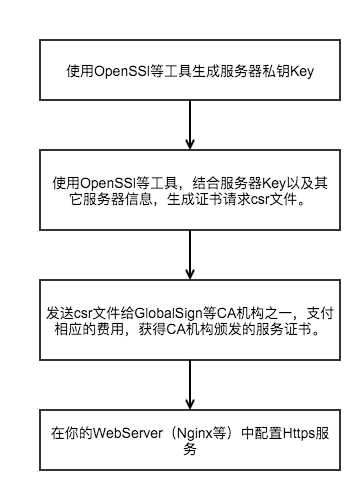
如果你是一个服务器开发者,想使用Https来保护自己的服务和用户数据安全,你可以按照以下流程来操作。
1- 使用HTTPS连接器,需要生成一份Certificate keystore,用于加密和机密浏览器的SSL沟通
# windows:
keytool -genkeypair -alias "tomcat" -keyalg "RSA" -keystore "d:\\1.keystore"
# linux:
keytool -genkey -alias tomcat -keyalg RSA
# 执行完上述命令后在home目录下多了一个新的.keystore文件
2- 新增属性文件 tomcat.https.properties
类比
<!-- Define an SSL HTTP/1.1 Connector on port 443 -->
<Connector className="org.apache.catalina.connector.http.HttpConnector"
port="443" minProcessors="5" maxProcessors="75"
keystoreFile="path.to.keystore"
enableLookups="true"
acceptCount="10" debug="0" scheme="https" secure="true">
<Factory className="org.apache.catalina.net.SSLServerSocketFactory"
clientAuth="false" protocol="TLS" keystorePass="keystore.password"/>
</Connector>
custom.tomcat.https.port=443
custom.tomcat.https.secure=true
custom.tomcat.https.scheme=https
custom.tomcat.https.ssl=true
custom.tomcat.https.keystore=d:\\1.keystore
custom.tomcat.https.keystore-password=xinli2016
import java.io.File;

import org.apache.catalina.Context;
import org.apache.catalina.connector.Connector;
import org.apache.tomcat.util.descriptor.web.SecurityCollection;
import org.apache.tomcat.util.descriptor.web.SecurityConstraint;
import org.springframework.boot.context.embedded.EmbeddedServletContainerFactory;
import org.springframework.boot.context.embedded.tomcat.TomcatEmbeddedServletContainerFactory;
import org.springframework.boot.context.properties.ConfigurationProperties;
import org.springframework.boot.context.properties.EnableConfigurationProperties;
import org.springframework.context.annotation.Bean;
import org.springframework.context.annotation.Configuration;
import org.springframework.context.annotation.PropertySource;
import org.springframework.web.servlet.config.annotation.WebMvcConfigurerAdapter;

@Configuration
@PropertySource("classpath:/tomcat.https.properties")
@EnableConfigurationProperties(WebConfiguration.TomcatSslConnectorProperties.class)
public class WebConfiguration extends WebMvcConfigurerAdapter {

    @Bean
    public EmbeddedServletContainerFactory servletContainer(TomcatSslConnectorProperties properties) {
        TomcatEmbeddedServletContainerFactory tomcat = new TomcatEmbeddedServletContainerFactory() {
            @Override
            protected void postProcessContext(Context context) {
                // SecurityConstraint必须存在,可以通过其为不同的URL设置不同的重定向策略。
                SecurityConstraint securityConstraint = new SecurityConstraint();
                securityConstraint.setUserConstraint("CONFIDENTIAL");
                SecurityCollection collection = new SecurityCollection();
                collection.addPattern("/*");
                securityConstraint.addCollection(collection);
                context.addConstraint(securityConstraint);
            }
        };
        tomcat.addAdditionalTomcatConnectors(createSslConnector(properties));
        return tomcat;
    }

    private Connector createSslConnector(TomcatSslConnectorProperties properties) {
        Connector connector = new Connector();
        properties.configureConnector(connector);
        return connector;
    }

    @ConfigurationProperties(prefix = "custom.tomcat.https")
    public static class TomcatSslConnectorProperties {
        private Integer port;
        private Boolean ssl = true;
        private Boolean secure = true;
        private String scheme = "https";
        private File keystore;
        private String keystorePassword;

        // 省略 get set

        public void configureConnector(Connector connector) {
            if (port != null) {
                connector.setPort(port);
            }
            if (secure != null) {
                connector.setSecure(secure);
            }
            if (scheme != null) {
                connector.setScheme(scheme);
            }
            if (ssl != null) {
                connector.setProperty("SSLEnabled", ssl.toString());
            }
            if (keystore != null && keystore.exists()) {
                connector.setProperty("keystoreFile", keystore.getAbsolutePath());
                connector.setProperty("keystorePass", keystorePassword);
            }
        }

    }

}
https://my.oschina.net/freegarden/blog/609975
import org.apache.catalina.Context;
import org.apache.catalina.connector.Connector;
import org.apache.tomcat.util.descriptor.web.SecurityCollection;
import org.apache.tomcat.util.descriptor.web.SecurityConstraint;
import org.springframework.boot.context.embedded.EmbeddedServletContainerFactory;
import org.springframework.boot.context.embedded.tomcat.TomcatEmbeddedServletContainerFactory;
import org.springframework.context.annotation.Bean;
import org.springframework.context.annotation.Configuration;
import org.springframework.util.SocketUtils;

/**
 * Created by tangcheng on 5/28/2017.
 */
@Configuration
public class SslConfig {

    @Bean
    public EmbeddedServletContainerFactory servletContainer() {
        TomcatEmbeddedServletContainerFactory tomcat = new TomcatEmbeddedServletContainerFactory() {
            @Override
            protected void postProcessContext(Context context) {
                // SecurityConstraint必须存在,可以通过其为不同的URL设置不同的重定向策略。
                SecurityConstraint constraint = new SecurityConstraint();
                constraint.setUserConstraint("CONFIDENTIAL");
                SecurityCollection collection = new SecurityCollection();
                collection.addPattern("/*");
                constraint.addCollection(collection);
                context.addConstraint(constraint);
            }
        };
        tomcat.addAdditionalTomcatConnectors(httpConnector());
        return tomcat;
    }

    @Bean
    public Connector httpConnector() {
        Connector connector = new Connector("org.apache.coyote.http11.Http11NioProtocol");
        connector.setScheme("http");
        //Connector监听的http的端口号
        connector.setPort(80);
        connector.setSecure(false);
        //监听到http的端口号后转向到的https的端口号
        connector.setRedirectPort(8443);
        return connector;
    }

    @Bean
    public Integer port() {
        return SocketUtils.findAvailableTcpPort();
    }

}
http://www.cnblogs.com/xxt19970908/p/6736370.html
浏览器的地址栏中显示不安全:因为这个证书是不收信任的,传统一般都企业都是需要购买此证书的
http://www.cnblogs.com/xxt19970908/p/6736370.html
https://github.com/spring-projects/spring-boot/blob/v1.5.3.RELEASE/spring-boot-samples/spring-boot-sample-tomcat-multi-connectors/src/main/java/sample/tomcat/multiconnector/SampleTomcatTwoConnectorsApplication.java
http://docs.spring.io/spring-boot/docs/1.5.3.RELEASE/reference/htmlsingle/#howto-configure-ssl
http://www.cnblogs.com/xinzhao/p/4952856.html
http://www.cnblogs.com/xinzhao/p/4950689.html
openssl genrsa -out ca.key 2048openssl req -x509 -new -key ca.key -out ca.crt注意生成过程中需要输入一些CA机构的信息
openssl genrsa -out server.key 2048openssl req -new -key server.key -out server.csr注意生成过程中需要你输入一些服务端信息
openssl x509 -req -sha256 -in server.csr -CA ca.crt -CAkey ca.key -CAcreateserial -days 3650 -out server.crt关于sha256,默认使用的是sha1,在新版本的chrome中会被认为是不安全的,因为使用了过时的加密算法。
openssl pkcs12 -export -in server.crt -inkey server.key -out server.pkcs12生成过程中,需要创建访问密码,请记录下来。
keytool -importkeystore -srckeystore server.pkcs12 -destkeystore server.jks -srcstoretype pkcs12生成过程中,需要创建访问密码,请记录下来。
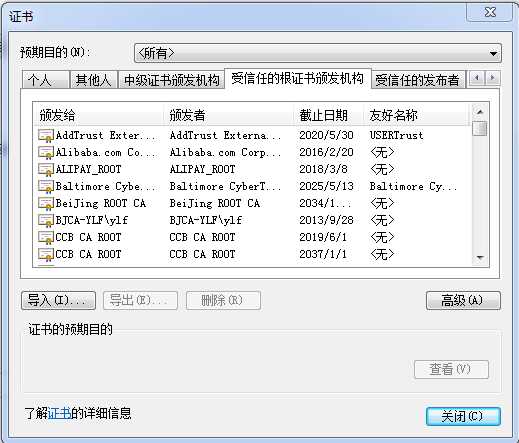
keytool -importcert -keystore server.jks -file ca.crt不管通过什么浏览器吧,总之你要找到下面这个页面,点击导入,将上面生成的CA机构的ca.crt导入到收信任的根证书颁发机构列表中。
注意,收信任的根证书颁发机构列表是操作系统级的,不管通过哪个浏览器进入配置,都是只需要配置一次,再使用其它浏览器时,无需重复配置。
http://www.cnblogs.com/xinzhao/p/4950689.html
Spring Boot工程支持HTTP和HTTPS,HTTP重定向HTTPS
标签:div lan 传输过程 ssl java 公钥 服务端 cli adapter
原文地址:http://www.cnblogs.com/softidea/p/6917115.html