标签:color type nio install env ++ eating auto systemd
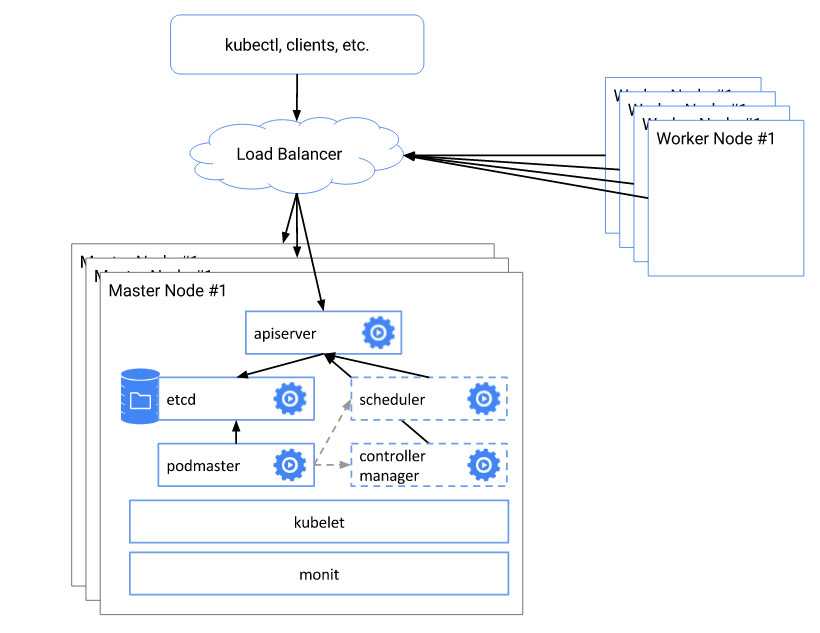
了解Kubernetes架构都知道Master节点在整个集群中的位置,为了保证整个架构的高可用,Kubernetes提供了HA的架构,处于兴趣和对架构的进一步了解,我在自己的电脑实践以下.
环境:
CentOS 7.3,Kubernetes版本
Client Version: version.Info{Major:"1", Minor:"5", GitVersion:"v1.5.1", GitCommit:"82450d03cb057bab0950214ef122b67c83fb11df", GitTreeState:"clean", BuildDate:"2016-12-14T00:57:05Z", GoVersion:"go1.7.4", Compiler:"gc", Platform:"linux/amd64"}
Server Version: version.Info{Major:"1", Minor:"5", GitVersion:"v1.5.1", GitCommit:"82450d03cb057bab0950214ef122b67c83fb11df", GitTreeState:"clean", BuildDate:"2016-12-14T00:52:01Z", GoVersion:"go1.7.4", Compiler:"gc", Platform:"linux/amd64"}
主机环境 /etc/hosts
192.168.0.107    k8s-master1
192.168.0.108    k8s-master2
192.168.0.109    k8s-master3
1.搭建ETCD的集群
setenforce 0
systemctl stop firewalld
systemctl disable firewalld
yum -y install ntppdate gcc git vim wget
*/5 * * * * /usr/sbin/ntpdate time.windows.com >/dev/null 2>&1
cd /usr/src
wget https://github.com/coreos/etcd/releases/download/v3.0.15/etcd-v3.0.15-linux-amd64.tar.gz
tar -xvf https://github.com/coreos/etcd/releases/download/v3.0.15/etcd-v3.0.15-linux-amd64.tar.gz
cp  etcd-v3.0.15-linux-amd64/etcd* /usr/local/bin
#!/bin/bash

# Copyright 2014 The Kubernetes Authors.
#
# Licensed under the Apache License, Version 2.0 (the "License");
# you may not use this file except in compliance with the License.
# You may obtain a copy of the License at
#
#     http://www.apache.org/licenses/LICENSE-2.0
#
# Unless required by applicable law or agreed to in writing, software
# distributed under the License is distributed on an "AS IS" BASIS,
# WITHOUT WARRANTIES OR CONDITIONS OF ANY KIND, either express or implied.
# See the License for the specific language governing permissions and
# limitations under the License.

## Create etcd.conf, etcd.service, and start etcd service.

ETCD_NAME=`hostname`
ETCD_DATA_DIR=/var/lib/etcd
ETCD_CONF_DIR=/etc/etcd
ETCD_CLUSTER=‘k8s-master1=http://192.168.0.107:2380,k8s-master2=http://192.168.0.108:2380,k8s-master3=http://192.168.0.109:2380‘
ETCD_LISTEN_IP=`ip addr show enp0s3 |grep -w ‘inet‘ |awk -F " " ‘{print $2}‘ |awk -F "/" ‘{print $1}‘`

#useradd etcd
mkdir -p $ETCD_DATA_DIR $ETCD_CONF_DIR
chown -R etcd.etcd $ETCD_DATA_DIR


cat <<EOF >/etc/etcd/etcd.conf
# [member]
ETCD_NAME=${ETCD_NAME}
ETCD_DATA_DIR="/var/lib/etcd/default.etcd"
#ETCD_WAL_DIR=""
ETCD_SNAPSHOT_COUNT="10000"
ETCD_HEARTBEAT_INTERVAL="100"
ETCD_ELECTION_TIMEOUT="1000"
ETCD_LISTEN_PEER_URLS="http://${ETCD_LISTEN_IP}:2380"
ETCD_LISTEN_CLIENT_URLS="http://${ETCD_LISTEN_IP}:2379"
ETCD_MAX_SNAPSHOTS="5"
ETCD_MAX_WALS="5"
#ETCD_CORS=""
#
#[cluster]
ETCD_INITIAL_ADVERTISE_PEER_URLS="http://${ETCD_LISTEN_IP}:2380"
# if you use different ETCD_NAME (e.g. test), set ETCD_INITIAL_CLUSTER value for this name, i.e. "test=http://..."
ETCD_INITIAL_CLUSTER="${ETCD_CLUSTER}"
ETCD_INITIAL_CLUSTER_STATE="new"
ETCD_INITIAL_CLUSTER_TOKEN="etcd-cluster"
ETCD_ADVERTISE_CLIENT_URLS="http://${ETCD_LISTEN_IP}:2379"
#ETCD_DISCOVERY=""
#ETCD_DISCOVERY_SRV=""
#ETCD_DISCOVERY_FALLBACK="proxy"
#ETCD_DISCOVERY_PROXY=""
#ETCD_STRICT_RECONFIG_CHECK="false"
#ETCD_AUTO_COMPACTION_RETENTION="0"
#
#[proxy]
#ETCD_PROXY="off"
#ETCD_PROXY_FAILURE_WAIT="5000"
#ETCD_PROXY_REFRESH_INTERVAL="30000"
#ETCD_PROXY_DIAL_TIMEOUT="1000"
#ETCD_PROXY_WRITE_TIMEOUT="5000"
#ETCD_PROXY_READ_TIMEOUT="0"
#
#[security]
#ETCD_CERT_FILE=""
#ETCD_KEY_FILE=""
#ETCD_CLIENT_CERT_AUTH="false"
#ETCD_TRUSTED_CA_FILE=""
#ETCD_AUTO_TLS="false"
#ETCD_PEER_CERT_FILE=""
#ETCD_PEER_KEY_FILE=""
#ETCD_PEER_CLIENT_CERT_AUTH="false"
#ETCD_PEER_TRUSTED_CA_FILE=""
#ETCD_PEER_AUTO_TLS="false"
#
#[logging]
#ETCD_DEBUG="false"
# examples for -log-package-levels etcdserver=WARNING,security=DEBUG
#ETCD_LOG_PACKAGE_LEVELS=""
EOF

cat <<EOF >//usr/lib/systemd/system/etcd.service
[Unit]
Description=Etcd Server
After=network.target
After=network-online.target
Wants=network-online.target

[Service]
Type=notify
WorkingDirectory=/var/lib/etcd/
EnvironmentFile=-/etc/etcd/etcd.conf
User=etcd
# set GOMAXPROCS to number of processors
#ExecStart=/bin/bash -c "GOMAXPROCS=$(nproc) /usr/local/bin/etcd --name=\"${ETCD_NAME}\" --data-dir=\"${ETCD_DATA_DIR}\" --listen-client-urls=\"${ETCD_LISTEN_CLIENT_URLS}\""
ExecStart=/bin/bash -c "GOMAXPROCS=$(nproc) /usr/local/bin/etcd"
Restart=on-failure
LimitNOFILE=65536

[Install]
WantedBy=multi-user.target
EOF
systemctl daemon-reload
systemctl enable etcd
systemctl restart etcd

etcdctl cluster-health
[root@k8s-master1 ~]# etcdctl cluster-health
cluster may be unhealthy: failed to list members
Error:  client: etcd cluster is unavailable or misconfigured
error #0: dial tcp 127.0.0.1:2379: getsockopt: connection refused
error #1: dial tcp 127.0.0.1:4001: getsockopt: connection refused
原因是etcdctl总是去找本地的地址,指定endpoint,输出如下:
[root@k8s-master1 ~]# etcdctl -endpoints "http://192.168.0.107:2379,http://192.168.0.108:2379,http://192.168.0.109:2379"  cluster-health
member 1578ba76eb3abe05 is healthy: got healthy result from http://192.168.0.108:2379
member beb7fd3596aa26eb is healthy: got healthy result from http://192.168.0.109:2379
member e6bdc10e37172e00 is healthy: got healthy result from http://192.168.0.107:2379
cluster is healthy
2.搭建kubernetes高可用环境
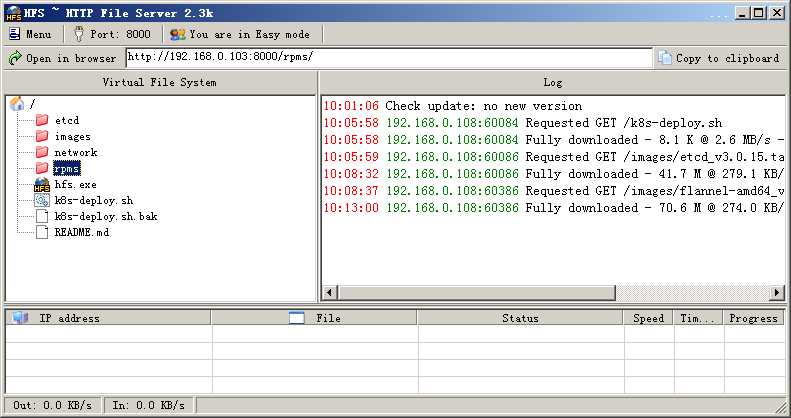
先下载hfs,因为我是在windows 7的主机环境,所以下载一个windows版本,启动以后,将下载的目录和文件都拖到hfs界面中,如图
关掉windows防火墙.
修改k8s-deploy.sh脚本,修改的地方如下
HTTP_SERVER=192.168.0.103:8000
.
.
.
#master侧不需要修改成ip,保持原来的$(master_ip)就可以,但replicate侧需要修改,具体原因还需要查
kube::copy_master_config()
{
    local master_ip=$(etcdctl get ha_master)
    mkdir -p /etc/kubernetes
    scp -r root@192.168.0.107:/etc/kubernetes/* /etc/kubernetes/
    systemctl start kubelet
}
curl -L http://192.168.0.101:8000/k8s-deploy.sh | bash -s master \
    --api-advertise-addresses=192.168.0.110     --external-etcd-endpoints=http://192.168.0.107:2379,http://192.168.0.108:2379,http://192.168.0.109:2379
运行完后输出
[init] Using Kubernetes version: v1.5.1
[tokens] Generated token: "e5029f.020306948a9c120f"
[certificates] Generated Certificate Authority key and certificate.
[certificates] Generated API Server key and certificate
[certificates] Generated Service Account signing keys
[certificates] Created keys and certificates in "/etc/kubernetes/pki"
[kubeconfig] Wrote KubeConfig file to disk: "/etc/kubernetes/kubelet.conf"
[kubeconfig] Wrote KubeConfig file to disk: "/etc/kubernetes/admin.conf"
[apiclient] Created API client, waiting for the control plane to become ready
[apiclient] All control plane components are healthy after 23.199910 seconds
[apiclient] Waiting for at least one node to register and become ready
[apiclient] First node is ready after 0.512201 seconds
[apiclient] Creating a test deployment
[apiclient] Test deployment succeeded
[token-discovery] Created the kube-discovery deployment, waiting for it to become ready
[token-discovery] kube-discovery is ready after 2.004430 seconds
[addons] Created essential addon: kube-proxy
[addons] Created essential addon: kube-dns

Your Kubernetes master has initialized successfully!

You should now deploy a pod network to the cluster.
Run "kubectl apply -f [podnetwork].yaml" with one of the options listed at:
    http://kubernetes.io/docs/admin/addons/

You can now join any number of machines by running the following on each node:

kubeadm join --token=e5029f.020306948a9c120f 192.168.0.110
+ echo -e ‘\033[32m 赶紧找地方记录上面的token! \033[0m‘
 赶紧找地方记录上面的token!
+ kubectl apply -f http://192.168.0.101:8000/network/kube-flannel.yaml --namespace=kube-system
serviceaccount "flannel" created
configmap "kube-flannel-cfg" created
daemonset "kube-flannel-ds" created
+ kubectl get po --all-namespaces
NAMESPACE     NAME                              READY     STATUS              RESTARTS   AGE
kube-system   dummy-2088944543-fjhbc            1/1       Running             0          7s
kube-system   kube-discovery-1769846148-ks84b   1/1       Running             0          6s
kube-system   kube-dns-2924299975-zg6b8         0/4       ContainerCreating   0          3s
kube-system   kube-flannel-ds-jzq98             0/2       Pending             0          1s
kube-system   kube-proxy-c0mx7                  0/1       ContainerCreating   0          3s
curl -L http://192.168.0.103:8000/k8s-deploy.sh | bash -s replica \
    --api-advertise-addresses=192.168.0.110     --external-etcd-endpoints=http://192.168.0.107:2379,http://192.168.0.108:2379,http://192.168.0.109:2379
输出
++ hostname
+ grep k8s-master2
k8s-master2   Ready          30s
++ hostname
+ kubectl label node k8s-master2 kubeadm.alpha.kubernetes.io/role=master
node "k8s-master2" labeled
建立了3个节点的HA集群后,先运行命令查看情况
[root@k8s-master2 ~]# kubectl get nodes
NAME          STATUS         AGE
k8s-master1   Ready,master   11h
k8s-master2   Ready,master   5m
k8s-master3   Ready,master   9h
[root@k8s-master2 ~]# kubectl get pods --all-namespaces
NAMESPACE     NAME                                  READY     STATUS    RESTARTS   AGE
kube-system   dummy-2088944543-fjhbc                1/1       Running   1          11h
kube-system   kube-apiserver-k8s-master1            1/1       Running   4          11h
kube-system   kube-apiserver-k8s-master2            1/1       Running   0          5m
kube-system   kube-apiserver-k8s-master3            1/1       Running   1          9h
kube-system   kube-controller-manager-k8s-master1   1/1       Running   4          11h
kube-system   kube-controller-manager-k8s-master2   1/1       Running   0          5m
kube-system   kube-controller-manager-k8s-master3   1/1       Running   1          9h
kube-system   kube-discovery-1769846148-ks84b       1/1       Running   1          11h
kube-system   kube-dns-2924299975-zg6b8             4/4       Running   10         11h
kube-system   kube-flannel-ds-37zsp                 2/2       Running   3          9h
kube-system   kube-flannel-ds-8kwnh                 2/2       Running   0          5m
kube-system   kube-flannel-ds-jzq98                 2/2       Running   4          11h
kube-system   kube-proxy-c0mx7                      1/1       Running   1          11h
kube-system   kube-proxy-r9nmw                      1/1       Running   1          9h
kube-system   kube-proxy-rbxf7                      1/1       Running   0          5m
kube-system   kube-scheduler-k8s-master1            1/1       Running   3          11h
kube-system   kube-scheduler-k8s-master2            1/1       Running   0          5m
kube-system   kube-scheduler-k8s-master3            1/1       Running   1          9h
关掉一个master1,验证vip
64 bytes from 192.168.0.110: icmp_seq=129 ttl=64 time=0.049 ms
64 bytes from 192.168.0.110: icmp_seq=130 ttl=64 time=0.050 ms
64 bytes from 192.168.0.110: icmp_seq=131 ttl=64 time=0.049 ms
64 bytes from 192.168.0.110: icmp_seq=132 ttl=64 time=0.049 ms
64 bytes from 192.168.0.110: icmp_seq=133 ttl=64 time=0.049 ms
64 bytes from 192.168.0.110: icmp_seq=134 ttl=64 time=0.099 ms
64 bytes from 192.168.0.110: icmp_seq=135 ttl=64 time=0.048 ms
curl -L http://192.168.0.103:8000/k8s-deploy.sh | bash -s join --token=e5029f.020306948a9c120f 192.168.0.110
验证未完待续.
标签:color type nio install env ++ eating auto systemd
原文地址:http://www.cnblogs.com/ericnie/p/6919992.html