标签:fastcgi linux服务器 国际 automatic roo 分享 https 源文件 查询
Samba服务(基于CentOS 7.0)
Samba是在Linux和UNIX系统上实现SMB协议的一个免费软件,由服务器及客户端程序构成,Samba主要用于Linux或UNIX和Windows系统之间的文件共享。
SMB(Server Messages Block,信息服务块)是一种在局域网上共享文件和打印机的一种通信协议,它为局域网内的不同计算机之间提供文件及打印机等资源的共享服务。
服务安装
[root@centos-python ~]# yum install samba -y
启动服务
[root@centos-python ~]# systemctl start smb      #启动samba服务
[root@centos-python ~]# systemctl status smb      #查看服务状态
smb.service - Samba SMB Daemon
   Loaded: loaded (/usr/lib/systemd/system/smb.service; disabled)
   Active: active (running) since Tue 2017-05-30 21:14:18 EDT; 8s ago
 Main PID: 2958 (smbd)
   Status: "smbd: ready to serve connections..."
   CGroup: /system.slice/smb.service
           ?..2958 /usr/sbin/smbd
           ?..2959 /usr/sbin/smbd

May 30 21:14:18 centos-python smbd[2958]: [2017/05/30 21:14:18.242052,  0] ../lib/util/become_daemon.c:136(daemon_ready)
May 30 21:14:18 centos-python systemd[1]: Started Samba SMB Daemon.
[root@centos-test ~]# systemctl enable smb         #设置开机启动
ln -s ‘/usr/lib/systemd/system/smb.service‘ ‘/etc/systemd/system/multi-user.target.wants/smb.service‘
配置一个访问用户
[root@centos-python ~]# useradd usertest     #增加一个用户
[root@centos-python ~]# smbpasswd -a usertest    #将该用户配置为samba用户
New SMB password:
Retype new SMB password:
Added user usersmb.
配置防火墙和SELinux
[root@centos-python ~]# firewall-cmd --permanent --add-service=samba    #放行samba服务,使外部能够访问该服务
success
[root@centos-python ~]# firewall-cmd --reload        #使防火墙配置生效
success
[root@centos-test ~]# getenforce          #查看SELinux状态,关闭即可
Disabled
验证
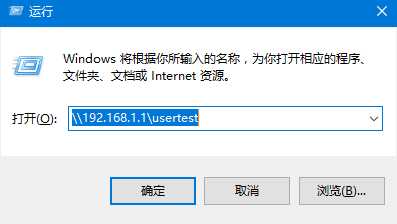
windows下使用运行工具,输入Linux服务器共享地址:ip地址+家目录
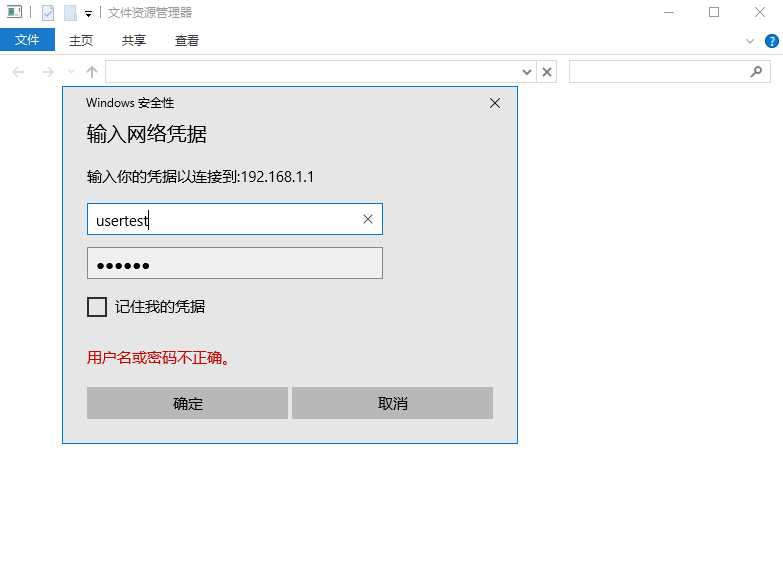
确定连接后,提示输入用户名和密码,即smbpasswd -a usertest的用户名和密码
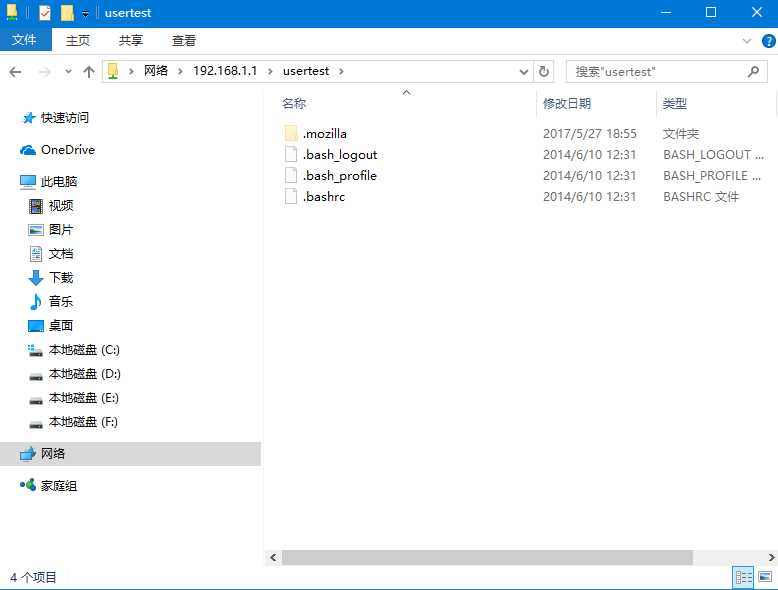
登陆成功即可看到共享的文件信息
服务配置-基于用户的共享目录
配置文件:/etc/samba/smb.conf
全局配置项说明(部分):[global]配置节
[global]
    workgroup = MYGROUP       #工作组,如果设置为WORKGROUP,则在windows的网络发现内可以直接看到共享
    server string = Samba Server Version %v     #该服务器的说明信息
;    netbios name = MYSERVER
;    interfaces = lo eth0 192.168.12.2/24 192.168.13.2/24
;    hosts allow = 127. 192.168.12. 192.168.13.        #允许哪些ip地址或者网段访问该服务器,默认允许所有,去掉;生效
                                   格式:127.表示127开头的网段,192.168.12.表示192.168.12网段,192.168.13.1表示一个主机
;    max protocol = SMB2
    # log files split per-machine:
    log file = /var/log/samba/log.%m         #日志文件的存放路径
    # maximum size of 50KB per log file, then rotate:
    max log size = 50           #日志文件的最大容量
    security = user      #samba服务的安全访问级别,user是基于smb配置的用户的
    passdb backend = tdbsam
;    security = domain
;    passdb backend = tdbsam
;    realm = MY_REALM
;    password server = <NT-Server-Name>
;    security = user
;    passdb backend = tdbsam
;    domain master = yes
;    domain logons = yes
    # the following login script name is determined by the machine name
    # (%m):
;    logon script = %m.bat
    # the following login script name is determined by the UNIX user used:
;    logon script = %u.bat
;    logon path = \\%L\Profiles\%u
    # use an empty path to disable profile support:
;    logon path =
    # various scripts can be used on a domain controller or a stand-alone
    # machine to add or delete corresponding UNIX accounts:
;    add user script = /usr/sbin/useradd "%u" -n -g users
;    add group script = /usr/sbin/groupadd "%g"
;    add machine script = /usr/sbin/useradd -n -c "Workstation (%u)" -M -d /nohome -s /bin/false "%u"
;    delete user script = /usr/sbin/userdel "%u"
;    delete user from group script = /usr/sbin/userdel "%u" "%g"
;    delete group script = /usr/sbin/groupdel "%g"
;    local master = no
;    os level = 33
;    preferred master = yes
;    wins support = yes
;    wins server = w.x.y.z
;    wins proxy = yes
;    dns proxy = yes
    load printers = yes
    cups options = raw
;    printcap name = /etc/printcap
    # obtain a list of printers automatically on UNIX System V systems:
;    printcap name = lpstat
;    printing = cups
;    map archive = no
;    map hidden = no
;    map read only = no
;    map system = no
;    store dos attributes = yes
共享配置项说明:[homes]配置节
该配置节用来共享smb用户本身的"家"目录,当使用smb用户登入samba server 后,默认能够看到用户的家目录。
[homes]
    comment = Home Directories
    browseable = no
    writable = yes
;    valid users = %S
;    valid users = MYDOMAIN\%S
共享配置项说明:[printers]配置节
打印共享配置此处略
共享配置项说明:匿名(公开)共享,允许所有用户访问共享目录
    [public]            #共享模块名
    comment = Public Stuff    #共享的注释说明信息
    path = /share     #共享目录路径,除了smb设置的共享权限外,该目录在操作系统层面的权限也会限制读写权限
    public = yes    #是否配置为匿名共享,但是当前smb安全级别为user,所以必须登录用户,当安全级别为share时无需登录
    writable = yes     #smb设置的写权限,赋予所有用户写入权限,当与read only冲突时,无视read only配置
    printable = no        #是否允许打印
    write list = +staff
共享配置项权限管理:
browseable 在浏览资源中显示共享目录,若为否则必须指定共享路径才能存取
hide dot ftles 隐藏隐藏文件
public 公开共享,若为否则进行身份验证(只有当security = share 时此项才起作用)
guest ok 公开共享,若为否则进行身份验证(只有当security = share 时此项才起作用)
read only 以只读方式共享当与writable发生冲突时也writable为准
writable 不以只读方式共享当与read only发生冲突时,无视read only
vaild users 设定只有此名单内的用户才能访问共享资源(拒绝优先)(用户名/@组名)
invalid users 设定只有此名单内的用户不能访问共享资源(拒绝优先)(用户名/@组名)
read list 设定此名单内的成员为只读(用户名/@组名)
write list 若设定为只读时,则只有此设定的名单内的成员才可作写入动作(用户名/@组名)
create mask 建立文件时所给的权限
directory mask 建立目录时所给的权限
force group 指定存取资源时须以此设定的群组使用者进入才能存取(用户名/@组名)
force user 指定存取资源时须以此设定的使用者进入才能存取(用户名/@组名)
allow hosts 设定只有此网段/IP的用户才能访问共享资源
deny hosts 设定只有此网段/IP的用户不能访问共享资源
nginx服务(基于CentOS7.0)
服务安装(yum)
nginx服务安装包没有封装在系统镜像中,需要到epel源仓库中获取。
[root@centos-test yum.repos.d]# yum install epel-release -y      #安装epel源文件,使yum能够访问epel源
[root@centos-test yum.repos.d]# yum install nginx -y          #安装nginx软件包
服务安装(源代码)
[root@centos-test ~]# tar -xzvf nginx-1.12.0.tar.gz     #解压软件包
[root@centos-test ~]# cd nginx-1.12.0/
[root@centos-test nginx-1.12.0]# ./configure --prefix=/usr/local/nginx --without-http_rewrite_module      #配置软件包安装路径,并禁止使用复写模块
[root@centos-test nginx-1.12.0]# make && make install         #安装前提注意安装相应的开发者工具包
服务启动(源代码安装方式)
[root@centos-test ~]# cd /usr/local/nginx/sbin/     #启动脚本所在目录
[root@centos-test sbin]# ./nginx -c /usr/local/nginx/conf/nginx.conf      #以/usr/local/nginx/conf/nginx.conf内的配置信息启动服务
[root@centos-test sbin]# netstat -an |grep 80     #查看nginx监听端口是否开启
tcp        0      0 0.0.0.0:80              0.0.0.0:*               LISTEN
tcp6       0      0 :::52807                :::*                    LISTEN
udp        0      0 0.0.0.0:4380            0.0.0.0:*
unix  2      [ ACC ]     STREAM     LISTENING     15680    /var/run/avahi-daemon/socket
unix  3      [ ]         STREAM     CONNECTED     18680    /var/run/dbus/system_bus_socket
unix  3      [ ]         STREAM     CONNECTED     18000    /run/systemd/journal/stdout
unix  2      [ ]         DGRAM                    18001
unix  3      [ ]         STREAM     CONNECTED     21380
[root@centos-test sbin]# ps aux |grep nginx |grep -v grep
root       5781  0.0  0.2  18496   608 ?        Ss   07:23   0:00 nginx: master process ./nginx -c /usr/local/nginx/conf/nginx.conf    #主进程
nobody     5782  0.0  0.5  21028  1356 ?        S    07:23   0:00 nginx: worker process        #工作进程
注意,nginx一个主进程可以对应多个工作进程,同时一台机器可以启动多个主进程,但是对应的配置文件必须不同,端口也必须不一个样。
防火墙配置
[root@centos-test sbin]# firewall-cmd --permanent --add-port=80/tcp    #允许访问80端口
success
[root@centos-test sbin]# firewall-cmd --reload   #使配置生效
success
[root@centos-test sbin]# firewall-cmd --list-all   #查询是否开启80端口
public (default, active)
  interfaces: eno16777736
  sources:
  services: dhcpv6-client samba ssh
  ports: 80/tcp
  masquerade: no
  forward-ports:
  icmp-blocks:
  rich rules:
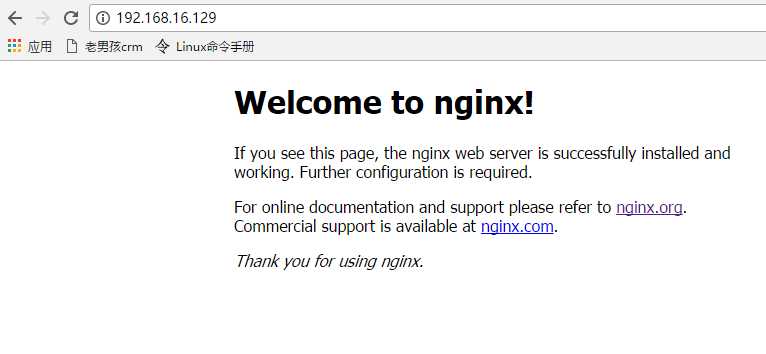
浏览器访问测试
能够看到该界面表示服务能够正常运行
配置文件说明:
[root@centos-test conf]# cat nginx.conf|grep -v "^$"
#user  nobody;
worker_processes  1;     #工作进程数
#error_log  logs/error.log;    #错误日志文件所在目录
#error_log  logs/error.log  notice;
#error_log  logs/error.log  info;
#pid        logs/nginx.pid;
events {
    worker_connections  1024;  #每个工作进程的并发连接数
}
http {
    include       mime.types;   #导入模块,该模块是用来描述信息类型的国际标准,即文件扩展名与文件类型映射表
    default_type  application/octet-stream;
    #log_format  main  ‘$remote_addr - $remote_user [$time_local] "$request" ‘      #日志格式,可以自定义
    #                  ‘$status $body_bytes_sent "$http_referer" ‘
    #                  ‘"$http_user_agent" "$http_x_forwarded_for"‘;
    #access_log  logs/access.log  main;   #连接日志存放路径,并调用main日志格式
    sendfile        on;
    #tcp_nopush     on;
    #keepalive_timeout  0;
    keepalive_timeout  65;    #用户访问连接超时时间,单位秒
    #gzip  on;
    server {
        listen       80;       #监听端口
        server_name  localhost;
        #charset koi8-r;
        #access_log  logs/host.access.log  main;
        location / {
            root   html;    #网站家目录
            index  index.html index.htm;  #主页文件
        }
        #error_page  404              /404.html;
        # redirect server error pages to the static page /50x.html
        #
        error_page   500 502 503 504  /50x.html;
        location = /50x.html {
            root   html;
        }
        # proxy the PHP scripts to Apache listening on 127.0.0.1:80
        #
        #location ~ \.php$ {
        #    proxy_pass   http://127.0.0.1;
        #}
        # pass the PHP scripts to FastCGI server listening on 127.0.0.1:9000
        #
        #location ~ \.php$ {
        #    root           html;
        #    fastcgi_pass   127.0.0.1:9000;
        #    fastcgi_index  index.php;
        #    fastcgi_param  SCRIPT_FILENAME  /scripts$fastcgi_script_name;
        #    include        fastcgi_params;
        #}
        # deny access to .htaccess files, if Apache‘s document root
        # concurs with nginx‘s one
        #
        #location ~ /\.ht {
        #    deny  all;
        #}
    }
    # another virtual host using mix of IP-, name-, and port-based configuration
    #
    #server {
    #    listen       8000;
    #    listen       somename:8080;
    #    server_name  somename  alias  another.alias;
    #    location / {
    #        root   html;
    #        index  index.html index.htm;
    #    }
    #}
    # HTTPS server
    #
    #server {
    #    listen       443 ssl;
    #    server_name  localhost;
    #    ssl_certificate      cert.pem;
    #    ssl_certificate_key  cert.key;
    #    ssl_session_cache    shared:SSL:1m;
    #    ssl_session_timeout  5m;
    #    ssl_ciphers  HIGH:!aNULL:!MD5;
    #    ssl_prefer_server_ciphers  on;
    #    location / {
    #        root   html;
    #        index  index.html index.htm;
    #    }
    #}
}
服务配置(负载均衡)
环境说明:一台访问的代理机器,三台web机器,代理机负责将访问转发给web机
web1机器配置:
[root@nginx-web1 ~]# cd /usr/local/nginx/html/
[root@nginx-web1 html]# mv index.html index.html.apk
[root@nginx-web1 html]# echo server1 >>index.html
web2机器配置:
[root@nginx-web2 ~]# cd /usr/local/nginx/html/
[root@nginx-web2 html]# mv index.html index.html.apk
[root@nginx-web2 html]# echo server2 >>index.html
web3机器配置:
[root@nginx-web3 ~]# cd /usr/local/nginx/html/
[root@nginx-web3 html]# mv index.html index.html.apk
[root@nginx-web3 html]# echo server3 >>index.html
三台web启动nginx:
[root@nginx-web1 html]# /usr/local/nginx/sbin/nginx -c /usr/local/nginx/conf/nginx.conf
[root@nginx-web2 html]# /usr/local/nginx/sbin/nginx -c /usr/local/nginx/conf/nginx.conf
[root@nginx-web3 html]# /usr/local/nginx/sbin/nginx -c /usr/local/nginx/conf/nginx.conf
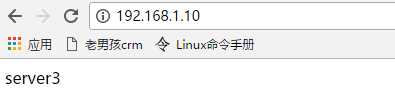
验证三台web配置
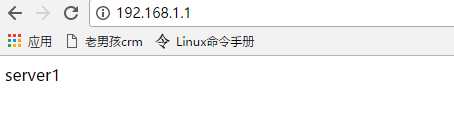
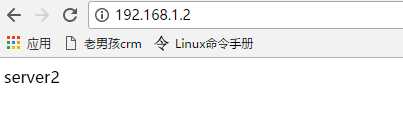

轮询模式配置
轮询即后端的三台web服务器依次访问一次
修改代理机器配置文件nginx.conf
http {
    upstream myapp1 {    #myapp1名字可以随便起,下面调用替换即可
        server 192.168.1.1;
        server 192.168.1.2;
        server 192.168.1.3;
    }

    server {
        listen 80;

        location / {
            proxy_pass http://myapp1;
        }
    }
}
修改完启动服务
[root@nginx-agent ~]# /usr/local/nginx/sbin/nginx -c /usr/local/nginx/conf/nginx.conf
轮询验证(访问后不断刷新即可)
最小连接数模式配置
当新的访问过来后,转发给现在连接数最少的web上
修改代理机器配置文件nginx.conf
    upstream myapp1 {
        least_conn;
        192.168.1.1;
        192.168.1.2;
        192.168.1.3;
    }
重新生效配置文件
[root@nginx-agent ~]# /usr/local/nginx/sbin/nginx -s reload
最小链接数验证
(没验证,主机数量限制)
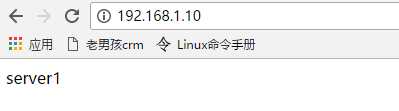
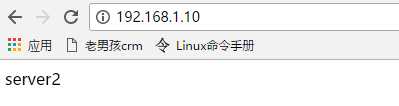
权重模式配置
轮询的过程中加上权重值,权重高的接收的连接数多
修改配置文件
    upstream myapp1 {
        server 192.168.1.1 weight=3;
        server 192.168.1.2;
        server 192.168.1.3;
    }
权重模式验证
刷新五次页面,会有三次出现server1,一次server2,一次server3,顺序可能不一样。
ip哈希模式配置
当一个访问过来,按照hash算法对发出访问请求的ip地址进行计算,匹配到一个web服务器上
ip哈希模式配置
upstream myapp1 {
    ip_hash;
    server 192.168.1.1;
    server 192.168.1.2;
    server 192.168.1.3;
}
ip哈希模式验证
访问后,只会匹配到一个web服务器,不断刷新,访问你的内容不会变
标签:fastcgi linux服务器 国际 automatic roo 分享 https 源文件 查询
原文地址:http://www.cnblogs.com/zero527/p/6925213.html