标签:sel 语句 dbutil nod jar包 count() read led throw
http://blog.csdn.net/yerenyuan_pku/article/details/69790950
之前我已讲过Spring使用AspectJ通过配置文件的方式来进行AOP的开发,现在就来讲怎样使用注解方式进行AOP的开发。

引入Spring的配置文件。主要引入AOP的约束:
<?xml version="1.0" encoding="UTF-8"?>
<beans xmlns="http://www.springframework.org/schema/beans"
    xmlns:xsi="http://www.w3.org/2001/XMLSchema-instance"
    xmlns:aop="http://www.springframework.org/schema/aop" xsi:schemaLocation="
        http://www.springframework.org/schema/beans
        http://www.springframework.org/schema/beans/spring-beans.xsd
        http://www.springframework.org/schema/aop
        http://www.springframework.org/schema/aop/spring-aop.xsd">

</beans>
编写目标类。
在Web项目的src目录下创建一个cn.itcast.aop包,并在该包下编写一个Book类:
public class Book {

    public void add() {
        System.out.println("book add.................");
    }

}
编写切面类。
再在cn.itcast.aop包下编写一个MyBook增强类:
public class MyBook {

    public void before1() {
        System.out.println("before........");
    }

}在增强的类上面使用@Aspect注解
@Aspect
public class MyBook {

    public void before1() {
        System.out.println("before........");
    }

}
在增强类的方法里面,使用注解配置通知类型:
@Aspect
public class MyBook {

    // 前置通知
    // *:方法的访问修饰符,也可写为execution(public void cn.itcast.aop.Book.*(..)),但一般都不会用
    @Before("execution(* cn.itcast.aop.Book.*(..))")
    public void before1() {
        System.out.println("before........");
    }

}AspectJ的AOP的注解:
@Aspect:定义切面类的注解@Before:前置通知,相当于BeforeAdvice@AfterReturning:后置通知,相当于AfterReturningAdvice@Around:环绕通知,相当于MethodInterceptor@AfterThrowing:抛出通知,相当于ThrowAdvice@After:最终final通知,不管是否异常,该通知都会执行@Pointcut:定义切入点的注解开启AspectJ的注解
<aop:aspectj-autoproxy></aop:aspectj-autoproxy>创建Book类和MyBook类的两个对象(使用配置文件)
<bean id="book" class="cn.itcast.aop.Book"></bean>
<bean id="myBook" class="cn.itcast.aop.MyBook"></bean>
最后在cn.itcast.aop包下编写一个TestDemo单元测试类
public class TestDemo {

    @Test
    public void testBook() {
        ApplicationContext context = new ClassPathXmlApplicationContext("bean1.xml");
        Book book = (Book) context.getBean("book");
        book.add();
    }
}测试即可。
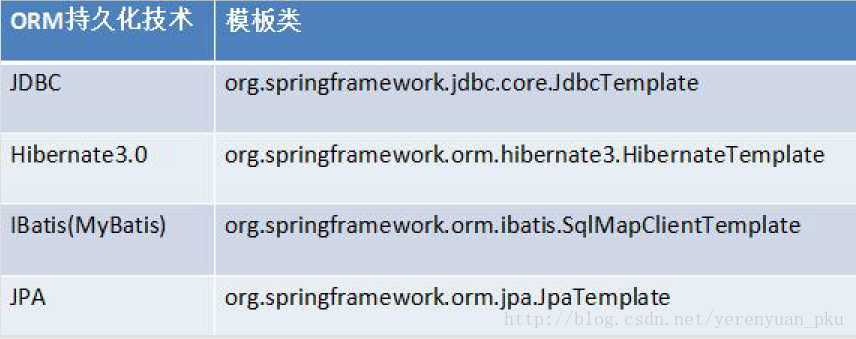
Spring是一个分层的JavaSE/EEfull-stack(一站式)轻量级开源框架。它针对JavaEE三层中的每一层都提供了不同的解决技术,在dao层,Spring提供了JDBC模板的技术,可对数据库进行CRUD操作。Spring提供了很多持久层技术的模板类简化了编程,如下图: 
我再次加以说明:Spring框架对不同的持久层技术做了封装,如对传统的JDBC使用JdbcTemplate进行了封装,对Hibernate框架使用HibernateTemplate进行了封装。JdbcTemplate对JDBC进行了简单封装,使用类似于dbutils,但是使用并没有dbutils方便,只是提供了一种实现的方式而已。下面来演示使用JdbcTemplate模板类实现CRUD操作。
首先创建数据库和表,如下:
create database spring_lee;
use spring_lee;

DROP TABLE IF EXISTS `user`;
CREATE TABLE `user` (
  `username` varchar(100) DEFAULT NULL,
  `password` varchar(100) DEFAULT NULL
) ENGINE=InnoDB DEFAULT CHARSET=utf8;使用JdbcTemplate模板类还须导入jar包,先引入JdbcTemplate的jar包:
但我们要知道spring-jdbc-4.2.4.RELEASE.jar包才是最主要的。除此之外还须导入MySQL数据库驱动的jar包。
在src目录下创建一个cn.itcast.jdbcTemplate包,并在该包下编写一个JdbcTemplateDemo1单元测试类。现在要编写一个add方法来测试添加操作。
public class JdbcTemplateDemo1 {

    // 1.添加操作
    @Test
    public void add() {
        // 1.设置数据库相关信息(JDBC模板依赖连接池获得数据库连接,所以必须先构造连接池)
        DriverManagerDataSource dataSource = new DriverManagerDataSource(); // 数据源
        dataSource.setDriverClassName("com.mysql.jdbc.Driver");
        dataSource.setUrl("jdbc:mysql:///spring_lee");
        dataSource.setUsername("root");
        dataSource.setPassword("yezi");

        // 2.做添加的操作
        JdbcTemplate jdbcTemplate = new JdbcTemplate(dataSource);
        String sql = "insert into user values(?,?)";
        int rows = jdbcTemplate.update(sql, "liayun", "lee");
        System.out.println(rows);
    }

}注意:JDBC模板依赖连接池获得数据库连接,所以必须先构造连接池,然后再创建JdbcTemplate模板类对象。而且还须用到JdbcTemplate模板类的update方法: 
这个方法中有两个参数:
现在要在单元测试类中编写一个update方法来测试修改操作。
public class JdbcTemplateDemo1 {

    // 2.修改操作
    @Test
    public void update() {
        // 1.设置数据库相关信息
        DriverManagerDataSource dataSource = new DriverManagerDataSource(); // 数据源
        dataSource.setDriverClassName("com.mysql.jdbc.Driver");
        dataSource.setUrl("jdbc:mysql:///spring_lee");
        dataSource.setUsername("root");
        dataSource.setPassword("yezi");

        // 实现修改操作
        JdbcTemplate jdbcTemplate = new JdbcTemplate(dataSource);
        String sql = "update user set password=? where username=?";
        int rows = jdbcTemplate.update(sql, "9999", "liayun");
        System.out.println(rows);
    }

}现在要在单元测试类中编写一个delete方法来测试删除操作。
public class JdbcTemplateDemo1 {

    // 3.删除操作
    @Test
    public void delete() {
        // 1.设置数据库相关信息
        DriverManagerDataSource dataSource = new DriverManagerDataSource(); // 数据源
        dataSource.setDriverClassName("com.mysql.jdbc.Driver");
        dataSource.setUrl("jdbc:mysql:///spring_lee");
        dataSource.setUsername("root");
        dataSource.setPassword("yezi");

        // 实现删除操作
        JdbcTemplate jdbcTemplate = new JdbcTemplate(dataSource);
        String sql = "delete from user where username=?";
        int rows = jdbcTemplate.update(sql, "liayun");
        System.out.println(rows);
    }

}现在要在单元测试类中编写一个testCount方法来测试查询表中记录数的操作。
public class JdbcTemplateDemo1 {

    // 查询表记录数
    @Test
    public void testCount() {
        // 1.设置数据库相关信息
        DriverManagerDataSource dataSource = new DriverManagerDataSource(); // 数据源
        dataSource.setDriverClassName("com.mysql.jdbc.Driver");
        dataSource.setUrl("jdbc:mysql:///spring_lee");
        dataSource.setUsername("root");
        dataSource.setPassword("yezi");

        // 2.创建JdbcTemplate模板类的对象
        JdbcTemplate jdbcTemplate = new JdbcTemplate(dataSource);
        // 3.sql语句
        String sql = "select count(*) from user";
        // 4.调用JdbcTemplate模板类里面的方法
        // 返回int类型
        int count = jdbcTemplate.queryForObject(sql, Integer.class);
        System.out.println(count);
    }

}在查询表中记录数的操作时,用到了JdbcTemplate模板类里面的queryForObject方法,如下: 
这个方法中有两个参数:
使用JdbcTemplate模板类进行查询操作的时候,还是比较麻烦的。前面我也说过JdbcTemplate对JDBC进行了简单封装,使用类似于dbutils,但是使用并没有dbutils方便,只是提供了一种实现的方式而已。我是为何这么说呢?因为在dbutils里面帮我们编写好了一些实现类,使用这些实现类可以封装结果,这些实现类都实现了接口ResultSetHandler;使用JdbcTemplate模板类进行查询操作返回数据结果的时候,虽然在JdbcTemplate模板类中有个接口,但是并没有提供实现类,故还需要自己编写实现类来封装结果。
好了,接下来复习一下编写JDBC最原始的代码做查询操作,基本功不要忘记了啊!
首先在cn.itcast.jdbcTemplate包下编写一个User类。
public class User {

    private String username;
    private String password;
    public String getUsername() {
        return username;
    }
    public void setUsername(String username) {
        this.username = username;
    }
    public String getPassword() {
        return password;
    }
    public void setPassword(String password) {
        this.password = password;
    }
    @Override
    public String toString() {
        return "User [username=" + username + ", password=" + password + "]";
    }

}然后再在该包下编写一个JdbcTemplateDemo2单元测试类,编写JDBC最原始的代码做查询操作。
public class JdbcTemplateDemo2 {

    // jdbc最原始的代码做查询操作
    @Test
    public void testJDBC() {
        Connection conn = null;
        PreparedStatement psmt = null;
        ResultSet rs = null;

        try {
            Class.forName("com.mysql.jdbc.Driver");
            conn = DriverManager.getConnection("jdbc:mysql:///spring_lee", "root", "yezi");
            String sql = "select * from user where username=?";
            // 对sql进行预编译操作
            psmt = conn.prepareStatement(sql);
            psmt.setString(1, "mary");
            // 执行sql
            rs = psmt.executeQuery();
            // 遍历结果
            while (rs.next()) {
                String username = rs.getString("username");
                String password = rs.getString("password");

                User user = new User();
                user.setUsername(username);
                user.setPassword(password);
                System.out.println(user);
            }
        } catch (Exception e) {

        } finally {
            try {
                rs.close();
                psmt.close();
                conn.close();
            } catch (Exception e2) {

            }
        }
    }

}接下来,就来讲如何使用JdbcTemplate模板类进行查询操作并返回一个User类的对象。其中就要用到JdbcTemplate模板类里面的queryForObject方法: 
这个方法有3个参数:
现在要在JdbcTemplateDemo2单元测试类中编写一个testObject方法来测试查询时返回一个User类对象的操作。
public class JdbcTemplateDemo2 {

    // 1.查询返回对象
    @Test
    public void testObject() {

        // 1.设置数据库相关信息
        DriverManagerDataSource dataSource = new DriverManagerDataSource(); // 数据源
        dataSource.setDriverClassName("com.mysql.jdbc.Driver");
        dataSource.setUrl("jdbc:mysql:///spring_lee");
        dataSource.setUsername("root");
        dataSource.setPassword("yezi");

        // 2.创建JdbcTemplate对象
        JdbcTemplate jdbcTemplate = new JdbcTemplate(dataSource);
        // 3.sql语句
        String sql = "select * from user where username=?";

        // 4.调用方法执行
        // 第二个参数是接口,RowMapper,要自己创建一个类实现这个接口,在里面进行封装
        User user = jdbcTemplate.queryForObject(sql, new MyRowMapper(), "mary");
        System.out.println(user);

    }

}注意,还要编写RowMapper接口的一个实现类。在以上JdbcTemplateDemo2.java源代码文件中编写RowMapper接口的一个MyRowMapper实现类。
// T:表示要将数据封装到哪个类的对象中
class MyRowMapper implements RowMapper<User> {

    // 实现接口里面的方法,在方法中实现数据封装
    // 第一个参数:返回的结果集,第二个参数是当前的行数(即第几行)
    @Override
    public User mapRow(ResultSet rs, int rows) throws SQLException {
        // 从结果集得到数据
        String username = rs.getString("username");
        String password = rs.getString("password");

        // 封装到对象里面
        User user = new User();
        user.setUsername(username);
        user.setPassword(password);
        return user;
    }

}现在要在JdbcTemplateDemo2单元测试类中编写一个testList方法来测试查询时返回List集合的操作。
public class JdbcTemplateDemo2 {

    // 2.返回List集合
    @Test
    public void testList() {

        // 1.设置数据库相关信息
        DriverManagerDataSource dataSource = new DriverManagerDataSource(); // 数据源
        dataSource.setDriverClassName("com.mysql.jdbc.Driver");
        dataSource.setUrl("jdbc:mysql:///spring_lee");
        dataSource.setUsername("root");
        dataSource.setPassword("yezi");

        // 2.查询操作
        JdbcTemplate jdbcTemplate = new JdbcTemplate(dataSource);
        String sql = "select * from user";

        List<User> list = jdbcTemplate.query(sql, new MyRowMapper());
        System.out.println(list);

    }

}
在进行查询并返回List集合的操作时,须用到JdbcTemplate模板类里面的query方法: 
或 
在实际开发中,一般都会用Spring配置C3P0连接池,所以下面我就来重点介绍在Spring中如何配置C3P0连接池。
首先引入Spring的配置文件,主要是引入约束:
<?xml version="1.0" encoding="UTF-8"?>
<beans xmlns="http://www.springframework.org/schema/beans"
    xmlns:xsi="http://www.w3.org/2001/XMLSchema-instance"
    xmlns:context="http://www.springframework.org/schema/context"
    xmlns:aop="http://www.springframework.org/schema/aop"
    xmlns:tx="http://www.springframework.org/schema/tx"
    xsi:schemaLocation="http://www.springframework.org/schema/beans
    http://www.springframework.org/schema/beans/spring-beans.xsd
    http://www.springframework.org/schema/context
    http://www.springframework.org/schema/context/spring-context.xsd
    http://www.springframework.org/schema/aop
    http://www.springframework.org/schema/aop/spring-aop.xsd
    http://www.springframework.org/schema/tx
    http://www.springframework.org/schema/tx/spring-tx.xsd">

</beans>
接着导入Spring的基本jar包,除此之外,还要导入C3P0的jar包: 
试想要是以前在Web项目中配置C3P0连接池,势必会写这样的代码:
ComboPooledDataSource dataSource = new ComboPooledDataSource();
dataSource.setDriverClass(driverClass);
dataSource.setJdbcUrl(jdbcUrl);
dataSource.setUser(user);
dataSource.setPassword(password);
而现在我们就可以在Spring配置文件(bean2.xml)中配置C3P0连接池了,即在Spring配置文件中添加如下配置:
<!-- 配置C3P0连接池 -->
<bean id="dataSource" class="com.mchange.v2.c3p0.ComboPooledDataSource">
    <property name="driverClass" value="com.mysql.jdbc.Driver"></property>
    <property name="jdbcUrl" value="jdbc:mysql:///spring_lee"></property>
    <property name="user" value="root"></property>
    <property name="password" value="yezi"></property>
</bean>
现在举例来演示如何在Spring中配置C3P0连接池了。我的思路是这样的:创建一个UserService类和一个UserDao类,然后在UserService类里面调用UserDao类的方法,在UserDao类中使用JdbcTemplate模板类进行数据库CRUD操作,并且用上C3P0连接池。
先在src目录下创建一个cn.itcast.c3p0包,并在该包下编写一个UserDao类。
public class UserDao {

    // 在Dao里面要得到JdbcTemplate对象
    private JdbcTemplate jdbcTemplate;
    public void setJdbcTemplate(JdbcTemplate jdbcTemplate) {
        this.jdbcTemplate = jdbcTemplate;
    }

    // 添加操作,使用JdbcTemplate模板来实现添加
    public void add() {
        String sql = "insert into user values(?,?)";
        jdbcTemplate.update(sql, "李阿昀", "lee");
    }
}
再在该包下编写一个UserService类,并在UserService类里面调用UserDao类的add方法。
public class UserService {

    private UserDao userDao;
    public void setUserDao(UserDao userDao) {
        this.userDao = userDao;
    }

    public void add() {
        userDao.add();
    }
}
那么Spring核心配置文件就应该像下面这样配置:
<!-- 配置service和dao以及它们的注入 -->
<bean id="userService" class="cn.itcast.c3p0.UserService">
    <property name="userDao" ref="userDao"></property>
</bean>
<bean id="userDao" class="cn.itcast.c3p0.UserDao">
    <property name="jdbcTemplate" ref="jdbcTemplate"></property>
</bean>

<!-- 配置JdbcTemplate模板类的对象 -->
<bean id="jdbcTemplate" class="org.springframework.jdbc.core.JdbcTemplate">
    <!-- 注入dataSource,因为在其源代码中dataSource属性有其对应的set方法,故可直接注入 -->
    <property name="dataSource" ref="dataSource"></property>
</bean>
从上面的配置可看出:UserDao中注入了JdbcTemplate对象,JdbcTemplate对象里面又注入了dataSource。
最后再在该包下编写一个TestDemo单元测试类。
public class TestDemo {

    @Test
    public void testBook() {
        ApplicationContext context = new ClassPathXmlApplicationContext("bean2.xml");
        UserService userService = (UserService) context.getBean("userService");
        userService.add();
    }
}
(转)Spring使用AspectJ进行AOP的开发:注解方式
标签:sel 语句 dbutil nod jar包 count() read led throw
原文地址:http://www.cnblogs.com/love540376/p/6944007.html