标签:case 导致 button html toe 10个 上传文件 height exception
本篇和大家分享的是一个磁盘文件查看系统,严格来说是使用NetCore写的一个Web系统应用,由于NetCore跨平台特性,我生成了exe的运行包,只需要配置运行电脑ip+端口,即可在浏览器中通过IP+端口的方式访问目标调用上的所有目录,不错是所有目录(如果您有:C,D,E,F盘都可以访问),当然为了安全最好限制下;还有上传,备份功能,具体看下面的分享内容吧;git地址:https://github.com/shenniubuxing3/ShenNiu.LogTool
本查看器主要是为了方便大家查看服务器上的日志,这里没有考虑其他安全性问题,比如特定人员登录才能查看,这个需要您们自己去增加;如果你服务器有对外开放了ip,那么运行这个软件的时候建议考虑配置成您们公司内网的ip,这里可以避免一些安全性问题;下面是主要功能:
. 通过可以定义文件配置常用磁盘访问地址
. 查看磁盘目录下的文件夹和文件
. 部分可访问行文件(如:txt,DLL,图片等)可以在浏览器中打开或下载(访问性格式由程序配置)
. 上传多个文件到指定磁盘
. 文件备份(如果上传的文件已经存在,会自动备份到bak文件夹中)
效果gif图片,有点花多多包涵:

效果还可以吧,不妨“推荐”下;
首先,要明确的是在NetCore1.1中api已经和大部分能和framwork对应上了(据@善友一篇博客简单介绍说NetCore2.0的api已经能够和framwork持平了),因此这里我们能够直接使用DirectoryInfo,来查看磁盘路径的文件夹和文件,所以就有了查看列表Action的代码:
 1  /// <summary>
 2         /// 磁盘列表
 3         /// </summary>
 4         /// <param name="path">磁盘路径</param>
 5         /// <returns></returns>
 6         public IActionResult Index(string path)
 7         {
 8             Console.WriteLine($"IP:{HttpContext.Connection.RemoteIpAddress}正在查看磁盘:{path}");
 9             var list = new List<FileSystemInfo>();
10             MoSearch moSerach = new MoSearch { Txt1 = path };
11             ViewData["Search"] = moSerach;
12
13             if (string.IsNullOrWhiteSpace(path)) { return View(list); }
14             if (path.StartsWith("c:", StringComparison.OrdinalIgnoreCase)) { this.MsgBox($"无权限访问:{path}"); return View(list); }
15             if (!System.IO.Directory.Exists(path)) { this.MsgBox($"磁盘路径:{path}不存在!"); return View(list); }
16             DirectoryInfo dic = new DirectoryInfo(path);
17             list = dic.GetFileSystemInfos().OrderByDescending(b => b.LastWriteTime).ToList();
18
19             return View(list);
20         }
这里我默认限制了C盘,并且采用自带的文件对象FileSystemInfo来返回信息,仅仅只需要一段 dic.GetFileSystemInfos().OrderByDescending(b => b.LastWriteTime).ToList() 就能获取按照最新修改时间得到磁盘目录信息;对应的View布局如下:
  1 @using System.IO
  2 @using ShenNiu.LogTool.Extension;
  3 @using ShenNiu.LogTool.Controllers
  4 @model List<FileSystemInfo>
  5 @{
  6     ViewData["Title"] = "日志搜索";
  7
  8     var moSearch = ViewData["Search"] as MoSearch;
  9 }
 10 <div>
 11     <h4>@ViewData["Title"]</h4>
 12     <hr />
 13     <form id="form01" method="post" enctype="multipart/form-data">
 14         <div class="form-group">
 15             <label for="txt1">磁盘路径</label>
 16             <input type="text" class="form-control" id="txt1" name="txt1" value="@moSearch.Txt1" style="max-width:100%" placeholder="会记录到后面的下拉框">
 17         </div>
 18         <div class="form-group">
 19             <label for="sel1">常用地址</label>
 20             <select name="sel1" id="sel1" class="form-control">
 21                 @*<option value="">==请选择==</option>
 22                     <optgroup label="日志">
 23                         <option value="D:\D\Joke">D:\D\Joke</option>
 24                     </optgroup>
 25                     <optgroup label="D盘">
 26                         <option value="D:\">D盘</option>
 27                     </optgroup>*@
 28             </select>
 29
 30         </div>
 31         <div class="form-group ">
 32             <input type="file" name="upFile" class="form-control" multiple placeholder="上传文件" />
 33         </div>
 34         <button type="button" id="btnSearch" class="btn btn-default">查 询</button>
 35         <button type="button" id="btnUp" class="btn btn-default ">上 传</button>
 36         <a href="javascript:window.history.go(-1);" class="btn btn-default">返 回</a>
 37         <span id="span01" style="color:red">
 38             @ViewData["msg"]
 39         </span>
 40     </form>
 41     <hr />
 42     <table class="table">
 43         <thead>
 44             <tr>
 45                 <th>文件名</th>
 46                 <th>磁盘路径</th>
 47                 <th>最后更新时间</th>
 48                 <th>创建时间</th>
 49                 <th>操作</th>
 50             </tr>
 51         </thead>
 52         <tbody>
 53             @foreach (var item in Model)
 54             {
 55             <tr>
 56                 <td>
 57                     @if (item.Attributes == FileAttributes.Archive)
 58                         {
 59                         <img src="/images/icon/@(item.Extension.GetExtensionIcon())" /><a href="/log/read?path=@item.FullName" target="_blank">@item.Name</a>
 60                         }
 61                         else if (item.Attributes == FileAttributes.Directory)
 62                         {
 63                         <img src="/images/icon/Directory1.jpg" /><a href="/log/index?path=@item.FullName">@item.Name</a>
 64                         }
 65                         else
 66                         {
 67                         <img src="/images/icon/@(item.Extension.GetExtensionIcon())" /><a href="/log/index?path=@item.FullName">@item.Name</a>
 68                         }
 69                     @item.Attributes
 70                 </td>
 71                 <td>@item.FullName</td>
 72                 <td>@item.LastWriteTime</td>
 73                 <td>@item.CreationTime</td>
 74                 <td>
 75                     @if (item.Attributes == FileAttributes.Archive)
 76                         {
 77                         <a href="/log/read?path=@item.FullName" target="_blank">查看</a>
 78                         }
 79                 </td>
 80             </tr>
 81             }
 82         </tbody>
 83     </table>
 84     <div style="color:red">@ViewData["msg"]</div>
 85 </div>
 86 <script type="text/javascript">
 87     $(function(){
 88
 89     $("#btnUp").on("click", function () {
 90             var msg = $("#span01");
 91             var form = document.getElementById("form01");
 92             //console.log(form);
 93             var data = new FormData(form);
 94
 95             $.ajax({
 96                 type: "POST",
 97                 url: "/log/AjaxFileUp",
 98                 data: data,
 99
100                 contentType: false,
101                 processData: false,
102                 success: function (data) {
103                     if (data) {
104                         msg.html(data.msg);
105                     }
106                 },
107                 error: function () {
108                     msg.html("上传文件异常,请稍后重试!");
109                 }
110             });
111         });
112
113         $("#btnSearch").on("click",function(){
114
115          var sel1Val = $.trim($("select[name=‘sel1‘] option:selected").val());
116          var txt1Val = $.trim($("#txt1").val());
117
118
119          var pathVal = sel1Val.length<=0?txt1Val:sel1Val;
120          window.location.href="/log/index?path="+pathVal;
121         });
122
123         $.getJSON("/log/GetSelData",function(data){
124             console.log(data);
125             if(data){
126
127
128
129                 var sel1 = $("select[name=‘sel1‘]");
130                 var gArr = [];
131                 gArr.push(‘<option value="">==请选择==</option>‘);
132                 $.each(data,function(i,item){
133
134                     gArr.push(‘<optgroup label="‘+item.gname+‘">‘);
135
136                     $.each(item.gval,function(i2,item2){
137
138                          gArr.push(‘<option value="‘+item2.val+‘">‘+item2.name+‘</option>‘);
139                     });
140
141                     gArr.push(‘</optgroup>‘);
142                 });
143
144                 sel1.html(gArr.join(‘‘));
145             }
146         });
147     })
148 </script>
列表页面的常用地址来源有系统配置文件配置的,通过前端ajax调用接口获取配置的json内容,接口Action代码:
 1  public async Task<ContentResult> GetSelData()
 2         {
 3             var apiUrl = $"http://{Request.Host.Host}:{Request.Host.Port}/js/tooldata/logconf.json";
 4             var str = string.Empty;
 5             using (HttpClient client = new HttpClient())
 6             {
 7                 client.BaseAddress = new Uri(apiUrl);
 8                 str = await client.GetStringAsync(apiUrl);
 9             }
10             return Content(str);
11         }
配置文件格式和内容如:
 1 [
 2   {
 3     "gname": "日志",
 4     "gval": [
 5       {
 6         "name": "JokeLog",
 7         "val": "D:\\D\\Joke"
 8       }
 9     ]
10   },
11   {
12     "gname": "D盘",
13     "gval": [
14       {
15         "name": "D盘",
16         "val": "D:\\"
17       }
18     ]
19   }
20 ]
通常咋们有这样的情况,我们没有直接访问服务器的权限,想上传个东西很麻烦,每次只能通过运维(当然这是正规的流程),可是往往一些特殊情况不得不自己传递个东西发布,因此这里增加了上传功能,并且上传时候如果已存在相同文件,那么在覆盖之前会自动增加备份到tempbak中去;
 1 /// <summary>
 2         /// 本查看系统具有上传文件的功能
 3         /// </summary>
 4         /// <returns></returns>
 5         [HttpPost]
 6         public async Task<JsonResult> AjaxFileUp()
 7         {
 8             var data = new MoData { Msg = "上传失败" };
 9             try
10             {
11                 var upPath = Request.Form["txt1"];
12                 if (string.IsNullOrWhiteSpace(upPath)) { data.Msg = "请在【磁盘路径】输入框输入上传路径。"; return Json(data); }
13                 if (!System.IO.Directory.Exists(upPath)) { data.Msg = $"磁盘路径:{upPath}不存在!"; return Json(data); }
14                 upPath = upPath.ToString().TrimEnd(‘\\‘);
15
16                 var files = Request.Form.Files.Where(b => b.Name == "upFile");
17                 //非空限制
18                 if (files == null || files.Count() <= 0) { data.Msg = "请选择上传的文件。"; return Json(data); }
19
20                 //格式限制
21                 //var allowType = new string[] { "image/jpeg", "image/png" };
22                 //if (files.Any(b => !allowType.Contains(b.ContentType)))
23                 //{
24                 //    data.Msg = $"只能上传{string.Join(",", allowType)}格式的文件。";
25                 //    return Json(data);
26                 //}
27
28                 //大小限制
29                 var nMax = 20;
30                 if (files.Sum(b => b.Length) >= 1024 * 1024 * nMax)
31                 {
32                     data.Msg = $"上传文件的总大小只能在{nMax}M以下。"; return Json(data);
33                 }
34
35                 //删除过去备份的文件
36                 var basePath = Path.Combine(Directory.GetCurrentDirectory(), "wwwroot", "tempbak");
37                 DirectoryInfo dic = new DirectoryInfo(basePath);
38                 var nCount = dic.GetFiles().Count();
39                 var nMaxCount = 10;
40                 if (nCount > nMaxCount)  //大于nMaxCount个文件清空临时目录
41                 {
42                     foreach (var item in dic.GetFiles().OrderBy(b => b.LastWriteTime).Take(nCount - nMaxCount))
43                     {
44                         try
45                         {
46                             item.Delete();
47                         }
48                         catch (Exception ex) { }
49                     }
50                 }
51
52                 //写入服务器磁盘
53                 var upLog = new StringBuilder(string.Empty);
54                 foreach (var file in files)
55                 {
56
57                     var fileName = file.FileName;
58                     var path = Path.Combine(upPath, fileName);
59                     upLog.AppendFormat("文件:{0};", path);
60
61                     //存在文件需要备份
62                     if (System.IO.File.Exists(path))
63                     {
64                         FileInfo info = new FileInfo(path);
65                         var tempPath = Path.Combine(basePath, info.Name); //备份目录
66                         var newInfo = info.CopyTo(tempPath, true);
67                         if (newInfo == null) { upLog.Append($"备份:失败,请稍后重试!"); }
68                         else { upLog.Append($"备份:成功!"); }
69                     }
70
71                     using (var stream = System.IO.File.Create(path))
72                     {
73                         await file.CopyToAsync(stream);
74                     }
75                     upLog.Append($"上传:成功;<br/>");
76                 }
77                 data.Msg = upLog.ToString();
78                 data.Status = 2;
79             }
80             catch (Exception ex)
81             {
82                 data.Msg += ex.Message;
83             }
84             Console.WriteLine($"IP:{HttpContext.Connection.RemoteIpAddress}正在上传:{data.Msg}");
85             return Json(data);
86         }
关键点的逻辑代码已经有注释了这里就不多说了,主要满足咋们的业务:上传+备份;至于上传的js代码已经在上面的列表试图中了这里就不重复贴出来了;这里用到了几个自定义实体类:
 1 /// <summary>
 2     /// 接口统一类
 3     /// </summary>
 4     public class MoData
 5     {
 6         public string Msg { get; set; }
 7
 8         public int Status { get; set; }
 9     }
10
11     /// <summary>
12     /// 搜索类
13     /// </summary>
14     public class MoSearch
15     {
16         public string Txt1 { get; set; }
17
18         public string Sel1 { get; set; }
19     }
20
21     /// <summary>
22     /// 文件
23     /// </summary>
24     public class MoFile
25     {
26         public string Name { get; set; }
27         public string Path { get; set; }
28         public string Url { get; set; }
29         public string Content { get; set; }
30         public FileAttributes Attributes { get; set; }
31     }
该系统可以直接查看如:txt,log等后缀的文件,因为这种类型的文件一般都有读,写同时操作的情况,所以这里我采用的方式是先拷贝当前访问的文件到temp临时目录中,然后在读取内容或下载文件;当满足超过10个文件的设置,那么自动删除修改时间最小的文件,避免拷贝文件一直增多导致磁盘空间的成本;下面是读取Action的内容:
 1 /// <summary>
 2         /// 查看内容
 3         /// </summary>
 4         /// <param name="path"></param>
 5         /// <returns></returns>
 6         public async Task<IActionResult> Read(string path)
 7         {
 8             Console.WriteLine($"IP:{HttpContext.Connection.RemoteIpAddress}正在查看文件:{path}");
 9
10             var moFile = new MoFile { Path = path };
11             if (string.IsNullOrWhiteSpace(path)) { this.MsgBox($"文件路径:{path}不存在。"); return View(moFile); }
12             if (!System.IO.File.Exists(path)) { this.MsgBox($"文件路径:{path}不存在!"); return View(moFile); }
13
14             try
15             {
16                 FileInfo info = new FileInfo(path);
17                 //if (!ExtensionClass._AllowExtension.Any(b => b.ToUpper() == info.Extension.ToUpper()))
18                 //{
19                 //    this.MsgBox($"无法访问{info.Extension}的文件"); return View(moFile);
20                 // }
21
22                 var basePath = Path.Combine(Directory.GetCurrentDirectory(), "wwwroot", "temp");
23                 DirectoryInfo dic = new DirectoryInfo(basePath);
24                 var nCount = dic.GetFiles().Count();
25                 var nMaxCount = 10;
26                 if (nCount > nMaxCount)  //大于nMaxCount个文件清空临时目录
27                 {
28                     foreach (var item in dic.GetFiles().OrderBy(b => b.LastWriteTime).Take(nCount - nMaxCount))
29                     {
30                         try
31                         {
32                             item.Delete();
33                         }
34                         catch (Exception ex) { }
35                     }
36                 }
37
38                 var tempPath = Path.Combine(basePath, info.Name);
39                 var newInfo = info.CopyTo(tempPath, true);
40                 if (newInfo == null) { this.MsgBox($"文件:{path}查看失败,请稍后重试!"); return View(moFile); }
41
42                 moFile.Name = newInfo.Name;
43                 moFile.Url = $"/{moFile.Name}";
44                 moFile.Attributes = newInfo.Attributes;
45                 if (moFile.Attributes == FileAttributes.Archive && !ExtensionClass._FileExtension.Any(b => b == newInfo.Extension))
46                 {
47                     using (var stream = newInfo.OpenRead())
48                     {
49                         using (var reader = new StreamReader(stream))
50                         {
51                             moFile.Content = await reader.ReadToEndAsync();
52                         }
53                     }
54                 }
55             }
56             catch (Exception ex)
57             {
58                 this.MsgBox($"文件:{path}查看失败,请稍后重试!");
59             }
60             return View(moFile);
61         }
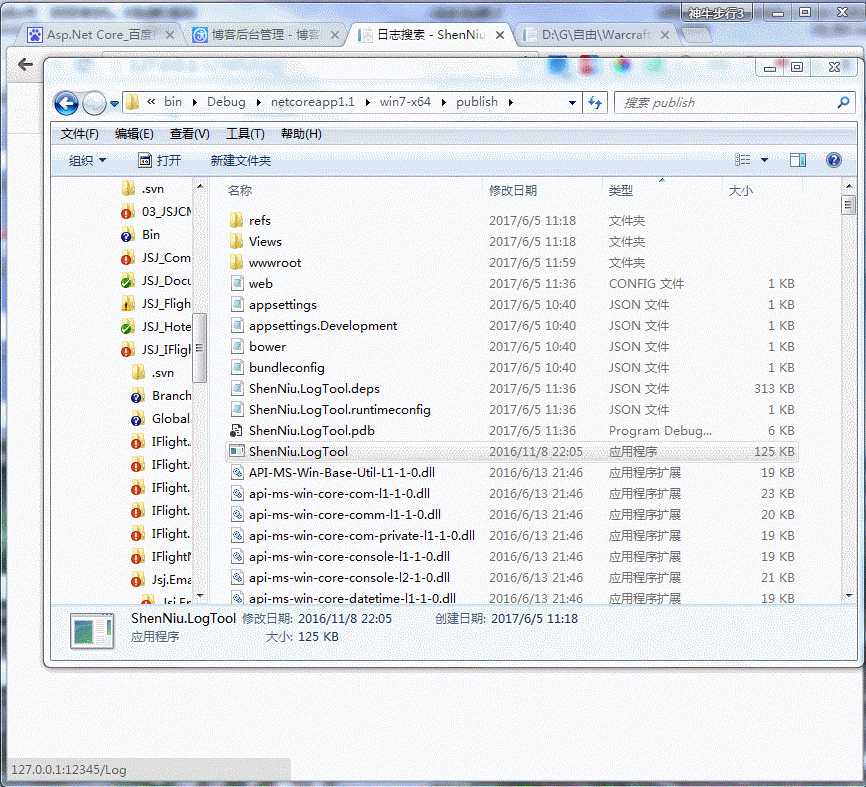
我这里只提供了一个windows x64平台的运行exe包ShenNiu.LogTool(不用安装什么运行环境),只需要双击“ShenNiu.LogTool.exe”-》配置Ip+端口(默认IP:127.0.0.1,端口:12345):

-》浏览器中输入:http://127.0.0.1:12345/Log 即可访问查看系统,剩下的操作就如上gif截图了;
本篇到这里还要讲一个工具nssm(这里不提供下载地址,个位网搜吧),因为就windows平台而言netcore生成如果不用iis发布,那么大多数都是通过exe来运行的,但是我们不可能再服务器上开很多个黑屏cmd一样的窗体,那这样服务器每次关闭的话那就用不了服务了;因此我们使用nssm把这个netcore上传的exe转成windows服务中去,这样就算关机重启也能及时启动;
由于windows服务不会提示让咋们输入绑定的ip,端口,所以这里我们需要改改代码:
 1 public static void Main(string[] args)
 2         {
 3             Encoding.RegisterProvider(CodePagesEncodingProvider.Instance);
 4             Console.OutputEncoding = Encoding.GetEncoding("GB2312");
 5
 6             //Console.WriteLine("输入服务绑定的Ip:");
 7             //var strHost = Console.ReadLine(); if (string.IsNullOrWhiteSpace(strHost)) { strHost = "127.0.0.1"; }
 8             //Console.WriteLine("输入服务绑定的端口:");
 9             //var strPort = Console.ReadLine(); if (string.IsNullOrWhiteSpace(strPort)) { strPort = "12345"; }
10
11             //var hostAndPort = $"http://{strHost}:{strPort}";
12             var hostAndPort = "http://127.0.0.1:12345";
13
14             var host = new WebHostBuilder()
15                 .UseKestrel()
16                 .UseUrls(hostAndPort)
17                 .UseContentRoot(Directory.GetCurrentDirectory())
18                 .UseIISIntegration()
19                 .UseStartup<Startup>()
20                 .UseApplicationInsights()
21                 .Build();
22
23             host.Run();
24         }
然后利用nssm工具,首先通过cmd命令执行如下命令:

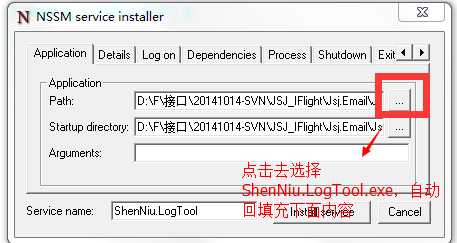
执行后会弹出一个框,然后如图操作:

再点击“install server”,不出意外的话会弹出一个 successful的提示;再来咋们看看windows服务中我们注册的服务:

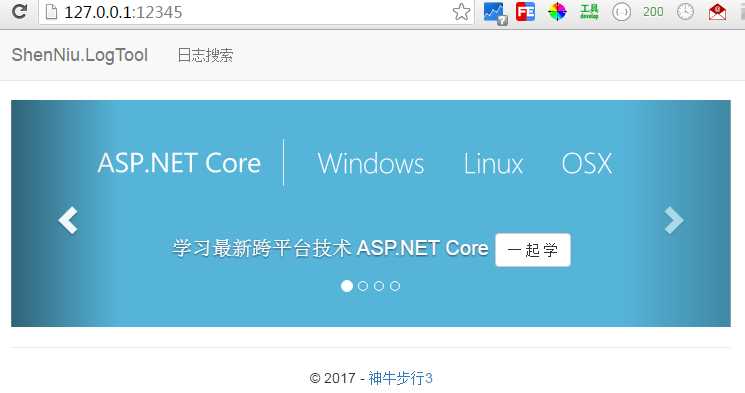
这个时候该服务是未启动状态,所以我们可以直接通过操作界面启动下(当然也可以通过nssm命令启动),能正常启动没问题的话,我们就可以在浏览器中访问:http://127.0.0.1:12345/Log:

好了本章到此就结束了,怎么样干货还是可以吧,不妨点个"推荐",谢谢。再发下git地址:https://github.com/shenniubuxing3/ShenNiu.LogTool
标签:case 导致 button html toe 10个 上传文件 height exception
原文地址:http://www.cnblogs.com/wangrudong003/p/6946236.html